In this article I will tell you how to paint camouflage correctly. Let's consider what paints and colors should be used, how to use stencils to create patterns or spots with a clear or blurred border. We will analyze in detail the process of painting camouflage, as well as the correct use of spray cans for painting.
The content of the article:
- What is camouflage? Real camouflage and camouflage stylization
- Stencils for painting camouflage
- What paint should I use for camouflage?
- What colors to use for camouflage?
- Preparing the surface for painting
- Painting in camouflage
- How to paint with a spray can?
What is camouflage? Real camouflage and camouflage stylization
Camouflage (from the French camouflage) is a camouflage concept that is part of modern military tactics. Simply put, camouflage helps objects painted in it be less noticeable. For the first time, camouflage in a simple form was used in the mid-18th century. Camouflage for weapons and equipment was used by the French in 1915, then began to be used by other armies in the First World War. Camouflage then became popular in fashion and art. Many designers past and present use camouflage in their clothing lines.
Effectiveness depends on the contrast of colors. A strong contrast with the base color, which breaks up the contours of the vehicle, is better suited for forests where the play of light and shadow is important. While low contrast is better suited for open areas with little shadow structure.
The so-called digital camouflage provides a camouflage effect due to the pixel print.
It helps to reduce the visibility of an object at different distances. When painting camouflage, visual destruction of the shape is achieved by adding uneven lines to objects with an even shape. The object is painted using 2 or 3 contrasting colors. The colors of the actual camouflage must match the colors prevailing in the area where the object is used. Objects appear darker in the upper layers and lighter in the lower layers as the upper part receives and reflects more light. This principle is especially important when painting vehicles. There are no special rules for the size of camouflage patches. They depend on the size of the object being painted and the size and type of objects in the environment. If you look at an object from a distance, small spots merge into one common color and do not visually destroy the shape of an object painted in camouflage. Thus, small spots in true camouflage are ineffective.
Real camouflage can be easily distinguished from imitation. True military camouflage is designed to camouflage the shape of a vehicle so that it blends in with the surrounding area. If you look at military equipment, you can see how camouflage spots of different colors seem to envelop and pass over the lines of the body, making it shapeless from afar. Therefore, it is important for what purpose you paint camouflage. If this is just an imitation and creation of a military style, then it does not matter how the spots will be located and what color they will be.
Types of camouflage film for cars
Camouflage films are gaining more and more popularity every year. Nowadays there is a large selection of materials. Camouflages differ from each other not only in pattern, but also in shade.
Popular types:
Military camouflage. This is a universal type that can be glued to different types of cars. This type is often preferred by motorcycle owners. This type of material not only perfectly camouflages a car in nature, but also makes it stylish.
An important advantage of this design is that it protects vehicles from car thieves and robbers. Military camouflage comes in different shades for sale.
The most popular is the green pattern. It is used from the beginning of spring to the end of autumn. In winter, an image where white color predominates well camouflages the car. In autumn, gray camouflage is used.
Military camouflage film
Pixel camouflage. This is a vinyl film that has a dot pattern in the form of small rectangles. It differs from military camouflage in the presence of straight lines. This material is often used for city cars. It is produced in different colors: black and white, green, brown, blue, pink, gray, khaki. Thanks to this pattern, you can not only hide the car, but also give it dimensions.
Pixel camouflage
Tree camouflage. This type of film has different patterns. This may be an image resembling spruce or pine branches. For camouflage near bodies of water, camouflage film with reeds and grass is used. The main disadvantage of this camouflage is its seasonality and dependence on the terrain.
Natural camouflage
Animal skin camouflage. Thanks to this film, it is easy to give your car an extraordinary appearance. There is material on sale that imitates the skin of animals such as zebra, tiger, leopard and others. Less often you can see a film with a pattern similar to the skin of a snake or crocodile.
Animal skin car design
Abstract camouflage. You won't be able to disguise your car with this film. They install it mainly to distinguish the car from many others. Tapes come in different shades, which makes it possible to choose the color that best suits your requirements. As for the drawing, most often it is dominated by straight lines, geometric shapes, numbers, and rounded signs.
Abstract camouflage
Stencils for painting camouflage
- Make your own stencils or choose ready-made stencils. On the Internet there are quite a few free, ready-made drawings, after printing which you can cut out stencils from them.
- Make several stencils. While one dries, after spraying the paint, you can use the other one in another place.
To make a stencil with your own hands, you can draw a design of any shape and cut it out.
- You can also use leaves, twigs and grass to create their shape on the surface to be painted. We will consider this option in detail in this article below.
- There is a classic camouflage, and you can also use almost any shape to create stencils, including skulls, logos, emoticons, and more. You can also use different types of grids that will create a cellular background.
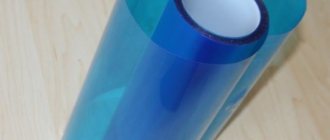
- Transparent film, which is used in airbrushing, is also suitable. This is a film with a slightly sticky layer that sticks, but peels off easily without leaving marks. You can use a sharp blade to cut any shape out of it, or a template onto the edges of which you can spray paint.
Car wrapping with vinyl film
A fairly common way to apply a camouflage coating to a car is to use vinyl film. This approach does not require highly professional skills and abilities. All you have to do is purchase the film at your nearest store and go ahead.
Despite the ease of the presented method, in order to obtain the desired result, it is necessary to adhere to a certain sequence of actions:
- Carry out a full car wash with water;
- do not start applying the coating until the body is completely dry;
- dismantle all third-party elements;
- degrease the body surface;
- Apply the film evenly to the selected body element.
This method has also gained enviable popularity due to the fact that vinyl film is available in a wide variety. In addition to the traditional coloring, all kinds of camouflage are offered, some of which even copy the coloring of wild animals of the African prairie.
Once an attribute of military camouflage, camouflage, due to its unusual design, began to be widely used by owners of civilian cars. It is believed that it best emphasizes the character of the owner - a strong-willed, selfless person.
One way or another, a car with such a unique surroundings will undoubtedly attract the attention of passers-by, and if necessary, it will certainly help to hide in the folds of the terrain from a potential enemy.
What paint should I use for camouflage?
There are paints from some companies (for example, Krylon Camouflage) in cans that are specifically designed for painting surfaces in camouflage. These are matte paints that adhere well to various types of surfaces, including plastic.
You can also use regular paint (when painting a car, automotive paint) by selecting the desired colors. It is better to paint with matte paint to create a real camouflage. If you want to make a camouflage stylization, you can cover the surface painted with camouflage with varnish.
What colors to use for camouflage?
Krylon offers 6 basic colors for painting camouflage:
- black,
- khaki,
- brown,
- olive,
- sand,
- light green.
In addition to the standard colors used when painting camouflage, you can use other brighter colors (pink, orange, blue, white and others). In this case, the meaning of camouflage is lost, and style comes to the fore.
Usually you need to choose three different colors, but you can have more if you wish.
Recommendations
The size of the image depends on its purpose. When driving around the city, it is customary to stand out; camouflage should be catchy and obvious. Its original mission - camouflage - will play the opposite role. Large, unnatural shapes will do you good! It is customary to apply paints according to the principle - from dark to light! Light colors perform the task of the main color of other tones. This sets a uniform design style. It is important to remember the rules - the new paint of the car must have half the base color. It’s a huge rarity to come across factory-produced khakis!
Preparing the surface for painting
You need to prepare the surface in the same way as for any painting. If there is any damage, dents or rust, they need to be repaired. The primer or old paintwork must be prepared by sanding so that the surface is matte and the new paint adheres well. You can read more about preparing the surface for painting in the article “preparing a car for painting.”
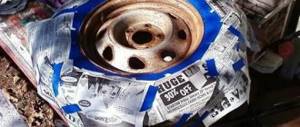
After preparing the surface of a car (or other object) for painting, you need to seal the body parts that will not be painted with masking tape and covering material.
How to choose a film
From us you can buy a film with a pattern you like and order a partial or complete car wrap. The range includes films with matte and glossy surfaces. If you are only interested in design, both options are suitable. If you go hunting or fishing, choose matte protective camouflage. The shine of the body does not contribute to effective camouflage.
Main brands:
- Oracal 970 series
- TeckWrap
- Hexis
- KPMF 5000 series
- KPMF 8000 series
Painting in camouflage
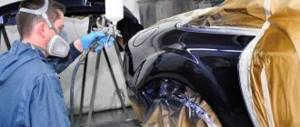
- Paint in a well-ventilated area. Use a respirator and gloves. Do not spray paint near open flames.
- Start with a base color that covers the entire piece, and then work your way down to individual pieces.
- The main color that paints the entire surface is usually the lightest. This way, other colors will be more visible on this base. In most cases, two thin coats are enough to cover the surface with the base color.
- Next, you need to let the paint dry. Then the stencil is glued and another paint is applied.
- Start with a light color and work your way to a darker color. Decide in what order you will paint the subsequent colors. Paint each color in stages, one color at a time. Thus, if the base color is yellow-brown, then the spots will be dark brown, then black. Yellowish-brown spots never appear on top of brown or black. Brown never goes over black. It is important to follow the order (sequence) of applying and overlapping colors to get a good result.
- Secure the stencil with masking tape to ensure it stays in place after spraying while the spray paint dries. They don't have to be glued straight. They can be located in different ways. This will create a personalized look to your work.
- Place the second spot or pattern in a free area where there is no spot or pattern yet. You can slightly overlap the previous stencil print with a new print.
- You can make 4-5 designs in one color (or more, depending on the size of the part), then move on to another color.
- You can make sure that spots or patterns of different colors do not have clear boundaries between each other. One color will transition smoothly into another. To do this, you need to hold the template or stencil with your hand and not lean it completely against the surface. This will make the edges look a little blurry, and there won't be a clear contrast between the edges and the rest of the surface.
- When painting with a spray gun, adjust the torch to a narrower spray pattern. Paint the edges of the stencil first, then fill in the middle.
- Different distances will give different degrees of smoothness to the edges. A farther distance provides a blurred edge, like a shadow, while a closer distance provides a sharper color change.
- Unpainting and minor unevenness are not critical. The main thing is that there are no leaks.
- When using natural objects (leaves, branches, grass), you need to lean them against the surface and spray paint on top. It is better to collect a variety of specimens. It will be more convenient to use flatter leaves so that they fit well on the surface. You can spray paint only on their edges. This way the outline of leaves and branches will be imprinted on the surface. After the paint has dried, the process must be repeated, using paints of other colors and leaning other leaves, positioning them differently. You can also overlap already painted leaves with subsequent ones.
- There is no need to do too many designs or spots so that the base color does not disappear and remains the main one.
- If you want to paint a car or other object in a camouflage pattern consisting of several large segments of different colors, as in the photo below, then each, before painting each segment, you need to cover the adjacent surface with masking tape and covering material. After one color has dried, you need to move on to masking the already painted surface and painting a new one.
Camouflage consisting of two colors.
- If the surface was not painted with special matte paints, then the resulting “camouflage” can be varnished. The varnish serves as protection for the base paint. Special matte paints do not require varnish.
- You can use the painted car the next day.
Required tools and materials
To carry out such a process as painting a car in camouflage with your own hands, it is worth purchasing and preparing the following materials and tools:
- High-quality aerosol paint, which is sold in special cans and applied to the car. You need to purchase four cans of green, black and brown shades;
- You will need a special vinyl film;
- Sponge and polish;
- Varnish that creates a matte effect on cars;
- Solvent grade 469 in the amount of half a liter;
- 200 ml gasoline;
- An ordinary painting spatula, the width of which is 7 cm;
- A certain amount of clean flannel rags;
- Halogen lamp with a power of 1 thousand watts;
- A large number of old newspapers;
- Special masking tape made of paper, 5 rolls of wide and narrow.