04 September 2015 Lada.Online 41 947 1
What is the first thing a person thinks about after buying a car? About its safety! The most popular way to protect your car from theft or accidental collision in a parking lot is to install an alarm system. In addition, the security system can combine other useful functions, for example, automatic engine start or remote trunk opening through an additional channel.
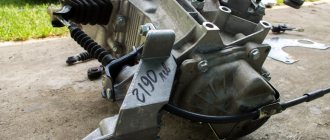
How to replace the central locking unit
Required
: remove the mounting block (put it aside without disconnecting the connectors with wires), a new central locking control unit (article 21900651201000, price about 1100 rubles).
- Remove the two screws securing the block.
- Disconnect the block with wires (pull it towards you).
The most difficult thing: unscrew the screw securing the mounting block, unscrew the bolts securing the central locking unit, remove the connector from the central locking unit and install it in its place. If it is not possible to tighten the bolts of the central locking unit in the reverse order, use plastic ties.
The process of removing and installing the central locking control unit on the Lada Granta is also shown in the video:
By the way, do you know that LADA cars can be equipped with sensors? This update will change the way you think about lock management.
Here we will only look at what the alarm connection to the central locking circuit is, and we will talk about different Granta configurations. The first option is intended for “luxury Grant” cars, those that have a central locking control button in the cabin. If there is no such button on the armrest, as, perhaps, the armrest itself, then another design option will suit you. We will now look at all this in more detail.
Characteristics of the standard alarm system Lada Granta
Writing about the Lada Grant's alarm system without saying a word about the other components of the car's security system would be completely wrong.
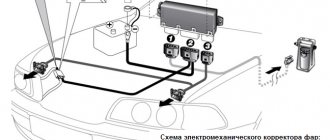
The immobilizer does not live its own life - it is a reliable control body at the brain center (ECU) of the car. It is located in the central tunnel of the car near the driver’s right foot. Most often this is a model with the abbreviation APS-6. The components of the entire safety system of the Lada Granta are:
- electronic unit (ECU) for machine control;
- pre-installed immobilizer for Lada Granta;
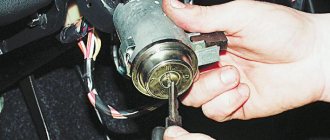
- ignition switch transmitting and receiving antenna;
- chip ignition key;
- blocking devices of the Lada Granta ignition and fuel supply system.
Failure of any of the components renders the entire security system inoperative. In this case, the movement of the Lada Granta car will be impossible.
Additional characteristics of the alarm system of this model are its functional capabilities from the comfortable series:
- control of the rear lights of the fog modification;
- sound reminder about forgotten ignition keys;
- a similar reminder about the side lights being turned on due to absent-mindedness;
- delay in blocking the operation of the power windows after the ignition is turned off;
- control of interior lighting.
Functionally, the work of the activated Lada Grant immobilizer looks quite simple. The registered working key for the standard ignition switch is inserted into its hole. The chip built into the key generates an encrypted code on the turns of the transmitting and receiving antenna.
Preparing the car before connecting
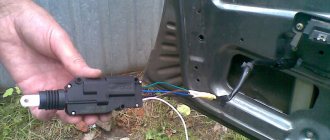
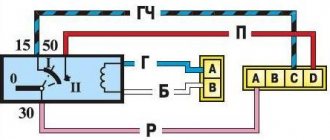
What controls the central locking? A special block to which the lock actuator wires fit. There are also two wires connected to it, connected to the driver's door microphone. More precisely, this wire is used alone in “Grant”, it has a brown sheath, and the second contact from the “micrik” is connected to ground.
The “micric” itself is located inside the actuator. So, the first piece of advice: after removing the left front door trim, you need to find the cable going from the actuator to the 7-pin connector.
Depending on the configuration, under the trim you will see the following:
- There are 6 wires suitable for the connector (from 2 microphones and a drive);
- The cords from the electric drive (pins “2/7”) are not connected, but there is still a brown wire connected to pin “1”;
- Only those wires that, according to the diagram, should be connected to contacts “4/6” are missing.
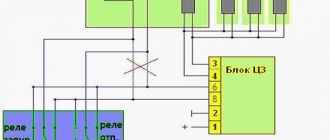
Connecting the signaling means that the wires from contacts “2/7” are still connected to the central locking control unit. The cords coming from the three actuators are always connected to the standard unit. You need to connect a fourth one, if this is not done by the factory. You may have to lay a two-wire cable from the door to the central lock control unit:
The central locking control unit is located under the fuse block, it is designated BUBD-2190.
Here's how one of the car owners coped with the task:
The cords that come out of the door are connected to the wires of the standard terminal block. The following connector pins are used: “3” and “4”. The main thing is not to confuse them. Take another look at the diagram to see what exactly we are talking about.
Lada Granta Sport › Logbook › Activation of standard alarm and installation of external
Good day!
In general, I drove for several months without an alarm, constantly opening the car through the lock. My standard alarm system is not activated from the interior, I refused it myself. I thought I’d install an external one later and not have to worry about the crawlers and other bastards. That’s what I thought before the first wash in winter - while warming up the castle once again, I decided that it was time to study this issue. So, after reading the club forums, I came to the conclusion that there is nothing wrong with activating the immobilizer and the standard alarm system, which means it needs to be activated, and as an anti-theft measure, the native immobilizer is very, very effective! I activated it myself, if anyone wants to, first decide for yourself whether you need it or not, instructions at the end of the post. The car opens with a button, in two stages, you can reprogram it and they will all open together, but then the doors will close when you move, so I left it as is.
I rode for a couple of weeks, I like everything) But it got cold! I'm tired of running to start the car. I was thinking about autostart. A call to Rustam at AvtoEstet (who needs contacts in Surgut - in a personal message, he approaches the work very well) - we agreed on Friday. The choice fell on StarLine A93 without CAN+LIN, because... I have had the comfortLIN module since I bought the car, more about it a little later.
Actually, a list of what was available:
1) Activated standard immobilizer and standard alarm 2) StarLine A93 3) StarLine BP-03 - module to bypass the standard immobilizer 4) comfortLIN module
I arrived at Rustam’s at 10:00, and at 17:00 I picked up the car with the alarm already installed. Everything works perfectly. Thanks to the comfortLIN module, when the Starline is armed, the standard one is also armed, the glass closers work, all doors open with one click on the key fob and do not close when you start driving. In general, I'm happy!
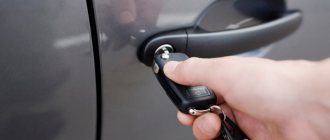
I also ordered this key for myself, it’s made on the basis of the standard board, when it arrives, I’ll just rearrange the board and use the switch key, and I’ll put the standard one aside as a spare, I’ll always have time to train it!)
And now about how to activate the standard alarm and immobilizer:
Immobilizer APS-6. Training procedure.
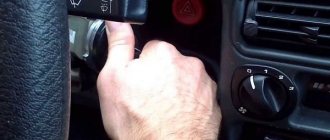
1. Close all car doors. Turn on the ignition with the training key and wait in the on state for at least 6 seconds.
2. Turn off the ignition. The lamp should begin to flash rapidly (5 times per second) while the learning procedure is being carried out correctly. If the lamp stops flashing quickly, it indicates an incorrect operation, an out-of-time interval, or a malfunction. Remove the training key from the ignition switch.
3. While the lamp is flashing (about 6 seconds), you must insert the working key into the lock and turn on the ignition. If everything is done correctly, the buzzer will emit three beeps when the ignition is turned on.
4. Wait with the ignition on (about 6 seconds) until the buzzer emits two more sound signals. If after 6 seconds the buzzer does not produce sound signals and the rapid flashing of the light stops, then you need to turn off the ignition and start the procedure again. If the situation repeats, this means a malfunction or that this working key has already been trained with another immobilizer.
6. If it is necessary to learn the second working key, then you should perform steps C…E again, using the second trained working key to turn on the ignition. If not, continue from point G.
7. While the lamp is flashing (about 6 seconds), you must remove the key from the ignition switch, reinsert the training key into the lock and turn on the ignition. If everything is done correctly, the buzzer will emit three beeps when the ignition is turned on.
8. Wait with the ignition on (about 6 seconds) until the buzzer gives two more sound signals.
9. Turn off the ignition. Do not remove the training key from the ignition switch. Approximately 6 seconds after the ignition is turned off, the buzzer should emit a single beep and the lamp should begin to flash twice as fast. If the buzzer does not emit a sound signal and the rapid blinking of the light stops, then you need to turn off the ignition and start the procedure again. If the situation repeats, this means a malfunction or that this training key does not fit this controller.
10. No later than 6 seconds after the sound signal (while the lamp is flashing quickly), you must turn on the ignition with the same training key. After waiting 2-3 seconds, turn off the ignition. No later than 5 seconds after turning off the ignition, the buzzer should emit three beeps and the light should stop flashing quickly. Do not turn on the ignition for at least another 10 seconds. When working with some controllers, the light stops blinking and the buzzer emits 3 sound signals when the ignition is turned on. In this case, you should still turn off the ignition and wait at least 10 seconds.
At the end of the learning procedure, it may be necessary to resynchronize the immobilizer and controller codes. This means that after the learning procedure is completed, the controller will not allow the engine to start when the ignition is turned on for the first time. To carry out resynchronization, you must turn on the ignition with any trained key (preferably a working one). Wait 6 seconds. If the immobilizer light begins to show an error condition (flashes once per second), then turn off the ignition and wait at least 10 seconds. After this, turn on the ignition again. The light should not flash and the engine should start.
Programming the duration of control pulses
Even if the alarm is connected correctly, it is not a fact that the owner will be able to control the locks from the key fob. The point is that it is necessary to correctly select the duration of the control pulse (for locking and for opening). There is no need to make it too large so as not to overheat the actuators.
See what exactly the manufacturer Starline offers. We can set the pulse duration to 0.7 s, which should be enough. The value “3.6” will be redundant at the same time.
The “Lux” package has the following property: after 15 minutes of inactivity, the electronics “fall asleep”. It may take an extra boost to wake her up. So, try to use the option that provides for a double pulse. The main thing is not to activate the “comfort” option, which uses a 30-second duration. To connect the signaling with “comfort”, you need to install an additional unit in Grants (AvtoVAZ does not produce it). We wish you success.
Activation of the standard immobilizer in Lada Granta
The need to activate the Lada Granta immobilizer may arise completely unexpectedly when an attempt to start an unauthorized car engine is detected. But there may be a reasonable solution when the owner of a Lada Granta car changes or the working keys are lost. In any case, knowledge of the procedure for activating the immobilizer will not be superfluous
| N order of activation | Description of activation steps | Time interval, sec | Light indication, no. once | Sound indication, no. once | Activation Operation Technical Notes |
| 1 | Using the learning key, turn on the ignition of the Lada Granta car | 6 | Activation is performed with the car doors closed | ||
| 2 | Turn off the car ignition for a short time | 5 | When the blinking stops, the time interval of the activation process has been violated | ||
| 3 | When the light is flashing, insert a working (not training) key into the hole and turn on the ignition of the Lada Granta again | 6 | 3 | ||
| 4 | Wait for additional buzzer signals | 6 | 2 | When the indicator stops blinking, resume the activation process | |
| 5 | Turn off the ignition by turning the working key and pull it out | If you need to learn a second key, complete episodes 2–5 of the activation process. | |||
| 6 | Insert the training key again and turn on the ignition of the Lada Granta again | 6 | 3 | The activation episode is performed while the indicator is flashing | |
| 7 | Wait for the next buzzer signals | 6 | 2 | ||
| 8 | Without removing the key from the well, turn off the ignition | 6 | 2 times more often | 1 | If there is no signal and the blinking has stopped, start the entire activation process again |
| 9 | Turn on the ignition of the Lada Granta once again | 2 — 3 | Same frequency | ||
| 10 | Turn off the ignition again | 5 | No blinking | 3 | |
| 11 | Give temporary exposure | 10 | No blinking | The immobilizer of the Lada Granta car has been activated |
Important: if you need to train another working key, you should repeat episodes No. 3 – 5 with it. If this is not required, then activation of the Lada Grant immobilizer can be continued from episode No. 6.