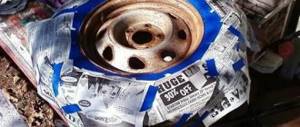
Preparing tools and materials
Their number and volume directly depend on the scale of the work performed. How many cans of paint do you need to paint a bumper? If partial repairs are being carried out, one volume of 500 milliliters is sufficient.
But it happens that the old bumper can no longer be repaired. Then disassembly comes to the rescue, from where a new replacement element is purchased. If you paint a new bumper from a spray can yourself, you will need much more material. At a minimum, we will need 3-4 cans. But besides this, the list of materials includes:
- Primer.
- Putty (for deep damage or dents that could not be restored by heating).
- Degreaser (white spirit or “anti-silicone”).
- Sandpaper of varying degrees of grit.
- Polishing machine with felt attachment.
If a partial repair is being carried out, it is important to ensure that the product is as shiny as possible. How many cans are needed to paint a bumper with varnish? One or two is enough. The varnish should be colorless. Also, do not forget about protective measures - prepare goggles, gloves and a respirator.
Necessary materials, tools and equipment for painting
It is worth giving preference to high-quality materials, which guarantees an appropriate result.
What you need to have on hand:
- Sandpaper for dry and wet sanding. To save money, it is better to purchase a set of sheets with different grain sizes starting from P600.
- Solvent or mineral spirits - This removes oils, road grease, dirt, car wax and other contaminants and improves adhesion.
- Glass fiber putty. Thanks to it, the surface strength and resistance to minor damage and impacts increases.
- Acrylic primer.
- Coloring pigment in a can and varnish transparent coating (aerosol).
- Special “interlayer” napkins.
- Polish - adds shine to the car bumper and protects the paint. Without a clear coat, the paint will look dull.
Additionally, you should have on hand:
- An orbital sander with a special pad - a foam adapter.
- Aerosol Sprayer - This converts an aerosol can into a spray gun, making it easier to apply paint and clear coat.
- Microfiber cloth. Avoid using other materials such as paper towels or cotton towels as they may scratch the clear coating.
- Technical wax not only adds shine to the surface of the bumper, but also protects against UV rays.
- Respirator, gloves, safety glasses and masks. All of these sprays are toxic and should be used in a well-ventilated area.
Price
Painting a bumper yourself using a spray can will cost significantly less than service from a service station. The main thing is to follow the process technology and have enough time left for drying and eliminating drips.
The cost of updating a bumper is affected by the quality of materials, the nature of the repair work and the number of layers of primer, putty, paint, etc.
Preparation
First you need to decide how to paint it. If this is painting a new bumper with a spray can, it is better to carry out the work with removal. For partial restoration, you can leave the bumper on the car and apply the compound locally. But remember that due to the complex geometric shape, it is very difficult to achieve a uniform layer. Drips may form if the bumper is painted on site.
Next we need to thoroughly wash and degrease the surface. Pay special attention to hidden places - edges and joints of the product. Bitumen stains can be removed with a special solvent that will not affect the paint layer. This way we will ensure that the surface is as smooth as possible before painting the bumper with a spray can yourself.
How to paint a plastic bumper from a spray can. Step-by-step instruction.
The bumper is often susceptible to both climatic and mechanical influences. Parked incorrectly and already scratched off some of the paint, or flying stones and dirt also constantly damage the paintwork of this body element. Ultimately, after a few years of using the car, you will need to restore the bumper. In this article we will tell you how to paint a bumper from a spray can with your own hands, and what stages the entire technology of carrying out the work is divided into. By strictly following the algorithm, you can save money and get good results.
Step 1. Preparing the bumper for painting.
If you plan to repaint this body element completely, then in this case you cannot do without dismantling. This way you will ensure comfortable working conditions, and also, you will not need to play with the protective film. If the damage to the bumper is local, then partial painting is done, and then using film and tape, try to cover as much as possible all untreated areas of the body and decor, as well as fog lights, if present.
Next, you need to wash the part with detergents and dry it. After that, we clean all problem areas with P80-150 sandpaper. We remove deep scratches, chips and swollen or chipped paintwork.
We degrease the plastic surface with anti-silicone.
Step 2. Leveling the surface with putty.
Using putty, you can fill deep scratches, chips or other defects present on the bumper structure. Use automotive two-component putty for this. To do this, it is mixed with the hardener immediately before application to the part. You only need to knead the amount of material that you can lay down immediately, otherwise it will set and can only be thrown away. After applying the first layer, wait about 15 - 20 minutes for it to dry. Next, the surface is sanded using sandpaper and its quality is checked; if there are still flaws, we apply a second and, if necessary, a third layer of putty until we get a perfectly flat surface. It is especially necessary to monitor the junction of the sanded and untreated sections of the bumper.
Related article: How to find out the paint number of your car? Three solutions for searching for tone: VIN, special code and computer selection.
Step 3. Apply primer.
After the putty has completely dried, which is about 24 hours, you need to additionally sand the area to be treated with P400-600 abrasive. Next, degrease the surface again. The next stage is priming. To do this, use standard acrylic primer, which is mixed with a hardener and solvent in the proportions specified by the manufacturer.
You can also paint the bumper with a can of ready-made primer.
Then, after the soil has completely dried, and there may be 2–3 layers, the surface is sanded with P800 abrasive. Next, degrease the surface again, wiping first with a damp and then with a dry cloth.
Step 4. Painting the bumper.
First of all, select the tone of the paint color. This is done using a catalog or according to the markings indicated on the car body. You can also seek advice from sellers in specialized stores.
Painting a plastic bumper from a spray can, both used and new, is a very responsible and scrupulous task. Before applying paint to a surface, it is better to practice on a test surface to determine the distance to the area to be treated and the degree of spraying.
First you need to shake the can well to mix the paint. Usually the can is kept at a distance of 30 - 35 cm from the surface of the bumper. After applying the first layer, allow it to dry for 25 - 35 minutes. The total number of layers is 2 – 4. Here you need to look at the quality of the resulting coating.
If you are interested in how many cans of paint you need to carry out the work, then you need to look at the task. If this is local painting, then you will need one can of paint, as well as primer and varnish. If this is a complete painting of a part, then depending on the size, you may need from 3 to 6 cans of paint and the same amount of varnish and primer.
Related article: How to paint a car roof? Methodology for independent work.
Next, if necessary, apply varnish, also from a spray can. The material dries completely within a day.
Video instructions for restoring the paintwork of a bumper using a spray can.
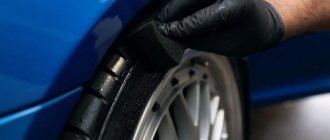
Step 5. Polishing the bumper.
The next stage is polishing the paint layer. This stage of work eliminates minor defects caused by applying varnish and allows you to achieve a shiny surface.
Polishing is carried out in several stages. First, using “wet sanding” with fine-grained sandpaper P1500-P2000, rough irregularities in the varnish surface are removed. Next, gradually using coarse and soft abrasive polish, we achieve a smooth surface, and with the help of polishing paste we add shine to the paintwork. Next, wash off the traces of polish from the bumper and enjoy the result.
As you can see, even without professional tools and using cans of paint, you can carry out minor bumper repairs yourself.
What's next?
At the next stage we need to correct the previous defects. These may include scratches and light dents. If the bumper has a crack, it is repaired with epoxy glue from the back side. In order to level the surface from the outside, use automotive putty.
It is mixed with a hardener and applied with a spatula. Please note that the paste dries quickly (less than 10 minutes). You need to mix the putty in small volumes. After drying, take a block of sandpaper and smooth out all the edges. It is important to ensure maximum smoothness and uniformity.
Remember that the final result of the repair depends 90% on quality preparation.
Putty and primer
Puttying the car will be necessary in case of leveling chips, and plastic putty is used for this purpose. Sometimes it can be replaced with a regular car one. For 50 parts of putty use one part of hardener. If you have enough experience, the process of creating a repair mixture can be done by eye. The mixture begins to harden quickly, so it must be applied almost immediately. This putty dries within twenty minutes.
When the putty dries, the most difficult areas of the bumper undergo additional preparation. They are processed with sandpaper, which is cut and placed on a small wooden beam. A sanding machine can also serve a very good purpose. During the second stage of sanding, you should pay attention to the junction of the previous place and the new sanded layer. There is no need to treat all damaged areas with putty in one day; you can divide the work process into two or three times.
Primer. After puttying, the bumper is primed and degreased. It is cleaned with water and sandpaper, and acrylic primer is also used for this. It is diluted with solvent and hardener. The primer is applied with a spray gun. After drying, the bumper is cleaned with sandpaper, washed and dried. Another degreasing process is done with special means that are aimed at treating the plastic surface. During degreasing procedures, surfaces are wiped with dry or damp wipes.
Primer
The sanded putty will definitely leave pollen behind. Its presence on the surface is not at all desirable.
Therefore, once again thoroughly degrease the entire surface. After this we begin to prime the bumper.
Note! The bumper has its own primer. When purchasing, check with the seller that you need the material specifically for plastic surfaces.
Then we apply the composition in several layers. Usually the bumper is processed in two passes. Between the first and second layers you need to take a 15-minute break. Give the composition a chance to dry. After the second layer, the bumper is sent to dry. It lasts 24 hours at a temperature of 20 degrees. The process can be accelerated by using an infrared heater.
How to paint a bumper yourself: detailed instructions
Everything will depend on what the task is. Painting a new bumper is a little different from working with an old one.
How to paint a new plastic bumper
- Painting a new bumper begins with cleaning it, removing oil used during transportation, and degreasing it. For sanding, use P800 sandpaper.
- The next stage is priming. For this, a two-component acrylic primer is used. It is applied sequentially in two layers. The next layer should be applied after the previous one has dried. The top layer of primer should be more liquid.
- The next grouting of the primer is done with any sandpaper from P500 to P800 for better adhesion of the base layer of paint to the plastic. If during grouting there are places that are visible to the putty or to the plastic, these places should be covered again with a very thin layer of primer. You need to cover it 2 times. After this, the surface of the bumper is blown with compressed air.
- Degrease the surface for painting.
- Apply a base coat of paint.
- Two more layers are applied at intervals of 15-20 minutes.
- After you are convinced of the quality of the paint, you should apply a layer of varnish to add shine and completeness.
Painting and repairing an old bumper
Painting an old bumper is different in that you must first repair all damage and defects in the bumper; you may need to solder the bumper.
- The bumper must be removed from the car and washed well.
- Remove dried tar or resin. White spirit or solvent will help with this. If the resin is not removed, it will clog the sandpaper during stripping and sanding.
- Make necessary repairs.
- Use P180 sandpaper to clean the surface, removing the old paint down to the primer.
- Next, blow off with compressed air under pressure.
- Treat with anti-silicone.
- Use plastic putty to eliminate any unevenness on the surface of the bumper. It is convenient to use putty with glass fiber. This putty settles less; glass fibers act as a reinforcing base.
- Sand with P180 sandpaper and coat with finishing putty;
- Sand with P220 sandpaper;
- Prime the entire surface of the bumper with a one-component quick-drying primer;
- Sand the primer with P500 sandpaper.
- Degrease the surface;
- Paint the surface of the bumper as with a new bumper.
Useful tips when painting a bumper
- All work can only be performed with a thoroughly cleaned and washed bumper.
- There should be no drafts in the room where painting work is carried out. Dust or flies that fall on a wet painted surface will certainly ruin the entire work.
- For degreasing, use a wet cloth and then a dry one.
- It is not recommended to use heating equipment such as hair dryers to dry paint.
- It is better to start treating the bumper from the edges and hard-to-reach surfaces, and then the surfaces that are not difficult to access.
- Before starting work, you should carefully study the instructions for the varnishes, primers, and putties that you are going to use.
- If streaks and shagreen marks have formed, wet sanding with waterproof sandpaper should be applied, then treated with polish.
We can conclude that you can repair and paint the bumper yourself if there are no serious requirements for quality. It is possible to repair a small scratch or chip. In more serious cases, it is better to contact a service station.
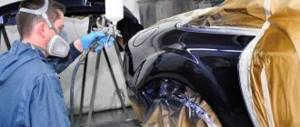
Professionals will do this job better. Painting a bumper requires special conditions and equipment. Stripping, grouting, sanding - these jobs are dirty and require respiratory protection. Without experience and skills, an amateur will spend a lot of time and nerves on this. The painting work itself is also harmful to health and can be performed in well-ventilated areas.
Technology for painting the entire bumper with a spray can
So, our bumper is completely prepared for final painting. But its technology will differ depending on whether it is a complete repair or a local one. Let's consider the first case.
In this situation, the entire area of the element is treated with paint. First you need to make a developing layer. It will be the thinnest. In order not to form drips, we spray the composition at a distance of no closer than forty centimeters at a speed of 0.5-1 meter per second. Then we wait until this layer dries on the primer. It is enough to wait 15-20 minutes. Then you can apply a second, thicker layer. But make sure there are no drips. Do not bring the spray tip too close to the element. Keep it strictly perpendicular to the surface. Pay attention to hidden cavities. After 20 minutes, apply another finishing layer. If the shade turns out to be pale and unsaturated (and the paint was registered), we cover the bumper again. It is necessary to achieve the same shade as the factory surface.
But not only the shade is important when painting. To make the surface look as factory-made as possible, you need to give it the appropriate shine. Therefore, at the next stage, we treat the element with transparent varnish in two layers with the same time interval. This completes the DIY spray painting of the bumper. All that remains is to wait a day until the paintwork is completely dry and put the bumper in place. After 3-4 days it is recommended to polish. To do this, use an angle machine and a clean felt circle.
Secrets of painting a bumper yourself
Painting should begin by preparing the workplace. It must be thoroughly filled with water to avoid dust. In addition, it is advisable to fence off the work area from the penetration of insects that strive to land on a freshly painted surface.
The paint in the can must be mixed well by vigorous shaking
Before painting, the paint in the can must be mixed very well by shaking. Inside there is a metal ball, which actively moves due to these movements and interferes with the paint. This should continue for at least 5 minutes. If the paint is not thoroughly mixed, streaking may occur during application.
It takes 25–35 minutes for the applied paint to dry.
However, poorly mixed paint is not the only reason streaks appear on the surface being painted. They can form if the same distance between the can nozzle and the bumper is not maintained; it should be in the range of 30 to 35 cm.
It takes 25 to 35 minutes for the paint to dry. This is how long you need to wait before applying each subsequent layer of paint.
Polish the dried paint layer with a sanding machine.
The dried last layer is polished with a grinding machine, on which a felt wheel is installed. Polishing paste is applied to its surface. The polished surface is thoroughly washed with warm water, dried and degreased. Only after this a protective layer of varnish is applied to it.
Video: how to spray paint a bumper
In conclusion, I would like to say that sometimes purchasing a new bumper is cheaper than repairing an old one. Therefore, before starting work, you should soberly assess the level of damage and estimate the amount of time and materials that will have to be spent on eliminating them. Only after this can you decide whether to repair the old bumper or whether it is cheaper to buy a new one.
Direct flow - how to make it yourself.
DIY eyelashes for headlights
Features of local painting
The main task is to make the transition to the factory paint layer as smooth and imperceptible as possible. The problem is further complicated by the fact that the shade of the factory paint may fade (paint slowly but surely fades in the sun).
How to make repairs correctly? To do this, prepare the surface in the same way: wash, prime, and, if necessary, putty. Next we make an imaginary transition line. Apply a developing layer as always. Then we cover the bumper with the base layer. The essence of transition painting is to smooth out the boundaries of the paint. For this:
- We increase the spray distance as the torch approaches the layer of factory paintwork.
- With each new layer we move the imaginary border further and further from the repair site.
- We do not use masking tape under any circumstances. It leaves a strong and noticeable transition. You can use tape and film only to protect adjacent body elements if the bumper is painted without removal.
- Varnish, unlike paint, is applied to the entire surface area. This way we will hide the difference in shades if the bumper is old and a little faded. We will also get rid of the dullness in the transition line.
Next, similar to the previous case, we wait for the paint to dry completely and after a couple of days we polish the surface.
Coloring of local areas
Painting the bumper and body is an almost identical process. Painting happens:
- Complete, when the bumper is removed and processed over the entire area.
- Local, in which only a certain area of the part is painted.
Let's consider the technological sequence of painting a plastic bumper:
- Wash the bumper from any type of dirt.
- Remove dried resin with a solvent.
- Peel off the previous peeling coating from the surface of the bumper.
- Use a sanding machine to prepare the plastic bumper for painting. Smooth out the corners, clean out chips with coarse sandpaper 120 grit.
- Blow on both sides of the bumper, checking for cracks. If necessary, solder them.
- Use fiberglass putty to smooth out all bumper bumps. Let it dry.
- Sand the putty layer with sandpaper no. p 120.
- Apply the finishing putty with softer sandpaper No. R 180-R 220. Repeat until the surface is completely flat.
- Perform matting to prepare the surface for priming using R 220 abrasive.
- Bumper sanding
Blow the bumper again and degrease it.
- Apply anti-silicone.
- Wipe the surface first with a damp and then with a dry cloth.
- Treat the bumper with an acrylic primer using a spray gun. Avoid excessive layer thickness, as this may cause the primer to leak.
- Dry the soil layer naturally for 24 hours or 5 hours next to an infrared heater.
- Repeat priming if necessary.
- Treat the surface with developing powder.
- Sand the primer with sandpaper No. R 320-R 400, and the next layer - R 400-R 500.
- Apply Scotchbrite to areas of the surface that are difficult to access.
- Blow the bumper under pressure with air.
- Degrease with special compounds.
- Stir the paint, especially if it is a metallic color.
- Apply the base coat with a spray gun 2-3 times with a drying interval of 15 minutes with plastic paint. If smudges or drops appear after drying, rub it with sandpaper and cover with polish.
- Apply acrylic varnish in two layers at similar intervals.
Step 1. Clean the surface from dust and other contaminants.
It is appropriate to use soap products to remove dirt and dust, including dishwashing detergents. Then, using a solvent, it is necessary to remove the layer of wax and tar (resin). Using a sharp knife, you need to remove the peeling old coating. And dry the surface of the bumper.
Step 2: Protect adjacent surfaces.
This step is necessary if the bumper is not removed during work. It is enough to cover the adjacent surfaces with paper or newspapers using masking tape.
Step 3: Sanding.
At this stage it is necessary to remove as much of the old coating and paint as possible. When working, sandpaper is used from larger to smaller grain sizes. All suspicious places, chips and cracks are cleaned. Dust is cleaned off with a soft cloth or blown off with a compressor.
Step 4. Elimination of gross defects.
If faults and cracks are revealed during inspection, they are welded with a powerful soldering iron or flat electrodes on both sides, depending on the global nature of the problem.
Step 5. Puttying and sanding.
For filling joints, it is better to use putty with glass fiber. It is less susceptible to subsidence and will become a reinforcing base.
After hardening, it is necessary to go over it with P120 sandpaper, and minor defects are removed with finishing putty. The dried surface is treated with sandpaper R180-R220 already under the ground. This step is repeated until all visible defects are eliminated.
Step 6. Matting the surface.
In addition to imparting a matte finish, traces from the P120 sandpaper are erased. To do this, take abrasive paper P220-240 and use a sander, and in some places carefully go over the surface of the bumper by hand. It is better to purchase a foam adapter for the machine in order to eliminate the harsh impact of the sole.
Step 7. Use microfiber or a compressor to remove fine dust.
The bumper is degreased with a solvent and treated with anti-silicone.
Step 8: Protect the rest of the vehicle and work area.
How to paint a bumper from a spray can with your own hands without protection? You can use old newspapers, masking tape and plastic. In any case, it is necessary to protect and moisten all surrounding surfaces and blow off dust.
Step 9. Primer.
Apply in several thin layers. After drying, apply a two-component acrylic-based primer, first over the entire surface, and then, taking breaks of 15-20 minutes, fill the problem areas.
Then the acrylic primer is slightly diluted with a solvent and applied over the entire surface in an even layer.
Step 10. Grinding the soil.
A well-dried surface must be sanded. To do this, take P400 sandpaper, a sander and whetstones.
You can use a special developing spray or powder that will ensure the quality of the grinding. This stage must be carried out very carefully in order to avoid partial removal of the soil.
Then the primer is reapplied in several thin layers and, after drying, sanded with P400-600 sandpaper.
Step 11. Painting.
Before painting, the surface is cleaned of dust and degreased. To cover the primer, 3-4 layers are enough. Each layer needs 15 minutes to dry.
If any dust is visible, wipe it off with a special napkin. The paint will then look dull compared to the rest of the car. For shine to appear, you need to apply a clear coat.
Step 12. Applying varnish.
Before applying the varnish you need to wait about half an hour. 3-4 layers are enough, each drying for 10-15 minutes.
The rear bumper is painted using a special device - a spray gun. To carry out work efficiently and economically, it is necessary to use a medium pressure spray gun - Middle Pressure, the injection force of which is about 4 atm.
DETAILS: Xenon in fog lights, selection and installation of xenon in PTF
If the pressure is lower, the adhesion of the paint to the surface will be insufficient, and at a higher pressure, paint consumption can increase up to 60% due to the jet being repulsed. Pressure is supplied by a compressor.
Do-it-yourself bumper painting is done in at least three layers.
Data on setting time and final drying are individual for each type of paint and manufacturer. Information can be found on the paint can.
On average, one day after applying the last layer, you can start applying varnish. Coating with acrylic varnish should be done in two layers with a 25-minute break.
There are situations when the bumper, unfortunately, cannot be repaired. And the ordered one is new, in the wrong color or without paintwork at all. In this case, painting the rear bumper can be done using an accelerated method.
It is advisable to remove the gloss from a new product with a sandblaster to avoid scratches.
It is permissible to use a cloth-based emery cloth attached to a high-speed polishing machine.
The rough surface is degreased and covered with primer for plastic. After 10 minutes, a new layer of base soil is applied, the drying time of which is about a day. Then the final processing is done with P600 sandpaper and the rear bumper is painted.
Local bumper painting refers to minor repairs. It is cheaper to produce it yourself, without purchasing cans of paint, but using an aerosol can.
- We limit the defective area with masking tape to avoid scratches on the undamaged part of the surface.
- The working area is matted - the gloss is removed using Scotch-Brite or a special Super-Fine abrasive sponge.
- The repair area is degreased with white spirit and aerosol or regular putty is applied to it.
- The dried surface can be sanded using two methods. When dry, use sandpaper with abrasive P320–400, when wet – P500–800.
- Before painting a plastic bumper with a spray can, shake it vigorously for 3 minutes.
It is optimal to work at a temperature of about 20°C and low humidity in a well-ventilated area. Paint is sprayed from a distance of at least 30 cm to avoid the formation of smudges. The time between application of layers is on average 10–15 minutes.
Previously, if it was necessary to replace a body part, the only option was to purchase a contract part at a car dismantling station or second-hand. This method has its disadvantages:
- it is very difficult to select a contract part that exactly matches the color of the car, and in addition to the cost of the part, you will have to pay for painting;
- a contract part may not be a contract part, but a used one; when repainting, a different color, putty, hidden damage may be discovered under the top layer of paint, and the cost of repainting will increase taking into account the repair.
Premises requirements
Do not under any circumstances perform this operation outdoors - only indoors.
Any garage will do for this. But before performing work, you need to prepare it:
- Carry out a complete wet cleaning. The slightest pollen falling on the surface will be clearly visible on a bright day, even from a great distance.
- Distribute work areas in advance. If you are painting the VAZ-2114 bumper with a spray can and removing it, prepare hooks to engage the element in a horizontal position. You should not place the part vertically - drips will form.
- Ensure ventilation, as painting work must be carried out with the gate closed.
- Provide quality lighting. The more light, the easier it is for us to notice and eliminate any defect.
Preparatory stage
- It is necessary to dismantle the bumper, wash it thoroughly using household chemicals, and wipe it dry.
- The old layer of paint is completely removed with sandpaper, which is specially designed for repair work. Grit size from P220 to P400. The work is carried out manually, with a grinder or an electric drill with a special attachment.
- The rear bumper is painted on a degreased surface. Degreasing is carried out using various chemicals. This can be a solvent, white spirit or anti-silicone. There are special napkins already impregnated with the appropriate compounds.
- The surface is primed with special compounds for plastic. This is done for better adhesion of the surface to the putty. It is applied to remove minor defects, scratches and abrasions that have arisen during use.
- Final sanding brings the surface to a perfectly smooth state; there should be no scratches or irregularities on it. The effective painting of the rear bumper and the final appearance of the product depend on its quality.
- The smooth surface is degreased and primed again to improve the adhesion of the plastic to the paint.