see also
Comments 51
didn't you have to cut anything?
If you're talking about rubber bands, you didn't have to trim much.
I'm talking about the door. If both rack and pinion windows are installed, will the windows go down completely?
Yes, if both slats are in one door, then both windows will open completely
awesome guy hooked up +++++++++55555
Cool topic, I still enjoy mine). Why didn’t you do it one by one?
Because clear glass does not release completely.
Is there any way to make it go down completely? And the madeleine that you glued to the outer glass does not fall off? And I still can’t glue anything without it falling off when it rains or after washing...
You can make the transparent glass lower completely by installing a rack and pinion lift.
“And the madeline that you glued to the outer glass doesn’t fall off? And I still can’t glue anything without it falling off when it rains or after washing...”)
While it's still holding up, I warmed Madeline up with a hairdryer
Did you leave the glass guides alone or two?
Great! Can you do something like this on 12k?
I think it can be used for any car
Super! Here's a question: I won't scratch the glass in the middle because of dust.
It’s good that we don’t touch the toner yet, there’s no need for such difficulties)) and for the work done 5+
Well done, I couldn’t be happier with this device for a year now.
Great! Only in the classics of the genre is it tinted internally, so there would be less dust between the glasses. Even with this performance, she gets there, I checked it from personal experience. Well, 5ka for your efforts!
This is some kind of garbage. Then you need to tint the windshield too.
cool)) if only there was a detailed description of the work done with photos and comments so that it could be repeated!)
The glass is tinted, supposed to be from the inside.)
Add. The glass is installed only on the outside, since the inside is not released completely; the outside had to be tinted. You can, of course, release the internal one completely, but you need to change the standard lift, and this also costs time and money)))
plus, if the toner is inside, it will mirror like shooting with PET)
sand will accumulate between the glass and all the glass will be scratched. you need to make sure that the tinted one rises regardless of the transparent one, then everything will be fine
Then you need another lift for the transparent glass, so that the transparent glass lowers to the end, and they will lower one by one.
well, it won’t take long to finalize it) a friend of mine made double glass on the nine, there’s no room in the door at all, everything that can be cut out
The door reinforcement was sawed too
What did you do with the guidelines? Or do they walk along the same line?
It turns out that until the transparent one is closed, it won’t close with toner?
source
Materials for installing double tinted glass
You can install double windows on a Priora yourself if you have the following materials prepared:
- two cable-type window lifters;
- two glasses that are fixed in the front of the car;
- shafts;
- madeline;
- tinting with color change 5%;
- epoxide;
- buttons that operate the windows, wiring suitable for them;
- four cables responsible for gas.
Double glazing of Lada Granta/Kalina cars
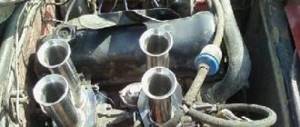
For the second glass, rack and pinion window lifters from Gazelle were purchased. Standard ESPs are cable-type. Modifications begin with shortening the additional ESP, then the mount under the glass is digested. The fastenings of the standard ESP also had to be re-cooked so that there would be more space in the door for external tinted glass. We glue this glass to the mount with epoxy glue. To prevent the glass from being scratched, we use madeleine between the glass.
Are you ready to modify your car in this way?
source
Tinting the interior glass on a VAZ 2107
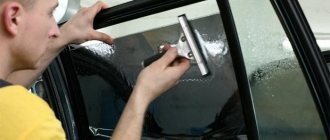
To be able to do double glazing on a VAZ 2107, you need to learn how to do tinting. First, let's look at the advantages that window tinting provides in general:
- tinting can block up to 99% of harmful ultraviolet radiation;
- reduces interior heating by half on hot days;
- Do-it-yourself tinting helps save a lot of money;
- in the event of an accident and glass breaking, tinting will help retain the fragments, thereby protecting the driver and passengers from dangerous cuts;
- tinting will perfectly protect from the glare of the sun or suddenly turned on headlights of an oncoming vehicle;
- tinting ideally hides the interior of the cabin from prying eyes;
- tinting gives an attractive and stylish appearance;
- tinting will protect the instrument panel and other plastic parts of the interior from heating by the sun.
Choosing high-quality film
Before you begin tinting your interior glass, you should choose a quality tint film. In this case, you shouldn’t save money and it’s better to buy a good one right away, so that you don’t have to pay twice later.
Headlight tinting is also done with film. Let's look at what types of good films are on sale today:
- Sun Tek film made by Commonwealth Laminating;
Automotive tint film
- Llumar tinting;
- Sun Control film;
- tinting Johnson Window Films and others.
They are all high quality and you can choose any of them.
Note. You should know that the package contains about two meters of tint film, a knife and a plastic spatula that ideally smoothes the film. As for the quality of the film, the more multi-layered and neutral in color it is, the better.
Buy automatic tinting “Duoglass”
Above were examples of independent “makeshift” installation of double glazing. We recommend purchasing a high-quality, ready-to-install kit from a company that has been developing and installing double glazing systems for several years!
The GRP company develops and installs double glazing systems in the front doors of cars.
Advantages:
- The ability to install automatic tinting on any car.
- A 1-year warranty is provided and post-warranty service is available.
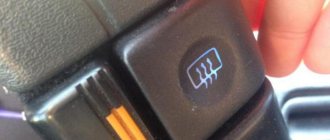
- Both windows in the door are controlled using standard buttons (without toggle switches or switches).
- Installation is possible at one of 14 dealers in Russia and Kazakhstan.
How much automatic tinting for LADA cars costs is indicated in the table (price list for other cars):
| Model LADA | Kit price + installation | Set price |
* users of the Lada.online website can buy automatic tinting with a 7% discount.
Discounts also apply to other products. Let us remind you that other instructions for modifying LADA can be found in the top menu of the site.
Read more: What kind of battery is installed on the Kia Seed
Found an error? Select it and press Ctrl+Enter..
Hello. The entire installation is examined on the driver's door. If you don't have a grinder and a drill, don't even start doing anything, they will be your best friends. So let's go...
The very first thing we need to do is make glass guides. The door frame has an opening 16mm wide, one glass 5mm thick, two glasses respectively 10mm. 16-10=6mm for separation. There's basically just enough space. We do not expand the door frame and glass guides, we leave them as is.
The original guide, also known as rubber sealing, fits perfectly under the glass guides.
It’s done this way) I think it will be clear in the photo, we separate the sealing garbage from the rubber band, look at the glass guide itself, and put it there in such a way that we get two tracks under two glasses, and there is a separation between them.
For convenience, the seal will have to be cut into its component parts: for each of the iron guides (there are 2 of them) and for the door frame. In the door frame, the seal is installed in exactly the same way, there is a groove 19 cm deep, and we put the rubber there. Maybe I’m not explaining clearly, but when you do everything it will become clear.) For better reliability, you can even put it on glue.)
It remains to make guides for the triangle of the side mirror and for the door between the left guide and the frame. There is a place where the elastic will not fit in the manner described above (by the way, just like in the triangle of the mirror). there is no 19cm extension.
Take an ordinary plastic corner from a hardware store, 1mm thick, cut it this way (pictured below), and glue it together. I won’t tell you the dimensions, I think you can figure it out yourself, it’s easy to cut with ordinary scissors. In the photo you can see the red fabric, it is a velvety fabric, I decided against it because I decided to use madeline. very good material (you can buy it at a car audio store or where they sell Shumka) and we glue the guides with this madeline. and paste them into the missing places. well, in the photo instead of velvet there should have been madeleine)
I placed a couple of nuts under the left guide from below to move it towards the middle (bottom edge), I don’t know why, but when the tinted glass was already installed (it is placed on the outside), when lifted, it slid onto the adjacent path where there should be clean glass. You may not need this, but it’s not a fact, I think it depends on the adjustment.
Well, we're done with the guides. without them you can’t even start anything. this is the very first thing you need to do. Now we need to remove (cut, chop down) the glass travel stop and the roller of the old manual lift. We don’t touch the top two rollers, they won’t bother us.
Next, metal is taken, preferably 2mm thick, and 3 plates are cut.
Read more: Toyota Prado diesel or gasoline reviews
Dimensions approximately: No. 1 - 50*4cm, No. 2 -11*4cm, No. 3 - 14*4cm. numbers 2 and 3, you can use rectangular ones, I just had these cut off from the edges, these were unsuccessful experiments. so as not to cut again, I used them. These plates will be screwed to the lifts and to them, in turn, will be glass.
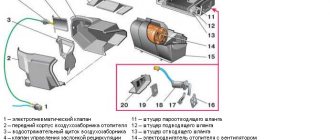
Next, open the box with Forward window regulators.
We take the lift itself and attach our homemade plates No. 1 and No. 2 to it. Number 2 is the spacer plate, followed by plate number 1, and we install the ready-made lift into the door. It will be inconvenient because the plate is long, but it’s possible to insert it.
We attach it to the door) drill two holes at 10, in the instructions we are suggested at 8, but we will do it at 10, for the adjustment of the lift. I don’t know the size, but you can see in the photo where it stands.
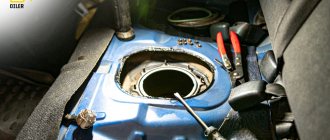
For a place for the second lift, you will have to cut the door, just in the place where you need to attach it, there is a tension roller, it just unscrews, but the place is thinner and the lift motor does not fit. We cut it down with a grinder and don’t regret it.
We attach plate No. 3 to the second lift. and lead us through the door. We cut the top fastening and move the window lift slightly towards ourselves.
and we observe such a picture that the two plates are almost parallel. because the glass will be at the same level, and when the tinted glass goes down first, the plates will cling. To fix this, remove both lifts and bend plate No. 1 so that when the glass is lowered, it passes by the second plate.
Next, we take the original glass, which will be tinted. it already has brackets. We leave the left bracket in place, and move the right one to the right, so that the distance between them is 26 cm. and cut it as shown in the photo, otherwise the bracket will cling to the clean glass.
This advice is that we don’t rush to tint the glass, because when you adjust everything, since a hundred times you will have to disassemble and reassemble everything, set up the entire system first, and only then roll the glass.
Now take clean glass) second. I bought it new at the store. together with the glass, buy a glass bracket from a VAZ 2101 (2106) it is longer than 2105. exactly the same 25-26 cm, and it will be located between.
We also cut off the pip from it and cut it in half. Unfortunately I forgot to take a photo. it will be attached to the sealant for gluing glass, I roughly sketched out a diagram. otherwise it will still cling.
I left it to dry for a day.
When you glue it on the inside, you need to go over it with a grinder to make it flush, just in case I glued the madeleine there, during the experiments it turned out that small burrs and protrusions can tear the tint, I myself ruined several pieces of tint, I re-glued the glass several times.
Read more: How to open a Logan without a key
Holds well, tightly. When I dismantled the door, the original factory velvets became unusable, so I had to buy new very high-quality velvets, Croatian, like this.
the outer edge where the velvet is attached will have to be slightly bent outward and the velvet should be installed, otherwise it will squeeze the glass and put pressure on it. Put the velvet cloth first, then the glass, it won’t work the other way around.
Well, installation of glass. First the exterior is tinted, then clean. I advise you to first adjust them separately, and then when you are sure that the glass runs smoothly, put them together. when you install tinted glass, immediately wipe it clean, otherwise this will not be possible later, because clean glass cannot be lowered lower than tinted glass, it is always either equal to tinted glass or higher. This is the only drawback.
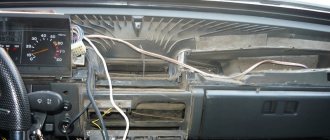
That's basically it, the mechanism itself is ready, all that remains is to do the wiring, arrange the buttons, and then let your imagination play out. Personally, I placed buttons instead of an ashtray, found some trim from the panel, cut the ashtray windows to the size, cut holes in it for 4 buttons and installed them.
all wiring consists of one harness: outputs for button chips, for ESP motor, 1 plus, 1 minus, and button illumination, everything is simple) powered directly to the battery plus through a 20A fuse, illumination for the dimensions) the only thing left is to install the casing and ride enjoy.
Well, I think I told you everything, in as much detail as I could, but I probably couldn’t go into more detail. I ruined two rolls of tint, now on one side there is a Chinese super dark black glued on, on the other I have the removable one that was before) I’ll drive like this until the summer, if everything is fine, I won’t be lazy, I’ll take everything apart and re-glue it with Lumar once and for all.
It took me about a month to come up with the whole mechanism, every day after work and spent the whole weekend in the garage. It took a lot of time to adjust so that the windows don’t squint when raising/lowering, so that they don’t rub, and so on, I lost count of how many times I had to remove the ESP, re-drill the plates, rearrange the brackets, it’s terrible as I remember, and it still didn’t work out perfectly, in short, no the limit of perfection., but nevertheless, I showed the whole basis, maybe you can do it better than me, I showed that two glasses for the classics are real...
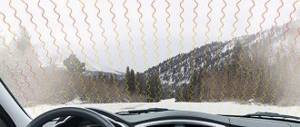
I think you yourself understand what the advantages of such tinting are, you can drive through traffic police posts without fear, in the dark, if you can’t see, open the windows, clean ones won’t go anywhere.
And finally, watch the video:
How to find out the light transmittance?
There are special regulations and rules for this, which many motorists are not aware of. Therefore, they find themselves in situations where fines are issued on illegal grounds. It’s worth mentioning right away that light transmittance readings can only be taken using the Blik device. It must have the appropriate serial number as well as a certificate.
It turns out that the device must be connected to the vehicle’s on-board network during testing. In this case, the driver may refuse to connect if he believes that the cigarette lighter is in poor condition.