Why is it needed?
Car batteries are used in cars as an additional source of electricity:
- for power supply of headlights, on-board network;
- to start the engine.
The battery consists of six interconnected cells. Its voltage norm corresponds to 13.5 V, 2.25 for each element. When discharged, the value drops to 9 V and below. These indicators are critical - 70%, they signal that the battery is faulty. This cannot be allowed.
In time, it is only possible to notice the approaching collapse if there is a charge indicator in the cabin. And if during the operation of the car it constantly signals about discharge, it’s time to go for a technical inspection at a car service center.
On new cars with computer filling, the driver has the opportunity to control the battery charge level. And for older car models, the best alternative to a voltmeter is a battery charge indicator. With this device you will always have accurate information before your eyes. The indicator performs two important functions simultaneously. He reports:
- about the process of charging the battery from the generator;
- about the charge level of the battery storage.
Such a device can be easily constructed with your own hands, its diagram is simple, and the parts for assembly are available in stores.
Important! The more worn out the battery is, the less time it holds a charge, especially in winter.
Dependence of the freezing temperature of the electrolyte on the state of charge of the battery
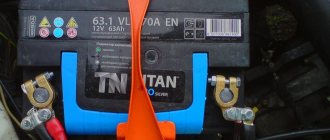
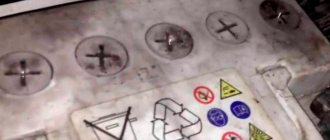
Green light on the battery (built-in indicator). What does it mean and why may it not light up?
Some batteries (usually above average quality) have a green indicator on the top (front), right, or left (some call it a light). This "eye" gives you an idea of the charge or discharge of your battery. It has three main positions in total, and it does not always glow green. Today I will tell you in detail what it is and why it was created. We’ll also look at why it might not burn at all...
THE CONTENT OF THE ARTICLE
To be honest, this indicator was created only to signal you about your battery, because as a rule, their design is not collapsible, and therefore you cannot climb inside and see what is with the electrolyte - just look at its level or measure its density. Therefore, such a “light bulb” gives you a complete idea by which you can make this or that decision. However, the indicator may not always light green; as a rule, three modes are used here.
What are the indicators?
There are different types of charge indicator. The most innovative models are on-board, built into modern cars, but this is still rare. The following types exist:
- crystal displays on instrument panels;
- indicators – hygrometers;
- a self-made version of the indicator.
At car dealerships, car enthusiasts purchase charge indicators of different models that differ in design and basic functions. Manufacturers offer the following types of models:
- by connection method: to the on-board network or to the cigarette lighter socket;
- by signal reproduction method: digital or analog.
These devices perform the main functions of determining the battery charge level and displaying indicators on displays or displays for viewing.
Indicator modes
The following combination is very common: green, white, black. However, some manufacturers use the following combination: green, white, red. But essentially it's the same thing. Let's go through these readings.
Green mode – fully charged battery, can be used in normal normal mode. That is, charging is not needed.
Built-in charge indicator
One of the existing built-in charge indicators is a hydrometer. It works by establishing the density of electrolytes. Its components:
- light guide and peephole;
- float with a leg.
There is a peephole on the outside of the battery, and the leg and light guide are built inside the case. The battery electrolyte level is measured using a float - a color designation. The peephole shows three battery positions:
- The ball (float) is green - the battery is well charged. It floats up from 65% charge and above.
- The eye is black or red - the float is immersed in the electrolyte, which means that its density has decreased. The battery needs to be charged urgently.
- The electrolyte itself is visible (white, yellow) through the peephole - this is a signal that the electrolyte level has decreased. You need to add distilled water.
This is not the most convenient indication option, since you have to periodically open the hood lid and monitor the position of the electrolyte under different operating modes. In addition, according to reviews from car enthusiasts, it is clear that the readings are inaccurate, and the device itself quickly breaks down. The causes of breakdowns may be the following:
- elements made of glass and plastic can become deformed due to overheating and show distorted data;
- the indicator is installed in one of the six compartments and shows the electrolyte state of only 1/6 of the entire battery; this may not always be correct.
Important! The hydrometer does not take into account in its readings the dependence of the electrolyte density on the temperature decrease.
Construction device
Many people mistakenly believe that such a device is made in the form of an LED light bulb. However, the design of this device looks different. In most cases, a special hydrometer is used, which is built directly into the battery case. This device allows you to accurately determine the density of the electrolyte in the device. Depending on the data received, a ball of a certain color floats up in the tube , after which it is projected onto a special window located on the surface of the device.
We recommend: How to determine the polarity of a car battery
If the battery is fully charged, there is a green ball at the top of the tube, which can be seen in the window and mistaken for a light bulb. If the device is low, a red ball pops up. In the case of black color, no ball floats up, and black color is simply visible in the window.
The reason for using this design is that electronics in the form of a regular light bulb would not be suitable for this task, since they also require energy. Moreover, any light bulb can burn out. In this case, the device will stop performing its task.
Factory models
The charge indicator on the panel is a good alternative to a hygrometer. It is purchased by car enthusiasts who have a second battery in their car, and the panel with the TMS indicator will become a very necessary device. It is made of aluminum, with LEDs. On the panel there is a voltmeter, a switch from one battery to the second. Its cost is about 1600 rubles, the country of origin is China.
Manufacturers offer devices based on the principle of a designer from a set of spare parts that are assembled by hand, for example - DC 12 V. It checks the completeness of the battery charge and the movement of the regulator. It consumes little electricity and operates up to 18 V. This is a budget option, its cost is up to 400 rubles.
There are offers on the market from American manufacturers. These indicators have a 12 V battery level, but they are very expensive, up to 5,000 rubles. Black design, 5 cm display, light bulb lighting.
Battery indicator - what color means what?
For convenience, many electrolyte batteries are equipped with a charge indicator; depending on the color indicator, it is easy to determine the status of the device.
At its core, this indicator on a battery is a hydrometer.
The device of the battery discharge indicator is quite simple:
- There is a peephole on top that signals the status of the device;
- Next comes a column magnifying glass - it projects color into the peephole;
- At the bottom there is a leg with a green ball or two - green and red.
Depending on the charge of the device and the state of the electrolyte, the ball inside the case floats or sinks to the bottom. This provides a visual indication.
How to assemble a charge indicator yourself
One of the simplest, most common ways to create a charge indicator with your own hands is offered below. The device will control the operation of the battery with an on-board voltage of up to 14V. The procedure is similar to the DC 12 V model. To work you need to purchase:
- printed circuit board;
- LEDs: green, red, blue;
- transistors BC: 547, 557;
- Zener diodes 9.1; 10 V.;
- resistors 2.2 kOhm, 1 kOhm (2 pcs.), 220 Ohm (3 pcs.).
The connection is made according to the diagram shown below:
- It is important to place all of the above components compactly on the board.
- Before soldering, LEDs are checked for the relationship between contact and color with a special tester.
- It is not recommended to solder LEDs directly to the board. The best option would be to carry them out on wires to install them in the car panel for convenience.
- The assembled indicator board is placed on the inside of the instrument panel.
- Then, they are connected to the general on-board network.
- LEDs on wires lead to the front of the panel, possibly to the bottom of the steering column. Here it will be easier to connect the device to the ignition switch.
Let's look at how it all works one by one. The display will inform you about charging indicators as follows:
- a light bulb with a green LED lights up when the voltage is more than 13 V - the battery is fully charged;
- The blue light is on when the voltage is 11-13 V, which means you can work;
- red lights up, at the moment the voltage drops from 10 to 6 V - the battery requires charging.
Now the driver will always know the condition of the battery and charge it in a timely manner, without waiting for critical and unpleasant moments. This means that the service life of the car will not be reduced due to battery breakdowns.
Important! If the work is done correctly, a color-coded charge indicator will appear on the car panel - an additional ability to monitor the battery charge.
Battery indicator color designations
To evaluate the color indicator, first of all you need to lightly tap the eye, a screwdriver handle or something similar will do for this.
This process is not always necessary, but it often helps before assessing the color of the battery indicator, since tapping will expel any air bubbles that may interfere with viewing.
Manufacturers do not particularly experiment with color variations in the eye on the battery (usually a different designation is written on the instruction sticker); the following colors are common:
- green - a green ball has floated up. Normal indicator.
- red/black - the red ball floats up, when there is a black one in the eye - the ball is at the bottom. Requires charge.
- white/gray/transparent/yellow - the color is seen differently due to different color rendering and perception by the eye, but in reality it is the color of the transparent leg of the plastic sensor, in the case of yellow - the color of the electrolyte. There is not enough water.
Indicators on the battery by color
Owners of batteries with an indication often have questions regarding the color of the eye, why it lights up in one color or another and, vice versa, does not light up.
- What color should the battery indicator light be??
In a normal state of charge and the ratio of water to electrolyte, the indicator should glow green.
In this case, no recharging or any action is required.
- What does the red light on the battery mean ? This also includes confusion about the black color of the battery indicator.
These colors indicate that the battery needs to be charged; if the device is left unattended, it will be completely discharged and may fail.
⦁ The indicator on the battery is white (gray or yellow).
This shade of the eye means that the electrolyte level has decreased. In the case of serviceable batteries, you need to add distilled water (sold in a pharmacy or auto shop) to the mark. If the battery is maintenance-free, we are talking about replacing it.
List of possible faults
We make acoustic podiums on the VAZ 2110 with our own hands.
After we have found out that the voltage difference indicator lights up, it will not be difficult to make a list of possible reasons for the absence of this difference:
- lack of charging or the amount of charge is less than the potential difference at the battery terminals;
- faulty battery lamp monitoring relay;
- poor contacts of individual circuit elements (ground connection, battery terminals, battery terminals, terminals in the mounting block).
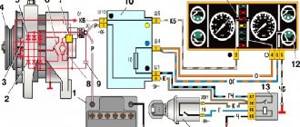
Generator
The reason why the battery light is on may be due to the following generator failures:
- The tension is too weak or the belt drive is broken. The sensor is guaranteed to notify you about this;
- wear of the brush assembly, collector slip rings. In the nascent stage, the light on the dashboard will light up only when a large number of energy consumers are turned on. To determine such a defect, the generator will have to be disassembled, otherwise it is impossible to assess the condition of the brushes;
- malfunction of the voltage regulator, which maintains the charging amount in a range safe for the on-board network. If the regulator fails to maintain the minimum voltage, the battery sensor lights up. In case of excessively high current, rapid failure of the battery may occur, sometimes even boiling. To test it yourself, you will need a power source with the ability to change the voltage. For example, a laboratory power supply;
- break of the excitation winding. To determine, you need to “ring” the winding;
- Incorrect operation of the diode bridge. In this case, the battery icon may flash. The test is carried out with a multimeter in resistance measurement mode. If the diodes are broken, the bridge must be replaced.
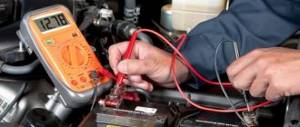
Diagnostics
If the battery light on the panel is on, the first thing to do is check the charge level. To do this, use a multimeter in DC measurement mode - DCV (rules for using a multimeter). The engine should be running at idle speed, turn on the maximum possible number of consumers. Voltage readings should not be lower than 13.4 W. Otherwise, the corresponding icon will light up. Without those turned on, the normal consumption value is considered to be 14-14.2 W.
Battery lamp control relay
In some cars, there may be a special relay in the circuit that is responsible for the battery charging sensor. For example, the classic VAZ model has a normally closed control relay (the icon is lit), which opens the contacts only after voltage is applied from the generator.
Poor contact
Very often, drivers underestimate the importance of good contact within the electrical circuit. But this is a very important indicator that can cause a voltage drop
If the voltage drops, the sensor will indicate a lack of charging, although the generator will be in full working order. To clean the contacts, use sandpaper or a needle file.
What to do if a breakdown occurs on the way
If the indicator on the dashboard lights up away from home, and you do not have a multimeter to check the voltage value, follow these tips:
- go to an auto supply store or radio station, if there are one near your location, to borrow a multimeter;
- If measurements cannot be taken, leave only the most necessary electrical appliances on (headlights, windshield wipers). Reduce the brightness of instrument lighting.
If your battery is still “alive”, then the car will be able to travel up to 150 kilometers.
Popular models
The most popular representatives of this brand for passenger cars are the two models presented below.
Battery Beast 60 Ah
There are two rechargeable batteries with this nominal capacity. Having the same performance characteristics, they are presented in forward and reverse polarity. Their cold cranking current is 600 A, with a capacity of 60 Ah, and the terminals are cone. The mass of such a unit is 16 kilograms 400 grams, and dimensions are 242-175-190 mm.
Ideal for injection cars with an engine capacity of 1.6 - 2.8 liters or for carburetor cars with an engine up to 1.8 liters.
Battery Beast 77 Ah
This model is also available in two versions - with direct and reverse polarity. Their starting current is 720 A. The weight of the device is 19.8 kg, dimensions are 276-175-190 mm. The terminal is a cone.
Can be installed on gasoline cars with engine capacity from 2.5 to 3.5 liters, as well as on diesel engines up to 2.7 liters.
Beast batteries do not support vehicles with a Start-Stop system.
Guide to making a device at home
The simplest and cheapest option is a self-made IN. Its purpose is to control how the voltage in the on-board network works within the range of 6-14V.
To prevent the device from working constantly, it should be connected through the ignition switch. In this case it will work when the key is inserted.
The following parts will be needed for the diagram:
- printed circuit board;
- resistors: 2 with a resistance of 1 kOhm, 1 with a resistance of 2 kOhm and 3 with a resistance of 220 Ohm;
- transistors: VS547 - 1 and VS557 - 1;
- Zener diodes: one for 9.1 V, one for 10 V;
- LED bulbs (RGB): red, blue, green.
For LEDs, using a tester, you need to determine and check the pins so that they match the color. The device is assembled according to the diagram.
The components are tried on the board and cut to the appropriate sizes. It is advisable to arrange the components so that they take up less space.
It is better to solder LEDs to wires rather than to a board, so that the indicators can be more conveniently placed on the dashboard.
Based on the manufactured device, it is impossible to determine specific battery voltage values; you can only navigate within what limits it is located:
- red lights up if the voltage is from 6 to 11 V;
- blue corresponds to voltage from 11 to 13 V;
- green means fully charged, meaning the voltage is greater than 13V.
The battery voltage indicator can be installed anywhere in the cabin. It is most convenient to place it at the bottom of the steering column: the LEDs will be clearly visible and will not interfere with control. In addition, the device can be easily connected to the ignition switch. After installation, the driver will be able to always know how charged his car’s battery is and charge his battery if necessary.
Price issue
If you buy a ready-made battery charging indicator, then the options presented below are possible.
Just recently a new Forse battery appeared under the hood. And here is the first adventure. The eye on the battery today noticed a black one. Just black. There is no color. The starter turns normally. There were no discharges.
I brought the charger. It took about 30 minutes to charge, and the charger said it was charged. But the peephole is still black.
I researched the structure of these eyes on the Internet. A primitive hydrometer. But it doesn’t turn green, most likely because the ball is stuck/stuck inside.
I'll try to stop by the store where I bought it soon. There is a guarantee. Let's see what they say.
Well, I think they’ll test it with a fork and say it’s ok. Then they will take it off and shake it a little. So that the ball floats up. That's where it all ends. I won't shake myself. This is their job. Let them do it. What if it really is a factory defect?
In winter it may become glitchy and appear green when the battery is low. But not the other way around. And mine is black. —————————————————- The problem disappeared on its own, just as it appeared. After a trip around the city, apparently due to shaking, the green ball floated up on its own. And it appeared in the peephole. Didn't do anything to him. It's worth remembering that this is possible. And that's okay. It's OK. You can shake the battery yourself, or look after a day or two after the trip and shaking. It happens that the ball inside can stick.
Review of Beast batteries
Modern equipment is used to produce Beast batteries. Many design solutions are the own developments of the scientific department of the AkTech company. The batteries have excellent performance characteristics and a long service life.
Beast battery design
Hybrid Ca Plus technology is an improvement on Ca-Ca. Positive electrode arrays are made of an alloy of antimony and lead. Thanks to Ca Plus, the Beast is resistant to deep discharges. Negative electrodes are made of lead with added calcium. This alloy reduces water evaporation and self-discharge. The battery requires less maintenance and is suitable for cars that are used periodically.
Hybrid technology Ca Plus
Expanded metal (ExMET) technology is used in the manufacture of negative electrode arrays. The plates acquire a more rigid structure. They are resistant to corrosion processes. The performance characteristics of the battery are improved.
Comparison of ExMET insert with conventional one
Lead powder for the active mass is produced using Tetra Oxide Power (TOP) technology using the Barton method. The paste obtained in this way has greater energy intensity. The starter current also increases, making it easier to start the engine.
Tetra Oxide Power
Positive electrodes are manufactured using PowerPass technology. The guide grids of the plates are positioned in such a way as to be pulled towards the eye. The method reduces the internal resistance of the battery, increases charge reception and current transmission.
The Beast battery cover has a labyrinth structure Complete Maintenance-Free. It is a specially designed channel system. Thanks to this, water leaves the electrolyte much more slowly.
Silicon dioxide is added to the electrode paste. It increases battery life. Thanks to it, shedding of the active mass of the electrodes is reduced.
A special indicator is used to monitor the battery condition. With its help, you can find out about the need to add water or recharge the battery. The operating principle of the indicator is shown in the image below.
Operating principle of the Beast indicator
The Beast battery has three main modifications. The first is a battery model designed for European and domestic cars. The capacity of such a power source varies from 55 to 90Ah.
For Asian-made cars, there is a special modification, Beast Asia. Such power supplies are manufactured in full compliance with the requirements of the Japanese Industrial Standard JIS.
Beast Asia
The largest batteries are represented by the Beast TT models. Such batteries are used in commercial vehicles, buses, trucks and special-purpose vehicles.
Reviews from car owners indicate a significant lack of Beast batteries. It is connected with the presence of a sticker on the lid.
Cover sticker
There are holes under the label for adding distilled water. They are closed with decorative plugs. It is impossible to feel them through the sticker.
All Beast batteries are low maintenance and therefore require periodic topping up with distilled water. Because of the sticker, many car owners do not know about the presence of holes. The electrolyte in the jars boils away and the battery becomes unusable.
Why may the green light not light up after charging?
Some people are faced with the fact that even after a long period of charging, the color of the eye does not turn green. There are several reasons for this:
- the green ball is simply stuck in a narrow passage and does not fit into the right place - lightly shake the battery to move it;
- dirt from the plates, which crumble over time, prevents the indicator from showing the correct value;
- the battery has failed.
The peephole on the battery is a convenient way to check its charge level, but many car enthusiasts argue that this is a useless gimmick and you shouldn’t completely rely on its values. To accurately check the charge, it is better to measure the voltage using a load plug.
About a light bulb - not a light bulb
I wanted to write this information at the top, but it creates more intrigue. In the structure of this sensor, no light bulbs are used at all - neither ordinary incandescent (low-current) - as many people think, nor LED, nor anything else.
The structure here is different . In fact, this is an ordinary hydrometer, only built into the battery case. It automatically measures the density of the electrolyte, and at different values it pops up - one or another ball, which is projected through a magnifying glass tube and a magnifying glass into a special window. It should be noted that the balls float up as if along special grooves, which are made in the shape of a pyramid - this is important! REMEMBER!
If the battery is charged, a green ball floats up and you see it in the window. If it is discharged, then either red or nothing at all floats in, so you see blackness. But if there is no electrolyte, then the end of the pyramid seems to be exposed - you see its end in the window, many people confuse it with white.
The use of electrics in a battery would not be justified - even if the light bulb were low-voltage, it would still suck some of the energy from the battery (and in winter this is oh so unnecessary). YES, and if it burns out, the owner will start to get nervous.
Now a detailed video, maybe someone didn’t understand about the pyramid...
Is it possible to remove this indicator?
On most batteries, yes, this window can be unscrewed, similar to a cork - but it will have to be twisted with force, it can even be broken; my friends unscrewed it using pliers with thin ends, and small “holes” were made in the window for engagement. In general, it’s a “collective farm”, but theoretically it’s possible to remove it! It is also worth remembering that if you unscrew it, then the airless space inside has been violated, and it is quite possible that a gaseous composition will come out - “explosive gas” or “HHO”. Then you will need to add distilled water. So always think, do you need to disassemble the battery?
Actually, I’m finishing the article, the information is clear and to the point, I think it was useful to you, read our AUTOBLOG.
(
50 votes, average: 4.66 out of 5)
How to make a battery charge indicator using LEDs?
There are dozens of different control schemes, but they produce identical results. It is possible to assemble such a device yourself from scrap materials. The choice of circuit and components depends solely on your capabilities, imagination and the assortment of the nearest radio store.
Here is a diagram to understand how the LED battery charge indicator works. This portable model can be assembled “on your knee” in a few minutes.
– a 9V zener diode limits the voltage on the LEDs, and the differentiator itself is assembled on three resistors. This LED indicator is triggered by current in the circuit. At a voltage of 14V and above, the current is sufficient to light up all the LEDs; at a voltage of 12-13.5V, VD2 and VD3 light up, below 12V - VD1.
A more advanced option with a minimum of parts can be assembled using a budget voltage indicator - the AN6884 (KA2284) chip.
Circuit of LED battery charge level indicator on voltage comparator
The circuit operates on the principle of a comparator. VD1
– a 7.6V zener diode, it serves as a reference voltage source. R1 is a voltage divider. During the initial setup, it is set to such a position that all LEDs light up at a voltage of 14V. The voltage supplied to inputs 8 and 9 is compared through a comparator, and the result is decoded into 5 levels, lighting the corresponding LEDs.