As with any car, the generator on the VAZ 2107 injector works in parallel with the battery - these are two power sources for the car, which are used in different modes. The article discusses the generator 37.3701, the principle of operation of the generator with different characteristics, including a maximum current of 80 Amperes, and provides instructions for connecting the unit. The G222 generator set is similar, you just need to pay attention to some differences.
[Hide]
Voltage regulator
Installed on the back of the generator and secured with two screws. The regulator is a non-separable element. Regardless of the engine speed, it maintains voltage in the electrical circuit. With the engine running, the generator winding is powered by diodes installed on the rectifier unit. At this moment, no current passes through the control lamp and it does not light up. When the warning lamp is on, a generator malfunction signal is given.
Also, on the back cover, there is a capacitor installed that suppresses radio interference. The regulator also controls the charging of the battery, producing less voltage at elevated temperatures.
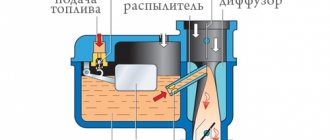
Operating principle of the unit and charge indicator lamp
The operating principle of the generator 37.3701 and G222 are identical. The generator device converts the mechanical energy that appears when the crankshaft rotates into electrical energy. The resulting electricity is needed to power the on-board network and recharge the battery. Alternating current is converted into direct current with a power of 80 Amps thanks to a rectifier unit consisting of 6 diodes.
A three-level regulator maintains the voltage at the required level. After turning on the ignition, the voltage passes through the control lamp, reaches a three-level regulator, and then goes to the excitation winding.
This process can be clearly represented in the form of a diagram:
Generator wiring diagram
In the diagram, the main parts of the on-board network are marked with the following numbers:
- Battery.
- Generator set.
- Mounting block.
- Egnition lock.
- Voltmeter for measuring voltage.
- A lamp that monitors battery charging.
Power comes from three diodes, which are located in the rectifier unit. If, after turning on the ignition, the indicator light does not go out, this means that the battery is not sufficiently charged. In this case, it is necessary to check what voltage is in the on-board network. Technical characteristics of the generator: at a voltage of 13 V, the maximum current is 55/80 Amperes (video author - Vladimir Zagrivy).
If the voltage is not normal, the reason may be:
- short circuit occurring in the network;
- battery malfunction;
- breakdowns in the three-level voltage regulator;
- malfunction of the VAZ 2107 generator set with an injector.
In this case, you need to check the degree of tension of the drive belt, the condition of the bearings, and the serviceability of the three-level regulator. In addition, it is worth checking the battery charge and expiration date. Since generators 37.3701 and G222 installed on a VAZ 2107 with an injector and carburetor do not differ much, their care is the same for both models. It is enough to ensure that moisture and dirt do not get on them.
The rotor in the VAZ 2107 generator circuit is the last of the most important elements
This is a shaft with a pressed sleeve and steel poles. Together forming a core. The excitation winding is placed in the frame on the bushing. There is a plastic bushing with slip rings on the shaft. The winding outputs are soldered to them. At the other end of the shaft there is a pulley with a fan impeller. The shaft itself rotates on bearings located in the generator covers, with the rear bearing pressed onto the shaft, and the front bearing located in the cover.
On some cars, another type of generator 9412.3701 was installed; the distinctive features of the design are the impeller located inside its body and the rectifier unit was placed outside the cover. Smaller slip rings to reduce brush wear.
The installation method and circuit diagram of the VAZ 2107 generator does not change.
When repairing a VAZ 2107 car generator, you will need this generator set diagram and a detailed current path in the field winding circuit.
1. Battery. 2, 5. Basic rectifier semiconductor diodes. 6. Generator stator winding coils. 7. Semiconductor integrated voltage regulator (charging relay). 8. Excitation winding (rotor) of the generator. 9. Noise filtering capacitor. 10. Mounting block (relays and fuses). 11. “Battery charging” indicator lamp. 12. Voltmeter (on-board voltage indicator). 13. Ignition relay (ignition switch relay). 14. Ignition switch.
Current path of the excitation winding with the ignition on and the engine not running: Terminal “+” of the battery – pink wire – terminal “30” of the generator – pink wire – contact “1” of connector “Ш10” of the mounting block – internal current-carrying tracks of the mounting block – contact “4” » connector “w1” of the mounting block – brown wire – pin “30” of the ignition relay (installed under the dashboard) – closed contacts of the ignition relay – pin “87” of the ignition relay – black and blue wire – pin “6” of connector “w1” of the mounting block – fuse “pr 10” of the mounting block – contact “1” of connector “w 4” of the mounting block – orange wire – contact “4” of the instrument panel connector (black) – conductors and conductive tracks of the instrument panel – contacts of the “battery charging” warning lamp holder - filament of the "battery charging" lamp - socket contacts - instrument panel conductive tracks - contact "2" of the instrument panel connector (white) - white-brown wire - contact "3" of the mounting block connector "w5" - internal conductive tracks of the mounting block - contact “7” connector “Ш10” of the mounting block – white-brown wire – terminal “61” of the generator – connecting bus for additional rectifier diodes – short conductor – charging relay terminal – internal semiconductor junctions of the charging relay – first brush – first contact ring of the rotor – generator excitation winding – the second contact ring of the rotor – the second brush – the “minus” contact – car body parts – the “-” terminal of the battery.
After starting the engine, a positive potential appears at the point “connecting bus of additional rectifier diodes”, current flows from it further to the brushes. The control lamp is shunted (shorted) by open additional diodes and goes out.
Read, it may come in handy: The most popular car
How to determine why the battery is not charging on a VAZ-2107
Experts recommend several effective steps to identify faults in the vehicle battery charging circuit.
First, diagnose all fuses, especially those marked “F10”. It is this safety element that is responsible for feeding the excitation winding of the generator.
Secondly, check the drive belt: if there are any breaks in it, and if it is tensioned correctly. If you have to adjust the tension of the drive belt, you should take into account an important nuance: you should not allow it to be over-tensioned. This can affect the bearings (they can deteriorate much faster than their service life is prescribed), and the battery will not be recharged.
Thirdly, pay attention to the lamp for monitoring the battery charge level. If it burns at half intensity, it means that the battery is not charging well, and the wiring is to blame. That is, the fault must be looked for in the conductive connections running from the battery to the car body. The cause of the breakdown may be oxidation of the contacts. To check this, you should:
- unscrew the nut;
- clean the contact terminal;
- clean the body surface;
- install the wire in its original place.
How to replace the charging relay?
- Important! First, as always, we turn off the ground, remove the negative wire from the battery terminal, then remove the yellow wire going from the generator to the relay, then use a Phillips screwdriver to unscrew it;
- Then we take it out together with the brushes:
- Now we need to carry out diagnostics. To do this, we test the voltage on the brushes with a voltmeter, and we power the relay itself from the battery, “simulating” the rectified current of the generator. At the same time, we apply (+) to terminal “B”, to the yellow wire, and connect (-) to the other terminal, “ground”. We are familiar with the signs of trouble. If you don’t have a tester, you can take a 1-3 W, 12 V light bulb.
- When installing a new relay, you need to press it firmly during installation, since new, unworn brushes provide more resistance.
If after taking these measures there is no effect, you need to look for the cause in the generator, we’ll talk about this next time. At the same time, remember that if you are removing a generator, then either you have decent knowledge in electrical engineering, or you have someone to give it to. There is no third option, especially if you have an injector.
In conclusion, let me tell you about several other reasons for the lack of charging or imitation, and also give advice:
- If you have a VAZ 2107 injector, then it is strictly not recommended to reset the battery terminal for various “checks” while the engine is running, and especially to allow strangers near the hood for this purpose. This is very harmful to electronic “brains”.
- It is advisable for those who like to “light up” to be able to say a firm “no” if you have a VAZ 2107 injector.
- On the instrument panel, the connectors are not soldered to the board, but riveted. Therefore, in some cars in the cold, while the interior is cold, there is no contact with the charging lamp. It lights up, simulating a lack of current from the generator. After the interior has warmed up, contact is restored and the lamp goes out.
- The next reason for those who like to go to the car wash in the cold. When water gets into the relay and brush assembly and freezes there, there is no charging. The solution is to heat it with any powerful hairdryer.
The weekend is here, and of course it's time for the garage again. This article will be about arousal. No, no jokes about Viagra, about energizing the generator.
Yesterday I was in the store and bought a relay for the generator, because... there were problems with it (well, just some minor things for the brake system). And now, let's talk about it, about the generator.
And so let's start, the symptoms:
— The battery does not charge when the engine starts.
— The charge appears only after the gas has been adjusted to two to three thousand revolutions.
(important) — After restarting the engine, there is no charging again. — The indicator on the dashboard does not light up.
I talked to my friends, and everyone unanimously said: This is a chocolate bar, change it! (generator relay)
By the way, yes, for information, for some reason I have a generator from a VAZ 2112, with a pulley from a seven. Apparently there was a need.
But I have already learned from bitter experience with the braking system that everything is not so simple in this miracle machine.
And so, I read all sorts of articles on the Internet and came to the conclusion: There is no generator excitation!
(by the way, for information: the carburetor and engineer seven have different generators, heresy was written here. Here.)
And so, I will write to you the main elements of this miracle chain:
1.
"battery" light on the dashboard. The fact is that current passes through it and gets to the “excitation wire”.
2.
What would you understand, excitement is a thin wire with a terminal that clings here
3.
The charge lamp does not light up when the ignition is turned on. The charge sensor and other control devices do not work. The generator did not charge. The cause of this malfunction is that fuse F10 (10 A) has blown. If nothing has changed after replacement, look for the reasons in the ignition lock or relay (if installed).
Troubleshooting VAZ 2107 battery charging problem
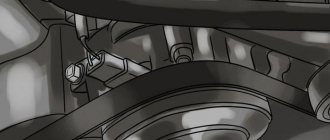
First, you should check the serviceability of the alternator belt - it is this that causes the alternator to rotate and generate current. This belt drives the coolant pump, so this malfunction also manifests itself in engine overheating.
If the charge indicator lamp does not light up, and the voltmeter shows normal voltage of the on-board network, and the battery does not charge, the reason is in the contacts at the terminals.
You should remove the wires from the battery and clean the battery terminals and wires with emery cloth. If the charge does not appear, it is necessary to measure the voltage at terminal “30” (generator output) with the engine running. If the voltage at this terminal and the battery is very different, you need to clean the contacts and ring the wire going from the generator to the battery. The faulty wire must be replaced.
If, when the engine is running, the voltage in the on-board network is within normal limits, but when a load (headlights) is connected, it drops, the reason lies in the weak tension of the alternator belt. As the load increases, the weakened belt slips. A correctly tensioned belt should bend by 12-17 mm with a force of 10 kgf. A loose belt must be tightened or replaced.
Important: if the belt is over-tensioned, excessive load occurs on the bearings of the generator and pump, which can lead to their failure.
Other reasons for the lack of charge may be a broken rectifier diode on the generator, an open or shorted rotor or stator winding.
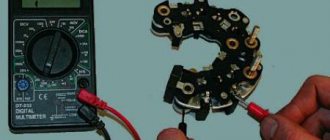
Diodes can be checked using a multimeter or a test lamp. Using a multimeter, you can check the resistance of the diodes in the direction in which they should be locked. To check with a test lamp, you must remove the “+” terminals from the battery and connect the test lamp. The wire of the test lamp must be touched in succession to the three bolts of the rectifier devices. Then perform the same operation, only disconnecting the “-” terminal. If the lamp lights up, the diode being tested is broken.
Diagram of the battery charging circuit on the VAZ-2107
The battery charging circuit diagram for the VAZ-2107 is the same as for other passenger cars. The mechanism of its action is as follows:
- The battery is connected by its “negative” terminal to the body using a copper busbar.
- The entire electrical system is connected to the positive terminal of the battery using two buses:
- the first tire goes to the starter;
- the second bus is to the generator.
- The “positive” terminal of the generator transmits voltage:
- on the fuse block;
- to the ignition switch.
- From the ignition switch, electricity is transmitted to the mounting block, which houses fuses (the one that protects this conductive circuit is marked “F10”).
- Voltage is supplied from the fuses:
- to the “Charge Level Signal” control lamp (it is intended to notify you that the battery is insufficiently charged);
- on a voltmeter, which shows digital voltage readings in a current-carrying circuit.
- The next stage in the battery charging circuit is the transfer of current to:
- fuse box;
- generator terminal 61 (brush assembly).
As you can see, a malfunction in this battery charging circuit can appear almost anywhere. For example, the contact breaks down, as a result of which the generator will stop efficiently charging the vehicle’s battery.
Completion
The most typical and common breakdowns were presented. For correct diagnosis in serious cases, special stands are needed, which are present in many workshops. It should be noted that sometimes the cost of such repairs can be equal to or even exceed the price of a new generator. Therefore, repair is not always the answer.
From the text it becomes clear that there are no significant differences between the injection VAZ 2107 and the earlier carburetor version. The same applies to the modification of the VAZ 21074 and all others.
Generator manufacturers claim that the generator is designed for 200-250 thousand kilometers. After passing the barrier of 100-150 thousand, it is necessary to conduct a thorough inspection and lubricate all mechanical connections.
What should you pay attention to?
To carry out repairs, you need to have a general understanding of electricity and its properties. If with mechanical breakdowns everything is much simpler and often a visual inspection is enough to detect a part that needs replacement, then with electrical faults there is no such clear visualization. Moreover, the initial cause of generator breakdowns may be a malfunction of another component of the VAZ 21074, for example, the same battery. And vice versa. Very often a chain reaction is detected, with damage to several nodes.
In such cases, it is important to discover the cause before taking action. Otherwise, there is no guarantee that after replacing one or another element everything will not happen again.
As mentioned earlier, you cannot check the operation of the generator on the VAZ 21074 using the old method of tilting the terminals. Don't forget about the injector and ECU.
Cars manufactured in 1996 and later (carburetor engines)
The connection diagram for the G222 generator on a VAZ-2107 after 1996 differs from the previous one in one small feature - the power supply to the excitation winding has been changed. Cars have been improved, and some improvements make it possible to kill two birds with one stone - simplify the design and make the fate of the driver easier.
After 1996, instead of a warning lamp, they began to install a voltmeter, which more or less accurately shows the battery charge level. And if the lamp allows you to monitor only the presence or absence of voltage on the generator, then using a voltmeter the driver visually assesses the level. And if necessary, it can understand that repairs or maintenance are necessary.