Selection of detergent composition
The aggressive components of most products can damage the surface of the headlight and the reflector. When choosing, it is important to pay attention to the composition, as you can purchase a low-quality product without a degreaser.
Distilled water does not leave streaks on the surface of transparent plastic and reflector, but is not able to wash away stagnant dust or haze from burning lamps.
An excellent detergent is regular toothpaste diluted in purified water. However, such a liquid requires careful rinsing, otherwise the plastic will become covered with a white coating.
How to wash internal headlight parts:
- soap composition;
- dishwashing liquid;
- shower gel.
Cosmetic micellar water to remove makeup will also help to wash the headlight from the inside. When choosing, you should pay attention to the absence of alcohol, which can easily wash off the coating and render the optics unusable.
Reasons for reflector damage
First of all, damage to the mirror layer occurs due to physical wear of the reflector. Its service life is not infinite. Even if you take good care of your car, it is impossible to avoid temperature changes in winter. Therefore, the possibility of encountering this problem cannot be excluded. Often the cause of damage to the reflector is a leak in the seal. Small particles of dust and moisture get inside, which lead to loss of shine of the reflector. As a result, the quality of the light flux gradually decreases. Loss of reflective properties can also be caused by installing non-standard lamps of higher wattage. The temperature inside the headlight reaches a critical value, after which a burnt-out spot forms on the surface of the reflector. Whatever the reason, the reflector must either be replaced or restored. The cost of restoring one reflector in a car repair shop is at least 1 thousand rubles, which is not acceptable for every car enthusiast. Therefore, we suggest considering several simple ways to restore a headlight reflector with your own hands.
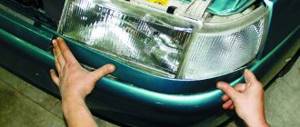
Removing the headlight
To clean the reflector, plastic and auxiliary parts from the inside, you will need to remove the headlights from the car.
To remove the optics, on some models you will need to remove the bumper. To do this you need:
- Turn out the wheels and remove the fender liner clips that are attached to the edge of the bumper.
- Remove the radiator grille.
- Unscrew the screws and remove the clips that hold the bumper.
- Carefully remove the part without damaging the headlight glass or lens.
Self-recovery methods
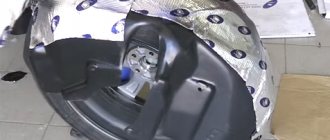
To get to the reflector, the headlight removed from the car must be disassembled. The first option involves repeatedly passing the hot air of a hair dryer over the seam. The second option involves leaving the headlight in an oven preheated to 100°C for 20 minutes. After opening, all parts are cleaned of sealant residues, washed without using alcohol-containing liquids and dried.
The sealant holding the headlight components together begins to deteriorate when exposed to temperatures above 75°C.
Using metallic tape
Let's start with how to restore the reflector on a headlight using tape foil. All you need is metallized tape, purchased at a hardware store for about 30 rubles. Its adhesive base copes well with high and low temperatures, and the aluminum film is very wear-resistant. In order to obtain a smooth surface with a minimum of seams after gluing the tape on the reflector, first, pieces of the most suitable shape are formed from several strips. Then remove the protective film and carefully stick it on. The whole procedure takes about half an hour.
Immediately before gluing, the surface must be degreased.
Advantages of the method: durability, low cost, ease of implementation.
Disadvantages: when gluing, irregularities and seams remain, which impair the properties of the reflector.
Using metal foil
Aluminum foil is highly reflective, which allows it to be used in the restoration of headlight reflectors. You will also need some epoxy resin. To maintain a perfectly smooth surface of the foil, the entire pattern is made from plain paper. Then the parts are duplicated from aluminum sheet, a thin layer of resin is applied to the reflector and glued, removing excess resin. Advantages: withstands any temperature changes.
Disadvantages: being between the metal foil and the plastic base, epoxy glue lacks air and takes a very long time to dry. It is almost impossible to remove dried glue. Therefore, such a reflector is not suitable for repeated restoration. With the advent of tape foil, this method is practically not used.
Using chrome paint
Headlight reflector repair using chrome paint is the most popular. No need to cut and glue anything. Paint is sprayed onto the degreased surface of the reflector from a can of white chrome until a uniform, uniform layer is obtained. After painting, the headlight is dried according to the instructions on the can. Benefits: Provides a smooth surface. You can even spray paint onto metal tape, thus increasing the reflective effect.
Disadvantages: does not tolerate high temperatures. You should try to find heat-resistant chrome paint.
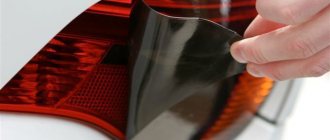
Using mirror film
No less effective is the restoration of the reflector by applying a metallized self-adhesive film of the Oracal brand. Films from the Oracal 351 and Oracal 352 series can withstand temperature changes from -40 to +120°C and, according to the manufacturer, can be used outdoors for two years without deterioration in performance. Since the headlight is a hermetically sealed space, the service life of the self-adhesive film increases.
The film in the color “Gloss Chrome” has the best reflective properties.
It is necessary to make templates from paper or ordinary tape that exactly replicate the shape of the reflector. Then cut out the polyester film of a similar shape. Using a hairdryer, glue it onto the prepared surface of the reflector, smoothing it out and preventing the appearance of bubbles. The joints and edges can be additionally treated with chrome paint.
Advantages: reliable manufacturer, excellent reflective effect.
Disadvantages: the price of 1 m2 starts from $5.
As you can see, restoring headlight reflectors is a simple procedure and quite feasible in a garage. Considering the fact that auto repair shops charge an order of magnitude more money for similar work, it always makes sense to try to return the headlight to its previous brightness with your own hands using one of the proposed methods.
The most affordable ways to restore headlight reflectors with your own hands
Using foil to repair headlight reflectors
This method involves gluing foil to the inner surface of the reflector. Before work, it is advisable to make paper templates that copy the surface. To avoid wrinkles later, it is better to make several templates for different areas, dividing the surface into parts. The most convenient way seems to be gluing the foil onto epoxy glue applied to the surface immediately before repair. It is advisable to heat the resin by placing the container with it in hot water - this will later make it easier to smooth out the foil with a plastic spatula.
How to paint - applying heat-resistant chrome paint to headlight reflectors
Restoring headlight reflectors using foil
If you carry out such repairs carefully, you can achieve a completely acceptable result. But first, it is necessary to mat the surface of the reflector with sandpaper. But this is not always possible to do - it all depends on the hardness of the factory coating, sometimes the material “does not lend itself” to abrasive. But if everything is different, then the sequence of work is as follows:
- mat the surface with P320 paper;
- primer. Moreover, it is better to do this in two layers. After drying, the first layer is sanded again with P320 - P400 paper, and the last layer with P800-P1000 paper;
- It would be ideal to then paint the headlight reflector black and sand it with P3000 sandpaper before chrome plating. The fact is that any paint is not completely opaque. The black surface will absorb rays that penetrate through the paint layer, thereby helping to prevent unnecessary glare, which favors the formation of the “correct” light beam. The use of sandpaper “coarser” than P3000 will have an adverse effect on the reflector - after drying, the paint will have a surface with a lot of microscopic irregularities that scatter light;
- Apply several layers of chrome paint. The drying time and temperature must be maintained as specified by the manufacturer - this is very important to achieve a positive result!
To restore the coating, we first clean it, then sand it, then apply chrome.
After painting with chrome, until the last layer has dried, you can coat the painted surface of the headlight reflectors with a compatible varnish, preferably from the same company. The varnish will create a protective coating, preventing moisture from penetrating the paint layer.
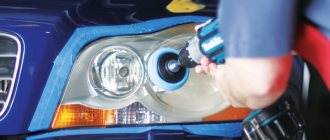
The process of removing dirt from the inside
Cleaning the inside of a headlight does not take much time, but it does require diligence and skill. Before starting work, you need to remove the lamps, unscrew the ignition unit and prepare the necessary tools. Immediately before the operation to remove dirt from the inside, we prepare cleansing baths.
Cleaning the reflector and plastic from the inside:
- Carefully pour liquid into the reflector through the lamp hole.
- Seal all holes with tape.
- Remove dirt with gentle shaking and circular movements.
- Drain the composition.
- Next, you need to pour a portion of fresh cleaning fluid into the headlights and continue shaking.
- Dust and minor contaminants will be removed from the surface of the reflector after 3-4 passes with water changes.
If plaque remains on the inside of the plastic, then you need to use the following method:
- Take two magnets.
- Tie a fishing line to one of them.
- Wrap the tools in a soft cloth.
- Place the magnet with fishing line into the headlight.
- Place the second tool on the front side of the plastic mask.
Once the magnets are firmly attached, you can begin cleaning the inside of the transparent mask using circular movements. This method helps get rid of more serious contaminants. To improve the effect, add a little cleaning compound inside the headlight.
The next step, after all operations from the inside of the optics, is to thoroughly rinse all parts with distilled water. This is an important and responsible moment in car care. A headlight that is poorly cleaned from the solution will fog up and become covered with a white film on the inside.
After complete rinsing, you need to thoroughly dry the optics. To do this you need to follow the steps:
- Wipe the headlight outside and inside with a clean cloth.
- Turn on the hair dryer and heat the optics evenly.
- If drops of water leak out, wipe them dry with a cloth.
- Check the optics for dryness using gentle shaking.
- If water appears, continue drying with a hairdryer.
- Leave the part alone for a couple of hours.
Installation of the removed parts is carried out in the reverse order.
When performing work, you should follow safety precautions and use gloves.
Large contaminants cannot be washed off without disassembling the modules and peeling off the plastic cover. However, a simple procedure without disassembly will significantly improve the appearance of the car and maintain a dense flow of light.
Restoring headlight reflectors is quite a technically complex task if you want to achieve a complete restoration of the mirror coating. Below we will list several ways in which you can update your headlight reflectors with your own hands, and you will choose which one is most suitable for you. We will briefly consider the most effective options at the end, but a detailed description of them would require a sufficient amount of space, and their use is not always justified at home, since it requires the manufacture of special equipment. If your plans do not include professional training, then purchasing or manufacturing equipment will lead to the fact that, as they say, “the game won’t be worth the candle.”
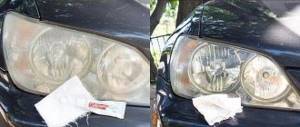
Washing headlight reflectors with a special solution
Dimmed or dirty headlight reflectors can be washed or cleaned. Solvents cannot be used for this; it is best to use a special degreaser based on isopropyl alcohol. After the headlight reflector has dried, you can wipe it, removing stains, with a special lint-free cloth. Such napkins are sold in paint shops that sell materials for body repairs. It is unacceptable to use rough cloths to wipe headlight reflectors.
Dimmed or dirty headlight reflectors can be washed or cleaned with a special degreaser.
But usually, washing cannot restore the reflective ability of the reflector, since as a result of temperature changes and exposure to moisture, its coating undergoes irreversible changes. In addition, often the “mirror” begins to become covered with cracks or fall off. Therefore, the most effective measures are either replacing the headlight reflectors or attempting to restore their mirror coating.
How to clean the inside of a headlight without disassembling it
Cleaning your headlights will be much easier if you can remove the glass and take them apart piece by piece. Unfortunately, many modern car models are equipped with non-removable lenses. But even they require cleaning from time to time.
Over the years of operation, an impressive layer of dust and dirt accumulates on the optical elements. This negatively affects the quality of lighting: the headlights become dimmer and more diffuse.
Video: why you need to wash your headlights from the inside
Glass cleaning
Even if you don’t want to completely disassemble the headlights, you still have to remove them from the car. This process will be different for different cars: in some cases you need to remove the radiator grille, in others you need to remove the bumper. Most likely, you yourself know how to properly remove headlights from your car, but if not, take a look at the owner’s manual.
- After you remove the headlight, you need to remove all the low and high beam lamps, turn signals, and dimensions from it.
- Pour a large amount of your chosen cleaning agent into the holes.
- Now you need to temporarily seal the holes with adhesive tape and shake it properly. Usually after these manipulations, the liquid acquires a dirty yellow color. This means that you didn’t start cleaning in vain.
- Open the holes and drain the water.
- Repeat steps 2 and 3 until the water runs clear.
- If you poured soapy water into the headlight, rinse it with clean distilled water at the end.
- Use a household hairdryer to dry the inside of the headlight. Do not set the temperature too high to avoid damaging the optics. You must get rid of all the small droplets.
- Make sure the inside of the headlight is completely dry and reinsert the bulbs.
When working with halogen and xenon lamps, do not touch the bulb itself! Due to the high internal temperature, traces of oil from your fingers will remain on it, even if your hands are perfectly clean. This will significantly reduce its service life. Try to hold the lamps only by the base. If this is not possible, wear medical gloves.
There is another unusual way to clean glass from the inside. It is not suitable for serious stains, but it can help if you need to quickly remove a small stain.
You will need two small magnets, which you need to wrap in a soft cloth. Lightly moisten the fabric of one of the magnets in the cleaning agent, secure it to the fishing line and place it in the headlight housing through the hole for the lamp. Using the second magnet, control the internal one and clean the glass in the right places. When you are satisfied with the result, simply pull the line and remove the magnet from the housing.
Video: cleaning the headlight from the inside using magnets
Cleaning the reflector
The reflector inside the headlight collects the light from the lamp into a single beam. Constant exposure to a light source may cause it to become cloudy. If you notice that the light has become dimmer and more diffuse, the problem may be caused by the reflector.
To clean this part from the inside without completely disassembling the headlight, use the following method.
- Remove the car headlight.
- Remove the low and high beam lamps.
- Take a strong piece of wire about 15 cm long and wrap it halfway with electrical tape or tape.
- Place a soft, lint-free cloth over the electrical tape.
- Lightly dampen the cloth with glass cleaner.
- Bend the wire so that it can reach the reflector through the lamp hole.
- Use a cloth to gently clean the reflector. Do not make sudden movements or use force! If handled incorrectly, the protective layer on the part may peel off.
- If after finishing work there are still drops of moisture on the reflector, dry them with a regular hairdryer.
- Replace the lamps and install the headlight on the car
Never use alcohol to clean the reflector! Under its influence, the reflector will delaminate, and you will have to purchase a new optical system.
Restoring headlight reflectors using vacuum coating
Headlight reflectors before and after pneumatic spraying
This method allows you to achieve, and it will not be inferior to the factory one. It consists of depositing metal particles in a vacuum chamber. A vacuum is needed to prevent the oxidation of microparticles of the metal evaporated by heating.
It is not always possible to create the necessary conditions for restoring a headlight reflector in a vacuum chamber.
The difficulty lies in creating a vacuum chamber equipped with an observation window to monitor the process. Craftsmen use glass containers for this purpose. In addition to the camera itself, you will also need a vacuum pump. No less difficult is how to ensure heating of the metal. The most acceptable, although unsafe, is to use a magnetron from a microwave oven (“microwave”) for this purpose. But those car enthusiasts who have managed to solve these problems are very pleased with the results - the coating of the headlight reflectors is almost as good as the original one from the very first attempts.
Cleaning the inside of headlights is no less important than washing them outside. During the operation of the car, not only the body and interior become dirty. High-quality cleaning of lighting fixtures is also required. Not only comfort, but also traffic safety depends on how carefully the driver takes care of the headlights. It is impossible to carry out all the manipulations without a set of tools that allow you to remove dirt from the inner surface of the lenses without disassembling the optical device.
Cleaning the inside of headlights is carried out with special detergents and chemical compounds, but most experienced drivers recommend avoiding the use of expensive solutions.
Qualified technicians and car owners with many years of driving experience advise cleaning headlights using:
- liquid soap;
- dishwashing detergent (this could be, for example, Fairy);
- a mixture of washing powder, hydrogen peroxide, table vinegar and baking soda. You need to mix 1 liter of warm water and 30 ml of peroxide, add a tablespoon of vinegar, a pinch of soda and the same amount of washing powder.
Micellar water is highly effective in removing contaminants from the inner surface of car headlights. It contains no alcohol and helps get rid of even the most stubborn stains without the use of additional products.
All mixtures and compositions do not have a negative destructive effect on the deposition of reflectors and do not lead to failure of the optical structure.
Detergents used in everyday life are available and relatively inexpensive. They can be purchased in many stores - not only specialized ones, but also in regular hypermarkets or retail establishments that sell cosmetic products. The price of these products makes them accessible to all car enthusiasts, and the results from their use exceed all expectations.
Dust and dirt can settle on the inner surface of the headlights if the seal of the housing is broken or if the vehicle owner does not secure them tightly after cleaning the lenses again. These unpleasant consequences can be avoided if car headlights are cleaned from the inside without disassembling the structure.
It is not necessary to disassemble the headlights, but you will have to dismantle the optical device.
Removing and cleaning headlights is done using:
- Screwdriver set.
- A hair dryer or a powerful hair dryer for drying and styling hair.
- Small size magnets.
- Wires.
- Insulating tape.
- Microfiber.
To remove dust and dirt accumulated in the headlights, you will need to purchase a special detergent, and you can wash it off using distilled water. After cleaning and washing, the inner surface of the headlights must be thoroughly dried. For this purpose, it is allowed to use a household hair dryer.
Do not try to replace distilled or twice-boiled water with alcohol. This will cause damage to the coating and failure of the reflectors.
The start of work depends on the characteristics of the car brand. In one case, it is enough to remove the radiator grille, and in the other, you will have to dismantle the bumper. After the headlights are removed, it is necessary to remove the plug from their rear side and disconnect the connected wires. At this stage, you will need to use insulating tape to cover the exposed ends of the wires. Now you can proceed directly to cleaning the inner surface of the walls of the lighting fixture.