Each car owner has a good idea of what his iron friend suffers during operation from the influence of the environment. When driving on roads, the body and its paintwork are especially vulnerable. Over time, chips of paint form, scratches on the body, and corrosion develops. How to protect your car or the most vulnerable body parts?
There has been armored film on cars on the market for many years now, it is also called protective or anti-gravel. It protects the entire car body or separately those places and elements that are most exposed.
Many car repair shops perform body wrapping work. Due to the simplicity of the gluing process and the relatively low cost of the material, you can carry out this operation yourself.
What kind of protective film is used and for what purposes?
Protective film is an artificial coating that protects the car body and its elements from damage. This is its main function. Additional – body styling*.
There are two types of films:
- Vinyl.
- Polyurethane.
Vinyl film was the first to be used for protection. In its physical and chemical composition, it most closely resembles plastic. It stretches when heated and when cooled turns into a hard plastic. Initially used to protect street advertising boards and billboards.
Polyurethane film has a different structure - it is soft, stretches at any temperature and returns to its original size. A synthetic polymer has properties similar to rubber. Acts as a damper*. It was developed in the USA for the needs of the Air Force, in particular, to protect helicopter blades from sand.
Essentially, both perform the same function - protecting the car body. The only difference is that vinyl protects due to its thickness, and polyurethane due to its physical properties, similar to rubber.
*styling - changing the appearance of a car... *damper - something that has a calming, softening effect...
Adhesive vinyl film to car
Now let's take a step-by-step look at how to apply a vinyl sticker on a car yourself:
- First we do the fitting. Without removing the backing, we try the vinyl on the surface on which we plan to glue it. Using construction tape, we put all the necessary marks on the car. We take measurements of the material and carry out cutting. It should be remembered that uneven and difficult areas will require more material.
Trying on vinyl film for pasting - Lay out the vinyl on a flat surface and carefully remove the backing. Care should be taken to ensure that no debris gets on the surface of the sticker and that wrinkles do not form there. It is best to resort to the services of an assistant - this will greatly simplify the work.
- If you are a beginner and are not entirely sure that the sticker will be done correctly the first time, you are better off using the “wet” method. Using a spray bottle, moisten the adhesive surface with a soap solution and apply it to the place of fixation. This method allows you to adjust the position of the film during operation. If you are sure that everything will work out right away, you can use the “dry” method - in this case, the surface of the sticker is not wetted.
- Place the vinyl on the surface to be glued and smooth it, pressing it with a rubber squeegee. At the same time, we warm up and dry the film with a hair dryer. An ordinary household hair dryer will not work - it will not provide the required temperature. Gluing is carried out from the center to the edges. We expel air bubbles and moisture if we are talking about the “wet” method. We make sure that the heating is carried out as evenly as possible.
Smoothing the surface - At bends and corners, the material will have to be stretched more strongly, so we pay special attention to the heating.
- After all the air has been removed from under the film, dry the surface with a hairdryer and leave for half an hour.
- Next we process it with a felt squeegee, removing small air bubbles and carefully smoothing it out. We heat the bends with a hairdryer, cut off the excess film with a construction knife and treat the edges and joints with sealant.
Final adjustment - We give it about 12 hours to dry and we can consider our task completed - the car is ready for use. It is not recommended to wash your car for 7 days.
Advantages and disadvantages
When there are two or more materials for any type of work, it is always difficult to give preference to one of them. To make it easier to make a decision in our case, we can compare the positive and negative properties of both types.
Vinyl film
Advantages:
- the coating protects the car body from damage caused by dirt, fine gravel, branches and sand;
- practically invisible on the body;
- minor defects are not visible on the body;
- protects the paintwork from ultraviolet radiation;
- variety of color;
- affordable price.
Flaws:
- short service life, instead of the stated 3-5 years, only 2-3 years;
- with strong impacts with large gravel, chips and cracks appear;
- Difficulties in dismantling when the coating has been used for more than two years, the glue and film harden, removing it can lead to peeling of the paint;
- fades under the influence of the sun, reacts negatively to reagents;
- a shagreen effect is possible.
It is 100 microns (0.1 mm) thick and transparent in appearance.
Polyurethane film
Advantages:
- durable, resistant to large chips and deep scratches;
- protects the paintwork from damage caused by gravel and pebbles;
- does not undergo deformation at high and low temperatures;
- does not tear, is resistant to damage even in minor accidents;
- service life from 5 to 10 years;
- can be polished;
- protection from reagents;
- There are no difficulties during dismantling; after removal it leaves no traces.
Flaws:
- high price, five times more expensive than vinyl;
- after gluing to the body, long-term drying;
- no protection against ultraviolet radiation.
Film thickness ranges from 150 to 300 microns. There is a positive side to the fact that polyurethane allows ultraviolet light to pass through. The partially coated car body will burn out evenly, and after removing it the color will be the same.
You can remove the polyurethane coating yourself, but it is better to remove the vinyl coating in a specialized workshop, otherwise there is a risk of damaging the surface of the body.
Carbon film
Let's delve into some technical features of the varieties of carbon film. There are six types of textures and coatings of this vinyl in the world.
1) 3D carbon texture, classic large cells, manufacturer, 3M company. Color palette: black, white, blue, orange, brown, red. Produced only in matte finish.
2) The texture of 4d carbon fiber, small cells, differs from the previous material in the more natural appearance of the squares and glossy finish. Manufacturer: TeckWrap. Color palette: black, white.
3) 2D carbon fiber texture, cells are printed on vinyl and laminated with a transparent glossy film. Such material has practically not been used since its release into mass sales. The manufacturer didn't even bother to come up with a name for his company. Country of origin: China. Available only in black.
4) 3d carbon film with small cells and a glossy finish. Manufacturer: Oracal. Color palette: black, white, red, blue, yellow, graphite, orange.
5)3d Carbon film with chrome effect. Produced by Hexis. High-quality film, available in two colors: chrome and gold.
6) 3d Carbon on transparent vinyl. Allows you to apply paintwork to new or in good condition cars while retaining the original color of the car, with the addition of carbon fiber texture.
What areas are usually protected with film?
It is best to cover the entire surface of the body. But, based on the cost, especially of polyurethane film, you can paste over the part of the body and its elements that are most exposed to sand, stones, branches, etc.
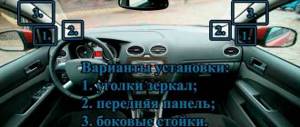
The optimal installation of protection is the front of the car:
- bumper;
- the leading edge of the hood or the entire hood;
- front wings;
- exterior mirror housings;
- leading edge of roof;
- thresholds, doors in the lower part;
- around door handles.
To this you can add the wrapping of the rear bumper, which is at risk when reversing or in heavy traffic.
An approximate partial body wrap of a Toyota Land Cruiser is shown in the photo:
Do-it-yourself car bumper wrapping
Technically, car bumper wrapping can be done at home. But you need to have at least some special skills. You not only need to know how to properly stick the film on a car bumper, but also be able to work with this material and a technical hair dryer. You shouldn't rush either. In a workshop, gluing takes an average of 2-3 hours; an inexperienced person will have to tinker much longer.
It is recommended to work indoors; the body and air temperatures should be approximately the same. If at this time the frost outside is below -15 °C or the heat is above +30 °C, it is advisable not to drive the car out of the garage for several hours. Then the film must be given time to shrink - up to 10 days. To prevent the coating from deteriorating, during this period it is better not to go to a car wash and operate the car in a gentle manner.
Is it possible to cover headlights with film?
Headlight armoring is an effective means of keeping your vehicle's lighting glass in excellent condition longer. Everything is very simple: sand and pebbles flying towards the car while driving will scratch the coating, not the glass. The film can always be replaced.
From the point of view of the legislation of the Russian Federation, there was a debate - whether it is possible to paste it over or not. The dispute arose due to a discrepancy in the interpretation of Article 12.4, the Code of Administrative Offenses of the Russian Federation, the Technical Regulations on the Safety of Wheeled Vehicles, a number of GOSTs and the List of faults and conditions under which the operation of vehicles is prohibited.
Fortunately, lawyers, through judicial practice, have sorted out this issue and proved that sticking a protective film on the headlights does not change the operating mode of the device. Therefore, protecting headlights is not prohibited by Russian legislation, but the lighting devices must shine white light.
How to properly apply film to a car bumper
The main thing when performing all work is slowness and attentiveness. It is easier to apply protective film to the rear bumper of a car, since the front one usually has a more complex configuration.
Vinyl film on car bumper
Tools you will need:
- sharp stationery knife (or scissors);
- technical hair dryer;
- soft spatula or special squeegee;
- tape (for fixing the film during “trying on” and pasting);
- soft lint-free cloth.
Now let’s talk about how to stick the film on a car bumper.
They do this in two ways:
- dry;
- wet.
In the first case, errors are very undesirable, since it is almost impossible to change the position of the material that is incorrectly glued to the body. In the second case, the coating can be moved, but it is difficult to get rid of the bubbles that appear.
Before pasting, a piece is cut out of the film in the shape of a bumper with allowances. The excess can then be carefully trimmed or folded.
If the film is fixed on a car bumper using a dry method, the protective layer is gradually removed from the adhesive side. Experienced craftsmen suggest doing this by securing the non-working edges with tape.
Operating procedure:
- An incision is made in the middle of the material, then it is applied to the prepared surface of the bumper and, removing the protective layer, it is lightly pulled to the edge.
- The coating is pressed against the bumper with a squeegee, making sure that there are no waves or bubbles. The same applies to the other side of the body.
- From time to time, heat the coating with a technical hair dryer to activate the glue.
- The most difficult places are notches and curves. Here it makes more sense to smooth the film and press it with your thumb.
- At the end of the work, you need to run a hairdryer along the edges so that they are securely fixed.
When applying wet pasting, the procedure is similar, only the surface of the bumper is first evenly sprayed with a soap solution (baby shampoo, dish detergent, or regular soap will also work). Wait until the surface dries a little.
Film on the bumper of a Renault Arkana car
Next steps:
Which is better, painting the body or wrapping it?
There is no clear answer to this question. Each type has its own advantages and disadvantages. Let's look at some of them.
Car body wrapping
- In terms of time, pasting is faster than painting.
- The cost of pasting is less than painting.
- The emission of harmful substances during pasting is less than during painting.
- The film preserves the paintwork.
- It is impossible to cover everything; some body shapes are easier to paint.
Car body painting
- Painting is more expensive.
- It takes more time to paint.
- High-quality painting requires specialists; it’s difficult to do it yourself.
- The paint weighs more than the film.
- Possibility of repeated polishing.
- Any part of the body can be painted.
You can accept one of the options, but if the car is new, it is better to cover it with film. If the car is used, treat its body and paint it. The decision is up to the owner.
What do we need
To wrap a car with carbon film, the following materials and tools are required:
- Primer 94 adhesive, which enhances film adhesion;
- Felt or plastic squeegee;
- Industrial hair dryer (you can use a regular hair dryer, but in this case the process will take longer and there is no guarantee that the film will last long);
- Scissors;
- A spray bottle with a soap solution, which can be made by mixing water and detergent;
- Stationery knife;
- Alcohol or white alcohol;
- Masking tape;
- Lint-free napkin.
Methods for gluing vinyl
As for how to properly stick vinyl film, it directly depends on the chosen method of applying the film - wet and dry.
multicolored vinyl
The first option is simpler. To do this, you should follow several sequential steps:
- clean and completely degrease the required surface and measure out the required amount of film;
- Next, you need to apply the prepared soap solution to the surface and to the inside of the film, having previously separated it from the paper;
- Next, you should carefully apply the film to the surface and, using a spatula, remove any remaining water from under the film;
- Next, the surface should be dried with a hairdryer and smoothed again using a squeegee.
- The edges must be lubricated with primer, wait until it dries, after which you should fold the film heated with a hairdryer under the edges towards the primer.
- Use a sharp knife to remove unnecessary parts of the film, and the car itself is left in a warm place for 12-24 hours.
You can stick vinyl on a car with your own hands using the dry method. This option is more effective, however, and more labor-intensive and time-consuming. To apply dry vinyl, you will need to do the following:
- prepare in advance a dry room with a temperature of at least 22 degrees;
- thoroughly wash and clean the car so that there are no traces of rust, deep scratches, etc. on its surface, and also degrease the surface using white spirit or another similar substance;
- prepare in advance a sharp knife, a powerful hair dryer, preferably construction soap, soap solution, magnets or tape;
- first you need to cut the required amount of film, separate the paper part from it and carefully fix the film on the surface;
- Using a squeegee, it is necessary to smooth the lash from the center to the edges, avoiding the formation of wrinkles on the surface. If there are errors in the work, the film should be peeled off and repeated all over again;
- Using a hairdryer, you need to evenly heat the surface of the film, avoiding overheating, and then smooth the surface again using a squeegee. You should not heat the film too much, it may simply melt and all the work will be in vain;
- process the edges using a primer, as when gluing in the previous way;
- After finishing the work, unnecessary parts of the film are carefully removed with a sharp knife, and the car remains indoors for 4-6 hours.
Important: after applying vinyl, the car should not be washed using rags and brushes for 2-5 days, and in a car wash for 7-10 days.
As for how to glue vinyl to a car, regardless of the method chosen, you should adhere to certain safety measures:
- since the process involves the use of chemically active substances, all work should be carried out only in well-ventilated areas;
- the room in which the work will be carried out must be dry and clean, but if the work is carried out in the fresh air, then this can only be done in calm weather, so that various debris does not get under the film;
- It is not advisable to apply gluing during rainfall; there is a high chance that the film will simply peel off.
The service life of the film depends on many factors: the quality of the material itself, proper care, etc. On average, taking into account our climate zone, the material can last 2-5 years or even more.
Pasting a car with vinyl is a real art that requires creativity, certain knowledge and skills, the necessary tools and materials, as well as patience . The process is quite labor-intensive, but quality work done will please not only the eye, but also the self-esteem.