Torpedo device
What is a torpedo? In short, this is the dashboard. The word “torpedo” came to us from the West and has now become firmly established in the everyday life of domestic car enthusiasts.
Dashboard of a VAZ 2115 car
The instrument panels on the VAZ 2113, 2114 and 2115 are almost the same. These are complex collapsible structures made of metal with plastic inserts. In addition, in the panels of this line of VAZ models, engineers actively used polymer film, which covers most of the controls.
Diagram of the main elements of the VAZ 2115 dashboard
Is it allowed to install a dashboard on a VAZ 2115 from another car?
In short, no. The dashboard on the VAZ 2115, 2114 and 2113 has a number of design features that are not found on other cars. Its cross members, mounting brackets and console sides are too long. There is nothing like this even on other VAZ models, not to mention foreign cars. But it should be noted that car owners often practice reverse replacement. In particular, a dashboard from a VAZ 2114 can be successfully installed on a VAZ 2109. But in this case, you have to trim the sides of the console and drill new mounting holes on the brackets.
Important points regarding replacement
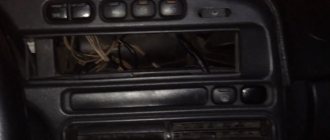
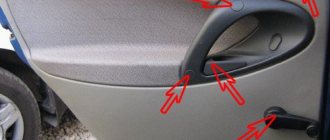
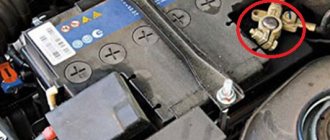
- When removing the right side of the console, be careful. Behind it are wires that can easily get caught on the side and be damaged. So before removing this cover, you should remove the negative terminal from the battery. You should also turn off the car radio by removing its connector from the common wiring harness located behind the upper instrument panel;
- Removing the plastic handles from the stove levers can cause serious difficulties. The fact is that there are protrusions on the stove levers (top and bottom), and holes on the handles. When you put the handle on, it snaps onto the lever. The only way to remove it is to pry it off with a flat screwdriver as shown in the picture. But when prying up the handle with a screwdriver, you should not bend it too much: the plastic breaks very easily;
The handles on the levers of the VAZ 2115 stove can be removed using a flat screwdriver - The fan handle can be attached in a similar way: two eyes that snap onto two protrusions of the lever. In this case, the car owner will also have to use a screwdriver. But this fan handle fastening system is used only on VAZ 2115 and 2114 produced after 2000. On earlier models, this handle can be easily removed by hand.
So, a novice car enthusiast is quite capable of removing the dashboard from a VAZ 2115 and other cars in this line. All that is required is patience and attentiveness. If, after unscrewing all the fasteners, the dashboard stubbornly refuses to come off, you should inspect everything again: it is quite possible that some tiny screw was missed.
How to remove a panel on a VAZ 2114
Greetings to all!
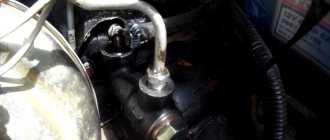
And so, this misfortune came to me, the stove faucet began to leak. I installed a new one, “Java”, but alas, it didn’t last long, and after about a year, the antifreeze began to disappear again... and under the passenger’s carpet it became treacherously wet, I drive like a pensioner, which means the antifreeze comes out of the faucet , which was confirmed by inspection.
After monitoring the network, I came to the decision that I needed to remove it and install fittings. However, this meant changing the heat balance in the car, and I didn’t want even more heat in the summer. Therefore, the following preliminary actions were taken:
a) The cable leading to the faucet was removed so that the faucet was always in the open position, which would allow us to find out how the stove will cope with the flow of cool air, whether it will heat up from the radiator, and to find out if you are lucky and stops leaking.
b) Monitoring prices for fittings and alternative solutions to the problem.
c) Monitoring prices for other related components.
The result of all these activities was a plan of successive steps and an understanding of the results obtained:
a.1) No overheating was detected, the damper works well and completely blocks the hot air. Plus, the thermal tape on the spider has so far shown itself to be at the same level; the temperature of the outlet air in the “COLD” position allows, if necessary, to cool down even at a fairly high outside air temperature, when for some reason it is impossible to open the windows. (Foreign odors, rain)
a.2) Alas, if you drive like a pensioner, not exceeding 3-3.5, then the antifreeze remains at the level; with high tachometer readings, the antifreeze begins to travel to the cabin.
b) No satisfactory alternatives were found. The prices for finished products also seemed unnecessarily high and the materials used aroused mistrust. After talking with a friend, he made an offer to turn out the necessary fittings, and I was provided with drawings for the work.
Finished stainless steel products
According to a friend: The car will rot, but they will live
Free passage of coolant, you can think about a Grant thermostat
c) After talking with work neighbors, noise and vibration dampening materials were purchased at a very reasonable price and professionally selected. (Will be shown in the next post)
Well, that’s all with the writing, I think I’ll stop tormenting you)
While the work has just begun, so I will gradually add entries; today the panel, stove, faucet were completely removed (And accidentally disassembled)
The beginning of the work is quite familiar and all this has been done several times already. We have already gone through the removal of the front console more than once.
I immediately decided to try a slightly different scheme:
All the screws and nuts were put into a box and it was signed where it came from
After removing the instrument panel, it was revealed that the left turn signal does not light up due to the bulb being unscrewed. The reason for the left screen not working has not yet been established.
Also, I tried to number all the connectors as much as possible so as not to get confused (I had the popagrek connectors mixed up)
After about an hour and a half to two, recalling those bad people who laid the wiring (for speakers, alarms, etc.), AvtoVAZ engineers, the panel was completely removed
It certainly looks scary
It turned out that the bolts on the steering wheel were not broken.
The operation of the stove was considered unsatisfactory; the dampers were not closed enough
But the radiator pleased me with the absence of leaks, I just need to insulate it additionally during installation
When removing the pipes from the faucet, quite a lot of precious antifreeze spilled thanks to my crankiness
The stove has been removed for prevention and defect detection.
The culprit of all this (Accidentally was disassembled during the work)
Well, for now this is all I can report on the process. I will keep you informed! No nail, no rod, be careful on the roads and all the best to you, see you soon!
The dashboard of a modern passenger car is an independent part of the car’s interior. Moreover, one of the most important components, which must meet two requirements and solve two important problems. Provide the highest functionality and create a feeling of aesthetic satisfaction, combined with an awareness of the comfort provided by a particular panel, through conveniently located storage drawers, cup holders, instruments and control buttons, as well as pleasant, non-straining lighting.
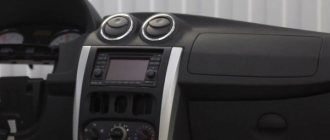
Dashboard VAZ 2114
Instrument panel VAZ 2114
Cars of the Samara-2 family are equipped with a modern VAZ 2114 dashboard, which is also called “Europanel”. Designers have worked on it to ensure that it has a good front view, good looks, combined information and ergonomics, while at the same time helping the driver cope with normal everyday needs. And they mostly succeeded. A block of instruments and sensors installed in front of the driver’s eyes, behind the steering wheel, provides him with as much information as possible:
- In the central part there are two switching devices, on the left. engine speed indicator, by which the driver determines at what load the power plant is operating at a certain moment and, if necessary, corrects this process by switching speeds; in the window under the arrow there is a digital clock. On right. speedometer or current vehicle speed indicator, in the window under the arrow. digital indications of the distance traveled during the entire period of operation of the vehicle and the last trip;
- At the top between the indicator instruments is a turn signal indicator light with green arrows indicating left and right;
- In the lower central part. red triangle “stop signal”, and below it CHECK ENGINE. red signal of engine emergency conditions in accordance with information from the electronic on-board device;
- On the left middle side of the instrument panel
there is an engine temperature gauge, or coolant temperature gauge as it is called in the literature, and above it there is an icon that lights up when the engine is overheating. Under him. throttle icons, oil pressure, handbrake and battery activation; - In the right middle part there is an arrow indicating the presence of fuel in the fuel tank, above it there is an icon of a fully filled tank, below. icon for the minimum amount of fuel in the tank, as well as icons. low beam, low brake fluid and warning light.
Ergonomics is ensured by the convenient layout of devices and information icons for visual perception of information, as well as keys, buttons and levers for their manipulation. A standard on-board computer is installed in the central part of the panel, usually Gamma, Multitronics, Prestige or State. The location for its installation was chosen very successfully and with its help the driver receives expanded information about the state of the operating systems of the engine and vehicle components.
INSTRUMENT PANEL VAZ 2114
Cars of the Samara 2 family are equipped with a modern VAZ 2114 instrument panel, which is also called the “European panel”. The designers worked on it so that it allows for good forward visibility, a pleasant appearance, combines information content and ergonomics, and at the same time helps the driver cope with ordinary everyday needs. And they mostly succeeded. A block of instruments and sensors installed in front of the driver’s eyes, behind the steering wheel, provides him with the maximum possible amount of information:
- In the central part there are two dial instruments, on the left there is an engine speed indicator, by which the driver determines what load the power plant is working with at a particular moment and, if necessary, corrects this process by switching speeds; in the window under the arrow there is a digital clock. On the right is a speedometer or an indicator of the current speed of the car, in the window under the arrow there are digital readings of the kilometers traveled for the entire period of operation of the car and for the last trip;
- In the upper part, between the dial instruments, there is a turn signal indicator lamp with green arrows pointing left and right;
- In the lower central part there is a red “stop signal” triangle, and below it CHECK ENGINE is a red signal for engine emergency conditions according to information from the electronic on-board unit;
- In the left middle part of the instrument block there is a dial gauge for the engine temperature, or as it is called in the literature, a coolant temperature sensor, above it there is an icon that lights up when the engine overheats. Below it are icons for the throttle, oil pressure, handbrake and battery;
- In the right middle part there is a dial indicator for the presence of fuel in the fuel tank, above it is an icon for a fully filled tank, below it is an icon for the minimum amount of fuel in the tank, as well as icons for low beam, low brake fluid level and high beam.
Ergonomics is ensured by the convenient arrangement of instruments and information icons for visual perception of information, as well as keys, buttons and levers for manipulating them. A standard on-board computer is installed in the central part of the panel, usually a Gamma, Multitronics, Prestige or State computer. The location for its installation was chosen very well and with its help the driver receives expanded information about the state of the operating engine systems and vehicle components.
This information is reflected not only on the BC display, but is also transmitted through other control or information lamps and signs located on the instrument cluster and in other places on the dashboard. In addition, the on-board computer display displays other information, for example about the timing of the next inspection or maintenance.
The glove box, which can be closed, is conveniently located and has a backlight and a fairly large niche underneath it. The central beard also has a niche for storing something and an ashtray. The air duct outlets are quite well made, allowing for efficient glass blowing and preventing fogging.
During the operation of a car, problems constantly arise with malfunctions or failures in various systems. In order to get to some of them, it is necessary to remove the VAZ 2114 panel. Even to remove the instrument panel, you need to figure out how to remove the dashboard on the VAZ 2114 (instrument panel).
In addition, on the VAZ 2114 the panel must be removed completely if there is a need to repair air ducts and the stove, or the car owner wants to completely glue and seal the joints of the panel structure so that it does not creak.
How to Remove the Top Panel Trim of a VAZ 2114
Car panel devices of a modern car are an independent part of the car interior. Moreover, it is one of the important components that must meet two requirements and solve two main problems. For maximum functionality and aesthetic pleasure combined with an understanding of the comfort of the panel thanks to conveniently located gloves, cup holders, gadgets and control buttons, as well as pleasant eye-free lighting.
VAZ 2114 instrument panel
The Samara 5 family has a modern VAZ 2114 panel, also called the “European panel”. Designers worked on it in such a way that it allows for a good front view, a pleasant appearance, interacts with information and ergonomics, and in this case helps the driver cope with ordinary household needs. And they mostly succeeded. A unit of instruments and sensors installed next to the driver’s apartment behind the wheel gives him a very likely amount of information:
- Two pointing devices are located in the center, on the left. The engine speed indicator, with which the driver determines what load is working on the power plant at a certain moment, and, if desired, regulates such a process by switching speeds, is a digital clock in the field under the arrow. On right. speedometer. another indicator of the current vehicle speed, in the field under the arrow. digital indications of the distance traveled for the entire period of operation of the vehicle and for the last trip;
- At the top between the switchgear is a control indicator for the turn signal with green arrows pointing left and right;
- In one of the central parts there is a reddish "brake light" triangle, and below it is a CHECK ENGINE. reddish engine alarm signal according to information from the electrical on-board unit;
- In the left middle part of the instrument panel there is an engine thermometer indicator, or, as it is called in the literature, an antifreeze sensor, above it. icon that lights up when the engine overheats. Below the throttle icons are oil pressure, handbrake and battery activation;
- In the right middle part there is an arrow above it indicating the presence of fuel in the fuel tank. icon of a fully filled tank, below. icon with a small amount of fuel in the tank, as well as icons. low beam, low brake water level and dim lighting.
READ How to Remove Front Bumper Gas 3110
Ergonomics is ensured by the convenient arrangement of devices and information icons for visual perception of information, as well as buttons, knobs and levers for manipulating them. A standard fender is mounted in the center of the panel, usually a BK Gamma, Multitronics, Prestige or Shtat. The installation location has been chosen very well, and when used, the driver receives extensive information about the state of the operating engine systems and vehicle components.
This information is not only displayed on the BC screen, but is also transmitted through other indicator lamps, in other words, information lamps and signs located on the unit unit and elsewhere on the instrument panel. Already today, the flight attendant displays information of a different nature, for example, the date of the next technical inspection for another maintenance.
The glove compartment is conveniently located, which, of course, has a backlight and a fairly large niche under it. The central beard also has a niche for storing something and an ashtray. The air duct outlets are quite well made, which allow the glass to be perfectly blown and even prevent fogging.
When using a car, problems with defects constantly arise, as they are also called failures in various systems. if you set a goal. To get into some of them, you need to remove the VAZ 2114 panel. Even to remove the device panel, you need to figure out how to remove the torpedo from the VAZ 2114 (instrument panel).
In addition, the VAZ 2114 panel must be completely removed if you need to repair the channels and plate, or the motorist wants to completely glue and seal the joints of the panel structure so that it does not creak.
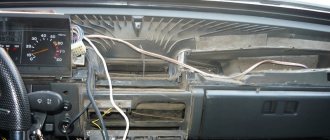
In this complex process, the driver must carefully study the design and location of the device panel on his own car. When taken apart, it looks something like this:
READ How to Clean the Heater in a Car Without Removing
Installation of LED lighting and replacement of the dashboard (panel) on a VAZ 2115 (Lada Samara)
Dashboard VAZ 2114
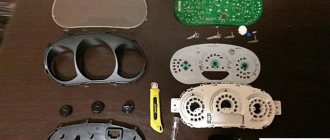
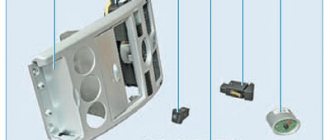
Instrument panel and accessories:
1. torpedo or dashboard of the VAZ 2114, in other words, the set of the entire structure to which the dashboard, fuselage, plate control levers, buttons and other linings and latches are attached;
2.7. a lining for the device panel, which has a decorative function; there are also exhaust air ducts for blowing the windshield;
6 and 11. right and left transverse beams;
7 and 10. right and left console screens;
If you carefully study this diagram, it will be clear how to remove the panel on a VAZ 2114. After determining your order, proceed to the process.
- Using a Phillips screwdriver, remove the three screws that secure the left console screen. For ease of use, it is best to use a screwdriver with a small handle and a stick.
Console VAZ 2114 left screen
- When removing the screen, carefully remove the bottom trim from the housing bracket.
- The right screen of the console is secured with five screws. Using a Phillips screwdriver, carefully loosen the screws left for our client while holding the cover with your hand.
Console VAZ 2114 right screen
Disconnect the ground from the battery by removing the gaskets. If your vehicle has a radio, disconnect it from the main wiring harness by pulling out the unit. If the radio is not installed on the car, simply disconnect the wires from the panel and close the plug. Be sure to turn off the lighter and remove the ashtray cartridge.
VAZ 2115 Removing the instrument panel and replacing light bulbs
- Remove the handles from the heater trim controls. Lower them using a flathead screwdriver to make the process easier.
Removing handles and levers from the instrument panel of a VAZ 2114
- Despite the obvious simplicity of this item, spend a lot of time removing the handles from the levers. This is a good example of how to do this on a remote device.
READ Peugeot 3008 Knock In Front Suspension
There is a special protrusion on the lever; when installing the handle, it, with a hole made in accordance with the myth, engages the lever. To do this, in the process of removing the handle, you need to pull out and lift the latch on the handle with a flat, narrow screwdriver, freeing it from the protrusion.
Removing the handle using a VAZ 2114 screwdriver
Removing VAZ 2114 Electronic fan handle
- The Phillips screws securing the device panel to the brackets on the right and left are unscrewed with a screwdriver.
Screws on the instrument panel fastenings of the VAZ 2114
- At the top of the window on the dash where the gauge is located, there are two screws on the top and two. Unscrew them by removing the cap (4) and cover (8).
Production of linings and shields for VAZ 2114
Screw for cap VAZ 2114
- Remove the two screws from the bottom holding the trim in place and remove it.
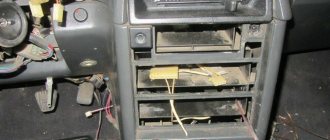
- Having marked the wires suitable for the switches, disconnect them.
Disconnect the wires from the VAZ 2114 buttons
Bolts for fastening the steering arm of VAZ 2114
Below is the mount on the VAZ 2114 bracket
- Unscrew the screw under the screwdriver and remove the lever.
- Disconnect the heating control unit and remove the cartridges from the back of the unit.
Cartridges on the rear of the VAZ 2114 unit
- remove the decorative insert by removing the outer parts from our customer.
- Unscrew the nuts with a wrench to “21”.
- Remove the hydraulic concealer light.
- Unscrew the upper and lower fastenings of the panel, remove the fastenings to the cross member on the left.
Upper mount on the left side of the VAZ 2114 panel
Europanel-2 VAZ 2110 How to rent Eurohotel | VAZ 2110 Diary
Removing the instrument panel of VAZ 2114
To clearly see the method on the go, you will see a video on how to remove the instrument panel on a VAZ 2114.
Source
Withdrawal procedure
- Remove the negative cable from the battery.
- Unscrew the left trim of the instrument panel console.
- Remove the cover. To do this, you need to remove the lower protrusion from the bracket.
- Unscrew the right panel of the instrument panel console.
- Disconnect the wires from the cigarette lighter.
- Disconnect the wires from the cigarette lighter light bulb.
- We push from the inside and take out a niche for small items.
- Unscrew the 2 screws and push the diagnostic connector block inside.
- Remove the heater fan switch handle.
- Using a narrow screwdriver, remove the handle from the lever.
- Unscrew the 2 screws above the instrument panel.
- Unscrew the two screws under the instrument panel.
- Remove the plug and unscrew the screw of the upper fastening of the lining.
- Unscrew the 2 screws of the lower fastening of the lining.
- We move the cover to the side.
- Mark the order in which the blocks are connected to the switches.
- Disconnect the wires from the switches.
- Remove the instrument panel.
- Unscrew the bolts securing the steering column and lower it down.
- Unscrew the 2 screws securing the panel to the bracket.
- Unscrew the 2 screws securing the bracket to the right cross member.
- Unscrew the 2 screws of the lower bracket fastening.
- We move the bracket to the side.
- Unscrew and remove the light guide from the instrument panel.
- We unscrew the 4 screws securing the stove control unit and recess it inside.
- Remove the lamp socket for the heater fan switch handle.
- Press the right lock and remove the air duct from the panel.
- Pull out and remove the headlight hydraulic adjustment handle.
- Remove the instrument lighting control knob
- Remove the decorative insert of the instrument panel.
- Unscrew the light guide.
- Unscrew the nut securing the hydraulic corrector and recess it inside the panel.
- Unscrew the nut securing the instrument lighting control.
- We take out the hydraulic corrector illumination lamp.
- Disconnect the wires from the instrument lighting control.
- Disconnect the wires from the immobilizer sensor.
- Disconnect the wires from the immobilizer unit.
- Disconnect the wires from the glove compartment light bulb.
- Disconnect the wires from the socket of the portable lamp.
- Unscrew the 2 screws of the top panel fastening
- Unscrew the 2 screws on the bottom fastening of the panel.
- Unscrew the self-tapping screw securing the panel to the left cross member.
- Remove the instrument panel.
- Installation of the instrument panel on the VAZ 2114 is carried out in the reverse order.
How to disassemble the instrument panel on a VAZ 2114
Before embarking on this complex process, the driver must carefully familiarize himself with the design and arrangement of the instrument panel on his car. When disassembled down to the cogs, it looks like this:
The device of the VAZ 2114 dashboard
Instrument panel and its accessories:
1 - VAZ 2114 torpedo, or - instrument panel, that is, the main part of the entire structure to which the instrument unit, on-board computer, stove control levers, key blocks and other linings and latches are attached;
2 — overlay on the instrument panel, has a decorative function, it also contains air duct outlets for blowing the windshield;
5 — ashtray body;
6 and 11 - right and left crossbars;
7 and 10 - right and left console screens;
8 — instrument panel;
9 — central bracket.
If you carefully study this diagram, it becomes clear how to remove the panel on a VAZ 2114. Having determined the order for yourself, you can begin the process.
- Using a Phillips screwdriver, you need to unscrew the three screws holding the left console screen. For convenience, when doing this work, it is better to use a screwdriver with a short handle and blade.
Left screen of the VAZ 2114 console
- When removing the screen, carefully remove the lower edge of the trim from the body bracket.
- The right console screen is secured with five self-tapping screws. Using a Phillips screwdriver, carefully unscrew all the screws while holding the trim with your hand.
Right screen of the VAZ 2114 console
- remove the screen without allowing it to get caught in the wiring harnesses that are hidden behind it.
Disconnect the ground from the battery by disconnecting the connectors. If your car has a radio, disconnect it from the main bundle of wires by pulling out the connecting connector. If there is no radio installed on the car, then simply pull the wires out of the panel; they should be closed with a plug. Be sure to turn off the cigarette lighter and remove the socket with the ashtray light bulb.
- Remove the handles from the heater damper control levers. To make the process easier, pry them off with a flat-head screwdriver.
Removing handles and levers from the dashboard of a VAZ 2114
- Despite the apparent simplicity of this item, removing the handles from the levers can take a lot of time. To do this, a clear example is given of how this should be done on a removed unit.
There is a special protrusion on the lever; when installing the handle, it engages with the lever through a hole made for this protrusion. To do this, when removing the handle, you need to use a flat, thin screwdriver to pry and lift the latch on the handle, freeing it from the protrusion.