After purchasing a car, it is often necessary to modify some of its components, elements, and mechanisms. The reasons are the most banal: upgrading the audio system, installing additional speakers, a subwoofer, etc.
Standard designs do not allow placing a row outside the factory components. Depending on the complexity of the task, we carry out the Lada Granta upgrade both independently and with the help of workers from a specialized studio.
Shelf material
The standard design is made of impact-resistant polymer material.
A tuned version of a shelf made of wooden inserts - supports, covered with felt fabric, which also serves as a noise absorber.
At the customer's request, the shelf for acoustic speakers can be made of special wood. This is practiced if you want to achieve an “ideal” sound. Obviously, the cost is several times more expensive than analogues.
Do-it-yourself manufacturing and installation
Shelf acoustic fret grant
For installation you will need simple standard materials:
- Plywood sheet;
- Wooden blank;
- Cardboard or fiberboard sheet;
- Rag;
- Set of bolts and screws;
- Saw;
- Drill;
- Glue;
- Covering fabric (fleece or carpet);
- Jigsaw;
- Soundproofing material;
- New acoustics;
- Wires;
- Sharp knife or scissors;
- Insulating tape;
- Construction hairdryer.
Like any creative action with a car, installing an acoustic shelf is a job that requires increased precision and extreme care. Before starting the process, we carefully take measurements and measurements. We transfer the future view of the workpiece onto a sheet of cardboard with a marker or pencil.
Note. The higher the accuracy of the measurements on the paper version, the better and better the board will fit after the work is completed. This means we will get the long-awaited high-quality sound in the car interior.
Acoustic shelf Lada Granta
Let's get started:
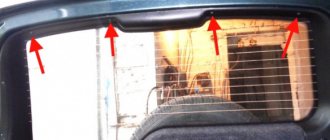
- We dismantle the old acoustic shelf;
- Turn off the brake lights;
- We take out the stop repeater lamp;
- We cut out the workpiece according to the calculations obtained, not forgetting about the holes for the trunk hinges.
Note. If necessary, we make overlays, grind them and secure them with self-tapping screws. There is no need to screw it tightly yet; this will need to be done at the very end, when the shelf is already firmly installed. If there are joints, we treat them with putty or construction putty and allow time to dry.
- The side adjacent to the window is immediately cut to shape using a milling cutter and the edges are processed with a grinding machine to the required size.
Note. You immediately need to decide whether the speakers will be directly on the workpiece, or whether an additional pedestal will be made for them. In this case, it is recommended to leave a large space under the speakers in the shelf itself. Firstly, to easily route a thick wiring harness, as well as to divert most of the resonating sounds into the trunk.
- We cut out the holes for the speakers with a jigsaw.
Advice. On the workpiece between the columns there is often a small pocket for the necessary automotive items, which can be open or closed with a door like a kitchen bread bin.
- We decide whether a stop repeater is necessary and cut another hole for it;
- Drill holes for the mounting bolts.
Advice. If you wish, you can deviate from the engineers’ idea and drill new channels in the metal of the car, but still the most acceptable option is to use standard grooves.
Noise insulation
Acoustic shelf noise
Noise insulation is a mandatory element to achieve the best acoustic sound, maximum noise insulation of the trunk, and minimizing the noise of the rear arches. There are two layers of “Shumka”. The first is damping (vibration-absorbing) material:
- The sheet is cut into pieces of the required size and rolled out with a roller on a shelf, additionally heated with a hairdryer for the best adhesion. It is necessary to cover as much of the shelf area as possible with the material.
The next layer is a sound absorber:
- The material should also cover the entire shelf completely. During the work process, you should not overdo it and glue too large layers - the shelf will not be able to fit into the standard fastening places, it will have to be redone.
In the most extreme case, if there is an acute shortage of funds, you can lay a thick layer of batting under the shelf, which can also soften vibrations. But this material is flammable, and its use by specialists is not recommended.
Padding
We wrap the resulting result with pre-prepared fabric. With an unlimited budget, the choice of a true music lover is karpet (Armenian word, emphasis on the second syllable). Comfortable, soft fabric, stretches well, easy to cut. For an alternative upholstery option, you can choose less popular, but more economical, fleece or Alcantara. It is necessary to fasten the fabric using aerosol glue, but if it is unavailable or to save time, an ordinary furniture stapler can come to the rescue:
- We cut the material into pieces and carefully glue each sector of the shelf;
- To avoid wrinkles, it is better to iron the fabric from the middle to the edges;
- Remove excess fabric.
- We cut out holes for the speakers and install them in the prepared sockets;
- We wear protective nets recommended by the manufacturers.
Preparatory work
So, if the owner has firmly decided to upgrade on his own, then we prepare the following:
- set of automotive tools;
- new shelf, insert;
- speakers (optional);
- blocks with electrical wires for connecting to the central power circuit;
- other components at the discretion of the owner.
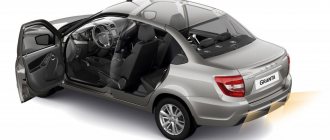
The shelf on the Granta sedan is located behind the rear row of seats. By default, the design does not have holes for speakers. This is precisely the stumbling block for many owners.
Features and nuances of installing the Lada Granta acoustic shelf
Very useful for beginners who decide to install an acoustic shelf will be a preliminary study of video recordings of other Lada owners.
Correct installation of the acoustic shelf on the Grant video will help to avoid mistakes when removing the standard one and installing a new element. It is especially important to study the conditions for connecting wires and hiding them carefully. This will greatly simplify the search for the optimal solution to the problem.
It is worth remembering that you cannot install speakers in a standard shelf. High-quality acoustic shelves on Granta are highly durable, which eliminates rattling during driving.
The factory stock element is simply not designed to support the weight of the speakers. Therefore, after cutting holes in it and installing acoustic elements, the shelf will sag and become completely unsuitable for noise protection.
It is recommended that you carefully study these tips and follow them when purchasing a new shelf and installing it. The new acoustic shelf on Grant's photo, which is presented in full assembly, will also be useful.
The buyer will be able to evaluate the implementation and choose the most stylish and practical option. And the purchased element will look good with the interior decoration and will allow you to travel with excellent music and a great mood.
The process of removing and installing a shelf
- We place the car on a flat platform, open the rear row of doors to provide full access to the shelf;
- lower the backrest of the rear row of seats;
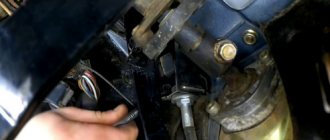
- unfasten the seat belt fastenings, having first unscrewed the fastening bolts;
- unscrew the fasteners for the child seat;
- use a screwdriver to pry up three plastic latches;
- pull it towards you and remove the plastic shelf.
Finally, we install the new one and assemble the components in the reverse order.
Removing the old shelf
Installation of the acoustic shelf is carried out behind the seats, in the place provided for this. The correct placement of the shelf in both the sedan and the liftback interior enhances the sound. Therefore, installation must be done responsibly. Initially, the factory acoustic shelf of the Lada Granta sedan is removed as well as the liftback.
Acoustic shelf
This is done this way:
- All rear seats are pulled out.
- The seat belt fastenings are unscrewed.
- Plastic pistons are wrung out.
- The factory shelf is removed.
Speaker shelf
Some points of sound insulation
You can increase the level of noise and vibration insulation in various ways. If we are talking about a standard design, then they practice pasting with felt fabric on the outside / underneath.
When it comes to a liftback shelf, it is already soundproofed from the start; there is no need for additional noise reduction.
We’ll look at how to remove the Grant liftback trunk shelf below.
When installing custom shelves, they are soundproofed by default during the manufacturing process.
Reviews
| № | Positive |
| 1. | Victor, 45 years old: the car is in its second year, the shelf is not deformed, fits tightly, does not make noise, does not creak. |
| 2. | Konstantin, 51 years old: a few months ago there was an accident, the impact hit the rear, and the glass was damaged. I thought it moved the shelf, but it turned out to be in vain, it didn’t even deform. Good quality. |
| 3. | Vitaly, 37 years old: I work as a foreman in a service station, I have seen many VAZ models, but in Grant the quality of the rear shelf is good. It’s a pity that Priora cannot “boast” of such things. |
| 4. | Alexander, 39 years old: I’ve been working as a salesman in a store for the second year, I noticed that Granta shelves are bought extremely rarely, unlike previous models. |
| 5. | Maxim, 41 years old: I bought the car since it was released in 2011, during this time I changed a few things, but I didn’t touch the interior, it doesn’t creak or knock. |
| 6. | Valery, 44 years old: plastic inserts are of good quality, I’ve been using the car for three years now, I have no complaints about the interior or inserts. |
| Negative | |
| 1. | Mark, 38 years old: due to the fact that the car was often parked in the sun, the rear parcel shelf was deformed, constantly knocking, and occasionally creaking. I am dissatisfied with the quality, because the plastic should be adapted to temperature changes. |
| 2. | Vyacheslav, 47 years old: after five years of using the car, the plastic inserts in the interior began to knock on uneven surfaces, and a creaking sound formed. In general, the manufacturer saved on quality. |
| 3. | Mikhail, 37 years old: I was dissatisfied with the quality of the standard shelf, I had to replace it with a Mercedes-Benz one, it fits exactly. |
Conclusion Removing the rear shelf on a Lada Granta is not at all difficult, it will take ten minutes of free time and you’re done.
Installing a tuned version of the insert is also not difficult for the average driver. If you don’t have free time, you can always contact a specialist service center. Now the owner knows exactly how to remove the Grant shelf with his own hands.
Crib
Instead of a conclusion, let's summarize:
- You can plug in budget sound into the Grant for an amount of 20,000 rubles or more.
- Podiums in the front doors = impossible to open the glove compartment.
- 16 cm speakers in the front doors - cut the metal of the door or prepare spacers with the factory facing of the speakers.
- The acoustic shelf covers the ISOFIX mounts.
- Audio preparation pulls wires only in the doors.
- Article numbers for ordering speaker covers and mounts are in the “Installing speakers in rear doors” section.
Did you like the article? Write a comment or see what we have about the selection of budget cars for 200 thousand.
Armrest 120 mm black fabric for Lada Granta, Kalina 2 after 2015
with 10% discount
Gas tank cap with lock for Lada Vesta
with 13% discount
Spacers for 16 cm speakers in the shape of the door for Lada Granta, Kalina 2, Datsun
with 11% discount
Eyeglass case for Lada Granta, Kalina 2, datsun
with 16% discount
Ashtray for Lada Granta, Priora, Kalina, Kalina 2, Largus
with 19% discount
Original audio preparation kit (plastic speaker grilles in the doors) for Lada Granta, Kalina 2
with 12% discount
Rear mud flaps (aprons) for Lada Granta, Kalina 2, datsun
with 18% discount
Acoustic shelves are designed to improve the overall sound quality of your speaker system, as well as to eliminate unpleasant squeaks, rattles and overtones that occur when the car is moving.