Cars admin26.02.2020
Every motorist knows that the fuel level sensor on the injection VAZ 2110 plays its irreplaceable role on the dashboard. How else will you determine how much fuel you have left in the tank?!
Fuel level sensor
When it comes to driving around the city, you don’t have to pay much attention to this, since there is always some gas station nearby. Traveling outside the city, where gas stations occur every few tens or even hundreds of kilometers, is a very risky activity in the case when the measuring element does not work.
Typical faults
The second part of the lever is, in fact, an additional contact. If you place it in a certain position, the circuit regulating the process of replenishing with spare fuel will be closed. In the domestic “ten”, the volume of reserve fuel is about 4-6.5 liters.
Alas, despite the importance of a fuel level meter, its quality is far from perfect, which is why car owners often have to deal with sensor malfunctions.
Typical breakdowns
Definition of markings
There are several characteristic faults that even a beginner can cope with.
- The fuel level indicator suddenly changes its values. Most likely, the contact track has worn out due to the slider. If the wear is not severe, it is enough to simply bend the fasteners of the slider so that it is slightly above the problem area. But when wear is severe, the contact track changes completely.
- The indicator arrow is at a level that is not true. For example, it shows an empty tank even though you just filled up. This will require some adjustment. Disconnect the sensor from the gasoline tank and adjust the indicator. It is enough to move the arrow from the value at which it is stuck to zero. Most often, this measure helps.
- The arrow barely moves and cannot reach the desired position. In such a situation, the tongue bends slightly, which allows you to increase the range of the pointer arrow. It is possible that the contacts on the pointers have broken or come loose. To do this, look under the dashboard and check the condition of the wiring.
- It is possible that the fasteners securing the wires have become loose. They need to be tightened up. If the instrument panel is in good condition, examine the entire wiring path. A short circuit often occurs, causing the measuring device to stop working.
If all the measures taken have not yielded any result, the sensor continues to show complete inoperability, you will have to replace it.
Choosing something new
Purchasing a fuel sensor for a VAZ 2110 is not at all a problem if you have already removed the old element from your car.
It is not recommended to just go out and buy the first one you come across, even if it is high-quality, since it may simply not be suitable.
There are two ways to solve this issue.
- Remove the old element, take it to an auto parts store and purchase a similar one.
- Take a look at your car's owner's manual to find out which sensor with which characteristics is used for your car. Buy a similar one.
Replacement
You don't have to be a professional auto mechanic to replace a fuel sensor. It is enough to study the operating manual and understand the nuances of disassembling and assembling the unit.
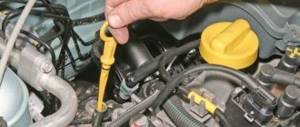
Alas, this cannot be done without related work. In order to get to the sensor, you will first have to remove the fuel pump .
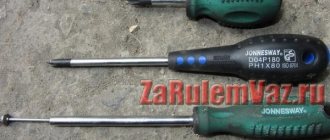
Before starting work, drain the fuel so that as little fuel remains in the tank as possible. Tools you will find useful:
So, let's start removing the fuel pump:
- Remove the floor covering you have in the trunk;
- Remove the fastenings of the rectangular cover, which is made in black;
- Disconnect the negative terminal from the battery;
- Make marks on the gas pipeline tubes so that you can later figure out which one is intended for supply and which one is intended for return;
- The fitting is unscrewed with a 17mm wrench, after which the supply pipe is removed;
- The outlet pipe is removed in a similar way;
- Use a 7 mm socket wrench to unscrew the nuts securing the pressure rim;
- A hammer may be required here, since the hardware is often firmly attached. Place a flathead screwdriver on the ridged part of the nut and give the handle a light hammer blow;
- With the rim free, lift the assembly and remove the float from the fuel tank;
- Now you can remove the pump and, accordingly, the sensor.
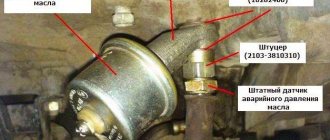
Removing or replacing the fuel sensor on a VAZ-2110
To dismantle the fuel module and remove the FLS from it using a 17 wrench, unscrew the fittings of the fuel supply and return pipes. We take the tubes to the side.
Then, using a socket head No. 7, unscrew the nuts securing the clamping ring. Since the nuts are usually very tight and may be oxidized (rusted), WD-40 (or a similar product) is used, and their tightening can be loosened by light blows of a hammer on a non-sharp chisel or the handle of a flat-head screwdriver, the “tip” of which is placed on the edge of the nut.
Then, using a screwdriver, we remove the pressure ring from the hatch. We remove the module by carefully removing the FLS float from the hole in the gas tank, being careful not to bend the sensor lever. To do this, tilt the module slightly.
Using a Phillips screwdriver, unscrew the 2 screws securing the FLS to the fuel module. Disconnect the FLS wires from the module connectors. If this is difficult to do on an assembled module, then disassemble it: bend the clamps of the two tubular guides from the pump side (bottom of the module), and then separate the upper and lower parts of the module.
The removed FLS can be inspected and, in case of repairable faults, repaired and replaced, or immediately replaced. We install the FLS in the reverse order of dismantling. During assembly, it is recommended to apply petrol-resistant sealant to the pressure ring and the seals underneath it.
Before closing the hatch of the body opening above the fuel module, you should check the tightness of the fuel line connections.
To do this, after connecting the battery ground, turn on the ignition for 5 seconds, while observing whether there is a gasoline leak.
Before purchasing a new sensor, you need to find out the markings of the one installed on the VAZ-2110 - it is better to replace a failed device with the same model. Experts do not recommend choosing a sensor “by eye”, because there are a dozen types of FLS, differing in resistance values. If you don’t guess with the right modification, then the indicator arrow on the dashboard may “float”. The catalog number is printed on the sensor body.
Tips for motorists
If the fuel level indicator on the instrument panel of your VAZ-2110 passenger car has refused to work, then it is, of course, possible to operate the car with such a malfunction, but it is still inconvenient. After all, there is an electric fuel pump in the fuel tank, and the operating rules for this car say that you cannot drive when the fuel level drops below the mark when the fuel level indicator lamp starts to constantly light up, as this will lead to failure of the fuel pump. It is difficult to determine the fuel level in the tank by eye.
There are three main problems with the VAZ-2110 fuel level indicator: the fuel level indicator does not work at all; the fuel level indicator needle jumps wildly, not letting the driver know what the level actually is; The fuel level gauge gives incorrect readings.
One of the reasons why the fuel level indicator starts to “lie” may be a jammed float. Preventing its normal movement, both up and down. Also, the fuel level readings will not be accurate if, when replacing the fuel level sensor, you installed a new one that does not correspond to the brand that was installed before it. The point is that each brand of sensor has a different resistance value, which will lead to incorrect readings on the fuel level indicator. It’s not difficult to get lost in the sensors, since they come in two types, depending on what combination of devices they are installed with, and there were about eight brands of them (DUT-1, DUT-2...).
A sharp movement of the fuel gauge needle, either up or down, occurs more often on cars with high mileage and can be caused by wear on the track along which the rheostat slider moves. As a result of wear, indentations are formed on the turns, as a result of which, when moving, the slider contacts do not touch each turn of the winding, and this leads to fluctuations in the fuel level indicator needle.
Installation and repair of fuel level sensor VAZ-2110 and Lada Kalina
The fuel level sensor of the VAZ-2110 and Lada Kalina controls the operation of a dial-type device and an emergency gasoline remaining indicator located on the dashboard. These Zhiguli models are equipped with potentiometric FLS (float type). They are a potentiometer (variable resistor) with strips of nichrome conductor on the working surface (contact track). This resistance is equipped with a movable contact that moves along the contact track by changing the position of the lever with a float at the end. On the VAZ-2110 and Lada Kalina, the FLS is installed on the fuel module (the structure in which the fuel pump is located) in the fuel tank under the rear seat of the car.
The principle of operation of the FLS is to change the resistance of the electric current flowing through the potentiometer in accordance with the amount of fuel in the tank (with the position of the float floating on the surface of the fuel inside the tank).
At a certain point in the contact track of the resistor, corresponding to the minimum allowable fuel remaining in the tank, the lever closes a contact connected to a control light, which signals that the engine is using a reserve supply of gasoline (4–6 liters).
If the sensor “lies” or does not show the fuel level, then first of all it is necessary to check all contact conductive connections from the FLS to the indicator on the dashboard. A malfunction such as a violation of the integrity of the float is also possible. This can be checked after removing the sensor and immersing the float in a container of liquid. The floats are not sold separately and the FLS with such a malfunction must be replaced.
The most common reason for incorrect operation or failure of the FLS is wear or oxidation of the contact track. The contacts on it are cleaned with fine sandpaper, then wiped with a dry cloth and, if necessary, soldered. If the FLS continues to lie, you can try to reconfigure it by bending the lever with the float. In case of fatal faults, the FLS must be replaced.
The principle of operation of the fuel sensor of a VAZ 2110 car
The sensor consists of the following components:
- a slider to which the sensor float is attached;
- resistive segments made by vacuum deposition of nichrome particles onto a non-conducting board;
- contact zones;
- sensor connector.
The principle of operation is as follows. The sensor is installed in the electrical circuit of the fuel level indicator on the dashboard, which represents a magnetic induction measuring instrument for the current strength in the circuit. When the float located on the surface of the liquid fuel placed in the tank moves up and down, the slider moves synchronously along the sensor segments.
As the float moves upward, the total resistance of the segments decreases, the current increases, and the indicator arrow on the dashboard also moves towards higher readings. When the fuel level decreases, the float moves down, the resistance of the contacts that the slider closes increases, the current decreases, and the indicator shows a lower fuel level.
At a certain position of the slider, the contacts close to power the critical fuel level indicator lamp, and it lights up.
Replacing the fuel level sensor (detailed test)
As we already know, the sensor is mounted in the fuel module, which, in addition to the sensor, includes a fuel pump and filters. To dismantle we do the following :
- Remove the negative terminal of the battery.
- Remove the rear seat cushion.
It's better to vacuum everything.
We disconnect the terminal block and take up the vacuum cleaner again - as a rule, there is enough dust here.
The pressure washer is fixed with small diameter pins. Try not to strip the threads both when unscrewing and when installing parts in place.
We take out the fuel pump and carry out an external inspection.
We unclip the sensor connectors with a thin screwdriver, and with a Phillips screwdriver we unscrew the fastening screws.
This is what the fuel pump looks like without a fuel level indicator.
Now you can test the sensor in more detail. The working device must have a resistance of 270 to 320 Ohms at the lowest point (the float hangs). At the highest point, the sensor resistance should be in the range 7–19 Ohms . We take this data using a multimeter in resistance measurement mode.
If, when moving the float, the resistance value does not change or changes abruptly, the sensor must be replaced.
When the level of gasoline in the tank is equal to half its volume, the resistance should be about 118 Ohms.
Assembling the fuel module with a new sensor is carried out in the reverse order. During assembly, it is advisable to lubricate the sealing ring of the pressure washer with petrol-resistant sealant.
Of course, we must remember that we work in close proximity to gasoline fumes, so there should be no hint of a spark, open fire or electrical appliances plugged into the network.
Main symptoms and causes of malfunction
Main signs of sensor malfunction, possible causes:
The fuel level indicator on the dashboard does not respond to the amount of gasoline in the tank. This malfunction may be due to:
- faulty electrical wiring;
- poor electrical contact in the sensor connector;
- broken conductors or poor quality of connection to the sensor in the tank;
- mechanical erasure of the slider area;
- a break in the mechanical rod connecting the slider to the float;
- jamming of the slider rod due to corrosion;
- violation of the tightness of the float, its inoperability.
The fuel indicator readings on the dashboard do not correspond to the actual values. Possible causes of the malfunction:
- partial destruction of nichrome coating;
- float damage;
- calibration violation;
- malfunction of the dial indicator on the dashboard;
- disturbance in electrical circuits.
The indicator needle moves intermittently, with dips in the readings. Reasons: destruction of nichrome segments, slider zones.
Methods for restoring performance
A faulty sensor does not always need to be replaced. Restoring the fuel level indication system must be done in the following sequence.
- Check the electrical equipment of the car in the dashboard area, check the voltage of the on-board network, along the power supply circuits of the dashboard.
- Process the sensor contacts.
- Dismantle the device, check the condition of the slider, and tighten the contacts if necessary.
- Check the condition of the float, its fastening, and draft.
- Calibrate the device by moving the float sequentially to its extreme positions.
- If the working areas of the sensor become dirty, wipe them with a soft cloth.
How to check the fuel level sensor for functionality?
Before throwing away your old device and replacing it, you should make sure it is faulty. You can do this as follows:
1. If the FLS shows distorted parameters, then make a simple adjustment. To do this, connect the sensor to the system (without installing it in place) and move the lever from one limit position to another.
At the same time, pay attention to the position of the fuel gauge needle. It should move according to the position of the float.
In the lower position the arrow should be at “0”, and in the upper position it should show the number “one” (full tank).
If in one of the positions the arrow shows the wrong value, then bend the adjusting “tongue” (from below or from above).
In this way, the float will be able to fall lower or rise higher than its previous level. Such an adjustment will allow you to set the maximum levels as accurately as possible.
2. Make adjustments directly on the instrument panel. This is easy to do - turn off the ignition and remove the dashboard. Then remove the fuel gauge arrow from the pin, connect the entire system and wait a few minutes.
After this, lower the float to its highest position (full tank), and set the arrow on the device. Now make sure that the pointer gives the correct information in all float positions.
There are situations when the fuel position indicator shows a full tank of gasoline, although in fact there is no more than half of it.
Proceed in the following sequence:
- Check the quality of the contact connections on the back of the dashboard. To do this, remove the “tidy” and tighten the small nuts that are screwed to the indicators and provide the necessary contact;
- make sure there are all the “cons”. Pay special attention to the “mass” that is located under the car’s handbrake. As a rule, it is she who fails most often;
- There are situations when everything is fine, the fuel level sensor is working, but the device still does not show. This happens if an old-style fuel level indicator is installed. It is useless to repair it - it is easier to replace it;
- if the gasoline level arrow is simply out of order, then press the daily mileage button and turn the key in the ignition switch.
Attention! Problems with the fuel level sensor are possible due to oxidation of the contact plates; the sensor sometimes works, sometimes it doesn’t.