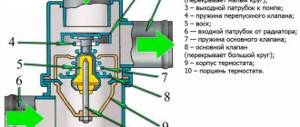
Why adjust valves on Daewoo Matiz
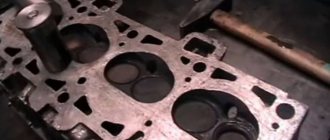
The valves in the cylinder head are required to tightly close the combustion chamber during the compression stroke. However, this does not always happen. In the case when at least one of the valves, intake or exhaust, performs its job carelessly, the edge of the valve does not fit tightly to the seat, and gases heated to enormous temperatures break through either into the intake or exhaust manifold.
This threatens, at a minimum, loss of compression and deterioration in filling the cylinders with the fuel-air mixture. Which in turn causes a drop in power, complicates starting and negatively affects fuel consumption. But that's not all. Hot gases tend to destroy first the edge of the valve, and then, after microcracks appear, they cause complete destruction of the working part of the valve.
If the valve does not open completely, when the thermal gap is too large, then in addition to poor filling of the cylinder with the mixture, poor ventilation of the combustion chamber occurs between compression strokes. And this is fraught with inefficient combustion of the mixture, which also leads to a drop in power and high consumption.
In addition, gases stimulate the formation of a large amount of carbon deposits on the entire gas distribution mechanism - springs, valve guides, rocker arms, which leads to wear of the valve stems and greatly disrupts the operation of the timing belt.
This is why thermal clearances between the valve lifters and valve ends are critically important, since when heated, all metals expand by a certain amount. This is the amount we leave the gaps between the valve and the rocker arm.
The manufacturer strongly recommends adjusting valves on Daewoo Matiz at least once every 20 thousand km . The dimensions of the gaps (a) are as follows:
- For the intake valve, the clearance is 0.15 mm.
- For the exhaust valve - 0.32 mm , since the exhaust valve warms up much more than the intake valve.
Interesting on the topic: New Chery Tiggo 8 2020. We are waiting at dealers
Now remove the ignition module.
Adjusting valves on Daewoo Matiz without this procedure is almost impossible.
By doing this we do the following:
- We find the fastener and press it away from the engine control system harness block.
- The coils are attached to the cylinder head cover holder; to remove them, you will need to unscrew three bolts with a “tenth” socket head.
- Remove the ignition module.
- Now remove the throttle assembly.
This action is also carried out in several stages:
- Disconnect the crankcase ventilation tube from the air duct tube.
- Also, remove the hose leading to the air filter, and then remove the air duct.
- It is necessary to disconnect all wires from the idle air control regulator. This applies to the 0.8 liter Matiz engine.
- The throttle valve has a position sensor. We also disconnect the wires leading to it.
- Antifreeze must be drained to the minimum mark.
- On the hoses that supply coolant to the throttle block, it is necessary to compress the clamps with pliers and disconnect them.
- The throttle body and intake manifold have four mounting bolts. They need to be unscrewed using a hex key.
- Now we can remove the entire throttle assembly.
One last thing to do right before making adjustments.
When the work is completed, remove the timing belt cover. To do this, you need to remove the front arch liner on the right and 4 mounting bolts.
Now there are a few more simple operations to be done:
- A vacuum hose will be pulled to the vacuum booster. It is necessary, using pliers, to clamp the clamp from the edges and move it along the hose.
- Remove the vacuum supply.
- Remove the ventilating crankcase inlet from the cylinder head cover fitting.
- The inlet pipe holder screw must be unscrewed using a hex wrench set to “5”.
- It is necessary to compress the petals of the fixing element of the wires located in the control system of the power unit using a screwdriver. Disconnect the harness from the holder.
- Using a ten-point socket, unscrew the bolt that secures the connecting hose bracket and move it to the side.
- Unscrew the bolts (8 pieces) that secure the cylinder head with the “fifth” hex key and disconnect it.
How to know when it's time to adjust the valves
In addition to the manufacturer’s recommendation that the gaps are adjusted every 20,000 km , there are a number of signs that directly indicate the need for adjustment. It is logical that adjustment is needed in the case when the cylinder head was repaired. There are a number of other symptoms:
- A characteristic clicking, chattering sound coming from under the hood . An experienced mechanic can easily determine just by sound that the valves need adjustment.
- Gradual decrease in power . The thermal gap is not lost instantly. Therefore, determining the loss of traction and dynamics can sometimes be difficult. However, if the power drops critically against the background of other symptoms, we can talk about a loss of nominal valve clearances.
- Engine overheating . Since some of the hot gases enter the manifolds, the engine can become very hot even at low loads.
- As you gain speed, you may experience noticeable popping noises both at the intake and exhaust.
- Incorrect engine operation , difficult starting, unstable idle speed.
If you have even these symptoms, you should already think about checking the valve clearances.
What is needed to adjust the gap
The tools you will need are a set of bits, sockets, wrenches, extensions and cardans, and a set of screwdrivers. You also need two probes for 0.15 mm and 0.32 mm. Since it is difficult to find a 0.32 probe, we will use two probes - 0.3 and 0.02 mm together. If the valve cover is secured with factory bolts, a 5mm hex is required.
This set of probes is enough for any adjustment
By the way, about the valve cover bolts (M6x1, length 35 mm) . They are extremely unreliable, and the manufacturer recommends replacing them every time the cover is removed. The fact is that the hexagonal hole often licks off when reused. So, if they are on sale, it is better to buy new original ones.
Original Korean bolt 94500741 with non-stick treatment. It is highly recommended to replace them every time the valve cover is removed.
The catalog number of the original bolt is 94500741-GM, their price is about 15 hryvnia per piece. As a last resort, you can use camshaft bed bolts from VAZ 2110-2112, but using regular hex head bolts is highly undesirable.
Interesting on the topic: Autobianchi Stellina. Star and motor in a suitcase
Many would be happy to save on the valve cover gasket. It is also disposable, even if it still looks decent. The fact is that over the years of use, the gasket shrinks, dries out, and loses elasticity. If there is no particular desire to observe oil streaks on the cylinder block, it is better to replace the gasket. The following options are recommended:
- PARTS-MALL P1G-C007 , price 30 hryvnia;
- CORTECO 440063P , price 80 hryvnia;
- BGA BGSILC , same price;
- ELRING 136.271 , about 100 hryvnia;
- VICTOR REINZ 71-53137-00 , price 125 hryvnia, one of the best options;
- NIPPARTS J1220907 , price 200 hryvnia;
- GLASER X83283-01, about 250 hryvnia.
We will also need a jack and, of course, a wheel wrench. If you have all this at hand, you can start adjusting.
We adjust the valve clearances of Daewoo Matiz
The adjustment is carried out with the engine cooled down to 20 degrees. If the temperature is higher or lower, it is necessary to adjust the gap size plus or minus one hundredth.
Table of clearance corrections taking into account temperature
First, let's jack up the car and remove the front right wheel and mudguard, install a stand under the hub and lower the jack.
Open the hood and remove the air filter along with the housing and the entire pipeline assembly.
Now it’s the turn of the ignition module. We disconnect the high-voltage wires and the terminal block on the back of the module. After this, unscrew the three bolts securing the module and remove it.
Disconnect the vacuum hoses and remove the throttle cable. Now remove the connector from the sensor and the pipe behind it. They will also interfere.
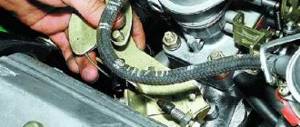
We remove the breather hose and at the same time check its integrity. Especially in the place indicated by the arrow. If a crack forms there, we will get an uncontrolled air leak at the inlet.
Remove the timing cover. First of all, unscrew the two distant bolts on the right side. To do this we use a cardan and an extension. Next, unscrew the other four. Be careful not to tear off the splines. 5mm hex bolts.
Now that the cover is removed, we will set the piston of the first cylinder to the top dead center of the compression stroke by rotating the crankshaft. To do this, we use a 17mm socket, an extension and a wrench. This is why we removed the wheel and mudguard.
To set the first cylinder to TDC, it is not necessary to remove the timing belt cover and align it to the marks. Although, this method has a right to exist and is considered correct.
Interesting on the topic: Our Lanos: changing the timing belt
You can go this way and after removing the timing belt cover, set marks on the crankshaft and camshaft pulley. However, in the case when we have no complaints about the timing belt, we can simplify our life
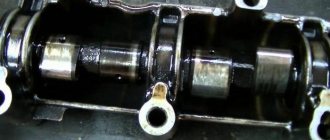
However, it is much easier and faster to set the piston of the first cylinder to TDC, guided by the position of the piston and the camshaft cam. To do this, turn the crankshaft clockwise (!) until the piston reaches TDC and the camshaft cam points straight down.
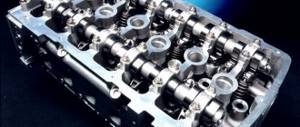
In this position we will be able to adjust both valves on the first cylinder, as well as the inlet of the second and the exhaust of the third.
First, let's check the existing gaps with feeler gauges. The feeler gauge should not fit freely between the valve and the rocker arm, but it should not fit too tightly either. The dipstick should slide with little effort.
If there is a need to adjust the gap, take a 12-mm spanner and tear off the fixing nut with it. Without removing the key, use a flat screwdriver to set the required gap by rotating the rocker arm pusher. Having achieved the desired gap, hold the screwdriver in this position and tighten the locknut. We check the gap again, and then tighten the nut with a force of 20 N∙m. We do the same with the remaining free valves.
Now rotate the crankshaft 360 degrees. At this time, the camshaft will rotate 180 degrees. In this position, we adjust both valves of the third (fourth cylinder on a liter engine), as well as the second exhaust (and third intake cylinder on a liter engine).
After adjustment, tighten the locknuts again and check the clearances on each valve again. When assembling, carefully wipe all mating surfaces with a rag, and tighten the valve cover crosswise, starting from the center, with a torque of 10 N∙m. We carry out the assembly in the reverse order.
Preparatory work for adjusting Daewoo Matiz valves
First of all, you need to remember that all adjustment work is performed on a cold engine. Now we complete the set of necessary tools:
- set of open-end wrenches;
- screwdriver set;
- set of heads;
- pliers;
- set of imbus keys;
- set of measuring probes.
The procedure for adjusting the gaps requires a number of preparatory measures, because it will not be possible to get to the timing components so easily. First of all, you should disconnect the negative cable of the battery.
Removing the air filter housing
The process consists of several transitions:
- Using a flathead screwdriver, loosen the air duct clamp.
- Disconnect the filter pipe from the air duct.
- For the Matiz 0.8 l internal combustion engine, disconnect the harness block of the engine control system and the air temperature sensor, remove the hose from the filter housing.
- Using a 10mm socket, unscrew the three bolts securing the filter housing to the air intake and remove them.
- Lift the housing with the air intake and resonator and remove the two pins from the rubber pads.
- Dismantle the unit.