To cool the power plant, every car these days uses specialized coolants, which makes it possible to additionally organize heating of the car interior during the cold season.
Reliable operation of this system is ensured by special devices - thermostats. Their main function is to create conditions for rapid heating of the engine and maintaining it in the required operating conditions.
general information
There are single-valve, two-stage and two-valve thermostats, as well as electronically controlled devices. Grants are equipped with thermostats Luzar LT0191 and Luzar LT0190 (costing from 450 rubles for the first, and from 800 rubles for the second), FENOX TS034E7 (costing from 800 rubles), VAZ-2123 (article 2123-1306010, cost from 650 rub.). It is worth mentioning such devices as VAZ-2101 GATES (article TH14580, cost - from 350 rubles), VAZ-2121 GATES (article TH15380, approximate cost - from 500 rubles), VAZ-2110 (article 21082-1306010, cost - from 600 rub.) and other devices. They are located between the engine and the radiator, but it should be noted that there are differences in the location of the thermostats on Grants with eight-valve and sixteen-valve engines.
Their main task is to prevent the movement of antifreeze through the radiator until the car engine warms up to the required temperatures. Accordingly, if the car engine does not warm up, then the coolant does not move in a large circle. Usually the thermostat is activated when the engine reaches a temperature of 80-95C. Among other things, the thermostat helps reduce the amount of harmful emissions released into the atmosphere and minimize engine wear.
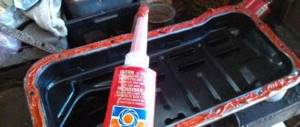
The thermoelement located inside the device is made of brass, has a cylindrical shape and is filled with artificial wax. When the engine reaches a temperature of approximately 82C, this substance begins to melt, which causes it to expand. This sets the valve in motion, it opens, after which the antifreeze begins to circulate through the car’s radiator. Turning off the motor causes the wax to solidify inside the thermostat and close the damper.
Below we will talk in more detail about possible malfunctions of thermostats, provide instructions for replacing and checking them, and also share a technique for reworking and upgrading this part, allowing you to increase its response threshold to 92C.
Why do you need to replace the thermostat on a VAZ-2110
Experienced car enthusiasts claim that replacing the “native” thermostat of the VAZ-2110 with the same device from Granta will help warm up the engine, and therefore the car’s interior, faster. Such changes in engine operation depend on the functional features of the replaced thermostat from Granta.
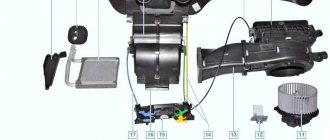
The fact is that this device is responsible for the redistribution of fluid flows in the vehicle engine cooling system. A standard automotive engine cooling system contains five required components:
- Water pump.
- Electric fan.
- Radiator.
- Expansion tank.
- Thermostat device.
Through such a cooling system, a special liquid can circulate without a radiator, that is, in a small circle.
And in the VAZ-2110, even in a small circle, the cooling process involves:
- radiator;
- intake manifold;
- BDK;
- liquid chamber.
The thermostat begins to function at the optimal temperature – 87 degrees. As soon as this temperature is established, the main pipe of the thermostat device opens and the coolant begins to circulate in a closed circle of the vehicle engine cooling system. As the temperature increases, the valve opens more and more, up to a maximum hole diameter of 8 millimeters.
Signs of breakdown
The thermostat is a fairly simple element, however, and it is not immune to breakdowns. Normally, after starting a cold engine, the lower hose extending from the radiator does not heat up for some time, but after the coolant temperature exceeds 85C (±2C), it begins to quickly heat up (provided the thermostat is in full working order). It is this aspect that will accurately indicate to the car owner the moment the coolant begins to circulate.
In cases where the valve cannot open, the coolant stops circulating and the engine begins to overheat. Overheating also causes incomplete opening of the valve. A delay in closing the valve, on the contrary, creates conditions for a longer warm-up of the engine, especially in the cold season.
As a rule, thermostat failure is caused by the following reasons:
- an unstable engine (triplication often leads to valve damage);
- wear of the rubber gasket;
- corrosion (it is the most common cause of breakdowns);
- antifreeze gets inside the thermostat;
- there is a leakage of wax from the device;
- there is mechanical damage on the valve.
Most often, a malfunction of the thermostat leads to the impossibility of further movement in the car, and therefore the faulty part must be replaced immediately.
How to install a thermostat from Granta on a VAZ-2110
In order to replace the “native” thermostat device of the “tens” with a thermostat from Granta, you need to perform a number of preparatory procedures. First, remove the “original” thermostat from the VAZ-2110. This is done in several steps:
- loosen the radiator hose clamps – outlet and inlet;
- dismantle the thermostat device.
Secondly, they conduct a comparative analysis of the cooling systems of both vehicles (we did this in the previous paragraph of this article).
Thirdly, purchase the necessary parts that will be involved in the procedure for installing the Grants thermostat on the VAZ-2110:
- The thermostat itself.
- The lower pipe to it.
- Gaskets.
- Washers.
- Clamps.
- Antifreeze.
- Sealant (for example, Abro).
Only after these three main steps can you begin the procedure for replacing the thermostat device from Granta to VAZ-2110. To do this, experts recommend following the following instructions:
- drain the antifreeze from the VAZ-2110;
- unscrew the bolts securing the “original” thermostat device;
- dismantle the temperature sensor;
- remove the studs, lower pipe;
- install a new pipe (do not forget to tighten the clamps);
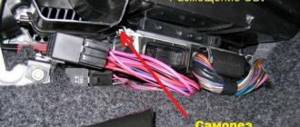
- plug the hose that comes from the throttle valve using an M10 bolt and clamps;
- install new studs of the thermostat device;
- install the Granta thermostat;
- connect all the hoses (to do this, the hose from the heating device will have to be cut on site to a suitable size - approximately 5 centimeters);
- install the previously removed temperature sensor;
- connect all wires;
- assemble the air pipe;
- connect the filter.
After all these steps, you will still have the “native” VAZ-2110 thermostat and the pipes that came with it. To check the operation of the “new” thermostat device, you need to pour new coolant into the cooling system of the VAZ-2110 engine, and then start the vehicle engine. Do not forget to monitor the heating temperature of the coolant and regularly check the tightness of all connections.
Instructions for replacing a faulty element
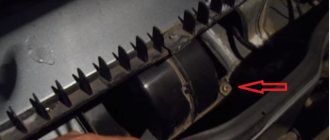
Dismantling work begins with draining the coolant. Then you need to free access to the thermostat, which will require removing the air filter. You should also remove the hose that supplies air to the throttle assembly. After this, you will press the lock of the block with the wires of the motor control system and disconnect the block.
The next step is to unscrew the nut attaching the tip of the “mass” wire to the thermostat and remove it. Then the tightening on the fastening clamp of the supply hose is loosened, after which it is removed from the pipe. The hose supplying fluid to the heater radiator is also disconnected in the same way.
Next, the nuts securing the thermostat housing itself are unscrewed, after which the housing is removed. The place where the housing connects to the cylinder heads is always sealed with a gasket. Therefore, unscrew the screws that secure the thermostat cover and remove it. In addition, a rubber ring seals the place where the lid is connected to the body. By pressing the locking plate with pliers and carefully turning it in different directions, remove this element from engagement with the protruding parts of the body. Then you need to remove the thermostat spring, after which the cylinder is removed from the thermostat.
Installing a new device involves exactly performing the steps described above in exactly the opposite order.
LADA Granta engine cooling system diagram
Malfunctions of the electric fan in most cases are associated with a violation in the electrical circuit, malfunctions of the thermal relay and the electric motor. The choice fell on the melting Camry of the tenth years.
When heated, the liquid in the cooling system expands, and some of it is forced into the expansion tank. Another winter has come. To begin, the removed thermostat bottle is lowered into a transparent container into which coolant has previously been poured.
Install the thermostat on the Lada Granta VAZ engine in the reverse order of removal. Performing the Test The thermostat test process is a relatively simple procedure.
Then, by unscrewing the cap of the expansion tank, relieve pressure in the system. In other cases, the procedure is carried out when antifreeze is contaminated or leaks. Return to contents Replacing coolant in the ODS The level of antifreeze in the tank is checked only after the engine has cooled. Press and rotate the locking plate to remove the cover.
The unit is located in the cylinder block and participates in the operation of the timing belt, since it has a common drive with the gas distribution system. With the advent of the modernized cooling system of the Lada Granta, the situation has changed for the better and here's why. Thanks to this, it will begin to warm up and release heat into the cabin from the first minutes after starting the engine, warming up at the same time as it. In addition, a rubber ring seals the place where the lid is connected to the body.
How does the VAZ-2110 engine cooling system differ from Granta?
The engine protection is removed. If the engine is in a constant state of insufficient heating, operation for a long time is prohibited, since it cannot be subjected to loads.
There is an improvement in circulation and a decrease in hydraulic resistance. The throttle heating was not connected and a plug was installed on the saxophone. Leaking of the exhaust valve leads to a decrease in the boiling point of the coolant, and its jamming in the closed state leads to an emergency increase in pressure in the system, which can cause damage to the radiator and hoses.
General information There are single-valve, two-stage and two-valve thermostats, as well as electronically controlled devices. We put the rubber pipe on the fitting. When a liquid cools, its volume decreases and a vacuum is created in the system. Their malfunctions are associated with seal failure and leaks, and a lack of coolant leads to overheating. Below we will talk in more detail about possible malfunctions of thermostats, provide instructions for replacing and checking them, and also share a technique for reworking and upgrading this part, allowing you to increase its response threshold to 92C. Thermostat from grants for VAZ 2110!!!
Carrying out an inspection
The process of checking the thermostat is a relatively simple procedure. To begin, the removed thermostat bottle is lowered into a transparent container into which coolant has previously been poured. Next, this container is heated, periodically stirring the coolant and monitoring with a thermometer the moment when the cylinder rod begins to move. When the coolant reaches a temperature of 85C (±2C), the rod of a fully working device will begin to extend. When the liquid in the container is heated to 100C (±2C), it will extend completely.
Adjusting the stroke of the thermoelement
Trimming the heel of the thermoelement rod allows you to increase the temperature of the coolant to 85-90° C. We shorten the rod sequentially, 1 mm at a time. This should be done carefully, as its metal is quite soft. Each time after trimming, you need to install a thermostat in the car and monitor the temperature of the fluid while driving. If it does not satisfy you, the rod is shortened by another 1 mm. And so on until the temperature in the cooling system reaches 90-92° C, and the air in the cabin warms up to the required temperatures.
How to change the thermostat of LADA “Granta”
The LADA Granta is equipped with power units with 6 and 8 timing valves. The location of the thermostat in these models is different, and accordingly, the replacement procedure is also different.
To replace the thermostat on the eight-valve Granta version you need:
- Phillips screwdriver;
- socket wrenches for 10 and 13;
- crosshead screwdriver;
- key T30;
- container for coolant.
Replacing the LADA Granta thermostat (8 valve) is performed as follows:
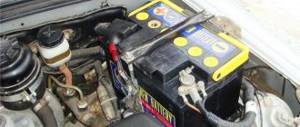
- install the LADA Granta on a site that has a slope so that the front part is higher than the rear;
- unscrew the bolts securing the engine protection and remove it;
- place a container for coolant under the radiator;
- remove the cap covering the expansion tank;
- Unscrew the drain plug on the radiator;
- drain the coolant into a container;
- tighten the drain plug on the radiator;
- press the latch and disconnect the wiring block from the coolant temperature sensor;
- loosen the clamp securing the rear hose to the thermostat cover pipe;
- remove the hose from the pipe;
- loosen the clamp securing the front hose to the thermostat cover pipe;
- remove the front hose from the pipe;
- unscrew the nut holding the ground wire to the thermostat mounting stud;
- remove the washer and the ground wire tip from the stud;
- unscrew the two nuts securing the thermostat to the engine, remove and set aside the washers;
- pull the thermostat housing off the studs;
- remove the thermostat gasket;
Important: when removing or replacing the thermostat, the sealing gasket must be replaced with a new one!
- unscrew the three bolts holding the thermostat cover;
- remove the cover;
- press out the thermostat fixing plate, overcoming the resistance of the spring;
- turn the plate, remove it from the grooves and pull it out;
- remove the spring;
- pull the thermostat out of the housing.