Axle shaft of VAZ 2107, 2106, 2101 - removal and replacement.
We hang the rear of the car on supports, first remove the rear wheel, then the brake drum.
Using a jack, raise the edge of the rear axle beam so that after removing the axle shaft, oil does not spill out. Using the head 17, through the holes in the flange of the rear axle shaft of the VAZ 2107, unscrew the four nuts.
Remove the elastic washers with tweezers.
We attach an impact puller to the axle shaft flange and knock out the rear axle shaft of the VAZ 2107 from the beam.
You can use a removed wheel instead. We unfold it and put it on the reverse side. We fasten it with two bolts and sharply pull out the rear axle shaft.
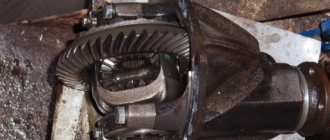
The axle shaft is removed along with the oil deflector, mounting plate, bearing and locking ring.
A rubber O-ring is installed between the beam flange and the brake shield.
Using pliers, remove the axle shaft cuff from its socket in the rear axle beam.
Using a hammer not very strong blows on the socket head, or a piece of pipe of suitable diameter, we press in a new cuff.
In case of deformation of the axle shaft, large radial and axial clearances in the bearing, displacement of the locking ring, wear of the splines, the axle shaft must be replaced with a new assembly. Replacing just the bearing and lock ring yourself is not recommended. Install the axle shaft in the reverse order of removal. Replacing an axle shaft on a VAZ 2106 is not a Nissan repair, so you don’t need to use expensive lubricant. Before installation, lubricate the working surfaces of the cuff with Litol-24 lubricant.
Useful tips for replacing the VAZ 2107 axle bearing
When repairing a VAZ 2107 axle shaft, you must adhere to the following tips and rules:
To avoid damaging the axle shaft when cutting off the old bearing with a grinder, it is necessary to saw only the outer ring and the cage. It is enough to make several cuts on the inner ring, and then split it with chisels.
The new bearing is driven onto the axle shaft using a hammer. If you hit the bearing directly, there is a possibility of it being distorted or destroyed. Therefore, the bearing must be filled using a piece of pipe whose internal diameter is slightly larger than the diameter of the axle shaft.
It is unacceptable to heat the bearing before seating it on the axle shaft. A heated bearing enlarges and fits into place more easily, but this may result in “annealing” of the metal, worsening its physical properties. As a result of annealing, the ductility of the metal increases and the hardness of the metal decreases.
Replacing a VAZ 2107 axle bearing is a rather complicated task, but quite doable in a garage. The main thing is not to damage the surface of the axle shaft when removing and installing the bearing. When installing a new bearing, be careful when using a hammer, as the steel from which the bearing parts are made is very brittle. Otherwise, the procedure does not contain complex operations that require special qualifications and equipment.
Photo report on the removal and installation of the rear axle shaft on a VAZ 2106
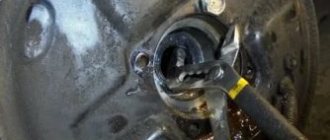
So, the first thing you need to do is remove the rear wheel mounting bolts, jack up the car and finally unscrew the bolts and remove the wheel. After this, it is necessary to remove the brake drum, since it is under it that all the axle shaft mounting nuts are located. As a result, we get the following picture:
Next, you need to align the holes in the axle flange with the fastening nuts. Since there are two such holes, you need to do this twice, of course, then turn the axle shaft so that the third and fourth fastening nuts are accessible in the holes.
It is advisable to first apply a penetrating lubricant and then rip it off with a wrench:
When the force is already small, you can use a ratchet handle for greater convenience:
When all 4 are completely unscrewed, you can then begin to remove the axle shaft. To do this, take the wheel, turn it over and screw it onto two bolts, just tighten it so that there is a slight spread across the bolts. This is clearly shown in the photo below:
And with sharp jerks using both hands we try to pull the axle shaft off the splines. This usually happens after the first jerk, since it does not require much effort:
Next, you can unscrew these bolts and remove the wheel, and finally remove the axle by hand:
After this, you can replace either the axle shaft itself or its bearing if necessary (I’ll write about this in future articles). Installation takes place in reverse order and does not take much time. The only thing worth noting is that when installing it is necessary to ensure that it matches the slots and hit it with a small blow. But I think that everything is clear from the video clip. As for the price of a new axle shaft for a VAZ 2106, it can range from 100 to 1300 rubles.
Photo report on replacing the rear axle axle shaft on a VAZ “classic”
So, the first thing you need to do is remove the rear wheel of the car, after first lifting the car with a jack. After this, remove the rear brake drum. When we have completed this task, we get something like the following picture, which is shown in the photo below:
After this, we place the holes on the flange so that the axle mounting nuts are visible through them:
And using a wrench and a 17mm socket, unscrew these nuts through the holes:
When these two nuts have been unscrewed, you need to slightly turn the flange so that two more appear through the holes:
And unscrew them in the same way as the previous two. After this, you must try to remove the axle shaft from the rear axle housing of the VAZ 2101-2107. There is a simple, but at the same time quite proven method for this: you need to turn the wheel inside out and tighten it lightly with two bolts:
And with sharp jerks we knock the axle shaft off the splines:
After the axle has come off, you can unscrew the wheel and finally remove it by hand:
We replace the bearing or the axle shaft itself if necessary and install it in the reverse order. The price of a new part is from 1200 rubles per piece.
What are axle shafts, why are they needed and how are they designed?
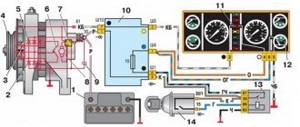
In rear-wheel drive cars, which the “seven” actually belongs to, the rear wheels are driving. It is they, rotating, that make the car move. The torque is transmitted to them from the gearbox through the drive (cardan) shaft, gearbox and axle shafts. There are only two axle shafts: one for each rear wheel. Their role is to transmit torque from the corresponding gear of the gearbox to the wheel rim.
Axle shaft design
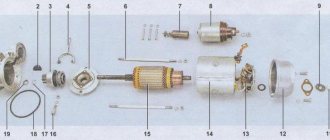
The axle shaft is an all-metal shaft made of steel. At one end there is a flange for attaching the wheel disk, and at the other there are splines for engagement with the gearbox gear. If we consider the axle shaft assembly, then in addition to the shaft, its design also includes:
- oil deflector;
- sealing gasket;
- oil seal (cuff);
- bearing. In addition to the shaft, the design of the axle shaft also includes an oil deflector, a gasket, an oil seal and a bearing.
Each of the axle shafts is installed in the corresponding (left or right) rear axle housing. An oil deflector with a gasket and an oil seal are used to prevent lubricant from leaking out of the casing. The bearing is designed to ensure uniform rotation of the axle shaft and distribute shock loads coming from the wheel to the rear axle of the vehicle.
1 — oil deflector; 2 - gasket; 3 - seal; 4 - oil seal; 5 - axle shaft; 6 - casing; 7 — bearing mounting plate; 8 — brake shield; 9 — bearing; 10 — fixing sleeve
Main technical characteristics of VAZ 2107 axle shafts and their elements
Axle shafts for the “seven” in Russia are produced under catalog number 21030–2403069–00. The right and left parts, unlike some other rear-wheel drive cars, are absolutely identical in the VAZ 2107. They have a diameter of 30 mm (for the bearing) and 22 slots. On sale you can also find so-called reinforced axle shafts with 24 splines, but to install them you will need to change the design of the gearbox.
Axle bearing
The bearing is the element that bears most of the loads. And although its declared resource is about 150 thousand kilometers, it can become unusable much earlier. It all depends on the operating conditions of the car, the serviceability of other transmission parts, as well as the quality of its manufacture. The most reliable today are considered to be bearings from the Vologda Bearing Plant, produced under article numbers 2101–2403080 and 180306. Imported analogues have catalog number 6306 2RS.
Table: dimensions and technical characteristics of bearing 2101–2403080
| Position | Index |
| Type | Ball |
| Number of rows | 1 |
| Direction of loads | Two-way |
| Outer/inner diameter, mm | 72/30 |
| Width, mm | 19 |
| Load capacity dynamic/static, N | 28100/14600 |
| Weight, g | 350 |
Stuffing box
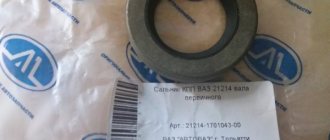
The axle shaft cuff has a much shorter lifespan than the bearing, since its main working material is rubber. It needs to be changed every 50 thousand kilometers. Axle shaft seals are available under catalog numbers 2101–2401034.
Table: dimensions and technical characteristics of the VAZ 2107 axle shaft seal
| Position | Index |
| Frame type | Rubberized |
| Type of rubber according to GOST | 8752–79 |
| Internal diameter, mm | 30 |
| Outer diameter, mm | 45 |
| Height, mm | 8 |
| Temperature range, 0С | -45 – +100 |
Malfunctions of VAZ 2107 axle shafts, their causes and symptoms
The main failures of axle shafts include:
- shaft deformation;
- fracture;
- wear or cutting of splines;
- Damage to the wheel rim mounting threads.
Deformation
The axle shaft, although made of high-strength steel, can become deformed under high loads. Such a malfunction is often a consequence of gearbox jamming, bearing problems, or the corresponding wheel falling into a deep pothole. A sign of deformation of the axle shaft is strong vibration of the wheel rim, sometimes accompanied by a hum, knocking, or crackling noise.
Fracture
The result of a wheel hitting a pothole or a strong impact on a bump can be a fracture of the axle shaft. In this case, the car loses control because one of the drive wheels stops rotating. If the axle shaft is broken, the gears of the gearbox may also fail, so if such a malfunction occurs, it must be checked.
Worn or cut splines
Natural wear of the axle shaft splines may appear after 200–300 thousand kilometers. More often they are cut off, which occurs when one of the wheels jams and the gearbox malfunctions. Also, the splines are cut off due to wear of the axle gear teeth that mesh with them.
A sign of spline damage is a crunching noise from the gearbox.
A sign of wear or cutting of the splines is a crunch (crack) from the axle shaft, which usually occurs when starting or moving downhill. The crunching sound indicates that the gear teeth are slipping between the axle shaft splines.
Damage to wheel threads
It is quite difficult to damage the threads on the flange, but such troubles still happen. The reason for this may be non-compliance with the tightening torque of the wheel bolts, incorrectly set direction of the bolts when tightening, or violation of the thread pitch on the bolts. A sign of thread damage is vertical play in the wheel, or beating in the rear of the car while driving.
If the listed malfunctions are detected, the axle shaft (one or both) must be replaced. Continuing to drive a vehicle with faulty axle shafts is extremely dangerous.
Signs of malfunction on the VAZ 2107
If the bearing itself fails or its seat breaks, the car owner will definitely notice this. We list a number of the main signs of failure of this part:
- While driving, a uniform low hum appears in the area of the rear axle, which over time can turn into a loud creaking or crackling sound. And the faster the car goes, the louder the noise becomes.
- A strong play appears on one of the rear wheels (to check this, just jack up the rear axle of the car and pull the wheel with your hands away from you and towards you).
- Balls fall out of the bearing (this means that the separator in which these balls are located has completely collapsed).
- Finally, the rear axle may simply jam. The drive wheels will stop rotating, and this can happen while driving (which may well cause an accident).
This is interesting: Some features of driving in poor visibility conditions
The cause of the destruction of a part can be both metal fatigue, which occurs due to very long cyclic loads on this part, and the quality of domestic roads, driving on which is often associated with impacts and other mechanical damage, falling on the rear axle.
Replacing the axle shaft
Let's look at the process of replacing the axle shaft, its bearing and oil seal in detail. Tools you will need:
- wheel wrench;
- a jack and a safety stand (in extreme cases, a stump or a few bricks);
- wheel stops;
- reverse hammer;
- wrenches 8 mm, 17 mm;
- slotted screwdriver;
- Bulgarian;
- round nose pliers;
- hammer;
- chisel;
- workbench with a vice;
- blowtorch or gas torch;
- spacer made of wood or soft metal;
- a piece of steel pipe with a wall diameter of 33–35 mm;
- Litol type lubricant;
- dry clean rag.
Removing the axle shaft
To dismantle the axle shaft, you should:
- Place the car on a flat surface and place chocks under the front wheels.
- Use a wheel wrench to unscrew the wheel bolts.
- Raise the car body with a jack.
- Unscrew the wheel bolts and remove the wheel.
- Using a size 8 wrench, unscrew the drum guide pins.
- Remove the drum. If it does not come off the blocks, carefully knock it down using a spacer and a hammer. If the drum does not budge, it must be knocked down using a hammer and a spacer
- Using a 17mm wrench (preferably a socket), unscrew the nuts (4 pcs) securing the axle shaft. They are located behind the flange, but you can access them through specially provided holes by turning the axle shaft. The bolts are unscrewed with a 17 socket wrench
- Using round-nose pliers, remove the spring washers that are located under the axle nuts. It is better to remove washers using round nose pliers or pliers.
- Disconnect the axle shaft from the rear axle by pulling it towards you. If it does not give in, use a reverse hammer. To do this, the tool flange must be screwed to the axle flange with wheel bolts. By sharply moving the hammer weight forward, knock out the axle shaft. If you don't have a reverse hammer in your tool arsenal, you can use a removed wheel instead. It needs to be screwed with the back side to the axle shaft flange and struck with a hammer on the tire from the inside until the axle shaft comes out of the casing. If you don't have a hammer, you can use a removed wheel instead.
- Remove the axle shaft assembly with the bearing and its retaining ring. The axle shaft is removed complete with oil deflector and bearing
- Remove the sealing gasket located between the brake shield and the axle shaft flange. The gasket is installed between the axle flange and the brake shield
- Using round nose pliers or pliers, remove the oil seal from its seat. The oil seal is removed using pliers
How to remove a broken axle shaft
If the axle shaft is broken, it will not be possible to dismantle it in the usual way. But there are other methods. If the shaft breaks directly in front of the flange and its broken end sticks out of the bridge casing, you can weld a piece of reinforcement to it, and then use it to pull out the rest of the axle shaft.
If the axle shaft breaks inside the casing, you can try to knock it out with a piece of reinforcement inserted from the back side of the bridge, after first removing the opposite axle shaft. In extreme cases, to remove a piece of shaft, you will have to disassemble the gearbox.
Removing and installing the bearing on the axle shaft
When replacing the axle shaft with a new one, it is recommended to replace the bearing, but if the old one is still fully functional, you can install it too. But to remove it you will need to remove the retaining ring. To do this you need:
- Securely fix the axle shaft in a vice.
- Using a grinder, saw through the outer part of the ring. To remove the ring you need to saw it, and then break it with a hammer and chisel
- Crack the ring body using a chisel and hammer.
- Remove the remaining ring from the shaft.
- Carefully knock the bearing off the axle shaft using the same tools. Apply blows only to the inner race of the bearing. Otherwise, you will damage it and will no longer be able to use it.
- Inspect the new axle shaft and bearing for manufacturing defects. Before installing a new bearing, you need to make sure it is in good working order.
- Remove the rubber boot from the bearing housing.
- Place grease between the bearing races.
- Reinstall the boot.
- Place the bearing on the axle shaft. Be careful: the bearing is installed so that the boot “looks” at the oil deflector.
- Place a piece of steel pipe against the bearing so that its walls rest against the end of the inner race.
- Applying gentle blows with a hammer to the opposite end of the pipe, seat the bearing in its place.
- Use a blowtorch or gas torch (you can use a burner from a regular kitchen gas stove) to heat the retaining ring. Don’t overdo it: you don’t need to heat it until red hot, but until there is a white coating on the surfaces. The ring must be heated until a white coating appears.
- Using pliers, place the ring on the axle shaft.
- Shrink the ring by hitting it lightly with the back of the hammer. To make it cool faster, pour motor oil on it. To cool the ring, you can pour it with motor oil.
Installing the oil seal
To install a new oil seal:
- Wipe the seat with a clean, dry cloth.
- Lubricate the socket surfaces with grease.
- Lubricate the oil seal itself with grease.
- Install the part into the mounting socket. Before installing the oil seal, it must be lubricated with grease.
- Using a hammer and a piece of pipe, carefully press in the oil seal.
Installing the axle shaft
Once the bearing and seal are installed, you can install the axle shaft. Installation is carried out in the following order:
- We install the sealing gasket.
- Insert the axle shaft into the housing until it stops. Check how the splines engage with the gear teeth by turning the axle shaft in different directions.
- Apply a few gentle blows with a hammer to the axle shaft flange to make sure it is seated correctly.
- Install spring washers onto the axle shaft studs. Install and tighten the nuts securing the axle shaft with a 17 mm socket wrench.
- Place the drum on the shoes and secure it with guide pins.
- Mount the wheel.
- Check to see if there is any play in the axle shaft or bearing by trying to shake the wheel along the vertical and horizontal axes.
- Lower the body and remove the chocks from under the front wheels.
- Tighten the wheel bolts.
- Check whether the signs of axle shaft malfunction have disappeared by driving on a flat section of the road.