November 30, 2015 Lada.Online 113 320 18
In addition to the multimedia system, AvtoVAZ installs a simpler audio system on the Lada Vesta. It has a 4.3" monochrome display, FM/AM with RDS, USB, AUX, Bluetooth and Hands free functions. There are 4 speakers paired with the radio. Let's take a closer look at the capabilities of this radio.
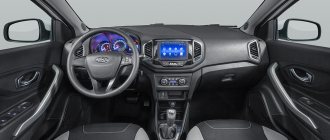
Lada Vesta Lux
This car has the best equipment. In order to control the multimedia navigation system, a seven-inch diagonal display
. There are triters in the mirrors and standard speakers.
Today, the radio has become an indispensable attribute of a modern car. This also applies to the new product on the domestic market – Lada Vesta. Initially, this model in most versions is not equipped with speakers. Only the “Comfort” variation is able to provide its owner with standard loudspeakers.
Note that not every Lada Vesta configuration is equipped with a radio, although all cars have audio preparation. In the poorest version in terms of equipment, the seats for the speakers are closed using soundproofing panels. And in this case, installation of a radio is required. Many car owners need to know what audio training is included in it?
Setting up the Lada Vesta radio
First you need to apply power by pressing the device's power key or encoder knob. Switching off is carried out automatically after turning off the ignition.
There is a battery in the panel to save radio stations when the battery is low for ten days.
The band is supported by FM/AM. Frequencies are selected in two ways: automatically and by selecting the encoder knob, RDS AF, RDS PTY, RDS REG keys. There is a noise reduction function.
Audio adjustment is carried out in the following order: equalizer, bass tone, treble tone, balance, front/rear balance, loudness, output.
The equalizer adjustment on the video is as follows: EQ JAZZ, EQ POP, EQ CLASSIC, EQ VOCAL, EQ USER. In the time section, the hours/seconds of the required time zone are set.
The hands free function allows you to connect your phone via Bluetooth. The connection is established in the setup menu on the touch panel.
General provisions
Installing music is not a complicated process, but it is responsible. Before directly installing audio components in the Lada Vesta interior, you will need to understand what composition of elements constitutes audio preparation. Therefore, a logical question arises: what is included in audio training?
The “Classic” modification has all the required minimum, allowing you to seamlessly connect both the head unit and dynamic heads. We are talking about the presence of cable lines, with the help of which the designated components of the audio system are switched.
Note that the corners of the doors near the exterior mirrors in this version of the equipment do not have wiring for connecting tweeters.
Installing music involves removing the plastic plug. After removing it, we find connectors according to ISO and FAKRA standards. They allow you to connect the antenna unit. We also see the presence of “USB” and “AUX” connectors.
You can install a 1DIN format radio in the seat. The installation process itself is not capable of causing any difficulties for the owner. It involves the need to connect wires. Please note that in order to successfully install a radio that fits the “2DIN” format, you will need to perform a number of serious modifications to the panel.
Installation of loudspeakers in Lada Vesta is endowed with certain nuances.
Important! To connect standard dynamic heads, non-standard connectors are used, similar to those that can be found in Renault-Nissan cars. To be able to switch analog speakers, you will need to purchase adapters such as “ZRS-AG-22” or “CT55-17”. We do not recommend removing factory connectors, since if such an action is discovered, you may lose your warranty coverage.
Replacing the Lada Vesta head unit
If the standard Lada Vesta radio does not suit you for some reason, then you can always replace it. Fortunately, now you can find anything on sale. The simplest option would be to install a multimedia system from more expensive models, and in particular the DVM 2117 iQ Multimedia Center with Navitel software is suitable. It can be ordered from officials at a price of about 35 thousand rubles. Or find it on the same Avito. You can also use article number 99999021174700 and order this system in the online store. In the last two cases, you will be able to save a lot.
But, unfortunately, not everyone can or wants to spend 30-35 thousand rubles on MMS. For those who want to save money but get the full functionality of the Lada Vesta multimedia system, there is a way out. You can install almost any 2DIN radio on a Lada Vesta car. To do this, you only need to purchase a special frame, which can also be found in specialized online stores. This frame looks like this:
And now we invite you to familiarize yourself with the three best radios in terms of price and quality, which can be easily installed on a Lada Vesta instead of the standard one. So, let's go.
1. AD-UNI707 is a Chinese radio that can be found on AliExpress. Here is the link to the product. Its advantage is that it runs on Android 6.0 OS, has a 7-inch display with a resolution of 1024x600 pixels, and 1 GB of memory. The price of this device is approximately 13 thousand rubles. Plus, this radio tape recorder fits organically into the interior design. How it works - look at the video.
2. MEKEDE MKD is another Chinese radio. It costs about 16 thousand rubles, but is designed for Lada Vesta cars, i.e. There will be no need to be tricky with the frames. You can immediately take this radio and install it instead of the standard one. It will fit perfectly into the seat. It also runs on Android OS, has an 8-inch display and 2 GB of built-in memory. The screen resolution is the same as the previous one - 1024x600. How it works - look at the video.
You can order here: link
3. 7021G. And China is in touch again. Another radio from AliExpress. It seems that the Chinese are ahead of the rest. We are looking for the necessary electronics and will definitely end up in China. But let's return to our radio. 7021G is the most budget option for those who want to get a standard set of functionality for such devices and a display on which something will be visible. So, 7 inches, 800x480, Windows CE6 OS. How it works - look at the video.
You can order here: link
Mounting speakers
There is no need for special training when installing speakers. It will be enough to remove the insulating material located in the places where the speakers will be mounted. We will need special gaskets that can be cut from felt material.
If 16-centimeter loudspeakers are mounted in the front door cards, then this procedure has a number of features. The standard set of fasteners involves fixing the speaker with three screws. In our case, we will need to install special spacers, whose dimensions depend on the size of the dynamic heads.
Using this technology, speakers are installed in the rear door panels of LADA Vesta.
Setting up the on-board computer on the Lada Vesta
We probably won’t find answers to all our questions there, since the menu is a service menu. It is necessary primarily for diagnostic specialists.
According to AvtoVAZ's plan, there is no need to provide the car owner with access to the functions of the Lada Vesta on-board computer . If the owner of the car mistakenly turns off the sound of the turn signal completely, then this mistake can be costly; in the event of an accident, it will be considered a breakdown.
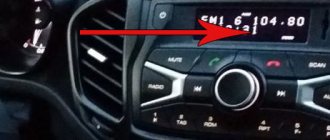
Practice shows that many have independently figured out the hidden functions of the built-in software, adjusting the tone and volume when the turn indicators are triggered, and hazard alarm settings. The purpose of the review is not to unravel secrets that are inaccessible to the average car user. Our topic concerns the classical difficulty. What should I do if the current time is shown on the dashboard? How to fix it?
Introducing metrics display features
To select the control function of the parameter we need, we need to use a special joystick.
It is located on the right side immediately under the steering wheel, attached to the steering column. This is the lever at the end of which our control panel is located. There are two arrows on it indicating the direction “up” and “down”, between them there are two rows of white dots, three in a line.
On-board computer functions.
If you briefly press the up or down pointer, the dashboard will sequentially display changes in various indicators: instantaneous, current fuel consumption, temperature, and the latest mileage indicators. The display occurs on the right in the second row from the bottom of the main display. By briefly pressing the joystick in the middle with your thumb, you can switch the display in the bottom center line of the panel. The readings of the ambient temperature, odometer and time can be changed sequentially in a circle.
How to choose a speaker system?
If the owner of a LADA Vesta needs high-quality sound, we recommend choosing two-component speakers. For these accessories, the high-frequency emitter is placed in a separate unit in relation to the low and mid-frequency head.
It is advisable to install such components in the front doors. The rear door panels can be "addressed" with lower quality coaxial speakers, which will serve as an expansion of the sound theater. To install high-frequency heads, additional cabling will be required. This is how the speakers are installed.
Recommendations for installing acoustics on Lada Vesta
Sound devices for domestic products are not very sensitive, but have a number of positive advantages: high-quality frequency indicators, a wide directional range and good sound balance.
It is recommended to mount car speakers for mid- and low-frequency frequencies at the rear, and for high-frequency speakers at the front, since a different position will affect the loss of playback perspective. The subwoofer can be installed in the trunk or under the seats.
Replacement and installation of radio in Lada Vesta
Radio for Lada Vesta It is necessary to understand that installing 16 cm speakers in the front doors is a simple matter, but for knowledgeable people. If you pry the case of the media player from the bottom, and then pull out the fixing rivets from the plugs, you can easily remove the radio cover. A picture with four connectors will open before us:
- universal bus for acoustics ISO consists of a pair of plugs and reduces dependence;
- The FAKRA port is designed to transmit information at high frequencies; in a car it provides a signal for the antenna;
- USB – a connector designed for connecting external media (flash drive);
- The AUX port is used to transmit external impulses and control the player without a standard panel (smartphone).
On a note!
There is not enough space on the dashboard to install a 2DIN player for additional upgrades. A single-block media system fits into the interior of the Lada Vesta without much effort, you just need the right approach to connection.
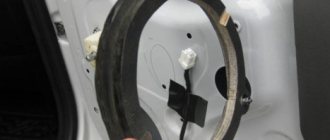
We mount speakers in the Lada Vesta door frame
The first step is to prepare the space for acoustics. The sound insulation should be removed by removing the trim. Here the design is similar to that of Renault Logan. The installation area is equipped with only three mounts, rather than the usual four. For the audio element to work properly, you need to make or buy special stands and place them in this area. The dimensions must match; it is necessary to check the connections of the mounted part.
Installing speakers on a car Installing speakers in a Lada Vesta involves the use of holders. Spacers for speakers in Lada Vesta cost about 800 rubles. Their installation takes no more than five minutes. You just need to unscrew the two screws at the bottom of the trim, bend the trim towards the door and push the spacer into the space. They fit tightly between the skin and do not require additional fastenings.
On a note!
The wires are already installed at the factory, but there is a slight problem with non-standard connectors. If you install speakers in the front doors yourself by mechanically replacing the plugs, there is a possibility of losing warranty service. A rational solution in such a situation is to use an adapter.
Rear fill – meaning and usage
The sound coming from behind gives the melody volume. The designed audio system eliminates high frequencies in the rear speakers. Two-channel or stereo designs will be adjusted if you can clearly distinguish between the “lows” and “highs” in the front seats.
Tips when installing an audio system
As we can see, the installation of acoustic components in the LADA Vesta interior is not capable of generating difficulties and dead ends. The main thing for the owner is to adhere to simple but useful rules, namely:
- We carry out the entire list of manipulations extremely carefully, without breaking the fasteners or scratching the panels.
- Since audio preparation is initially present, we just need to connect the speakers and head unit.
- We do not cut off the standard connectors, but stock up on the previously specified adapters.
- Before directly installing the dynamic heads, we soundproof the door panels.
- Installation of the speakers is carried out on previously prepared gaskets.
Buy tuning for Lada Vesta at an affordable price
If you have long been eager to improve your car, to make it stand out among its fellows, then there is nothing simpler than tuning. This is a universal, and most importantly, very affordable way to transform your favorite car. In the LadaVestaTuning online store you can buy not only tuning parts, both for the exterior and interior, but also various accessories, trims, radiator grilles, acoustic shelves, armrests, mats, optics and much more. For ease of ordering, Lada Vesta tuning is shown in the photo.
Buy tuning for Lada Vesta in the Ladavestatuning online store at affordable prices. Improve your car and make it special. Simply select the product you need and add it to your cart. It will only take you a couple of minutes to place your order. Take the first step towards changes, and your car will open up for you from a new side. Tuning the exterior and interior of the Lada Vesta is a great way to modify the car without much intervention in its original image.
We work 24 hours a day. Hurry up to create a unique style for your car!