↑ Wheel alignment angles after maintenance
After the first maintenance (after 1500–2000 km) and during further operation of the vehicle, the wheel alignment angles should be:
- camber — 0°30'±20' (0° 5'±20')*;
- longitudinal angle of inclination of the turning axis - 4°±30' (3°30'±30')*;
- toe - 2-4 mm (3-5 mm)*.
The difference in the longitudinal angles of inclination of the turning axes of the right and left wheels should not exceed 0°30'.
Before adjusting wheel alignment, check:
- tire air pressure;
- axial clearance in the front wheel hub bearings;
- serviceability of shock absorbers (no rod jamming);
- radial and axial runout of tires;
- clearance in the upper ball joints of the suspension;
- free movement of the steering wheel.
Eliminate any detected faults and make the necessary adjustments.
In what situations is it necessary to adjust wheel alignment?
First, let's define what constitutes wheel alignment. This concept refers to the angle of their installation relative to the vertical axis. If the top of the wheel tilts slightly outward, there is positive camber. Otherwise, we get an angle with a minus sign.
Convergence occurs already during the movement. This parameter may differ depending on the model of a particular car.
For example, on rear-wheel drive cars the toe-in should be positive, and on front-wheel drive cars it should be negative.
As we mentioned above, adjustment of wheel alignment may be required after any work on repairing suspension elements. In addition, it is impossible to do without it in the following cases:
- Fuel consumption increases significantly during normal operation of the engine and fuel system of the vehicle;
- tires wear out very quickly and unevenly;
- deviations in wheel alignment adjustment are visible even to the naked eye;
- Even on a perfectly flat highway, the car “steers” in one direction or another.
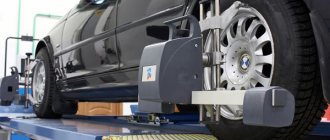
↑ Control and adjustment of wheel alignment angles
Monitoring and adjustment of wheel alignment angles can be carried out both on a loaded vehicle and on an unloaded one, however, monitoring the angles on a loaded vehicle gives more accurate results. Therefore, in critical cases, it is recommended to control and set angles on a car under a static load of 3136 N (320 kgf), which corresponds to approximately the weight of four people and a load of 40 kg in the trunk.
The car is loaded either with special weights suspended from the bottom of the body, or with ballast (280 kg) placed on the seat cushions and in the trunk (40 kg). The front seats should be in the middle position of their longitudinal travel. The cargo in the trunk is evenly distributed. The lack of fuel is compensated by the cargo located on the right side of the trunk area.
After installing the car on the stand, immediately before checking the angles, “press” the car’s suspension, applying a force of 392–490 N (40–50 kgf) 2–3 times, directed from top to bottom, first on the rear bumper, and then on the front. In this case, the wheels of the car must be parallel to the longitudinal axis of the car.
Why do you need to adjust the front wheel alignment yourself on a Lada 2107?
Violations in wheel alignment create a whole bunch of negative consequences that directly affect the level of car controllability:
- Inadequate reaction of the car to steering wheel turns - wheels leaving the chosen trajectory, skidding and loss of directional stability.
- Wear of front suspension components: bearings in hubs and articulated joints.
- Increased tire wear.
An untimely do-it -yourself alignment on a VAZ 2107 may entail replacing the supports or their bearings, which means significant financial expenses. The factor of damaged tires, which, at incorrect angles, lose their quality in just a few months, will not add to optimism. We must not forget about the procedure for adjusting caster in the event of body repairs after an accident or replacement of front suspension parts.
Manufacturer's recommendations
Modern car enthusiasts have already forgotten the standards for carrying out maintenance on the “Seven”, but in vain. According to the manufacturer’s recommendations, adjustments to wheel alignment values are carried out after 10,000 km , and the angle values must correspond to the following indicators:
- The camber angle is 4°30'+20′ or 0°5'+20′ when the vehicle is unloaded.
- Wheel toe - for a loaded car 2-4 mm or 3-5 mm for an unloaded car.
- Castor – 4°±30′ for a loaded car or 3°±30′ for an empty car.
↑ Angle of longitudinal inclination of the axis of rotation. What to do if it does not meet the norm?
↑ Front suspension:
- front wheel hub bearings;
- hub cap;
- adjusting nut;
- washer;
- steering knuckle axle;
- wheel hub;
- stuffing box;
- brake disk;
- ball pin of the upper support;
- rounded fist;
- ball pin protective cover;
- upper support bearing;
- upper suspension arm;
- upper support bearing housing;
- compression progress buffer;
- compression stroke buffer bracket;
- shock absorber support cup;
- shock absorber mounting pads;
- cushion washer;
- suspension spring insulating gasket;
- suspension spring upper support cup;
- upper suspension arm axis;
- inner bushing of the hinge;
- outer bushing of the hinge;
- rubber bushing of the hinge;
- support washer;
- adjusting washer;
- spacer washer;
- bracket for fastening the cross member to the body side member;
- front suspension cross member;
- stabilizer bar mounts;
- stabilizer bar cushion;
- stabilizer bar;
- body spar;
- lower arm axis;
- lower suspension arm;
- lower arm axle mounting bolts;
- suspension spring;
- stabilizer bar mounting clip;
- shock absorber;
- shock absorber mounting bolt;
- nut securing the shock absorber bracket to the suspension arm;
- bracket for attaching the shock absorber to the lower suspension arm;
- suspension spring lower support cup;
- lower support liner clip;
- lower support bearing housing;
- ball pin race insert;
- lower support bearing;
- ball pin;
- front wheel rotation limiter.
If, when checking, the angle value does not correspond to the data given above, change the number of adjusting washers 27 installed between the axis of the lower arm and the cross member.
Adjusting the toe and camber of VAZ-2101 wheels
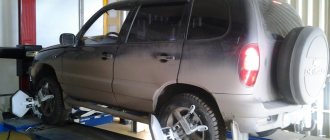
To check the wheel alignment angles, you need the simplest tools - a ruler or caliper with a length of at least 100 mm, a plumb line (thread with a weight), a cord about 3 m long - and a horizontal platform. Since in most cases, after checking, it becomes necessary to adjust the angles, it is better to carry out this work on an overpass or inspection ditch so that the tool can be reached to the front axle of the car. The platforms on which the wheels will stand must be in the same plane and located horizontally. It should be noted that correct wheel alignment angles can be ensured only when the position of the wheels themselves is stable while driving. Therefore, the camber and toe are checked after first making sure that the front suspension and steering are in full working order, that there is no increased play in their moving joints - the front wheel hub bearings, the ball joints of the swivel struts, the tie rod ends, the bushings of the suspension arms and the axle of the pendulum arm. In addition, the condition of the rubber bushings of the rear suspension rods is monitored; tighten all mounting points of the front and rear suspensions, loading the car (320 kg). Then check the fastening and condition of the wheels and tires, bringing the pressure in them to normal (or 0.1 atm more than prescribed in the instructions).
Determination of wheel equal runout points
Only after all this do they begin to adjust the unloaded machine. Having hung the front wheels and turning them, we determine and mark with chalk diametrically opposite points of equal runout on the protruding parts of the tire sidewalls. Then we remove the decorative caps from the front wheels and install the steering wheel in a position corresponding to the linear movement of the car - its spoke should be located horizontally.
Wheel position when checking camber
Now we turn the front wheels so that the previously marked points of equal runout of the tires of both wheels are located vertically. By pressing on the bumper, we roll the car forward and backward to eliminate the influence of the supports on the position of the wheels.
Determination of wheel camber
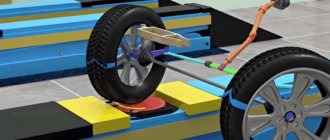
: 1 - cross member; 2 — adjusting washers; 3 - lower lever; 4 - plumb line; 5 — wheel tire; 6 — upper lever; a and b - distances from the thread to the edges of the rim
Finally, you can begin to determine the camber angle of the wheels. To do this, we bring a plumb line to the top of the tire and measure with a ruler the distances “a” and “b” between its thread and the rim at the lower and upper points of the wheels. If the difference between the obtained values (b-a) is in the range from 1 to 5 mm, then the camber angle of the wheels is normal. A difference of less than 1 mm indicates that the angle is insufficient. To increase it, you should remove the required number of shims (washers) located between the axis of the lower suspension arm and the cross member, after first loosening the two fastening nuts. If the camber angle is excessive (b-a more than 5 mm), washers must be added. Remember that the change in their total thickness should be the same under the front and under the rear bolt. Otherwise, the longitudinal angle through which the steering axis of the wheel tilts will be disrupted, and as a result the car will be pulled to the side.
↑ How to adjust or adjust the camber angle of the front wheels
If the camber angle differs from the norm, adjust it by changing the number of adjusting washers 27 installed between the lever axis and the cross member, following the table:
↑ What to do if the camber angle and longitudinal inclination of the wheel rotation axis changes when the number of washers in the packages changes?
To increase the camber angle, remove the same number of washers from both bolts, and to decrease it, add more.
↑ What to do if the toe-in of the front wheels is different?
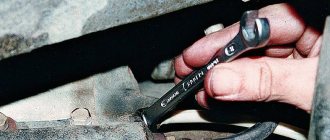
If the toe-in value differs from the norm, loosen the side tie-rod clamps and use wrench 67.7813.9504 to turn both couplings the same amount in opposite directions; In this way, the couplings are screwed in or out and change the length of the side rods.
After making the adjustment, install the tie clamps with the slot horizontally with an upward or downward deviation of no more than 60° and tighten them in this position. When the nuts are tightened, the edges of the slots in the tie clamps should not touch.
Adjusting the camber - toe-in yourself in the garage
If there is no money for service station maintenance or there is an interest in making adjustments yourself, then first you need to diagnose the chassis. If the chassis system is not in order, then there is no point in doing a wheel alignment.
There are several parameters that determine the vehicle wheel alignment angles:
- tire pressure;
- vehicle load;
- running condition.
Before proceeding with the adjustment, you need to empty the trunk, check the pressure by comparing it with the table, and make sure that the chassis system does not require repair.
It is advisable to carry out the work in a garage where there is an inspection hole. The floor in the room must be perfectly level. You must first prepare the following tools:
Adjusting the camber and toe primarily concerns the wheels located in the front. The angle is adjusted as follows:
- It is necessary to install the car on a flat horizontal surface. The front wheels should point straight ahead.
- Make two chalk marks on the rubber - at the bottom and at the top.
- Attach the thread of the plumb line to the wing and measure the segment from the rim to the plumb line at the lower and upper points. The difference should not be more than 3 mm.
- Move the vehicle so that the wheels turn 90 degrees. Repeat measurements.
If adjustment is required, then you need:
- Remove the wheel.
- Loosen the connection between the support part of the oil pump strut and the steering knuckle using a No. 19 wrench.
- Based on the parameters obtained from the measurements, move the car suspension part inward or outward.
After making the adjustment, you should assemble all the parts and take the final measurement. When adjusting the camber of a front-wheel drive car, you can allow an error of +- 1 mm, and for rear-wheel drive + 1-3 mm. If the first attempt fails, everything must be repeated.
To adjust toe, you need to take the following steps:
- To ensure smooth rotation of the wheels, the space under them must be treated with a foam solution.
- The steering wheel of the car should be fixed in the “straight” position.
- Pull a thin, strong thread along the center of the hubs at the same distance from the center of the rear and front wheels. Determine the distance from the thread to the rim points located in front and behind.
- If the difference in distances is more than 3 mm, then it is necessary to change the length of the tie rod by turning the coupling with a No. 13 key.
- During the regulation process, keep under strict control the change in the difference in distances from the thread to the rim.
- Do the toe-in of the second wheel in the same way.
The rear wheels are adjusted much less frequently, but you shouldn’t completely reject this, since they are installed at a certain angle. Incorrect rear wheel camber often involves deformation of one or more elements of the rear axle. To set the correct camber angles, deformed areas should be eliminated or updated. Most often this is enough.
To ensure that the instructions are not dry information, to reinforce the material, you can watch the detailed video:
vaz2107 Both the natural wear of suspension elements and repeated impacts on uneven road surfaces can disrupt the architecture of geometric connections. However, manipulations with steering elements or front suspension components also entail the need to adjust the geometry.
A qualified do-it-yourself camber adjustment on 2107 ensures the correct relative position of the wheels, guaranteeing:
- safe behavior on the road (no pulling to the side or “yaw”);
- uniform tire wear;
- optimal operating conditions for suspension elements.
Let's sum it up
You need to set the correct front suspension geometry on a level surface using the following tools:
- Template for determining the castor angle.
- Plumb line and string with hooks.
- Caliper or ruler.
- Bar 28 mm thick.
- Set of keys.
Having adjusted the caster by rearranging the washers, you can begin adjusting the angles of the front wheels in the following sequence: adjusting the camber by adding/removing washers and adjusting the toe by rotating the steering linkages.
I decided to adjust the alignment. There will be a theory at the end. I took the fishing line and cut off the plates and made them into a sharp corner.
He brought fishing line to the corners.
This would be a catch on the tread.
I took a soft spring and connected two fishing lines with corners.
Next, I made two bars from the block, one 22mm and the other 6mm.
The end result is this design.
To perform the work of checking wheel alignment, we use a strong thread with hooks tied at the ends. We hook the hooks to the tread at the level of the axles of the rear and front wheels. Since the track of the rear wheels is 44 mm smaller than the track of the front wheels, we place a 22 mm thick block under the thread to the sidewall of each rear wheel.
We install the steering wheel in such a position that the thread touches the sidewall of the front wheel tire at diametrically opposite points.
We fix the thread on the treads on the opposite side of the VAZ 2107 and place a 6 mm thick block under the thread on the sidewall of the rear wheel.
Thus, the total thickness of the bars on one side of the rear wheel will be 28(22+6) mm. With a toe-in of 1 mm for one front wheel, the thread should lightly touch the sidewall of its tire at diametrically opposite points.
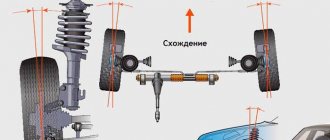
And now a theory from the Internet. Wheel alignment angles (wheel alignment) are design parameters that determine the position of the wheels on the car in straight-line driving mode and in turns. Deviation of wheel alignment angles from standard values can cause unstable movement (spontaneous deviation from a straight line, “yaw”), uneven and premature wear of tires and suspension parts, as well as increased fuel consumption. The caster angle is the angle between the vertical and the steering axis of the wheel when viewed from the side. The angle is adjusted by changing the number of adjusting washers on the bolts securing the axis of the lower arm, suspension, which ensures stabilization of the wheels when the car moves in a straight line. The camber angle is the angle between the plane of rotation of the wheel and a vertical straight line passing through the center of the tire contact patch with the road surface. The camber angle of the wheels is not regulated by simultaneously changing the number of adjusting washers of the same thickness on both bolts of the lower arm axle, which ensures the correct position of the wheel during suspension operation. Wheel toe is the difference in distances between the front and rear points of the inside of the rims of the right and left wheels. It is recommended to check and adjust the alignment angles of the front wheels on a VAZ 2107 on a stand in a specialized workshop, however, the operation of checking the alignment angles of the front wheels on a car (with the exception of checking the longitudinal inclination angle of the turning axis) can be performed with sufficient accuracy with your own hands. More accurate results are obtained by monitoring angles on a loaded vehicle under a static load of 320 kg, which approximately corresponds to the weight of four people placed on the seats and a load of 50 kg in the trunk. The fuel tank on the vehicle must be completely filled. After the first maintenance and subsequent operation, the value of the angles must correspond to the following values: — the longitudinal inclination angle of the wheel rotation axis: 4°±30′ (3°±30′)*; — wheel camber angle: 4°30'+20′ (0°5'+20′)*; — wheel toe: 2 — 4 (3 — 5)* mm. * values of angles on a VAZ 2107 without load are indicated in brackets. Before checking the wheel alignment angles (camber - toe), we check the air pressure in the tires, the absence of axial and radial runout of the tires, play in the hub bearings, play in the upper ball joints of the suspension and free play of the steering wheel. If necessary, we eliminate identified faults. Before checking the angles, set the steering wheel to the position of straight-line movement of the car. We “press” the suspension of the VAZ 2107 by applying a vertical force of 40-50 kgf 2-3 times, first to the rear bumper, and then to the front. We check the wheel alignment angles (camber - toe) on the VAZ 2107 in the following order: - the longitudinal inclination angle of the wheel rotation axis (checking and adjusting the longitudinal inclination of the wheels is possible only in a specialized workshop); — wheel camber angle (you can check the wheel camber angle yourself, but adjusting the wheel camber angle is possible only in a specialized workshop); — wheel alignment (you can check and adjust wheel alignment on a VAZ 2107 yourself). Checking the camber angles 1. First of all, you need to prepare the car for adjusting the camber. 2. We carry out the preparatory work necessary before checking the wheel alignment angles. 3. Using a caliper, measure the distance from the plumb line to the top and bottom points of the rim and determine the difference in distances. A difference of 3 mm approximately corresponds to a camber angle of 30′. Wheel alignment. The toe-in of the wheels on the VAZ 2107 is adjusted by changing the length of the steering rods by rotating their threaded couplings. This ensures the correct position of the vehicle's front wheels at different speeds and turning radii. 1. We prepare the car for operations. 2. We carry out the preparatory work necessary before checking the wheel alignment angles. 3. To perform the work of checking wheel alignment, we use a strong thread with hooks tied at the ends. We hook the hooks to the tread at the level of the axles of the rear and front wheels. Since the track of the rear wheels is 44 mm smaller than the track of the front wheels, we place a 22 mm thick block under the thread to the sidewall of each rear wheel. 4. Place the steering wheel in such a position that the thread touches the sidewall of the front wheel tire at diametrically opposite points. 5. We fix the thread on the treads on the opposite side of the VAZ 2107 and place a 6 mm thick block under the thread on the sidewall of the rear wheel. Thus, the total thickness of the bars on one side of the rear wheel will be 28(22+6) mm. With a toe-in of 1 mm for one front wheel, the thread should lightly touch the sidewall of its tire at diametrically opposite points. We adjust the toe-in of the wheels on a VAZ 2107 ourselves. To do this: 1. Using two 13 mm wrenches, loosen the tie clamps of the outer tie rod coupling. 2. Using sliding pliers, rotate the clutch and adjust the length of the rod until the gaps between the thread and the sidewall of the front wheel tire disappear. 3. Tighten the clamps. We carry out similar work with the other wheel and achieve a total toe-in of the front wheels of 2 mm. To set the toe of one wheel equal to 1.5 mm, it is necessary to place a block with a thickness of 31(22+9) mm under the thread, for a toe of 2 mm - 34(22+12) mm, respectively.
How to adjust wheel alignment on a VAZ 2107 car with your own hands: key points
Adjusting the wheel position parameters is difficult to do on your own, so it is better to use the services of a good assistant. But even if you couldn’t find one, then don’t despair - by slowly acting on the points listed, you will be able to implement the setup operations in full.
Setting the Camber Angle
To adjust the camber or toe of the front wheels on a Lada with your own hands, it is enough to perform several simple operations. To measure actual values, take a plumb line and a caliper. Further actions are carried out according to the following scheme:
- Place a plumb line at the top of the tire sidewall.
- Using a caliper, measure the distance from the disk rim to the string at the lower and upper points.
- Determine the difference between the results obtained. For example, if the difference between the numbers at the lower and upper points is 3 mm, then this indicates that the camber angle is 30°.