The chassis of a car is a very important element. And with any intervention, it is necessary to re-set the wheel angle. If these procedures are not carried out, then the car on the road may not behave very well, cornering will be worse, all this will affect braking and acceleration, and much more. Of course, today many in such cases resort to specialists who carry out such work. And that is why it is necessary to carry out the wheel alignment yourself on the VAZ 2110; now it’s worth figuring out whether this procedure can be done with your own hands.
Wheel alignment - what is it?
Wheel camber is the angle between the center plane and the plane of the road, all of which will affect traction, as well as the ability to control the car. Of course, if everything is configured correctly, then the car will perform maneuvers correctly.
Wheel alignment - what is it?
Alignment is the difference between the points of the rear and front wheels, most often measured in degrees or millimeters. The wear of the tires will depend on this parameter, and if it is not there, the tires will wear out quickly.
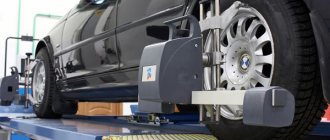
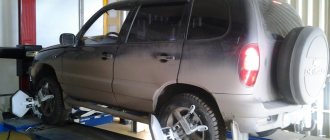
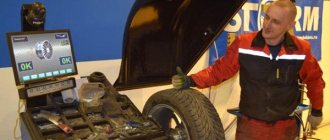
That is why they carry out the do-it-yourself wheel alignment procedure on a VAZ 2110, that is, adjusting all the presented parameters so that the car has good handling. Most often today, wheel alignment is carried out on special stands.
Adjusting wheel alignment angles
Checking and adjusting wheel alignment angles is carried out on special stands in accordance with the operating instructions for the stand.
ATTENTION !
Replacing or repairing suspension parts may result in a change in wheel alignment, so checking the wheel alignment is mandatory.
For a new, run-in car in running order with a payload of 3136 N (320 kgf) [4 people and 392 N (40 kgf) of cargo in the trunk], the wheel alignment angles should have the following values:
| camber | 0°±30′ |
| convergence | (0±1) mm |
| caster angle | 1°30’±30′ |
Before adjusting wheel alignment, check:
– air pressure in tires;
– radial and axial runout of wheel disks: it should not exceed 1 mm for axial, 0.7 mm for radial;
– free play (play) of the steering wheel;
– free play (play) in the bearings of the front wheel hubs;
– technical condition of suspension parts and assemblies (absence of deformation, destruction and wear of rubber-metal hinges, unacceptable settlement of the upper support of the suspension strut).
Correct any defects you notice.
After installing the car on the stand, immediately before checking the corners, “squeeze” the car’s suspension, applying a force of 392–490 N (40–50 kgf) 2–3 times, directed from top to bottom, first on the rear bumper, and then on the front. In this case, the wheels of the car must be parallel to the longitudinal axis of the car.
When checking and adjusting wheel alignment, first check and adjust the caster angle, then the camber angle, and lastly, the wheel toe.
Angle of longitudinal inclination of the axis of rotation. If the angle does not match the above data, change the number of shims installed on both ends of the suspension braces. To increase the caster angle of the steering axis, reduce the number of washers on the extension in the front or rear part. And, conversely, to reduce the angle, add a number of washers, but only in the rear part of the stretcher, since this is not always possible in front due to the short threaded part of the stretcher.
When changing the number of washers on the brace, make sure that the chamfers on the washers are facing towards the thrust end of the brace. Observe the same rule when installing the internal thrust washer of the rubber-metal hinge when the adjusting washers are completely removed. Failure to comply with these requirements may result in loosening of the nuts securing the guy wires.
The number of adjusting washers on the extension should not be more than two in front, four in the rear.
To ensure that the position of the brace relative to the suspension arm does not change when adjusting the longitudinal inclination of the steering axis, use a special device that fixes the brace relative to the lever, thereby preventing the brace from rotating under the influence of forces when tightening the nut securing the brace to the lever. This requirement must be observed in order to prevent premature wear of the rubber-metal hinge and rubber cushion on which the ends of the extension rest.
When installing or removing one shim, the caster angle of the steering axis changes by approximately 19′.
Front wheel camber angle. If the camber angle is different from the norm, then adjust it. To do this, loosen the nuts of the upper and lower bolts and, turning the upper adjusting bolt 3
(see figure Front suspension assembly), set the required camber angle. After completing the adjustment, tighten the nuts to a torque of 88.2 N·m (9 kgf·m).
Front wheel alignment. If the toe-in is not within the standard, loosen the tie rod end bolts with wrench 67.7812.9556 and, rotating the rods 4
(see figure Steering gear assembly with drive), set the required toe-in.
Then make sure that plane C of
the ball joint
2
is parallel to plane
D
of the supporting surface of the swing arm
3
, and then tighten the tie rod end bolts to a torque of 19.1–30.9 N·m (1.95–3.15 kgf·m).
Multiple ways to set corners
In general, it is not recommended to change the factory settings on a car, but you need to set the wheels to a certain position, and there are several options.
- In the first case, if the castor is negative, then the car becomes too sensitive. And in this case, the car will seem to float and not hold its position when turning.
- In the second case, the castor is positive, but the camber angle is at zero, and the steering wheel will be too heavy. But the car becomes more obedient on the road.
- In the third case, they make it sporty, that is, they set it to both minus and plus, and the steering wheel will remain the same, but the handling will improve.
We check and adjust the wheel alignment with our own hands
The chassis of a car is a complex component with many parameters. Any intervention in it will lead to a change in the wheel alignment angles. As a result, the behavior of the car on the road changes for the worse: cornering becomes difficult, the car can wobble when braking and accelerating, it becomes difficult to direct it in a certain direction, and skidding occurs. To fix the problem, they resort to wheel alignment. Is it possible to make it yourself and what is needed for this?
What is wheel alignment
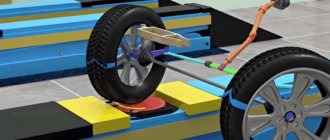
Wheel camber is the angle between its central plane and the road surface. It directly affects the quality of the clutch and the accuracy of car control. If everything is set up correctly, the wheels will turn exactly where you point it.
Toe-in is the difference in the distances between the extreme front and rear points of the rims. It is measured in millimeters or degrees. Toe-in affects tire life. If it is incorrect, the tires will quickly become unusable.
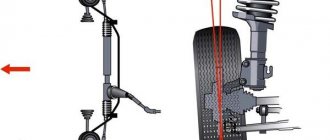
Another important parameter of the wheel is caster, i.e. the longitudinal inclination of the kingpin. It affects the accuracy of car control and the ability of the wheels to self-balance. If the caster is not adjusted correctly, steering difficulties will occur.
Wheel alignment is the adjustment of the listed parameters to ensure controllability and reduce tire wear.
Wheel alignment adjustment on a stand in a car service center
When and why do you need it
Manufacturers recommend that owners of foreign cars carry out the procedure every 30,000 km, and owners of domestic cars - every 15,000 km. The period may be reduced if the car is operated in difficult conditions and often drives on bad roads. In some cases, an unscheduled procedure may be required:
- if the disc is crushed when entering a hole at high speed;
- if the chassis was repaired;
- if shortened springs were installed on the car or the ground clearance was changed for other reasons, auto buffers were installed;
- if when driving you clearly feel the car “pulling” to the side;
- if the tires begin to wear out much faster;
- if the steering wheel does not return well after negotiating a turn.
What will you get from the wheel alignment results?
- The directional stability of the car will improve. When driving in a straight line, the vehicle will move only forward, without moving to the side.
- The car will become more maneuverable, strong drifts will disappear, and control will be simplified.
- Fuel consumption will be reduced and tire service life will increase.
Depending on the purpose, one or another type of wheel camber can be selected
Signs of the need for such work on a car
There are several signs and symptoms that can help you understand that it's time to adjust your wheels.
- When driving, the steering wheel is in the central position, and the car leans to the side.
- The steering wheel is turned to one side, but the car still drives in a straight line.
- If you just bought a car, be sure to contact a car service for an alignment. Masters at the store's internal service station must carry out the procedure before selling, but in practice this does not always happen. Ideally, it is better to ask about this before purchasing.
- When changing tires, stop by a service station to check your wheel alignment. You may not have to do it, but there is a possibility.
- Also, pay attention to fuel consumption and tire wear rates. If these parameters have increased, perhaps the problem is in the condition of the wheels.
Uneven tire wear is one of the signs that a wheel alignment is needed.
Rear wheel alignment
Is it necessary to perform a rear wheel alignment in a front-wheel drive car? Yes, but you need to keep in mind a small nuance. If the rear wheel is turned outward, the rear axle will be pulled to the side of the road, which will lead to severe skidding when cornering. If the wheel is turned towards the center of the turn, the car will have difficulty turning. However, a slight reduction of these parts of the car to one another only benefits the driver, since it will be easier to move in a straight line, and the suspension will be able to better “steer” in a certain direction even with strong gusts of side wind, which is a constant help for a novice driver.
So, if the undersides of the rear wheels are slightly turned towards each other, this is normal. But their discrepancy needs to be eliminated.
Chassis problems and setting wheel parameters
Be sure to perform a wheel alignment if the vehicle's chassis has been repaired. It is especially important to do this when replacing the following parts:
- silent blocks;
- tie rod ends;
- suspension arms.
Theoretically, when replacing upper and lower ball joints, springs and shock absorbers, there is no need to resort to the procedure, but some experts recommend performing it when working with absolutely any chassis component. Just in case.
What should the installation angles be: negative and positive values?
The optimal value for a passenger car is either zero or slightly negative (i.e., the wheels should point slightly outward with their bottoms). Positive values can be set from 0 to 4.5 degrees. Sports cars use a negative value of -0.5 to -5.5 degrees. Thanks to this, a high level of grip is achieved and cornering stability is increased.
Negative angles have disadvantages. So, when driving in a straight line, the inner edge of the tire will wear out faster, and instability may occur during acceleration and braking on a straight path. The best option is to set the indicator at -0.5 degrees.
Positive and negative camber
Adjusting camber and toe without visiting a car service center
Preparation
Prepare the following items:
- telescopic ruler for checking wheel alignment;
- chalk;
- cord with a plumb line;
- standard set of motorist keys.
Ruler for measuring toe. Once upon a time, every car was equipped with it
Work should be carried out on a site without uneven surfaces. It is advisable that there is a lift on it, but a pit will do.
First you need to determine how accurate the existing wheel alignment indicator is. To do this, we put the car on a flat area, turn the steering wheel in one direction until it hits an obstacle, and make a chalk mark in the middle of it. Then we rotate the steering wheel in the opposite direction (also as much as possible), counting the number of revolutions and circles required for this. Divide the result by 2 and turn the steering wheel back to the resulting number of revolutions. If, as a result, the steering wheel is set to your usual position, everything is in order. If not, you will have to start adjusting the rack.
Adjusting the steering rack yourself
- Remove the steering wheel by unscrewing the nut.
- Fix the control element in the previously determined optimal position.
- Locate the nuts on the tie rod ends and loosen them. Unscrew one of them a little, counting the number of revolutions needed for this. Then tighten the second nut the same number of turns.
That's it, the car is ready for wheel alignment adjustment.
Toe-in (with diagram)
- The car must be parked on a level surface. The wheels are pointing forward. It is best to do the work in a pit.
- Place a mark on the inside of the left and right wheels - they should be located next to the discs.
- Create a pre-tension in the ruler. Place it between the wheels so that the measuring device rests on the marks, but does not touch other parts of the car.
- Shake the ruler. Align the pointer with the division “0” (zero).
- Leaving the ruler on the wheels, roll the car forward a little. The measuring device must turn together with the wheels without contacting the body and suspension elements.
- Look at the line. Have the readings changed? If not or have changed slightly (up to 1 division), then the toe-in is fine. If the difference is greater, adjustment is needed.
- Loosen the locknuts on the tie rods. Turn the clutch to change the length of the pull.
- Tighten the locknut and take the reading again. Repeat until you get the desired result (i.e. zero to ±1).
Rotate the locknut to set optimal toe-in
Collapse: tips for doing it yourself
This process is more difficult than adjusting toe.
- Raise the car so that its wheels do not touch the ground.
- Set the wheels to straight driving position.
- Use chalk to mark the highest and lowest parts of the wheel rim.
- Place a cord with a weight on the wing so that it and your marks are located in the same plane. Measure the distance from the cord to each mark (you need to measure the distance from the cord to the disk, i.e., be guided by the bottom of the mark). Write down the result.
- Roll the car forward a little so that the wheels turn 90 degrees. Make new marks at the top and bottom, repeat the procedure with the weight and ruler. Write down the result again.
So you need to measure the distance from the wheel to the cord with a plumb line
The difference in the distances between the cord of each of the marks should be ± 1 mm for cars with front-wheel drive and ± 3 mm for cars with rear-wheel drive. If this is so, everything is in order with the collapse. If not, follow these steps.
- Raise the car with a jack. Remove the wheel. Remove the 2 bolts that attach the shock absorber bracket to the steering knuckle.
- There is a special bolt on the steering knuckle. When you turn it, the part will move inward or outward. Your task at this stage is to place the fist in such a way that the wheels are in the correct position.
- Tighten the bolts and put the wheel in place. Roll the car forward a couple of meters. Hang the cord again and measure the distance from it to the marks. If the distance returns to normal, you have successfully adjusted the camber. If not, remove the wheel and repeat the steps with the steering knuckle until victory.
Video: How to check and adjust wheel alignment on a VAZ 2110
The main thing that is required for independent wheel alignment is accuracy and precision. Carefully monitor each indicator; the success of the entire work depends on the correctness of the measurements.
pol-z.ru
Why do they do a wheel alignment on a VAZ 2110?
In order for everything to function correctly, this procedure must be carried out every 30 thousand km; this is the recommendation of specialists for foreign-made cars.
But wheel alignment is often carried out in unforeseen situations:
- When the disk is compressed, this happens when you fly into a large hole at high speed.
- After repairing the chassis.
- When the car's clearance changed.
- In some cases, the car drifts to the side while driving.
- Heavy wear on the tires on the car.
- The steering wheel does not turn when cornering.
What are the benefits of undergoing this procedure?
- The car has good handling. This occurs when driving on a straight road, that is, there is no displacement.
- The rubber will not wear out much and thus fuel consumption can be reduced.
Collapse: tips for doing it yourself
This process is more difficult than adjusting toe.
- Raise the car so that its wheels do not touch the ground.
- Set the wheels to straight driving position.
- Use chalk to mark the highest and lowest parts of the wheel rim.
- Place a cord with a weight on the wing so that it and your marks are located in the same plane. Measure the distance from the cord to each mark (you need to measure the distance from the cord to the disk, i.e., be guided by the bottom of the mark). Write down the result.
- Roll the car forward a little so that the wheels turn 90 degrees. Make new marks at the top and bottom, repeat the procedure with the weight and ruler. Write down the result again.
So you need to measure the distance from the wheel to the cord with a plumb line. The difference in the distances between the cord of each of the marks should be ± 1 mm for cars with front-wheel drive and ± 3 mm for cars with rear drive wheels. If this is so, everything is in order with the collapse. If not, follow these steps.
- Raise the car with a jack. Remove the wheel. Remove the 2 bolts that attach the shock absorber bracket to the steering knuckle.
- There is a special bolt on the steering knuckle. When you turn it, the part will move inward or outward. Your task at this stage is to place the fist in such a way that the wheels are in the correct position.
- Tighten the bolts and put the wheel in place. Roll the car forward a couple of meters. Hang the cord again and measure the distance from it to the marks. If the distance returns to normal, you have successfully adjusted the camber. If not, remove the wheel and repeat the steps with the steering knuckle until victory.
The main thing that is required for independent wheel alignment is accuracy and precision. Carefully monitor each indicator; the success of the entire work depends on the correctness of the measurements.
It is quite possible to correct the alignment of a VAZ 2110 with your own hands, using simple devices and improvised means.
First of all, it is worth noting that replacing the steering joint or shock absorbers leads to a significant change in angles, which will subsequently require adjustment. As a rule, in most cases it is enough to adjust only two of these parameters: toe and camber angles. In addition, there is a third parameter, namely the longitudinal inclination angle of the kingpin, which needs adjustment much less frequently than others.
DiagnosticsSo, in order to adjust the toe-in of wheels, it is most convenient to take measurements using a special ruler, while it is most comfortable to work in a pit. In addition, do not forget to place the steering wheel strictly in the straight-ahead position. Before adjusting the wheel alignment of the VAZ 2110 with your own hands, you need to apply marks on the inside of the wheels; you can use chalk for this. After you create tension in the ruler, you need to install it, resting its two ends on the previously designated points. Then shake the ruler slightly, and then align the “zero” with the pointer.
Wheel alignment on VAZ 2110 Don't forget to fix the scale. After this, roll the car forward a little so that the ruler moves along with the wheels, but does not touch the suspension or body. Then you need to check the readings. It is quite possible to correct the wheel alignment of a VAZ 2110 with your own hands without having much experience.
Toe adjustment
So, if on a car the distance between the wheels located at the rear is less than at the front, then it is necessary to shorten the steering rods, and if it is greater, then, on the contrary, lengthen it. It is worth noting that such adjustments must be made after almost every repair of the vehicle chassis. Also, even if you haven't done any repairs, be sure to have your vehicle inspected at least every six months.
In order not to adjust the wheel alignment, it was not necessary to carry out the alignment after the repair; before disassembling the suspension, you need to mark absolutely all disconnected connections; if you don’t have chalk on hand, you can get by with paint or a chisel. In addition, you should count the number of revolutions while turning the ends out of the rods.
However, do-it-yourself wheel alignment of a VAZ 2110 is quite a common procedure that any experienced motorist can handle without much difficulty. Thank you for attention.
You can actually fix many problems yourself, following the advice and recommendations of specialists. Further in the article we will look at how to do the wheel alignment of a VAZ-2110 with your own hands and in what sequence.
Making a wheel alignment for a VAZ 2110 with your own hands
If you carry out car repairs yourself, then in this case you can save not only money, but also carry out high-quality repair work. And you can even do a wheel alignment of a VAZ 2110 with your own hands, the main thing is to have ideas and a certain set of tools.
Since the concepts of alignment and camber have already been discussed, it is now worth considering what castor is. When a car moves, it is strongly affected by the castor - this is the angle between the represented plane and the rotation of the wheels when the steering wheel is turned. The castor can be either positive or negative; it will determine how the drive axle will immediately return to its place. That is, with such values, the car should move in a normal position. Thus, the camber and toe angles should be checked periodically, but the caster is set by the manufacturers at the factory, and is not changed in the future. Now it’s worth figuring out how to do a wheel alignment on a VAZ 2110 yourself.
Tools for work
In order to make a wheel alignment yourself in your garage, you will need a small set of tools that I have listed below.
| A set of keys | Level | Roulette |
| Ruler | Plumb | Special ruler for determining angles |
Adjusting the camber angle of the VAZ 2110
So we have come close to the question of how to set the wheel alignment yourself on a VAZ 2110.
Most often, data on angle degrees is indicated in the operating instructions for the VAZ 2110 car, and they are presented in 0 degrees.
Before you do the wheel alignment yourself on a VAZ 2110, you need to wet all the fasteners in advance, this is necessary so that all the nuts can be easily unscrewed. To measure the angle of inclination, use a building level.
Camber adjustment:
- On the wheel rim, using chalk, place two marks on the top and bottom.
- The plumb line is fixed on the car fender, and then the distance between the marks is measured; the readings should not differ by more than 1 mm.
- Ideally, the wheel geometry is not accurate; in this case, the car is rolled back so that the risks move 90 degrees, and readings are taken again.
- After this, the wheels are turned again, but by 180° and measured again.
- Now remove one of the wheels using a wheel wrench, then unscrew the bracket on the shock absorber a little.
- then the steering knuckle is moved to the required distance, all this will help make more accurate camber measurements.
- Now you can put the wheel in place and rock the car a little with a little pressure on the wheel and take measurements again.
- All these procedures are carried out until the desired measurement figure is reached.
If we talk about the VAZ 2110, then the readings should have a difference of 1 mm.
Toe adjustment
Most often, ordinary threads are used to carry out such measurements, but in some cases a special ruler is used. To carry out such work, it is necessary to drive the car into a pit and set the steering wheel straight.
And now carry out the work in a certain sequence:
- Draw two marks on the tires next to the rims.
- Next, the ruler is installed so that its ends coincide with the marked marks.
- You can also use special equipment with a scale here; it should be set to 0. If such equipment is used, then several measurements should be taken with a ruler.
- The car is moved forward a little so that the marks move and the ruler moves along with the wheel.
- and at this time monitor the readings of the ruler.
- The readings on the rear and front wheels may be different, although this should not be the case. In this case, it will be necessary to adjust the steering rods.
- The locking nuts are unscrewed using a 27 wrench.
- then use a 24 key to change the length of the steering rod; work is carried out only with the coupling.
- Next, the scale of the ruler must be set so that you can adjust the toe to 0 and you will have to move the car a little back.
- if the readings agree with the desired value, then the alignment is complete, but it is better to double-check and again move the car forward a little.
- It is also worth paying attention to the steering wheel; if it is misaligned, it will immediately be clear that the traction is not set correctly. In this case, you need to check which traction is broken, and it will have to be increased.
conclusions
As you can see, adjusting the wheel alignment angle on the VAZ-2110 is quite simple.
Not a lot of special tools are required. Now this technology is almost never used, since there are modern computer stands for making adjustments that will perform all operations quite accurately.
Read more: Diesel SUVs up to 300,000 rubles
After replacing the shock absorbers on the front wheels, it is necessary to adjust the wheel geometry. What do we need to do the wheel alignment?
We will need: a set of tools:
and two pancakes like this, quietly rotating around their axis.
I think it's easy to make them yourself. They must be independent from each other, since when adjusting one wheel, the second must remain standing without changing position. We also need this plumb line:
and two equal strips.
In our case, they are 60 centimeters each. We will also need a tape measure and two pieces of aluminum wire. The first thing you need to do is check the curvature of the floor of the room where you are going to make the adjustment.
If the floors are uneven, then when installing the pancakes, you need to achieve the same level between them. Now we drive the car onto our pancakes, into this part with the front wheels,
so that the collapse can be done.
When we are done with the camber, we will move the car in the center of the pancakes to adjust the toe. On cars with front-wheel drive such as: Samara, Lada, 2108-2110, wheel camber can be either negative or positive.
The literature says that the camber can be from 0°±30′. This is approximately 2-2.5 mm. gap It turns out that there will be a gap either in a negative or positive direction.
We will do negative camber, that is, the wheels will stand in the letter “M”, and we will do it in about 1 minute. 30 sec.
The process of adjusting the camber/toe.
Before you begin adjusting the wheel alignment, do not forget to check the tire pressure and, if necessary, equalize it.
If the camber angle is different from the norm, then adjust it. To do this, loosen the nuts of the upper and lower bolts and, by turning the upper adjusting bolt, set the required camber angle. After completing the adjustment, tighten the nuts to a torque of 88.2 N·m (9 kgf·m).
After we adjusted the camber, we got figures of about 1m. 30sec. A 2.2 mm thick plate is welded on our plumb line.
When we apply it to the disk, the level should be equal. The test bubble is in the center.
Read more: Damage of various types to the car
The camber is also adjusted on the second wheel, making the same angle there.
Now we proceed to adjusting the toe of these wheels.
We rearrange the car wheels in the center of the pancakes. This is how we attach the bar to the front discs using aluminum wire.
There is a small nail on the edge of the bar to which we will attach the tape measure.
We do the same on the reverse side. Now we stretch the nylon thread in such a way that it does not touch the rim in this place.
On Russian-made cars, the rear beam is narrower than the front wheel track. Therefore, we need to place a regular plastic bottle cap under the thread, on the rear wheel.
On the other hand, everything should be identical. Next, we take measurements of the front wheels with a tape measure and begin adjusting the wheel toe. We record the results of all measurements on paper.
In our case it turned out:
- front wheel 163.7 cm;
- rear wheel 162.6 cm:
- left wheel, gap 8 mm;
- on the right side there was a gap of 5 mm.
As a result of measurements, we obtained a discrepancy of 11 mm. We look at the gap here, that is, between the thread and the tire.
To make toe-in, we need to set the gap to approximately 1-1.5 mm, and the width should be 163.5 cm.
Now we adjust the toe.
Toe is adjusted by rotating the adjusting rods with the tie rod ends loosened.
When both rods are tightened, we take measurements. The following should appear on the front wheel:
- When measuring at the front of the wheel, the distance should be 163.1 cm;
- When measuring the back of the wheel, the distance between them should be exactly 163 cm, that is, we see a difference of one millimeter;
- The gap between the threads should be 1 mm.
The wheel on the other side should have the same performance.
This wheel adjustment is very simple, which anyone can freely do in a garage, without resorting to any car services. Also, such an adjustment will help you save money and nerves.
Having made the adjustment yourself, you will be much calmer and more confident, you will see the results yourself and will be satisfied.