Every motorist who has a manual transmission knows what a clutch is, and sooner or later is faced with the fact that it simply disappears, and when it starts to move, it does not disengage, thereby creating some kind of inconvenience. The only option in such a situation is to contact the nearest car service center, where the clutch on your Chevrolet Niva will be replaced within two to three hours. This option is not cheap, so if your budget does not allow this replacement procedure, you can do it yourself in the wild.
You will learn from this article how replacement, adjustment, and repairs occur, and you will also find out which one is best to install.
What is clutch
Thanks to it, torque is transmitted from the engine to the gearbox itself, making it possible to change gears on the gearbox. If this work is not done properly, it will negatively affect other mechanical components. This drive is hydraulic, there are no gaps in it, and has automated compensation, so there is no wear on the functional linings. This drive is one of the important parts, as it sends a signal to the working elements to the driver himself.
What kind of malfunctions are there?
This is a whole mechanism, and there can be a lot of reasons why it fails. Let's look at the most common ones:
When you press the clutch pedal on a Niva Chevrolet, slipping occurs, that is, the engagement is not complete, this can be caused by:
- If the friction linings are worn out or they are burnt out, this problem can be solved by completely replacing the disc.
- Oil appears on the surface of the driven disk, which indicates that the parts have faulty seals. You can fix the problem by washing the discs, removing the causes of the leak.
It happens that, on the contrary, it does not turn off completely; it starts to behave, this could be for the following reasons:
- Warping or beating occurs on the driven disk; this problem can be solved by repair, unless, of course, it has minor damage. But as a rule, if this malfunction occurs, it can be solved only by completely replacing the disk.
- The rivets on the fixed pads have become loose. The driven disk set will need to be replaced
- The presence of air in the system itself. This can be solved by bleeding the system.
- Warping and distortion of the disk. You can solve it by replacing this part.
A malfunction may occur where some parts need to be replaced. This is determined by the following characteristics:
- Noises are heard when pressing the clutch
- The same noise is heard when the pedal is released
This suggests that it is necessary to remove and disassemble this system, and eliminate the damage that has appeared.
Clutch
Design Features
| Rice. 5.1. Clutch assembly: 1 – clutch housing; 2 – flywheel; 3 – bolt securing the clutch housing to the flywheel; 4 – driven disk; 5 – pressure disk; 6 – clutch casing; 7 – clutch release clutch; 8 – gearbox input shaft; 9 – clutch release fork; 10 – central pressure spring |
The vehicle has a single-disc, dry, permanently closed clutch with a central diaphragm spring. The clutch device is shown in.
| Rice. 5.2. Clutch release drive: 1 – tube; 2 – main cylinder; 3 – master cylinder fastening nut; 4 – pedal bracket; 5 – clutch release clutch; 6 – ball joint; 7 – clutch release fork; 8 – clutch release fork cover; 9 – bracket fastening bolt; 10 – bracket; 11 – working cylinder; 12 – valve for removing air; 13 – clutch pedal axis; 14 – clutch pedal; 15 – locking bracket; 16 – master cylinder pusher; 17 – bushing; 18 – locking bracket; 19 – bushing |
The clutch drive is hydraulic, backlash-free, with automatic compensation for wear of the friction linings of the driven disc. The drive consists of a main 2 () and a working 11 cylinder, a clutch pedal, a hydraulic clutch release tube 1 and a hose.
| USEFUL TIPS To ensure a long and trouble-free clutch service, do not constantly keep your foot on the clutch pedal. This bad habit is often acquired while learning to drive in driving schools for fear of not having time to disengage the clutch while stopping the car. In addition to the rapid fatigue of the leg, which is always above the pedal, the clutch is depressed at least a little, and the driven disk slips and wears out. In addition, although the release bearing is designed to operate in constant rotation mode, when the pedal is pressed slightly, it is under increased load, and its service life is reduced. For the same reason, we do not recommend keeping the clutch disengaged for a long time (for example, in traffic jams). If you don’t have to move away right away, it’s better to put the gearbox in neutral and release the pedal. Clutch slipping can be easily determined using a tachometer. If while driving, when you sharply press the accelerator pedal, the speed rises sharply, and then drops a little and the car begins to accelerate, the clutch requires repair. |
Checking the technical condition of the clutch
Check the technical condition of the clutch using the following methods.
| 1. Put the gearbox in neutral, start the car engine and warm it up to operating temperature. When the engine is running at minimum engine speed, disengage the clutch (press the pedal) and engage reverse gear. The transmission should engage without grinding, knocking or other extraneous noise. |
| 2. While the car is moving, change gears. All gears should be engaged without grinding, knocking or other extraneous noise. |
| 3. When accelerating a car, there should be proportionality between the increase in engine speed and the increase in vehicle speed (the clutch should not “slip”). Clutch slipping can be easily determined using a tachometer. If while driving, when you sharply press the accelerator pedal, the speed rises sharply, and then drops slightly and the car begins to accelerate, the clutch requires repair. |
If the indicated signs of normal clutch operation are absent, try removing air from the clutch hydraulic drive. If bleeding the hydraulic drive does not lead to the desired result, remove the clutch for repair.
Bleeding the hydraulic clutch
If, when the pedal is pressed all the way, the clutch does not disengage completely (“drives”), which is accompanied by a characteristic grinding of gears when engaging reverse gear, there may be air in the clutch hydraulic drive. Remove it by bleeding the drive.
In addition, pumping is performed when the hydraulic drive is filled with fluid after its replacement or after repair of system components associated with its depressurization.
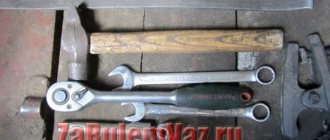
You will need: an “8” wrench, a bleeder hose, a container for brake fluid, brake fluid.
| USEFUL ADVICE Carry out the work with an assistant in the inspection ditch. |
| 1. Pour (or add) liquid into the tank to the bottom edge of the filler neck. |
| 2. Place a bleeder hose onto the slave cylinder valve. Place the other end of the hose in a container with a small amount of brake fluid so that it is submerged in the fluid. |
| 3. Press the clutch pedal 4-5 times and keep the clutch pedal depressed. |
| NOTE The assistant must press the pedal sharply, with intervals between presses of 2–3 s. |
| 4. Open the bleeder valve to bleed air from the system. Liquid with air bubbles will come out of the hose into the container. |
| 5. After the flow of fluid from the hose stops, tighten the fitting and release the clutch pedal. |
| 6. Repeat steps 4, 5 and 6 several times until liquid begins to emerge from the hose without air bubbles. |
| WARNING Do not allow the fluid level in the reservoir to drop below the “min” mark. Add fluid in a timely manner, otherwise when the bottom of the tank is drained, air will enter the system and the pumping will have to be repeated again. |
| 7. Remove the hose from the bleeder valve and put on the cap. |
| 8. Add brake fluid to the master cylinder reservoir to the “max” mark. |
Removing and installing the hydraulic clutch reservoir
Remove the reservoir if the brake fluid is excessively contaminated and deposits appear on the walls of the reservoir.
You will need: a 10mm wrench, pliers, a container for brake fluid, brake fluid.
| 1. Unscrew the tank cap. | 2. Unscrew the nut securing the tank bracket. |
| 3. Remove the tank from the bracket. |
| 4. Drain the liquid from the reservoir. |
| 5. Inspect the tank. If deposits are detected... | 6. ...loosen the hose clamp and disconnect it. |
| NOTE The tank can be washed and reused. |
| 7. Install the tank in the reverse order of removal. |
| 8. Fill with fluid and bleed the hydraulic system (see “Bleeding the clutch hydraulic drive”). |
Removing and installing the clutch master cylinder
Remove the master cylinder for replacement or repair if there is a fluid leak, the clutch is not fully disengaged (can be caused by a fluid leak or cuff wear), as well as when the clutch is not fully engaged (as a result of the compensation hole being clogged or blocked by a swollen cuff).
You will need: a 13mm wrench (socket head with extension), pliers, a rubber bulb.
| 1. Use a rubber bulb to pump out the liquid from the tank. |
| 2. Loosen the hose clamp and disconnect it from the master cylinder. |
| 3. Move the hose to the side. |
| 4. Remove the nut securing the pipeline from the master cylinder. Remove the pipeline from the master cylinder hole and move it to the side. | 5. Unscrew the two cylinder mounting nuts and... |
| 6. ...remove it from the car. |
| 7. Install the cylinder in the reverse order of removal. |
| 8. Bleed the clutch hydraulic drive (see “Bleeding the clutch hydraulic drive”). |
Removing and installing the clutch slave cylinder
Remove the slave cylinder for replacement or repair if the clutch does not disengage completely due to a fluid leak.
You will need: keys “13”, “17”.
| 1. Loosen the slave cylinder hose end. | 2. Remove the two bolts of the bracket securing the slave cylinder to the clutch housing. |
| 3. Remove the bracket. |
| 4. Remove the slave cylinder pusher from the clutch release fork and remove the protective cap along with the pusher. | 5. While holding the hose tip from turning and rotating the cylinder, separate them. |
| 6. Drain the fluid from the drive and cylinder into a prepared container. |
| 7. Install the new slave cylinder in the reverse order of removal. |
| 8. Bleed the clutch hydraulic drive (see “Bleeding the clutch hydraulic drive”). |
Replacing the hydraulic clutch hose
You will need: key “14”, “17”, “19”.
| 1. While holding the hose fitting from turning with wrench 1, use wrench 2 to unscrew the pipeline nut and disconnect it. | 2. Remove the bracket securing the fitting to the body bracket. |
| 3. Drain the fluid from the drive into a prepared container. |
| 4. Unscrew the hose end from the working cylinder. |
| WARNING Be careful not to lose the sealing washer. |
| 5. Install the new hose in the reverse order of removal. |
| 6. Bleed the clutch hydraulic drive (see “Bleeding the clutch hydraulic drive”). |
Removing and installing the clutch
The main malfunctions that require removal and disassembly of the clutch to eliminate are:
– increased (compared to usual) noise when the clutch is engaged;
– jerking when the clutch operates;
– incomplete engagement of the clutch (the clutch “slips”);
– incomplete disengagement of the clutch (the clutch “drives”).
| USEFUL TIPS The work of removing and installing the clutch is very labor-intensive, so first make sure that the malfunctions are not caused by defects in the clutch drive. If, after disassembling the clutch, no obvious signs of malfunction of individual components are found, replace all components at the same time. Since the transmission must be removed before removing the clutch, work with an assistant. |
| You will need: an “8” wrench, two screwdrivers, a mandrel for centering the driven disk (can be made from the input shaft of the gearbox by removing the gear). |
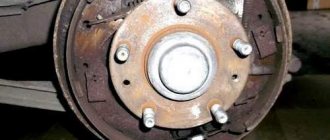
| 1. Place the vehicle on a viewing ditch or lift. |
| 2. Remove the gearbox (see “Removing and installing the gearbox”). |
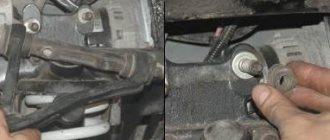
| 3. If you are installing the old pressure plate, mark in any way (for example, punching) the relative positions of the disk housing and the flywheel in order to install the pressure disk in its previous position (to maintain balance). | 4. Remove the six bolts securing the pressure plate to the flywheel, holding the flywheel from turning with a mounting blade. |
| 5. Remove the pressure and driven disks, while holding the driven disk. | 6. Inspect the driven disk. Cracks on the parts of the driven disk are not allowed. Check the wear of the friction linings. If the rivet heads are recessed by less than 0.2 mm, and the surface of the friction linings is oily or the rivet joints are loose, then the driven disk (or friction linings) must be replaced. |
| 7. Check the reliability of the damper springs in the driven disk hub sockets. If the springs are broken, replace the disc. Check the runout of the driven disk if warping is detected during a visual inspection. If the runout value exceeds 0.5 mm, replace the disc. | 8. Using an external inspection, evaluate the condition of the pressure plate diaphragm spring. Cracks on the diaphragm spring are not allowed. The contact points between the spring petals and the clutch release bearing must be in the same plane and have no obvious signs of wear. |
| 9. Install the clutch in the reverse order of removal. |
| NOTE Before tightening the pressure plate mounting bolts, carefully center the drive plate using a mandrel. If this is not done, installation of the gearbox will be difficult. |
Replacing the clutch release bearing
A sign that the clutch release bearing needs to be replaced is increased noise when the clutch pedal is pressed.
| 1. Remove the gearbox (see “Removing and installing the gearbox”), if it was not removed to repair the clutch. |
| 2. Disengage the bearing from the fork. | 3. Pull back the fork and... |
| 4. ...remove the bearing. |
| 5. Install the new bearing in the reverse order of removal. |
| 6. Lubricate the splines of the input shaft with a thin layer of lubricant LSC-15 or Litol-24. |
| 7. Install the gearbox and removed components in the reverse order of removal. |
How to make a replacement
When the cause of the breakdown is clear, you need to move on to eliminating it. The replacement process is very long and labor-intensive, so you need to be patient and follow everything strictly according to the instructions, which includes the following steps:
- Installing the car in the pit
- Prepare the necessary tools
- We remove the gearbox, this is necessary to have access to the device
- After the box is removed, you need to mark with marks where the flywheel and housing are located.
- Using an eight-mm wrench, we unscrew several mounting bolts; they secure the clutch disc itself to the flywheel.
- We remove two disks, pressure and driven
- We inspect them and if there are various chips and cracks, then it must be urgently changed.
- Check the condition of the release spring
- After inspection and elimination of all faults, installation occurs in the reverse order in which removal was carried out.
At this point, all stages of replacing the clutch on a Niva Chevrolet car are completed. During the replacement process, it is very important to look at the condition of the release bearing, and if it is in a worn state, it is better to replace it with a new one, since in a couple of months if you do not replace it, you will have to disassemble the device again. Now you have an idea of how to remove and replace the disk yourself, and you can carry out the entire procedure yourself at any time, without contacting a specialist.
Replacing the clutch fork Niva Chevrolet video
How to replace the clutch fork without removing the gearbox, Niva 2121
Replacing the clutch fork VAZ 2121 Niva
How to replace the clutch fork without removing the gearbox.
Chevrolet Niva (shniva). clutch problem!
Replacing fork and release bearing WHA.
Removing the Niva Chevrolet gearbox and replacing the clutch / RELEASE BEARING
The clutch has disappeared, which is something to immediately pay attention to.
Niva Chevrolet - Clutch Lost. Reason. Let's figure it out.
Replacing the VAZ 21213 clutch with a VAZ 2123_Chevrolet Niva. Related work when removing the gearbox and manual transmission.
THE CLUTCH PEDAL IS FAILING. REASON.
Also see:
- Fuses for windshield wipers Ford Focus 2
- Installing navigation in a Volvo car
- Bolts for Volvo stamped wheels
- Radio for Lexus is250 in Germany
- If the check engine light on a BMW comes on
- Fuel consumption of Volkswagen Tiguan
- Slick wheels for Hyundai Solaris
- Fuel filter Mitsubishi Pajero wagon diesel
- Mazda 323 canister purge valve
- Geely emgrand x7 crash test euroncap video
- How much oil does a Toyota Corolla engine need?
- Peugeot 807 and Lancia Phedra
- Noise in the front suspension of the Chevrolet Lacetti
- Steel wheels for Nissan Juke
- Volkswagen Turan 2 liter diesel reviews
Home » News » Replacing the clutch fork Niva Chevrolet video
logovaz-auto.ru