We repair the Chevrolet Niva gearbox
Before removing the gearbox, the oil contained in it is drained.
On average, a part holds from 1.7 to 2 liters of liquid. You need to prepare a container that has a wide neck and sufficient volume. On the body of the device there is a box that is unscrewed with a hexagon and is intended for draining the oil. The gearbox contains viscous fluid that must be drained for at least 10 minutes. During this period, no additional work is carried out. To ensure high-quality drainage of oil from the gearbox, it is recommended to warm up the engine for 5 minutes before carrying out the operation, which will speed up the process of its movement through the channels.
Further work is performed in accordance with the step-by-step instructions:
- Before disassembling the box, it is recommended to clean the plug, which contains dust and grease residue. Experts recommend replacing the O-ring first. After that, it is installed in place and screwed until it stops.
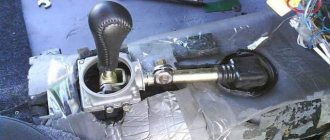
- At the next stage, the cardan and intermediate shafts are removed.
- The wiring from the reversing headlight device is disconnected.
- To change the gearbox, you need to climb into the vehicle interior and use a screwdriver to pry off the gear selector cover. For convenient work, it is recommended to first move the cover up.
- On the support plate of the equipment with which the speeds are switched, there is a fastening nut that is unscrewed.
- The handle is unscrewed from the gear lever. It and the protective cover are dismantled.
- Using a wrench, unscrew the fastener, which is located on the gearbox support plate.
- The rear support on the gearbox is removed and the clamping screw on the rod mounting clamp is unscrewed.
- The support plate bracket is secured with three screws that must be removed to allow the transmission drive to be removed.
- Use wrenches to unscrew the screws securing the shield, which is located on the clutch housing. The bolts cannot be lost, so they are set aside.
- The working cylinder is secured to the crankcase with screws that can be unscrewed, allowing for convenient removal of the crankcase itself. During the procedure, it is not recommended to remove the pipe from the part. The clutch cylinder must be on the pipe.
- Unscrew the three starter mounting screws and set them aside.
- The anti-roll bar and exhaust pipe are dismantled.
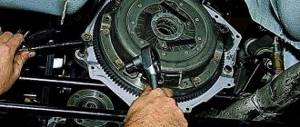
- Use a wrench to unscrew the bolts securing the clutch housing to the car engine. Disassembly requires the help of a second person to hold the motor from behind to prevent it from falling.
- The gearbox and crankcase are removed from the vehicle at the same time. When performing work, make sure that the input shaft does not rest on the clutch spring petals. When the springs become deformed, the pressure plate is replaced.
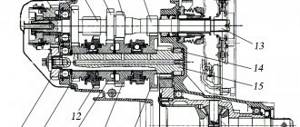
After removing the gearbox on a Chevrolet Niva, it is adjusted and repaired. When disassembling the device, observe the bearing and input shaft. To determine bearing wear, it is recommended to remove the cover, which is located at the bottom of the device. If, when moving parts, they are observed to shift, this indicates wear. Bearings are being replaced.
To carry out a major overhaul, you will need to perform a number of actions:
- The nut located on the shank is unscrewed. The helicopter flange and gear selection mechanism are being removed. The drawstring is inspected to identify cracks.
- The cover located on the back of the device is removed. If this manipulation fails, the bearing race is pushed down. After removing the clutch housing, the condition of the spring washer is checked.
- You get the bushing, clip and washer. To do this, it is recommended to disassemble the locking mechanism by unscrewing the bolts, removing the fungus and the ring.
- Fifth gear is completely removed. The gear is disassembled and the fixation ball is removed by pushing it inside. There is a bolt on the third and fourth speed fork that needs to be unscrewed. The rod is pulled out and removed, as well as the cracker, which is dismantled along with the fixing ball. The first and second gears are analyzed in the same way.
- The 5th speed fork is unscrewed and the rear gear is removed. The integrity of the backlash is checked.
- The front bearing is pulled out and the shaft is moved back and forth. Using a chisel, knock out the clip inside.
- You get 1st, 2nd, 3rd, 4th gear forks and a front shaft. The support ring is removed using a hammer or puller. The ring is removed using pliers. The needle bearing is inspected.
- The bearing is removed by rocking from one side to the other. The shaft is removed and the 1st and 2nd speed gears are removed. It is necessary to remove the couplings that are located on the 1st, 2nd, 3rd, 4th hub. If there are malfunctions, the stopper is released and the 3rd and 4th speed hubs are removed. It is recommended to replace the seals.
After complete disassembly of the gearbox, the degree of wear of the part is determined. The device is assembled and installed in the vehicle in the reverse order. Initially, the bearings are installed in their seats, and then the shaft is hammered in. To do this, it is recommended to use a pipe whose diameter matches the shaft.
After assembling the gearbox, it is recommended to verify its functionality and the correctness of the work. If there are errors, the device will have to be disassembled again.
Disassembly and repair of the gearbox is required for the following malfunctions.
— wear of gear teeth and synchronizers;
— axial movement of the shafts.
— wear of the spherical joint of the gear shift lever, lack of lubrication in the assembly;
— deformation of the gear shift lever;
— burrs, bends, contamination of rod seats, jamming of locking blocks;
— contamination of the splines of the sliding coupling and hub;
— deformation of gear shift forks.
— wear of the holes for the balls on the rods, breakage of the clamp springs;
— wear of the synchronizer blocking ring;
- synchronizer spring failure;
— wear of the teeth of the synchronizer coupling or the synchronizer ring gear.
— wear of the oil seals of the primary and secondary shafts;
— loosening of the gearbox housing covers, damage to the sealing gaskets;
— loosening of the clutch housing to the gearbox housing.
The listed malfunctions may be caused by other reasons, the elimination of which does not require removing and disassembling the gearbox.
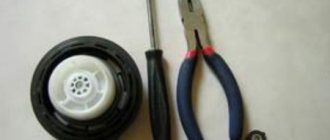
You will need: screwdrivers (two), replaceable heads “for 13”, “for 17”, extension, wrench, keys “for 10”, “for 13” (two), “for 17”, “for 19”, “for 30", impact screwdriver, circlip puller, hammer, universal pullers.
Drain the transmission housing if you did not do so when removing it from the vehicle.
Unscrew the three nuts securing the gear selector housing
Remove the centering ring seal.
While holding the elastic coupling flange from turning, unscrew the flange securing nut.
By unscrewing the nut, you simultaneously compress the secondary
shaft centering ring.
Remove the lock washer
Remove the flexible coupling flange
We install the gearbox with the clutch housing on the workbench. Using a 10mm socket, unscrew the ten nuts securing the lower gearbox cover.
Remove the sealing gasket.
Using a screwdriver, through the hole in the gear selection mechanism, we move down the fork rod for selecting 1st–2nd gears (this engages 2nd gear).
Using a 13mm wrench, unscrew the rear cover fastening nut located inside the box body
Using a 13mm wrench, unscrew the five nuts securing the back cover located outside the case
We tap the cover bosses with a hammer, while using a screwdriver (or a suitable piece of pipe with the secondary shaft oil seal removed) hold the rear bearing on the secondary shaft.
We slide the cover off the studs and remove it, turning it clockwise (looking from the side of the secondary shaft shank) to prevent the cover from touching the rods and the gear block of the 5th gear and reverse gear.
Remove the cover gasket
To replace the bearing of the gear block of the 5th gear and reverse gear, pry up the bearing rollers with a screwdriver and remove the rollers from the separator
By hooking the outer ring of the bearing with a hook...
...remove it from the rear cover slot.
Remove the thrust ring of the rear bearing of the secondary shaft.
Remove the outer ring of the bearing with the cage and rollers
Removing the inner race of the bearing
Also interesting: Working clutch cylinders for Chevrolet Niva in Balashikha