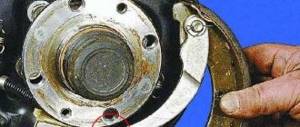
Check the inside of the brake drum. Slight wear on the drum from the action of the pads is normal.
Measure the inner working surface of the drum in several places. Compare the results of the obtained measurements. Thus, the optimal gap between the pads and the drum is automatically maintained.
Perform the work on a car with the rear wheels hanging on a lift or a car mounted on supports using a jack. Compress by tightening the bolts evenly into the two threaded holes of the drum. With the car stationary on the ground, press the brake pedal 2-3 times to move the shoes to the drum.
Niva Chevrolet replacement of rear brake pads, cylinders and drums. Video and photo instructions
We have a Chevrolet Niva car, produced in 2005, mileage 137 thousand km, for scheduled repairs, on which it is necessary to replace the rear brake pads, drums and cylinders. We will show you how you can do this yourself, without resorting to the help of specialists.
It looks like the pad on the rear left wheel has been torn off, there is a grinding noise when braking, and when reverse gear is engaged, the wheel jams and then breaks. Therefore, it was decided to immediately lift and change the pads, drums and cylinders on both sides. After this, we'll bleed the brakes with a vacuum.
It really didn’t work out for us, all the threads remained on the bolts, it was very soured, so a hammer comes to the rescue, since we will eventually have to change the drum anyway. This situation arises when, when replacing fasteners, they are not coated with copper grease; I believe that there is no need to save on this!
Also interesting: Moving the generator to the top of 21214
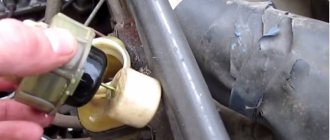
Using a 10mm wrench, loosen and then unscrew the fitting. Be prepared, brake fluid will flow. We install and screw on the new brake cylinder. We lubricate all fastening bolts with copper grease so that in the future we will not have problems with unscrewing.
We assemble new brake pads, we have them from TRIALLI, spare parts catalog number GF-232, put on the handbrake cable and put them in place.
We loosen it so that our new brake pads press against the cylinder. Since the pads are now compressed, the new brake drum should fit easily. We install the drum from TRIALLI, its number is TF-078. Before installation, we knock off the accumulated dirt on the seat with a brush with metal bristles, then lubricate it with copper grease. Place the drum and assemble in reverse order.
Since we drained the brake fluid a little, we need to bleed the brakes; if you did not touch the cylinders, then you do not need to do this. We will pump, or rather remove, air from the system using a special vacuum device. In the video you can see how this process works.
Niva repair manuals: removing and installing the brake drum
HELPFUL ADVICE
Perform the work on a vehicle with the rear wheels raised (on a lift or on a vehicle placed on supports using a jack). The parking brake lever must be lowered all the way down (the car is released).
You will need: 12mm wrenches, a screwdriver, two mounting blades.
1. Engage 1st gear and install wheel chocks under the front wheels.
2. Check that the parking brake lever is lowered all the way down (the car is released).
3. Remove the rear wheel.
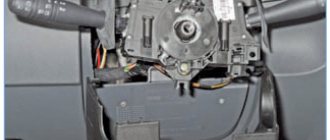
4. Remove the hub protective cap.
5. Remove the two bolts securing the brake drum to the axle shaft.
6. Remove the drum from the axle shaft with light blows of a hammer through a drift.
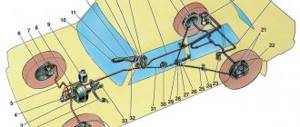
Rice. Rear wheel brake mechanism: 1 – working cylinder; 2 – upper tension spring; 3 – pad lining; 4 – brake shield; 5 – inner plate; 6 – rear cable sheath; 7 – lower tension spring of the pads; 8 – front brake pad; 9 – pad support plate; 10 – rivets; 11 – oil deflector; 12 – guide plates of the pads; 13 – rear parking brake cable; 14 – rear cable spring; 15 – rear cable end; 16 – rear brake pad; 17 – block support post; 18 – release lever for parking brake drive; 19 – rubber cushions; 20 – pad spacer; 21 – release lever pin.
Rice. Rear wheel brake working cylinder: 1 – pad stop; 2 – protective cap; 3 – cylinder body; 4 – piston; 5 – seal; 6 – support plate; 7 – spring; 8 – crackers; 9 – thrust ring; 10 – thrust screw; 11 – fitting; A – slot on the thrust ring.
7. Remove the brake drum.
8. Install the drum in the reverse order of removal. First, clean the axle shaft seat from corrosion, lubricate it with graphite lubricant and bring the pads together using two mounting blades.
WARNING
Please note that as the pistons are pressed into the cylinders, the brake fluid level in the master cylinder reservoir rises. If necessary, pump out the liquid.
9. Check that the wheel rotates easily. Light brushing of the drum against the pads is allowed. With the car parked on the ground, press the brake pedal two or three times to move the brake pads to the drum.
Share on social networks:
Removing the brake drum Niva Chevrolet
The brake drum is removed to replace it if the working surface is damaged or worn, as well as to monitor the condition of the brake mechanisms and to replace brake pads and working cylinders.
Perform the work on a vehicle with the rear wheels hanging (on a lift or a vehicle supported by a jack).
The parking brake lever must be lowered all the way down (the car is released).
You will need: 12mm wrenches, a screwdriver, two mounting blades.
Engage 1st gear and install thrust blocks under the front wheels.
Check: the parking brake lever must be lowered all the way down (the car is released).
Remove the rear wheel.
For ease of use, remove the decorative cap. When replacing the drum, the cap does not need to be removed.
Moisten the gap between the drum and the axle flange with some easily penetrating liquid (kerosene, WD-40, etc.).
Also interesting: Amount of oils and fuel fluids VAZ 4×4 2121 Niva
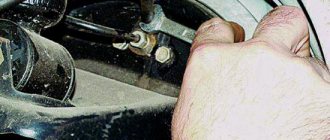
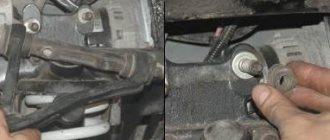
Remove the two bolts (one is visible in the photo) securing the brake drum to the axle shaft.
Remove the drum from the axle shaft with light blows of a hammer.
If the drum cannot be removed by hand, knock it down with a hammer, using a wooden block, or.
Compress by screwing the bolts evenly into the two threaded holes of the drum
Remove the brake drum.
When installing the old drum, use a file to remove the collar on the working surface of the drum that has formed as a result of wear.
Install the drum in the reverse order of removal.
First, clean the axle shaft seat from corrosion, lubricate it with graphite grease or LSC-15 grease, and bring the pads together using two mounting blades.
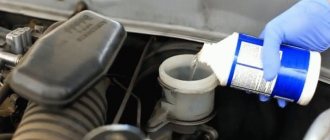
Please note that as the pistons are pressed into the cylinders, the brake fluid level in the master cylinder reservoir rises.
If necessary, pump out the liquid.
Check that the wheel rotates easily. Light brushing of the drum against the pads is allowed.
With the car stationary on the ground, press the brake pedal 2-3 times to move the brake pads to the drum.
Societies › Chevrolet Niva › Blog › How to remove rear brake drums?
Hello everyone, now I wanted to change the rear brake pads. As annoying as it may sound, I was unable to remove the drum. How to remove them correctly?
Thanks for the advice on hanging and heating the drum. On my own behalf, I would like to add that there is a slight play on the heels, so the wheel spins back and forth and then almost jumps off on its own. Thanks again, I spent half a day today tapping around the perimeter through the wood of the cup, still a little free
Better sum it up: 1. VD-40, 15 minutes, VD-40, 15 minutes.2. Try the trick with hanging and accelerating and braking. It's not that tight. (If you miss everything, then about 0.5 mm on the studs moves.)3. Knock on a piece of wood through the installation, but this is more convenient with two people, because... there are not enough hands. Put a piece of wood on the drum, put the assembly on top and hit it - this way it turns out more evenly than with a piece of wood.
Using this method, everything worked out :)).
And also interesting: VAZ 2130 engine | Characteristics, problems, tuning
You press the end of the mounting against the edge of the head and hit the mounting with a hammer. At the station they knocked down drums with peeling pads like this
How to Remove a Sticky Brake Drum on a Niva
How to remove a sticky brake drum
? 3 methods
With change inevitable, the question is how to take off
the attached brake drum often becomes vital. And you don’t even have to blame the Russian auto industry. drums for foreign cars are welded. Of course, it rides for a while and so on. All this slows down the car unnecessarily, the sounds at times seem downright scary, but you can agree with this if you do not understand how dangerous it is to joke with the brakes.
Some will say that this is great, let's say change the pads more often, you won't soon remember the drum. And he will be right! But later, but this must be remembered. The longer a replacement part lasts, the more likely it is to be similar to the car. Therefore, the method described in each manual (screwing the holes and pushing the drum) is remembered only by hopeless optimists.
How to remove a stuck brake drum
, for example, using a sledgehammer, maybe one of the car owners knows. But in such a primitive business there are aspects that should be taken into account. And sometimes all this cannot be overcome by a stubborn drum. you will destroy the bridge faster than you can knock it out. However, our people do not give up and come up with ways in such situations.
READ How to Remove a Torpedo on a Volkswagen Passat B5
Most often this helps. But you need to take into account some subtleties: blocking the car. Perhaps they are simply drawing him towards this consolation. At the same time, not taking into account that the sledgehammer. a sluggish thing, and a bully is not measured. Occasionally, this combination works so well that the nest gives way. Therefore, support is needed. The best way to use it is with a steel goat. many in the garage are hiding somewhere in the corner.
How to remove stuck rear brake drum in NIVA
In case someone needs a thread)
Simply and quickly remove sticky brake drum on the field!!!
So with a gas torch it is easy to remove a jammed brake drum
and not even hit its edges!
In the absence of walking and cutting logs
. Just don't support them with the car, but drop it there. To ensure safety, it would also be a good idea to put chocks under the wheels: if the car rolls, it, of course, will not go far, but it will provide additional repairs (and save, and, God forbid, injuries).
READ How to Remove the Fuel Pump Audi 80 B4
Before you take the sledgehammer, it would be wise to go over the hub with a steel brush. The salt and dirt from the cement is wrapped along the rim at a good level of the concrete. After cleaning, the centering belt is treated with something like WD-40. There is no need to hit one place with all your might. firstly, it is possible to tilt the, as it is called, bend of the drum, and it will be even more difficult to remove, and secondly, of course, destroy what should not be changed. However, you need to gently tap in a circle, while peeling off not the metal, but the strip, which will act as a gasket.
If the drum has become too stubborn for you, you will have to take constructive measures. Considering that they are associated with the highest degree of threat, the machine's locking must be reliable and checked a couple of times.
The following actions:
- Get behind the wheel, start the car, engage second or third gear and release the clutch. The raised part of the axle will begin to move,
and so will the drum - Rewind the engine to 3000 rpm in some places;
- Slam on the brakes;
- Another 10 seconds you fill with gas;
- Stop the engine and remove the drum.
READ How to Remove a Mirror Glued to Liquid Nails
A force majeure situation develops if the drum is not very stuck, but at the same time the brake cylinder is completely jammed. Neither brake gas nor a sledgehammer will help here. You have to take a drill and drill holes (small, 2-3 mm) at the junction of the drum and the shaft axis. Brake fluid is poured into it. and again it’s the sledgehammer’s turn.
Source
Removing a soured brake drum VAZ 2123 / Russian crazy service car
In this video I show how to remove a drum that has become soured on the axle shaft. Special pullers couldn't cope with this.
Having learned from the “bitter” experience of the previous 10, having driven the tires from the passenger compartment, the very first thing I did was remove the drums. I coated the seats with graphite. Such questions no longer arise! ! ! and also loosened all the nuts on the brake pipes, including the ABS unit, one by one. made it possible to lubricate the brake nut contact.
Read news about the new Niva
- How to bleed the brakes of a Niva Chevrolet
- Hard or soft brake pedal. What is the reason and what to do
- Rear disc brakes
- How to bleed brakes on a Chevrolet Niva correctly
- Brake system Chevrolet Niva
- How to tighten or replace the handbrake on a Chevrolet Niva
- Creaking pads: How to fix whistling when braking
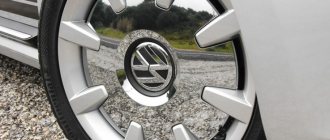
- Chevrolet Niva bolt pattern: diameter of the holes in the Chevy Niva, what is the bolt pattern of wheels and rims in the Chevrolet Niva, radius 15 and 16