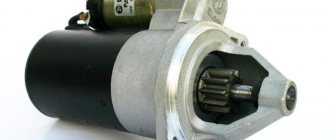
The Niva 21213 and 21214 cars have a starter with mixed-type excitation, with an electromagnetic-type traction relay and two independent windings. Four poles are fixed in the housing, one of which is connected in parallel, and the rest in series. The casing and cover are tightened using a pair of bolts. Inside there is an armature with a collector (the latter is of the end type). The armature rotates on metal-ceramic bushings pressed into the covers.
Despite the apparent design complexity, starter repair is accessible even to beginners. The main thing is to have the necessary tools on hand, diagnose the problem in a timely manner and follow the manufacturer’s instructions. Below we will look at what starter malfunctions exist and how to fix the problems.
How to recognize a breakdown?
During operation, the following problems are possible: 1. After turning the key in the ignition switch, the Niva car does not start, the starter does not turn. Causes of the problem:
- The machine's power supply has run out.
- The terminals on the battery or the terminals of the connected wires are oxidized.
- The terminals are poorly stretched.
- Interturn short circuit or damage to the traction relay winding.
- The switching starter relay has failed or there is a break in the power supply wire of the device.
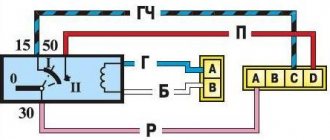
- Lack of closure between the “thirtieth” and “fiftieth” contacts.
In the cases described above, the faulty element is replaced or repaired, and the contacts are cleaned.
2. When the key is turned in the ignition switch, the relay works, but the starter does not turn (hot or cold). Causes:
- The battery is discharged or damaged.
- The fastening of the lugs of the wire connecting the engine with the body part has been loosened.
- The “plus” and (or) “minus” on the power source is oxidized, poor traction.
- The commutator was burnt and the brushes were worn out.
- The positive terminal of the brush holder was at ground.
- There is a break in the armature and (or) stator windings.
Depending on the malfunction, the faulty part is replaced or repaired, the contacts are cleaned, or the short circuit is repaired.
3. Upon supplying voltage to the starter, the relay is activated repeatedly and then switched off. The engine does not turn over (the problem occurs when it is hot or cold).
Causes:
- Short circuit or break in the relay winding.
- Battery discharge.
- Reduced voltage at relay contacts (occurs when wires oxidize).
4. After voltage is applied, the starter armature rotates, but the engine flywheel does not. Causes:
- The clutch engagement lever has failed.
- Clutch slippage.
5. A strange sound appears when the armature is turned:
- The starter fasteners are loose or the device is mounted askew.
- The integrity of the flywheel gears or drive gear is damaged.
- Bearing bushings are worn out.
- The starter fastener is loose.
6. The gear hangs in fixation with the flywheel:
- The lever, traction relay or splined coupling is stuck.
- The ignition switch is broken (at the junction of the contacts).
- The springs of the traction relay are weakened or damaged.
Video repair:
Regardless of whether the engine turns or not, each of the above cases requires repair or replacement of damaged components . Let's look at how to do this work below.
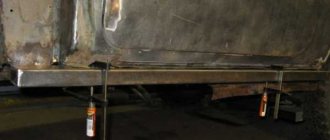
Dismantling
Removing and checking the starter on a Niva yourself is not a difficult task. This will take no more than 30 minutes if you follow the instructions. Here are the tools you will need to prepare:
- ratchet with extension;
- wrench or socket wrench 13;
- head for 10.
Following are the instructions:
- open the hood of the car;
- disconnect all wiring from the starter structure using a ratchet with an extension and a 10mm socket;
- unscrew the bolts securing the starter to the engine with a spanner wrench - depending on the design, the device can be held on by 2 or 3 bolts;
- Pull the starter to the right and up.
Starter replacement or repair
Algorithm of action: Use the key set to “thirteen” to loosen the fastening of the conductor connected to the traction relay. Discard the tip.
To check the VAZ-2121 relay, apply a voltage of 12 volts to the relay output, and apply “-” to the body. Connect a resistance meter to the contacts. If the relay is intact, then the armature pushes out the overrunning clutch, and the contacts close. If a part is found to be faulty, replace it.
- To remove the traction relay, remove the three screws using a slotted screwdriver.
- Pull the rod with the spring out of the device casing, and install the new traction relay using the reverse algorithm.
If the problem persists, continue repairs:
- Take a Phillips screwdriver and tighten a couple of screws, then remove the casing.
- To check the integrity of the brushes, twist the fastening screw of the contact conductor, and then use a screwdriver to press out the spring. Next, it remains to remove the brush.
- In a similar way, remove the remaining three brushes and inspect them. If at least one of the brushes is up to 1.2 centimeters high, then it must be replaced (further use of the part is not recommended).
- Connect a multimeter to the starter windings (one at a time) and check them for a short circuit. The task is to make sure that there is no short circuit between the turns and on the housing.
- Using a screwdriver, lift the locking ring, remove the washer from the shaft and, using a ten-socket wrench, tighten a pair of tightening bolts.
- Separate the starter elements and remove the insulating tubes.
- Inspect the appearance of the windings and commutator. Remove burn marks from the collector using sandpaper. If this part is severely worn or charred, then repair is useless - the device is replaced. Remove burrs using fine-grained sandpaper, then polish the product.
- Use a multimeter to check the armature for a short circuit. If a problem is found, replace the unit.
- Remove the rubber seal from the drive cover and remove the washer to adjust the armature.
- Remove the cotter pin of the lever axle and select the last one. Next you need to remove the armature along with the drive.
- Pry up the drive lever of the screwdriver and remove it.
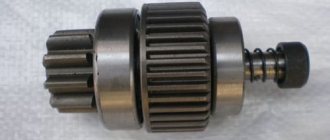
- Check the car's gear - it should turn easily left and right. Also inspect for nicks and chips. If the gear is worn out or the clutch is out of order, then it is useless to carry out repairs - replace the assembly.
- Support the shaft on a wooden block and knock out the limiting ring.
- Use a screwdriver to pry up the ring and remove it.
- Remove the restrictor ring and the overrunning clutch together with the gear.
- Assemble the starter using the reverse algorithm.
Starter repair and maintenance
The Niva 21213 and 21214 cars have a starter with mixed-type excitation, with an electromagnetic-type traction relay and two independent windings. Four poles are fixed in the housing, one of which is connected in parallel, and the rest in series. The casing and cover are tightened using a pair of bolts. Inside there is an armature with a collector (the latter is of the end type). The armature rotates on metal-ceramic bushings pressed into the covers.
Despite the apparent design complexity, starter repair is accessible even to beginners. The main thing is to have the necessary tools on hand, diagnose the problem in a timely manner and follow the manufacturer’s instructions. Below we will look at what starter malfunctions exist and how to fix the problems.
During operation, the following problems are possible: 1. After turning the key in the ignition switch, the Niva car does not start, the starter does not turn. Causes of the problem:
- The machine's power supply has run out. The terminals on the battery or the terminals of the connected wires are oxidized. The terminals are poorly stretched. Interturn short circuit or damage to the traction relay winding. The switching starter relay has failed or there is a break in the power supply wire of the device. Lack of closure between the “thirtieth” and “fiftieth” contacts.
In the cases described above, the faulty element is replaced or repaired, and the contacts are cleaned.
2. When the key is turned in the ignition switch, the relay works, but the starter does not turn (hot or cold). Causes:
- The battery is discharged or damaged. The fastening of the lugs of the wire connecting the engine with the body part has been loosened. The “plus” and (or) “minus” on the power source is oxidized, poor traction. The commutator was burnt and the brushes were worn out. The positive terminal of the brush holder was at ground. There is a break in the armature and (or) stator windings.
Depending on the malfunction, the faulty part is replaced or repaired, the contacts are cleaned, or the short circuit is repaired.
3. Upon supplying voltage to the starter, the relay is activated repeatedly and then switched off. The engine does not turn over (the problem occurs when it is hot or cold).
Causes:
- Short circuit or break in the relay winding. Battery discharge. Reduced voltage at relay contacts (occurs when wires oxidize).
4. After voltage is applied, the starter armature rotates, but the engine flywheel does not. Causes:
- The clutch engagement lever has failed. Clutch slippage.
5. A strange sound appears when the armature is turned:
- The starter fasteners are loose or the device is mounted askew. The integrity of the flywheel gears or drive gear is damaged. Bearing bushings are worn out. The starter fastener is loose.
6. The gear hangs in fixation with the flywheel:
- The lever, traction relay or splined coupling is stuck. The ignition switch is broken (at the junction of the contacts). The springs of the traction relay are weakened or damaged.
Video repair:
Regardless of whether the engine turns or not, each of the above cases requires repair or replacement of damaged components . Let's look at how to do this work below.
Algorithm of action: Use the key set to “thirteen” to loosen the fastening of the conductor connected to the traction relay. Discard the tip.
To check the VAZ-2121 relay, apply a voltage of 12 volts to the relay output, and apply “-” to the body. Connect a resistance meter to the contacts. If the relay is intact, then the armature pushes out the overrunning clutch, and the contacts close. If a part is found to be faulty, replace it.
- To remove the traction relay, remove the three screws using a slotted screwdriver. Pull the rod with the spring out of the device casing, and install the new traction relay using the reverse algorithm.
If the problem persists, continue repairs:
- Take a Phillips screwdriver and tighten a couple of screws, then remove the casing. To check the integrity of the brushes, twist the fastening screw of the contact conductor, and then use a screwdriver to press out the spring. Next, it remains to remove the brush. In a similar way, remove the remaining three brushes and inspect them. If at least one of the brushes is up to 1.2 centimeters high, then it must be replaced (further use of the part is not recommended).
- Connect a multimeter to the starter windings (one at a time) and check them for a short circuit. The task is to make sure that there is no short circuit between the turns and on the housing. Using a screwdriver, lift the locking ring, remove the washer from the shaft and, using a ten-socket wrench, tighten a pair of tightening bolts. Separate the starter elements and remove the insulating tubes. Inspect the appearance of the windings and commutator. Remove burn marks from the collector using sandpaper. If this part is severely worn or charred, then repair is useless - the device is replaced. Remove burrs using fine-grained sandpaper, then polish the product. Use a multimeter to check the armature for a short circuit. If a problem is found, replace the unit. Remove the rubber seal from the drive cover and remove the washer to adjust the armature. Remove the cotter pin of the lever axle and select the last one. Next you need to remove the armature along with the drive.
- Pry up the drive lever of the screwdriver and remove it. Check the car's gear - it should turn easily left and right. Also inspect for nicks and chips. If the gear is worn out or the clutch is out of order, then it is useless to carry out repairs - replace the assembly. Support the shaft on a wooden block and knock out the limiting ring. Use a screwdriver to pry up the ring and remove it. Remove the restrictor ring and the overrunning clutch together with the gear. Assemble the starter using the reverse algorithm.