Characteristics
Basic requirements for brake fluid:
- Should not destroy rubber seals in the system. Maybe someone remembers red BSK brake fluid. Only the factory rubber bands remained alive. She ate all the “co-op and China” like a crocodile.
- Brake fluid must have lubricating properties. This applies to the surfaces of the brake pistons in the cylinders.
- Must have stable characteristics at low and high temperatures. This issue will be discussed in a separate paragraph below.
Classification of brake fluids
Let's decipher the mysterious abbreviation - DOT. It's simple - Department of Transportation, US Department of Transportation. In the USSR and Russia there have never been GOSTs for these products, so everything is produced in accordance with the specifications. And this is translated for the average user, “some to the forest, some to get firewood.” Maybe something has changed in 2020, but I doubt it. Further after the abbreviation DOT, there are also some mysterious “numbers”. Their translation into Russian is as follows:
- DOT3 – mineral base. 50% - alcohol, 50% - castor or camphor oil. Accumulates moisture relatively quickly. My personal opinion: can be applied and used in dry climates.
- DOT4 is the most common option today. The base is glycol. To bind the condensate, boric acid is added. The most versatile option.
- DOT1 is an improved version of DOT4. The boiling point is slightly increased and the viscosity at low temperatures is reduced. Relevant for the north and other “resort places” of our homeland.
- DOT5 – silicone base. Does not absorb moisture from the air. But as always, if there are pros, there are also cons. Accumulated water can collect in the lower parts of the brakes and freeze there. Applicability: sports cars and motorcycles.
1.5. Frequency of replacement of operating fluids and lubricants
| GENERAL INFORMATION |
Engine oil
must be replaced every 10,000 km. For a new car, it is necessary to change the oil after the break-in period (after 2500 km). When changing the oil, you must install a new oil filter (ZMZ-4062 engine) or its filter element (all engines). For the oil change procedure, see subsections 2.3.2, 2.3.2.2 and 2.3.3.3.
Into the engine crankcase
It is recommended to fill in the same brand of oil as was in the engine. If you fill in oil of a different brand, you must first flush the engine lubrication system with oil of the same brand that will be poured into the engine. To do this, drain the old oil and fill in new oil 2–4 mm above the “0” mark on the oil level indicator (dipstick). Start the engine and let it idle for about 10 minutes. Then drain the oil, replace the oil filter or its filter element and add fresh oil.
Coolant
must be changed once every 2 years or after 60,000 km (whichever comes first). For the procedure for replacing the coolant, see subsection 2.4.4. It should be borne in mind that the coolant is poisonous, so you should not suck it into your mouth when pouring it. When working with coolant, it is recommended to use safety glasses and not to smoke or eat. If the liquid gets on exposed skin, wash it with soap and water.
Gearbox oil
must be replaced after 60,000 km. For the oil change procedure, see subsections 3.3.2 and 3.4.2. Every 20,000 km, you need to check the oil level in the gearbox and top up if necessary. The oil level in the crankcase should reach the edge of the filler hole. If the drained oil contains metal particles or is very dirty, the box should be washed. To do this, pour 0.9 liters of fresh oil into its crankcase. Raise the rear of the car with a jack. Start the engine and, engaging first gear, let it run for 2-3 minutes. Then drain the oil and refill with fresh oil. When checking the oil level, you need to clean the surface of the breather from dirt and turn its cap several times to remove any dirt trapped under it.
Oil in the rear axle housing
must be changed after 60,000 km. The oil is changed in the same way as in a gearbox. After 20,000 km, you need to check the oil level in the crankcase and top up if necessary. The oil level should reach the edge of the filler hole. When checking the oil level, you need to clean the breather from dirt in the same way as you did for the gearbox.
Warning
Do not reuse drained brake fluid.
Brake fluid
In clutch and brake drives, they must be changed once every 2 years, regardless of the vehicle’s mileage.
Clutch and brake drives use domestically produced brake fluids “Rosa”, “Rosa-3”, “Tom”, “Neva” or their foreign analogues on a non-petroleum basis, the quality level of which is not lower than DOT-3. The use of other brands of fluids, especially petroleum-based fluids, is prohibited
.
Brake fluid is hygroscopic, so it should not be stored in open containers.
The procedure for replacing brake fluid is as follows:
1. Remove the brake master cylinder reservoir cap.
2. Remove the rubber protective caps from the air release valves on the wheel cylinders and place rubber hoses on the valves, the ends of which are lowered into glass containers.
3. Unscrew the valves no more than one turn and, pressing the brake pedal all the way, drain the fluid. As soon as liquid stops flowing out of the hoses, tighten the air release valves.
4. Pour the drained brake fluid out of the vessels and put them in place.
5. Pour fresh fluid into the master cylinder reservoir, unscrew all air release valves one turn and, pressing the brake pedal all the way, fill the brake system. In this case, you need to constantly add fluid to the master cylinder reservoir. After clean brake fluid begins to flow out of the hoses placed on the air release valves, tighten the valves.
6. Bleed the brake system to remove air from it (see subsection 6.9).
7. Close the brake master cylinder reservoir with a plug. Remove the hoses from the air release valves and put protective caps on them.
The fluid in the clutch hydraulic drive is replaced in the same way.
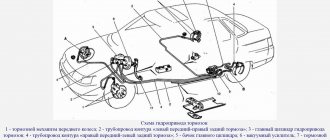
Brake system Chevrolet Niva
Brake fluid level in reservoir 1, fig. 43, check visually using the marks on the body of the tank, made of translucent plastic. With cover 2 removed and new brake pads, the fluid level should be at the “MIN” mark.
When checking the brake fluid level in the reservoir, do not forget to also check the operation of the emergency brake fluid level sensor. To do this, with the ignition on, press on top of the central part of the protective cap 3 - the warning lamp in the instrument cluster should light up.
Attention The warning lamp for the emergency condition of the service brake system lights up when the fluid level in the reservoir drops below the “MIN” mark, which, with new or partially worn brake pad linings, indicates a fluid leak due to depressurization of the system. In this case, add fluid only after the system’s tightness has been restored.
To identify and eliminate the causes of depressurization of the brake system, immediately contact your dealer of JSC GM-AVTOVAZ. When operating a vehicle, pay special attention to the condition of flexible hoses, as they are exposed to water, dirt, sand and salt. If small cracks are detected on the outer shell of the hose or swelling appears when pressing the brake pedal, it is necessary to replace the hose with a new one. After three years of operation, the brake fluid in the system must be replaced. This is due to the fact that brake fluid absorbs moisture from the environment, which leads to a decrease in its boiling point. In addition, water content may cause corrosion of service brake system components. Carry out work on replacing brake hoses and brake fluid at the dealer of JSC GM-AVTOVAZ.
Warning Brake fluid is poisonous! It should be stored in a tightly closed container and out of the reach of children.
Attention Do not allow brake fluid to come into contact with the paintwork of the body - this may damage it.
Warning If there is a malfunction in the brake system, use the services of a tow truck.
Summary
You can replace the fluid yourself only on cars with a hydraulic accumulator and valves combined into one unit. List of required equipment:
- syringe with extension tube or bulb;
- transparent containers;
- transparent tube 20-30 cm long;
- open-end wrenches at “8” or “10”.
Briefly about the procedure for replacing brake fluid in a car with ABS on your own:
- replace the composition in the tank with a new one;
- bleed the left and right front brake cylinders;
- bleed the rear right cylinder with the brake pedal depressed and the pump turned on;
- bleed the rear left cylinder with the brake pedal released and the hydraulic pump turned on;
- check the system for leaks.
If there is a drain fitting on the ABS module, you should use the classical method according to the scheme specified by the factory to bleed all 4 brake cylinders, and then “drive” the ABS installation with excess pressure supplied from outside.
According to the operating rules of any car, including the Lada Priora (VAZ 2170), the brake fluid level in the reservoir is checked every time immediately before leaving. Always use only one brand of brake fluid; do not allow different modifications to be mixed, as this will lead to a loss of basic qualities. As a rule, DOT-3 or DOT-4 fluid is widely used today. Adding fluid, provided that the tightness of the system is at the proper level, is done extremely rarely, once every six months, or even a year. If it goes away quickly, then it is necessary to check and troubleshoot.
To carry out repair work, prepare a standard set of tools, new fluid and perform the following sequence of actions:
First of all, we check the level. The fluid is poured into the brake reservoir, which is located on the master cylinder. The level must correspond to the “MAX” mark. If the level is below the recommended value, top up. In addition to visual monitoring, a float sensor is built into the tank lid, which monitors the level and informs the driver through a warning lamp on the instrument panel when the level is critical.
Holding the sensor with one hand, unscrew the tank cap with the other and remove it. Next, add new brake fluid to the maximum mark, not higher, otherwise the float will displace the excess and it will overflow. Screw on the cap, having first checked the operation of the sensor, turning on the ignition and moving the float to its extreme positions, the lamp on the instrument panel should light up, otherwise replace the sensor.
At this point, the repair work to check the level and top up the brake fluid on the Lada Priora car has been completed.
Sources
- https://vaz-russia.ru/remont-vaz-2170-priora/zamena-tormoznoy-zhidkosti-na-priore.html
- https://mashinapro.ru/1233-tormozuha.html
- https://zubilovaz.ru/lada-priora-proverka-i-dolivka-tormoznoj-zhidkosti
Required Tools
In order to change the brake fluid on a Chevrolet Niva, you need the tools from the table below.
https://www.youtube.com/watch?v=ytdevru
Table - List of tools required to change brake fluid
| Tools | Note |
| Spanner | "at 8" |
| Transparent hose | Up to a meter long |
| Rags | To clean dirt |
| Syringe | Can be replaced with a rubber bulb |
| Tara | Can be replaced with a rubber bulb |
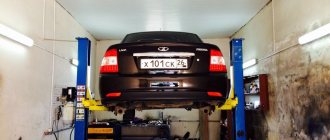
To carry out work, access from the bottom is required. Therefore, an inspection hole or overpass will be required. It is more convenient to replace the vehicle with a partner, but there are ways to carry out the task alone.
Also interesting: The design of the Chevrolet Niva brake system and its diagram
Which brake fluid to choose for Priora
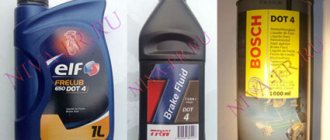
The manufacturer fills it with DOT 4. The most popular brake fluids among buyers are ROSDOT 4 and NEVA-M. The first option is more expensive, the second is cheaper. For cars with and without ABS, it is recommended to use different types of fluids.
- DOT-4 plus - for cars without ABS
- DOT-4 class 6 - designed for modern braking systems (ABS, ESP, VSA)
Depending on the capacity, the cost of the brake fluid indicated above is from 50 to 150 rubles.
You can also add DOT 5.1 fluid. It has a lower viscosity than the above samples, as well as a higher boiling point and, according to manufacturers, changes once every five years.
It is prohibited to mix liquids of different types with each other!
Replacing brake fluid
If a replacement is needed, then you should study the structure of the brake system of your vehicle. Changing ABS brake fluid is very different.
Suppose without an ABC or a hydraulic accumulator, the pump and the ABC hydraulic valve block are located in one unit, then you can replace the fluid with your own hands. With integral ABC, it would be more correct to go to a service station.
Work must be carried out on each circuit of the brake system. The tools you will need are an empty bottle and a flexible hose. Additionally, you need to have a set of keys to work.
It all starts with the wheel that is furthest from the brake cylinder. First you need to drain the fluid from the brake reservoir and pour new one into it. Next, unscrew the fittings on each brake cylinder and wait until the old brake fluid drains out.
When a new one starts to leak, tighten the fitting. If the car has a diagonal system of contours, the process must begin with the right rear wheel, then the left front, then the rear left, and finally the front right.
With a parallel circuit, the sequence is:
- Right rear.
- Left rear.
- Right front.
- Left front.
Replacement must be carried out on removed wheels. If there is a hole, the work will be much easier. As a last resort, you can do all this with a jack, removing the wheels one by one.
At the same time, you can visually check the condition of the car, check the suspension elements and shock absorbers.
Be sure to bleed the brakes after all work. Look in the reservoir; you may need to add new fluid.
It is necessary to check the effectiveness of the brakes after replacing the brake fluid. We carry out the test on a dry road at various speeds. The car should stop smoothly and maintain directional stability. Have a good trip and no breakdowns.
Sources
- https://luxvaz.ru/vaz-2114/199-zamena-tormoznoy-zhidkosti.html
- https://nadomkrat.ru/tormoznaya-sistema/zamena-tormoznoj-zhidkosti-na-vaz-2114
- https://remontavtovaz.ru/avto-sovety/zamena-tormoznoj-zhidkosti-na-avtomobile-svoimi-silami.html
Replacing brake fluid Lada 2123 (VAZ 2123)
At the same time as changing the tires, I decided to replace the brake fluid, since according to the regulations it is recommended to change it every 2 years.
Due to the fact that before carrying out this operation, some questions arose, for example, about the sequence of bleeding the brakes (different information is indicated in different operating manuals), I decided to create such a report. By the way, I changed it in this order: - Right rear - Left front - Left rear - Right front
It seems to me that this is more correct, because the contours of the system are located diagonally, but by and large there is probably no difference.
Well, as usual, a photo report is attached =)
Here are the consumables that were required to carry out all the necessary procedures. There is also antifreeze here, over two years the level has dropped a little, I had to add about a third of the tank. Bleeding tube from the IV.
Let's start with the words that are written in books about how to replace the clutch on a Lachetka: “performing this operation requires certain skills and equipment, so if you do not have confidence in your own abilities, it is better to entrust this work to an authorized service.” There is some truth in these words, but finding a quality service is also not an easy task.
› Interesting ›
25.10.2019
When carrying out repair work, you must follow the instructions and observe the numbering of components. On the master cylinder body there is a reservoir, in the neck of which a brake fluid deficiency level sensor is installed. The cylinder itself cannot be disassembled and if it breaks, it will have to be replaced. The GTZ tank must be dismantled and washed, and if necessary, replace the rubber bushings securing the tank.
We remove the brake fluid sensor wires, unscrew the reservoir cap along with the level sensor float. Don't forget to drain the brake fluid! Please note that brake fluid causes serious damage to the painted surfaces of the car!
Also interesting: Suspension lift in the field yourself
Next, bend the tank clamps and remove it. If the fastener bushings are damaged, replace them. We install the tank back.
The master brake cylinder is dismantled using wrenches 10 and 13. We unscrew the nuts securing the pipelines to the cylinder, remove the tubes and turn them to the sides. The tube holes must be plugged. Do not damage the pusher rod! After the cylinder is removed, we begin its inspection and maintenance. The mirror of the cylinder itself and the working surfaces of the piston assemblies must have perfectly smooth surfaces. If n
After all the faults have been eliminated and the damaged parts have been replaced with new ones, you can install the GTZ in place. During installation, it is necessary to adjust the length of the pusher rod.
We install a sealing gasket on the cylinder flange, place the adjusting device on top and tighten the adjustment bolt until it stops. At the end of installation, we discharge the brake booster using a vacuum pump.
Installation of the Niva Chevrolet GTZ is carried out in the reverse order of dismantling. Diagnostics and inspection are part of regular work carried out on the vehicle's braking system. It is advisable to inspect the hoses and check the brake fluid level before each trip, especially long-distance ones.
If, when you press the brake pedal, it begins to fail, this is a reason to visit a car service center and diagnose the car’s braking system. The brake fluid is replaced in accordance with the technical specifications of the vehicle.
Timely identified and corrected faults will ensure your safety and reduce vehicle maintenance costs.
Makeev Vasily
Reading the article will take: 1 minute
Bleeding Chevrolet Niva brakes is important if one of the following symptoms is observed:
- "cotton pedal" effect
- decreased braking efficiency,
- With each press of the pedal, the force increases.
- Why do you need to bleed Chevrolet Niva brakes?
- Algorithm of actions
Now you can start removing the pads on the Chevrolet Niva.
Regardless of mileage, brake fluid on a Niva Chevrolet is replaced every two years. Replacement should also be carried out if a low-quality liquid is encountered, which has darkened during operation.
Brake fluid is hygroscopic, that is, it absorbs moisture from the air, so it should only be stored in a closed container and therefore should not be poured into the system if it was stored in an open container.
Also interesting: Reverse sensor: where is it located, check, replacement, repair
For replacement, use the brand of fluid that was in the system.
The replacement sequence is as follows: rear right, front left, rear left, front right. To carry out repair work, prepare a standard set of tools, new brake fluid, a silicone hose for the drain fittings of the brake cylinders, and an empty plastic bottle into which you will bleed the old fluid from the system. Drive the car onto a viewing hole or overpass and do the following sequence of actions:
- Open the reservoir with the liquid and take the rubber bulb out, then add a new one to the bottom edge of the neck.
- Remove the front wheels. Then remove the rubber protective caps from the brake cylinder valves.
- Similarly, remove the protective cap from the rear brake cylinders.
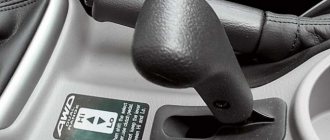
- If the car is installed on lifts, that is, the rear wheels are hanging, then you need to unlock the brake pressure regulator by inserting a flat-head screwdriver between the screw and the bracket.
- Now the assistant must intensively press the brake pedal several times, creating pressure in the system and without releasing it, you thereby put a silicone tube on the cylinder valve, the other end of which is lowered into a plastic bottle, open the valve and bleed out the old brake fluid. We repeat this operation several times, after which we move on to the next wheel.
- While performing this work, monitor the fluid level in the tank and do not forget to top up.
- When replacing fluid in the front wheel mechanism, both valves are used.
- Thus, this cycle is carried out until clean/new brake fluid comes out of the system.
- Upon completion of work, bring the level in the tank to the maximum mark, tighten all cylinder valves and put rubber protective caps on them.
At this point, the repair work to replace the brake fluid on the Niva Chevrolet has been completed.
Brake fluid Niva Chevrolet, climatic conditions
If we are talking about a hot climate, on the Niva family, the use of DOT-3 is quite possible. This liquid has a very gentle relationship with factory rubber bands and seals. If we are talking about Yamal or Krasnoyarsk, then it is best to use DOT-5.1. The viscosity characteristics of this liquid at low temperatures are almost twice as good as those of DOT-4. But do not forget to look at the rubber bands and seals for leaks. Better yet, replace them with branded ones before changing the fluid. Now about DOT-4. My hometown is St. Petersburg, with an air humidity of 90%. Over the course of a year, the volume of “glycol” absorbs approximately 2-3% of water. The critical percentage that German manufacturers talk about is 4.5%. Once this ratio is reached, the characteristics of the brake fluid drop like an avalanche. In the summer there were complaints that the pedal became weak. In winter, the brake pedal can barely be pressed. The reason is simple - there is water in the system. The solution is to change the fluid every two years.
How to properly bleed your car's brakes yourself
We repeat the bleeding operation until the release of air bubbles from the hose stops and only brake fluid comes out.
In this case, air and part of the brake fluid are forced into the vessel, and the pedal is lowered to the floor (air bubbles are clearly visible in the vessel with the liquid). We tighten the fitting and only after that the assistant can release the brake pedal.
Also interesting: Do-it-yourself Niva 2121 elevator: drawings, dimensions
We repeat the bleeding operation until the release of air bubbles from the hose stops and only brake fluid comes out. 4. Then remove air from the cylinder block of the left front wheel. 5.
Remove the protective cap from the lower bleeder fitting of the cylinder block of the left front wheel. 6. Putting a hose on the head of the fitting, lower its free end into a vessel partially filled with brake fluid. We remove air through the lower fitting of the cylinder block. 7.
If all fluid has drained from the master cylinder while bleeding the first brake, fill the master cylinder and bleed the brake again, allowing approximately five seconds between cycles.7.
Tighten the bleeder fitting, remove the plastic tube and install the dust cap.8. Repeat the procedure on the remaining brake mechanisms in the above sequence.
Bleeding using a device with a non-return valve 1.
These devices are a tube with a non-return valve that prevents escaping air and liquid from being drawn back into the system. Some kits also include a clear container.2.
Place the tube onto the bleeder fitting and open it. Press the brake pedal slowly and smoothly, then release it slowly. Repeat this action until the liquid coming out of the fitting is free of air bubbles.3.
For some reason, drivers are not afraid to fix a braking system without ABS on their own, but if an anti-lock braking system is installed, then many have difficulties.
Actually bleeding ABS brakes and doing it correctly is not that difficult, although there are differences and things to know.
And, you also need to know that each car with ABS has its own differences in pumping and replacing the fluid.
The vehicle's braking system must be in good condition and respond to pressure on the brake pedal in accordance with the driver's expectations. The slightest problems with the brakes can lead to a traffic accident, so when the first symptoms of malfunctions appear, they must be eliminated.
Most often, drivers take care of their brakes by promptly changing pads and brake discs. However, system maintenance should not end there. It is equally important to replace the brake fluid in your car on time, and at the same time correctly perform the brake bleeding procedure.
Bleeding the hydraulic brake system, replacing Niva Chevrolet fluid
We pump the brakes to remove air from the hydraulic drive after it has depressurized when replacing the master cylinder, wheel brake wheel cylinders, hoses, tubes, as well as in case of replacing the working fluid or when the brake pedal becomes “soft”.
— brake mechanism of the right rear wheel;
— brake mechanism of the left front wheel;
— brake mechanism of the left rear wheel;
— brake mechanism of the right front wheel.
If air gets into one of the circuits, it is enough to bleed only this circuit, and not the entire hydraulic drive. Before pumping, check the level of working fluid in the brake system hydraulic reservoir and, if necessary, add fluid (see “Checking the fluid level in the brake hydraulic reservoir,” page 33). We bleed the brakes with an assistant. If the rear wheels are hanging out.
..insert a screwdriver between the pressure regulator piston in the hydraulic drive of the rear wheel brake mechanisms and the piston lever, fixing the regulator piston in the recessed position.
We clean the bleeder fitting of the brake mechanism of the right rear wheel from dirt.
and remove the protective cap from it.
Using an 8-mm spanner, loosen the tightening of the bleeder fitting. We put a hose on the fitting, and immerse its free end in a container partially filled with working fluid.
An assistant must vigorously press the brake pedal all the way 4-5 times and keep it pressed.
Using the “8” wrench, unscrew the bleeder fitting 1/2-3/4 of a turn.
In this case, liquid with air bubbles will flow out of the hose, and the brake pedal should be pressed all the way.
As soon as the liquid stops flowing out of the hose, tighten the fitting and only after that can the assistant release the pedal. We repeat pumping until air bubbles no longer appear in the liquid coming out of the hose. We remove the hose, wipe the bleeder fitting dry and put a protective cap on it. We bleed the brake mechanism of the left front wheel.
. remove the protective cap from the lower bleeder fitting of the working cylinder block of the left front wheel.
We put a hose on the fitting and lower its free end into the vessel,
partially filled with brake fluid.
We remove air through the lower fitting of the working cylinder block.
In the same way, we remove air through the upper fitting of the working cylinder block of the left front wheel (shown in the photo with an arrow). Similarly, we bleed the brake mechanisms of the other circuit.
When pumping, you need to monitor the fluid level in the tank and add fluid if necessary.
Also interesting: Suspension lift in the field yourself
If, when you press the brake pedal, you feel its “softness” and increased travel, it means there is air left in the system. In this case, we repeat pumping until the pedal becomes “hard”, i.e., when pressed, go no more than half the distance to the floor. If air cannot be removed, check the tightness of connections, pipelines, hoses, master and working cylinders.
When replacing, pump out the old fluid from the tank with a syringe or rubber bulb.
Fill the reservoir with new fluid. We pump the hydraulic drive of the brake system until new fluid (lighter than the old) begins to come out of the bleeding fittings of all working cylinders. After bleeding the brakes, bring the fluid level in the hydraulic brake system reservoir to normal (see “Checking the fluid level in the brake hydraulic reservoir,” page 33).
Hello, as I understand it, you need to bleed the brakes in a certain sequence. Rear right, front left, rear left, front right. Everything is clear with the rear, there is 1 fitting, but with the front it’s somehow not clear. There are 2 fittings on the calipers. Liquid flows from the top ones when opened, but not from the bottom ones. Tell me how to deal with the front?)
Brake fluid Niva Chevrolet, choice
brake fluids
Let's take the following fact as an axiom - almost NONE of the leading manufacturers of pads or brake components makes their own brake fluid. It is made either by chemical concerns or manufacturers of auto chemicals and oils. Example. Everything that is in jars of the TRW, BMW, ATE brands is made by manufacturers ROWE, BASF, Pentosin, ELF-TOTAL. Therefore, when I selected suppliers, I was guided by the following thought. A well-known company that deals with brake systems simply will not disgrace itself and sell a low-quality product in its own name. That's why I settled on Bosch, TRW, Brembo products. To fully pump the system of our car, 1 liter of product is enough. There is still some left for refilling.
What are the best brake pads for Niva Chevrolet?
Good day, dear car enthusiasts! There is most likely no driver among us who has not at least once experienced a feeling of helplessness at the moment of braking. When the car continues to move, and not at all in the direction the driver wants. Skid.
Also interesting: Installing a Start-Stop button instead of the ignition switch (operating principle, connection diagram, errors)
Fortunately, engineering does not stand still. The modern driver is armed with a system such as ABS. Let's take a closer look at the system and see if it is possible to bleed ABS brakes yourself.
› Interesting ›
25.10.2019
Makeev Vasily
The vehicle's braking system must be in good condition and respond to pressure on the brake pedal in accordance with the driver's expectations. The slightest problems with the brakes can lead to a traffic accident, so when the first symptoms of malfunctions appear, they must be eliminated.
Most often, drivers take care of their brakes by promptly changing pads and brake discs. However, system maintenance should not end there. It is equally important to replace the brake fluid in your car on time, and at the same time correctly perform the brake bleeding procedure.
A car's clutch is one of the main components of the transmission. It is this that takes the brunt of the impact when changing gears, protects the car from overloads and dampens vibrations. Particularly high voltages are experienced by devices on vehicles with a manual transmission.
Simple procedures for setting up this unit will significantly reduce the risk of wear of parts. Skills in bleeding the hydraulic drive will not be superfluous, because any intervention in the system, be it replacing the working cylinder or a drop in the fluid level in the drive reservoir, leads to airing of the system.
Replacing brake hoses Niva 2121
The front hoses on Niva 2121 and 21213 are distinguished by their length, the outer hose is longer than the inner one. There are a total of four hoses on the front of the car; on the rear of the car there is one hose from a VAZ 2101, from a tee.
To replace hoses on Niva 2121 you will need:
- Split wrench 8 - 10
- Open-end wrench 17
- Copper washers from the brake system of a VAZ
- Pliers
Replacing the front hose 2121:
- We hang and remove the front wheel.
- Next, you need to unscrew the end of the brake hose from the tube. To do this, use a 17 wrench to hold the end of the hose, and use a 10 wrench to unscrew the tube connector.
perednie-tormoznye-shlangi-2121-2131
Then, using pliers, pull out the hose clamp. We remove the hose from the hole in the body bracket, having previously twisted the flat of the tip so that it passes through the hole.
perednie-tormoznye-shlangi-2121-2131-1
- Next, bend the stopper securing the hose and remove it. Niva front brakes
- The second hose is removed in the same way.
- Assembly is carried out in reverse order.
Replacing brake hoses Niva 2123
The Chevrolet Niva already has a simplified (classic) brake system; on the front part there are only two hoses from the Niva 2123 of the same length. At the rear of the bridge there are two hoses from 2108 (rear), they are also the same length.
To replace hoses on Niva 2121 you will need:
- Split wrench 8 - 10
- Open-end wrench 15
- Copper washers from the brake system of a VAZ
Replacement of front hose 2123:
- We hang and remove the front wheel.
- Use a 15mm wrench to hold the brake hose. Using a 10 mm wrench, unscrew the brake pipe and remove the brake hose.
- Chevy replacement
- Use a screwdriver to press the rubber clamp of the hose and remove it from the bracket
- Chevy 3 replacement
- Using a 15 wrench, unscrew the hose from the caliper and remove it.
- Chevy 4 replacement
- The second hose is removed in the same way.
- Assembly is carried out in reverse order.
The procedure for repairing or replacing components and mechanisms
In fact, according to the observations and assessments of specialists, repairing the master cylinder in a garage rarely leads to the desired result - increasing the efficiency of the brakes.
The recommendation is simple - it is easier to replace the master brake cylinder assembly, if we are not just talking about replacing the rubber seals.
When replacing the master cylinder reservoir, it is recommended to change the sealing gaskets, having first lightly lubricated them with brake fluid.
When completely replacing or dismantling the master cylinder for repair, first pump out the brake fluid from the reservoir and plug the pipelines.
It is strictly forbidden to repair the pressure regulator of the master cylinder. The characteristics of the regulator are set by the manufacturer during manufacture, so the pressure regulators are replaced as a set.
After repairing the brake cylinder, do not forget to bleed the brake system.
Good luck with your brake master cylinder repair.
Design Features
The front wheel brake mechanism (Fig. 1) is a disc with a floating three-piston caliper.
Cylinder block 1 is fixed in the caliper on two guides and secured with a spring retainer.
Brake pads 2 with steel bases having a figured shape, ensuring their tight fit to the pad guide.
When installing the pads, spring-loaded levers 3 press the caliper 7 to the ends of the pads, which ensures constant pressing of the pads to the guide grooves.
Brake disc 8 is made of cast iron.
Bleeding the brakes of a Niva Chevrolet: step-by-step instructions
Tools:
- Split spanner 10 mm
- Split spanner 8 mm
- Rubber bulb
- Capacity for brake fluid 1-2 l.
Parts and consumables:
- Brake fluid
- Rags
- Aerosol lubricant type WD-40
- Brake fitting
- Bleeding hose
Bleeding the brakes is necessary when replacing brake fluid, as well as to remove air that has entered the hydraulic drive during the repair or replacement of individual components of the brake system. Air trapped in the hydraulic drive causes an increase in the free play of the brake pedal (the pedal becomes “soft”) and significantly reduces the effectiveness of the brakes.
– when you press the pedal once, the pedal travel increases, its “softness”;
– with repeated pressing of the pedal – a gradual decrease in the pedal stroke with a simultaneous increase in its “hardness”. Before bleeding the hydraulic drive, it is necessary to identify and eliminate the cause of depressurization.
We carry out the work with an assistant on an inspection ditch or overpass. Thoroughly clean the wheel cylinder bleeder fittings from dirt. We remove air first from one brake circuit, starting from the wheel cylinder of the right rear wheel and ending with the cylinder block of the left front wheel. We remove air with the rear wheels loaded.
When bleeding the brakes on a car with the rear part suspended (for example, on a lift), it is necessary to load the rear brake pressure regulator, insert a screwdriver between the pressure regulator piston and the piston lever.
1. Remove the protective cap from the bleeder fitting of the wheel cylinder of the right rear wheel.
2. We put a hose on the head of the fitting, lowering its free end into a vessel partially filled with brake fluid.
3. An assistant presses the brake pedal three to four times at intervals of 1-2 seconds and holds the pedal down. Using the “8” wrench, unscrew the bleeder fitting 1/2 - 3/4 turn. In this case, air and part of the brake fluid are forced into the vessel, and the pedal is lowered to the floor (air bubbles are clearly visible in the vessel with the liquid).
We tighten the fitting and only after that the assistant can release the brake pedal. We repeat the bleeding operation until the release of air bubbles from the hose stops and only brake fluid comes out. In this case, air and part of the brake fluid are forced into the vessel, and the pedal is lowered to the floor (air bubbles are clearly visible in the vessel with the liquid).
4. Then remove air from the cylinder block of the left front wheel.
5. Remove the protective cap from the lower bleeder fitting of the cylinder block of the left front wheel.
6. Putting a hose on the head of the fitting, lower its free end into a vessel partially filled with brake fluid. We remove air through the lower fitting of the cylinder block.
7. In the same way, remove air through the upper fitting of the cylinder block of the front left wheel.
8. To remove air from another circuit, we bleed in the sequence: left rear - right front wheel.
When removing air from the system, you need to monitor the fluid level in the master cylinder reservoir and add it if necessary.
If there is no air in the system, the brake pedal should be “hard”, i.e. when pressing, go no more than half the distance to the floor.
When removing or replacing elements of one of the circuits, only this circuit must be pumped. When removing or replacing the master brake cylinder, pressure regulator, or a drop in the level of brake fluid in the reservoir, resulting in air entering the hydraulic drive, it is necessary to completely bleed the brake system, i.e.
The article is missing:
- Photo of the instrument
- Photos of parts and consumables
- High-quality photos of repairs
- Hydraulic fluid contains poison. If it comes into contact with exposed skin, wash it off immediately with a large stream of water. If suddenly the substance gets into your eyes, or, worse, you swallow it, you should seek medical help.
- Some types of hydraulic fluid are flammable and can therefore catch fire if they come into contact with hot elements or an open flame. During your work, you should always remember this in order to take appropriate precautions in time.
- The liquid is aggressive to plastic parts and paint. If the substance gets on the surface of a painted body or plastic, immediately wash it off with a large stream of water.
- The liquid is hygroscopic, that is, it can absorb moisture from the air. Excess moisture content lowers the boiling point to unacceptable levels, resulting in an unsafe reduction in braking performance.
- Used hydraulic fluid cannot be reused. It is most likely already contaminated. If you need to add or replace fluid in the system, use only the recommended type.
Air, compared to liquid, is more easily compressed, as a result of which the presence in the line rapidly reduces braking performance. In Chevrolet, the brake mechanism is equipped on a 2-circuit principle. The latter ensures reliability during depressurization. Thus, one circuit includes the working cylinders of the tires (right rear, left front), while the second circuit includes the left rear, right front. The pumping sequence involves bleeding air bubbles using a special fitting.
Signs of air penetration are as follows:
- increased pedal travel, softness appears when pressing the brake pedal;
- a smooth decrease in pedal travel and a simultaneous increase in rigidity when pressing the pedal (before pumping, depressurization must be identified and eliminated).
Also interesting: How to bleed the brakes of a Niva Chevrolet ||
Chevrolet Niva brakes are being pumped. The activities must be carried out with a partner on an equipped area - an overpass or an inspection hole. The tire casing bleeder fittings should be thoroughly cleaned of dirt. First, you have to get rid of the air in one brake circuit, starting with the rear right tire housing and ending with the left tire block at the front. Meanwhile, air should be removed when the rear wheels are loaded.
When bleeding the brakes in a Chevrolet Niva with a rear mounted section, it is worth loading the pressure lever of the brake located at the rear. Now you need to insert a screwdriver into the middle of the piston lever and the pressure regulator piston.
For work, prepare tools and consumables in advance:
- union (split) nut head for 10;
- union (split) nut head for 8;
- container for TJ (1-2 liter);
- rubber bulb;
- brake fluid;
- brake fitting;
- aerosol VD-40;
- rags;
- hose.
- Remove the dust cap from the fitting (to make it more convenient, it will fit to remove the rear tire).
- Wet the fitting with WD-40, then put a wrench on it and tighten the tightening bolt.
- Pull the rubber tube onto the fitting. Then lower its end into the prepared container, partially filled with TJ.
- Meanwhile, your partner needs to press the brake 3-4 times every 1-2 seconds, thus holding the pedal in the pressed position.
- Next, you need to take the head 8 and unscrew the fitting half or ¾ of a turn. At the same time, air bubbles, as well as some of the brake fluid, will escape into the container; the brake pedal will go to the floor.
- The next step is to tighten the fitting, after which the assistant can release the brake.
- Repeat the operation performed to bleed the Chevrolet. Perform the action until air bubbles stop coming out of the tube, but only TJ.
In the same way, you need to get rid of air using the upper fitting on the front tire on the left. To remove bubbles that form in another circuit, pump the tire in the following order: left - rear - front right tire.
Bleeding the brakes is especially necessary if any of the following symptoms occur:
- decreased braking performance;
- feeling of a cotton pedal;
- Each time you press the pedal, more force is required.
- Remember that hydraulic fluid is poisonous. If it gets on exposed skin, wash off immediately with plenty of water. If liquid suddenly gets into your eyes or is accidentally swallowed, call an ambulance immediately.
- Some types of liquid are flammable and can ignite if they come into contact with a hot substance or open flame. During work, it is better to play it safe, considering that any liquid is flammable, in order to react in time and take all precautions.
- Hydraulic fluid is considered aggressive towards plastic elements and paints. If liquid gets on the painted surface of the body or on plastic parts, it should be washed off immediately with plenty of water.
- Liquid has the ability to absorb moisture from the air, therefore it is hygroscopic. Excess moisture content reduces the boiling point to unacceptable parameters. This leads to an unsafe reduction in braking performance.
- Old liquid cannot be reused, because it may contain a lot of dirt and foreign particles. If you need to add or replace fluid, use only the recommended one.
At the same time as changing the tires, I decided to replace the brake fluid, since according to the regulations it is recommended to change it every 2 years.
Due to the fact that before carrying out this operation, some questions arose, for example, about the sequence of bleeding the brakes (different information is indicated in different operating manuals), I decided to create such a report. By the way, I changed it in this order: - Right rear - Left front - Left rear - Right front
It seems to me that this is more correct, because the contours of the system are located diagonally, but by and large there is probably no difference.