Hi all! My recent trips with family and friends on vacation and into nature clearly showed that even SUVs can experience a shortage of luggage space. And when you have a Niva at your disposal, you won’t be able to fit everything you want inside the car.
That’s why I decided to discuss with you the expedition rack for the Niva. Although there are other roof racks.
You can install this design both on a regular domestic Niva with index 2121 or 2131 (2 and 4 side doors, respectively), and on Chevrolet brand products. Although for any other car that structurally allows for roof racks to be mounted, a similar option for expanding cargo transportation capabilities is suitable.
Key Features and Benefits
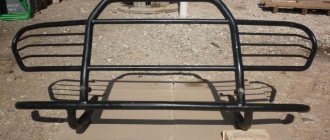
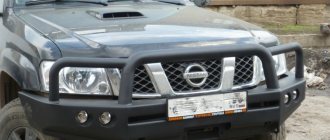
Let's assume that you decide to install a spacious expedition trunk on your Chevy Niva. This is a large platform with sides into which all sorts of things are loaded. It differs from a regular trunk in its reinforced design, which allows you to count on impressive loads.
An expedition trunk (EB) can be described as a basket with a frame structure and additionally several supports. They allow you to install mounts on the roof, that is, on the roof rails of your SUV. Installation of such a design will provide you with the opportunity to transport large cargo that does not fit in your domestic Niva or Chevrolet Niva, or free space is required for passengers.
I would include the following advantages and key features of EB:
- versatility and multifunctionality;
- structural strength with simultaneous lightness;
- a way to get rid of excess cargo inside the car;
- attractive appearance.
Yes, the simplest solution would be to buy a ready-made factory expedition rack. Check out the available roof rail rack options. But such ready-made designs are not the cheapest, so not every one of you will want or be able to buy them.
Sometimes car owners, in order not to spend extra money, decide to make an electric vehicle for their Niva on their own. A good option, since a homemade trunk is not much different from a factory one. Only for this purpose use high-quality materials and take a responsible approach to assembling the structure. I will try to help you with this.
Material of manufacture
Which metal is better - aluminum or steel? Of course, aluminum wins in weight, which will affect fuel economy. However, this metal cannot withstand impact weight loads. Another disadvantage of the aluminum modification is its prefabricated design - bolted.
You can guess what this threatens: when shaken, the structure can be disassembled using spare parts. That is, there is no point in purchasing an aluminum expeditionary trunk for a Chevrolet Niva.
A steel expedition truck is characterized by a large margin of safety, and in the event of a car overturning in an accident, it can protect the roof from damage. In terms of cost, such a security force is much cheaper. So, all the advantages are obvious.
Preparing for work
If you were attracted by the option of installing an expedition rack on the roof of the Niva, then you probably often transport some kind of cargo and are a fan of outdoor activities, fishing or hunting.
The Niva itself is a machine designed for such purposes. Often used as a workhorse. By installing an expedition-type trunk, the amount of horsepower will not increase, but the functionality and practicality of the car will clearly change for the better.
To start building, you will need to go through the preparation phase.
- Time and place. To make EB, you will need a place to do it and free time. It’s a shame when the desire does not coincide with the possibilities, and a person simply does not have enough time to work on his car on his own. Therefore, really weigh your options.
- Drawing. Without knowing the dimensions of the car and the parameters of the design of the trunk itself, it makes no sense to start work. There are many examples of schemes in the photo, according to which it is possible to make an electronic battery specifically for the Niva. Just make sure what kind of Niva we are talking about, so as not to start assembling a trunk for the domestic Niva, the design of which is focused on Chevrolet.
- Materials. Official manufacturers and simple craftsmen usually use aluminum and aluminum alloys. I support this option because these metals are strong, reliable, durable and at the same time lightweight. With excellent strength parameters, a heavy metal structure will not sit on the roof of your car. Plus, aluminum does not rust, which is an important argument in its favor.
Basically, expedition racks are made by welding pipes. They are also made by the sides of the required height. Pipes with a smaller diameter are laid on the bottom, and sometimes they are reinforced, that is, reinforced with a metal mesh. Here, focus on the loads that will affect your homemade electronic device.
Advantages and disadvantages
Advantages of an expedition rack:
- large load capacity (up to 200 kg);
- large margin of safety;
- when driving through forest areas it is not damaged, but the box, made of plastic, is scratched and broken;
- Various elements can be attached to the arches, for example, a spare wheel holder, additional headlights.
Disadvantages of an expedition trunk:
- worsens the aerodynamic qualities of the car;
- does not provide protection for cargo from wind, precipitation, or impacts from branches;
- worsens the appearance of the Niva.
Many car enthusiasts do not pay attention to the noted shortcomings or eliminate them:
- An SUV is not a racing car, and air resistance begins to manifest itself significantly at speeds over 90 km/h. To reduce drag, fairings can be installed on the arches.
- Car enthusiasts install branch guards on their own, come up with protection for the load and its fastening.
- Successful tuning of the trunk, done by yourself, gives the car a unique, and sometimes even exotic look.
Buy or make it yourself?
Calculations show that the cost of steel parts is 10% of the cost of the entire structure. Therefore, many Chevrolet Niva owners prefer to design a roof rack with their own hands. To do this, they use ready-made drawings of an expedition rack or develop their own. Often their designs are superior in quality and functionality to industrial ones.
All SUVs of the VAZ family have a significant drawback - the volume of the cargo compartment is too small. Therefore, cargo has to be transported not in the cabin, but on the roof of the car.
Motorists believe that an expeditionary trunk for the Niva is the best solution.
It is often necessary to install a trunk on a Niva, since the luggage compartment in this car can only accommodate small-sized items, and quite often it is necessary to transport many large ones: inflatable boats, hunting equipment, crops from the garden.
You can buy the design in a store, or you can make it yourself. In both cases, it is also necessary to follow the rules for installing and operating luggage racks.
Frame preparation
First you need to measure the roof of the car and determine the mounting locations of the structure. Next, we make drawings of the expedition trunk for the Niva with our own hands. When calculating the parameters, it is necessary to take into account the endurance of the structure: how much weight it can withstand.
- Next, you should measure the pipe blanks for the frame according to the drawing, cut and weld them: you should get two quadrangular frames. When welding, we “catch” the diagonal.
- We weld transverse pipes onto the lower frame to strengthen the structure. It is important to forge the rounded edges on the front and rear bars to improve appearance and improve aerodynamic properties.
- We strengthen the corners of the frame by welding small cross beams.
- We prepare 14 vertical bars measuring 110 mm for welding the lower and upper frames. How to weld an expeditionary trunk for a Niva? We connect the lower and upper frames together using vertical beams.
- Next, we prepare pieces of 2x2 profile and construction mesh to strengthen the structure. The mesh should be 2 x 0.5 meters in size.
- When the structure is assembled, it is necessary to treat the metal with a rust converter.
- Next, we clean the expedition trunk on the Niva using a sander, apply primer and paint.
- After painting, install it on the rails and secure it with bolts (approximately 8 mm, 70 mm long).
- We install work lights, a spare wheel, a jack, a shovel and other upgrades on the trunk. Do-it-yourself expedition trunk for Niva 2131 is ready.
How to make a trunk with your own hands
Many motorists think about how to make a trunk. After all, it is better to transport large-sized and inconvenient things for transportation in a special compartment, and the purchase of such structures is quite expensive.
It’s not difficult to do this kind of work; you just need to follow a number of sequential steps:
- Preparation. Depending on whether the trunk is installed on a Chevrolet Niva or on a classic model, the dimensions of the trunk also differ. Therefore, first of all, measure the roof and determine the locations of future supports. Then select the main parameters, decide on the future design: think over the mounting locations, calculate the frames and components. Draw up a drawing of the platform with data related to the technical specifications for the vehicle;
- production of a supporting frame. Cut the racks and weld them into a rectangle, and attach the rods to the middle of the resulting frame. Add a few more stiffeners made of professional metal to the inner plane at equal distances. You will receive a lattice frame with parallel crossbars;
- strengthening the structure. Weld small sections of profile pipe inside the frame so that square cells are formed;
- improving the aerodynamic qualities of the structure. Weld a trapezoid-shaped structure of selected dimensions to the front part: its base should be equal to the width of the platform, and the smaller part should be chosen arbitrarily. To make a grinder, divide the profile pipe into sectors, and then heat and bend to obtain the desired shape. Treat the corners with gas welding and connect them to the platform. At the end, install 2 – 3 jumpers;
- production of boards. Make the side trapezoidal crossbars according to the principle described above. Makes sure that the angle of inclination of both trapezoids is the same. Weld sections of studs on the front and back sides, and a sleeve at the obtuse corner of the trapezoid. Pass the ends of the studs into the bushings and weld again;
- attachment to the main frame. Drill holes at the points intended for supports and reinforce them with bushings. Insert them into the drilled grooves and weld them to the metal base. Drill several grooves in the profile with a diameter of no more than 10 mm, insert a threaded rod into each and weld them. Cut the liner to the required length and secure with threads;
- giving a presentable appearance to the trunk. Clean the platform from scale, remove burrs, degrease and prime. Wait a day and cover the surface with a layer of paint or enamel.
Making a trunk with your own hands
Is it possible to make an expedition trunk for a Chevrolet Niva with your own hands? If you know how to use a welding machine, then this will not be difficult. To work you will need:
- welding machine;
- square pipes;
- fasteners.
First, you need to draw up a drawing of an expeditionary trunk for a Chevrolet Niva, taking into account the distances between the fasteners. Next follow the instructions:
- We make a platform with sides, which consists of a frame and a bottom. The frame should be welded from pipes with a diameter of 20x20, and the bottom can be made of metal mesh.
- Prime the platform, dry it and paint it with black metal paint.
- Reinforce the attachment points under the seal with bushings, then weld the platform to them.
- For additional illumination, install taillights on the trunk.
You can also attach straps to the basket to secure loads. The expedition trunk for the Chevy Niva is ready.
Tip: If you are going to install headlights on the trunk, purchase a higher power generator. Otherwise, the on-board network will quickly fail.
How to install a trunk
Before installing the roof rack on the Niva, it is important to clean it of dust and dirt. You can also coat the car with protective compounds. Then wrap the parts and fasteners with insulating materials. After this, follow the following sequence of actions:
- drill slots for the trunk in the roof;
- insert the key into it and turn 90 degrees;
- remove the support cover and install the support fasteners into the arc slot. To do this, use the cam, pressing it upwards towards the arc;
- try on the arch on the roof and, if necessary, adjust its position;
- secure the supports to the arches so that the support pads are located as close to the center of the car as possible;
- Use an L-shaped wrench to tighten the fastenings;
- insert the rubber gasket into the groove of the arc;
- close the arc on top with a plastic plug.
After installing the roof rack on the Niva is completed, be sure to check the reliability of the fastenings and the rigidity of the structure. If at least something makes you distrustful, it is better to repeat the operations.
Rules for using a homemade trunk
Even if you rarely transport cargo in a homemade trunk, you need to periodically check its condition and the integrity of the fastening. It is imperative to do this immediately before traveling, especially over long distances. And also follow the following recommendations:
- secure the protective edging so that it does not come into contact with any of the doors;
- do not transport cargo in the trunk during the first 24 hours after installation;
- make sure that the metal brackets are not deformed;
- distribute the load evenly so that it is close to the edges;
- secure the load fairly securely;
- adhere to the maximum permissible load capacity;
- do not exceed the speed of 130 km/m;
- Do not make sudden accelerations, lane changes or braking with a loaded trunk, because in this case the center of gravity shifts and the car may behave unpredictably.
Making and installing a roof rack on a Chevrolet Niva or Lada 2121 4×4 Niva is not difficult. As a last resort, you can purchase one of the many design models in specialized stores. In any case, such a detail will greatly simplify the transportation of goods when traveling out of town, hunting or fishing.
The procedure for making a homemade roof rack
For those car owners who are wondering how to make a roof rack themselves, you should know that this procedure itself is not complicated and includes the following stages of work:
- To make an aluminum trunk, first of all, you should make a drawing of it. Thus, you can find out in advance what this product will look like, calculate all the necessary dimensions and the required amount of materials.
- Next, we weld the box frame, which will have the shape of a rectangle. Here we weld two main beams, which will subsequently be connected to the roof rails.
- Due to the fact that the distance between the transverse profiles is quite large, it is necessary to weld the intermediate beams. To give the structure reliability, we weld the profile strips together.
- To improve appearance and aerodynamic properties, a homemade trunk should be made with more rounded corners. Typically, this is performed on the anterior and posterior arches.
- The next stage of work is installing the sides of the trunk. Here you need to drill holes on the sides of the structure. After that, special bushings must be inserted into these holes, which should be scalded. This is necessary so that the metal does not bend when tightening the bolts. After that, we make the sides themselves. To do this, we cut the profile to a certain length, weld the studs to the sides and screw them into the holes located on the frame. After this, we weld the bushing to secure the cross member. We weld part of the stud onto the sidewall and back.
- The final stage is priming and painting the finished trunk.