Having set out to increase the efficiency of my car's heater, I re-read the available methods on the forums, and realized that these methods have some drawbacks that did not suit me. For example, installing a fan from a VAZ 2108 allows you to increase the air flow through the heater and blower nozzles, but this air is taken from the street, it is icy, and therefore the interior begins to warm up only after the engine has completely warmed up. In addition, this method requires significant modifications to the design of the heater, as well as the cost of purchasing a fan. Next, I’ll tell you how to modify the stove on the Niva with your own hands without investment and in a short time.
Fan replacement
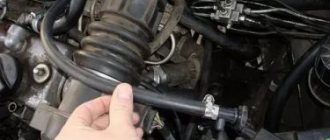
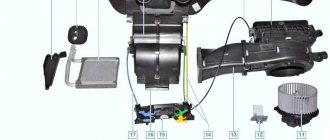
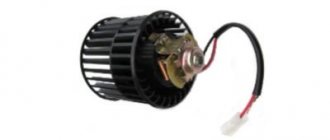
The main reason for the low temperature in the car is the poor performance of the heater fan, which forces warm air through it into the cabin. In addition, being directly inside the car, it operates quite loudly at high speeds and whistles unpleasantly, especially in winter. Therefore, it is replaced with a fan from a VAZ-2108 (“eight”) car, which together with the casing is often called a “snail”. Their sizes differ slightly, so installing a new one is quite simple, with minor design modifications. Place the fan in the engine compartment, inside the air intake. This significantly reduces the noise from it. The heater radiator shutter needs to be removed.
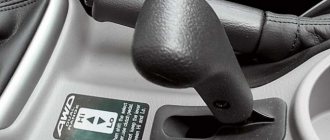
You can leave the standard two-speed airflow mode switch
or replace it with a three-position (and, if desired, four-position) installed on 2108, adding an additional resistor from the “eight” to the fan circuit.
They place it inside the air duct, since it needs airflow.
The cross-section of the wires suitable for it needs to be increased, since the new motor consumes more power.
The outer openings for air passage in the hood must be sealed to reduce the flow of cold air through them to the stove by half.
Engine insulation
This is the first place to start insulating the Chevrolet Niva. There are several options here.
Available means
Most car owners are trying to save money, so they use various available means, for example, pieces of felt, leftover foam rubber, old blankets, etc. As many years of practice have shown, this method is ineffective.
Special car blankets
They are made from high quality refractory material and are characterized by low cost and fairly high efficiency. In this case, the engine warm-up time is reduced by approximately half.
The most important thing here is the choice of quality products. There have been cases when car blankets began to smoke at elevated temperatures and caught fire. This is basically a cheap Chinese product. High-quality car blankets now cost from 1.5 to 2 thousand rubles.
Professional insulation
Among all materials they are the most effective. Their main advantage is ease of installation. They are also easy to remove with the onset of spring warmth.
From this group we can highlight several of the most popular materials:
1. "Izolon" . It is quite inexpensive and very effective at retaining heat. One square meter of Isolon, depending on the thickness, will cost approximately 50-150 rubles. The quality of this material is kept at the highest level and is often used to trap heat under the hood.
2. "Tiviplen-P" . It is classified as a self-adhesive type material. It is based on polyethylene foam. "Tiviplen-P" is a three-layer material. The middle layer is polyethylene foam, and the outer two are the front and adhesive layers. Foil is not used here, since heat is retained perfectly without it. The thickness of the material ranges from 4 to 15 millimeters, and the cost is from 200 rubles per square meter.
Also interesting: Tuning for VAZ Niva 4×4 (LADA Niva) buy with delivery throughout the Russian Federation
3. "Isoflex" . It is often used as an effective soundproofing material, which also copes very well with the function of retaining heat. Therefore, Isoflex is a double-acting material, acting as a sound and heat insulator. High-quality products will cost approximately 60 rubles per square meter.
4. “Stizol”, “Isoton” . These are materials that simultaneously perform sound and heat insulating functions. Most often they are sold in sheets measuring 2x1 meter. One sheet of such materials will cost approximately 1.5-2 thousand rubles.
The entire process of insulating the Niva takes place in several stages. First you need to prepare the material and tools. Of the latter, the following will be required:
• stationery knife; • scissors; • pencil; • ruler; • scotch; • paper; • black and yellow markers.
Replacing the heater tap
The standard heater tap on Niva 21213 does not do its job. Since it has a small cross-section, coolant flows quite slowly through the radiator. In addition, it often becomes a place for coolant to leak into the cabin. Therefore, car owners prefer to exchange it for similar models from other AvtoVAZ, Volkswagen, Toyota or Opel cars. For example, the ceramic faucet installed in 2108 has a large diameter passage opening, which increases the performance of the stove. It is better to install it in the pipe that supplies coolant to the stove, otherwise even if it is closed in the warm season, heated air will still flow into the cabin.
Insulation of the interior
When the insulation of the Niva in the engine compartment is completed, you can proceed to the next stage, which involves thermal insulation of the Niva’s body interior. Here, first of all, the goal is to retain heat in the cabin as much as possible and thereby significantly speed up its warming up in winter.
It is worth noting that such work can be carried out not only on domestically produced cars, but also on foreign models.
Along with thermal insulation, modern materials will also make it possible to provide good sound insulation, which will allow you to feel as comfortable as possible on any trip.
Also interesting: How to properly use the transfer case on Niva 2121
The most common materials for thermal insulation of the Niva's interior are polyurethane foam and penofol.
Insulation with polyurethane foam
The first of them provides effective protection from external cold and noise. It is applied to the surface by spraying. Thanks to this method of treating the car interior, you can cover the entire surface of the body from the inside and achieve maximum effect. Polyurethane foam also allows you to carefully close all the cracks and thus prevent cold air from entering from the outside.
This building material has a very low thermal conductivity when applied even in the thinnest layer. It is also very important that polyurethane foam will perfectly protect the vehicle from corrosion processes and is absolutely harmless to human health.
To apply this substance to the surface of a car body, special equipment is needed, which is a certain disadvantage. Therefore, there is no way to do without the services of a specialized company, and for this you will have to pay a fairly tidy sum (more than 10 thousand rubles).
Penofol insulation
For the average car enthusiast, Penofol is a more affordable product compared to polyurethane foam. It is made of foamed polyethylene, which is covered with foil on top. Penofol has high heat and sound reflecting properties.
The material is produced in a thickness of only a few millimeters, but one very thin layer is enough to achieve the desired result. Penofol is characterized primarily by durability, ease of installation and flexibility. The heat inside the Niva's interior remains much longer after pasting its surface.
An interior insulated with penofol allows you to keep cool for much longer in the summer heat and, as a result, the need to turn on the air conditioner arises much less often. All this allows you to save a lot on fuel consumption and financial resources. Therefore, penofol is most often used to insulate car interiors.
How to make Niva insulation with your own hands
The entire process of thermal insulation of the car interior is carried out in several successive stages.
1. First you need to prepare all the tools. This includes rubber gloves, insulation, a knife, sealant, cardboard, marker, penofol, tape, screwdriver and scissors.
2. After this, you need to carefully prepare the car for the subsequent procedure. To do this, it must be cleaned and washed. You can do this yourself, or use the services of a car wash.
3. Now you need to remove all unnecessary items from the interior - seats, door panels, dashboards, etc. It is also worth tidying up the rear parcel shelf.
4. After this, you need to inspect the entire body and close all the cracks with sealant. Particular attention should be paid to the space between the car interior and the engine compartment. It is also recommended to remove the radiator and thoroughly treat all seams with the same sealant.
Also interesting: Niva pickup: technical specifications and tuning for model 2329
5. If necessary, completely replace worn rubber seals.
6. Now you can prepare the underbody after removing the seats. It needs to be washed well and degreased with a solvent, after which, using a marker, make the necessary bottom markings on the cardboard and cut out blanks from the cardboard with scissors.
7. Then you can go to the store to purchase the required amount of Isolon. It is worth considering that the material must be taken with a certain reserve, since there is always a chance of spoiling some of it. When Izolon is purchased, you can attach cut-out cardboard blanks to it and cut out the necessary parts for the bottom.
8. Since penofol has an adhesive base, it will fit perfectly on the prepared surface. If the material was purchased without glue, then it can be fixed to the bottom using Tilit. Its consumption is approximately 2 liters per 5 square meters.
9. When the bottom of the cabin is completely finished, you can start gluing the doors. They also need to be thoroughly cleaned, washed and degreased. First you need to very carefully cut out the holes for the door handles. Regarding the fastening elements, the approach here is similar to that for the bottom. You can use furniture staples on the inside, and special clips can be used to secure raised areas on the outside.
10. In a similar way, you can insulate all other parts of the car body.
11. When the process of insulating the interior is completely completed, you can return all the removed items and put them in place. We can consider insulating the Niva with our own hands complete.
Conclusion
As can be seen from everything described above, the procedure for insulating the interior and engine compartment of the Niva is not complicated. The most important thing here is to provide the necessary amount of material for the work, to be patient and time. Then everything will definitely work out.
As a result, the owner of a Chevrolet Niva will receive a vehicle that is completely protected from the summer heat and severe frosts.
Read news about the new Niva
- Air conditioning Niva Chevrolet - design and repair
- Clutch adjustment on Niva 21214 - Online reference book to help the car owner - looking for and fixing faults
- How to eliminate vibration of the VAZ-21213 transfer case
- Fuses and relays (location and purpose of fuses and relays) Niva Chevrolet "
- Mud tires for Niva 4x4: radius 15 and 16 - which one is better to install "
- Liquids used and filling volumes Niva VAZ 21213, 21214, 2131 lada 4×4
- Wheel stud M12x1.25x41 2121, 21213, 2131, 21214, 2123 rear
- Niva Chevrolet transfer case: device, connection diagram and how to use?
Other details
The standard heater radiator and thermostat are also replaced. Preference is given to three-row copper radiators. They are more efficient in operation and leak less often. The thermostat is replaced with an analogue one or its thermal insert is modified.
Do-it-yourself modification of the stove on Niva 21213 with your own hands is quite labor-intensive and takes a lot of time. To modify the heating system of this car, you can find ready-made kits on sale that make this work easier. The procedure is presented in the video “Remaking the stove on Niva 21213 with your own hands: video instructions.”