In the gas distribution system, the belt is of particular importance. It is he who is responsible for the possibility of connecting the crankshaft and camshaft. In addition, without this drive, synchronous operation of the pistons in the cylinders and the intake/exhaust valves is impossible. The timing belt turns the camshaft pulley exactly half a revolution of the crankshaft pulley.
Quality and reliability are especially important in engines where the piston and valve group are a single unit, for example, like Kalina’s. Why should every car owner know how to change the timing belt on Kalina? The valves and pistons are located in the same block, but thanks to the belt they do not touch. Accordingly, when they break, the pistons hit the valves, which leads to expensive engine repairs.
Signs and reasons for replacing the timing belt Lada Kalina
The advantage of the 8-valve engines of the VAZ 2108 and subsequently the Samara 2 family was that when the timing belt breaks, the pistons do not meet the valves and do not bend them. Lada Kalina engines are structurally different from the previous model. And a break leads to the need for repairs.
Replacement frequency
It is regulated by the manufacturer. Usually this is about 80,000 mileage, but given the low quality of components, it is recommended to reduce this period to 50,000 km. In general, the best option would be a timely visual inspection of the part to determine the degree of wear. The first sign of wear will be microcracks, which are clearly visible on a tensioned belt.
If microcracks are found, there is still time to replace it in the near future. Because of this, the belt does not break immediately, since inside it is reinforced with thin and durable steel threads. This provides the belt with the ability to repeatedly withstand heavy loads and maintain its properties for as long as possible. Another sign of wear can be loose tension due to stretching. In this case, the engine will start to run noisily, and the dynamic characteristics will also weaken.
Many motorists, as well as auto repair shop workers, recommend replacing the water pump (pump) and the tensioner roller along with the belt.
The fact is that their wear is often not visually observed, and yet the process of replacing them is quite labor-intensive. Therefore, it is better to change these elements immediately, especially since manufacturers produce kits consisting of a belt and a roller. Some make parts with reinforced metal cord. They are somewhat stronger than regular ones and last longer, but they are also more expensive.
Wear factors
Despite the fact that the manufacturer recommends changing the belt no later than 80,000 kilometers, it is impossible to determine the exact frequency, since this is influenced by several factors. The following points influence the degree of wear.
- Quality. If instead of the original belt, which is installed at the factory, an analogue was installed, then its condition should be inspected at least once every 10,000 kilometers, and preferably more often. It is impossible to predict how long a spare part from a particular manufacturer lasts.
- Vehicle operating conditions. If the machine is actively used, for example, when working in a taxi, then the replacement period should be shorter. During long operation, the belt constantly heats up, which eventually leads to wear.
- Other factors. These moments include poor-quality replacement of the timing belt, when the new element begins to come into contact with other parts in the engine compartment in the immediate vicinity during operation, for example, a protective casing. It is better to correct the situation as soon as possible, otherwise the part will quickly fail.
If a car is purchased from the secondary market, it doesn’t hurt to ask the former owner in advance when exactly the belt was changed. It’s even better to play it safe and replace it along with other consumables that should definitely be replaced on a used car.
Timing belt tension on Kalina
This Lada has two types of engines. On a 16-valve internal combustion engine, an automatic timing belt tensioner is used, and on an engine with 8 valves, a tensioner roller is installed. In the case of a roller, the tension should be checked every 10-15 thousand kilometers and replaced after 75,000 kilometers.
On a 16-valve engine, you do not need to tighten it yourself; there is an automatic mechanism for this. The belt in such motors lasts longer. But, on the other hand, it is possible that the tensioner may fail or oil may get onto the teeth due to a faulty crankshaft oil seal. Breakage or wear of its teeth will lead to disruption of the gas distribution mechanism and subsequent repair of the internal combustion engine. Therefore, you should not rely only on the automatic mechanism and periodically check the wear status of the part during maintenance.
To carry out the procedure for tensioning the timing belt on a drive with a tensioner pulley, you will need a special wrench. The algorithm of actions is as follows.
- Using a 10mm wrench, unscrew the bolts securing the drive cover, lift it up and remove it.
- Rotate the timing drive mechanism by the camshaft pulley mounting nut, thereby assessing the degree of belt wear. There should be no oil stains, cracks, delaminations on the surface of the belt, and the teeth should not be worn out.
- At the middle level (between the camshaft and crankshaft pulleys), you should turn the belt 90 degrees to the right and left, without applying significant force. If the force is not enough to turn the belt 90 degrees, it means it is too tight and needs to be loosened. Accordingly, if the belt turns to a larger angle, it should be tightened.
To adjust the tension, you will need to cool the engine and use a 17mm spanner to loosen the tensioner roller fastener. Next, you will need a special key with which you need to turn the roller to the right or left (to tighten or loosen), after which, holding the key in the desired position, tighten the roller fastening nut. After this, the tension level is assessed again. If necessary, the procedure is repeated. If the belt is tensioned as required, you can put on the protective cover and secure it with three fastener bolts.
For a 16-valve engine equipped with an automatic tensioning mechanism, a similar procedure is not provided.
Choosing a timing repair kit for Lada Kalina
The quality of the belt and roller is very important, since the smooth operation of the engine depends on it. The issue should be approached with all responsibility. On the other hand, this is a consumable item, which means you still have to change it.
The Lada Kalina is equipped with a timing belt with number 21126-1006040 from the factory. The original is considered one of the best and is highly reliable, on average it lasts for 50,000 kilometers. The cost varies depending on the region: 1,000–1,500 rubles. There are a large number of analogues on the modern market, which are usually cheaper.
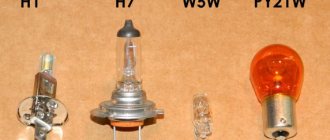
But there are also more expensive examples. The following brands became the most popular:
- Gates (on average about 2 thousand rubles);
- LUZAR (2,000 rubles);
- Bosch (1,500–1,800 rubles);
- Pilenga (tensioner roller and belt on average 3,000 rubles);
- Trialli (set, about 3,500 rubles).
The most affordable analogues are considered to be belts from manufacturers such as Master-Sport, Hofer and some others. On average, their cost does not exceed 1 thousand rubles. It is also equally important to choose a high-quality tensioner roller, since belts are usually changed together with them in pairs. There is also a lot of variety here.
The original roller installed from the factory has a catalog number 21126-1006135.
The average price, depending on the region, is no more than 700 rubles. The market for analogues is much more diverse, and accordingly, their prices vary from 400 to 2,000 rubles. More often than others, car enthusiasts choose brands such as Gates, Pilenga, Trialli, Master-sport and others. On average, their service life is about 50,000 kilometers +/- 5,000, it all depends on the quality.
Cost of replacement work
Prices for Lada Kalina timing belts in our auto stores vary from 400 to 1000 rubles per unit. If you also need to replace the tension roller, be prepared to shell out another 400-600 rubles.
The cost of replacing a belt is 500-800 rubles. With a roller – up to 1000 rubles.
When buying a timing belt, it is better to give preference to a branded VAZ product. If this is not possible, you can purchase an analogue produced by a well-known brand. Below are samples showing the catalog numbers of the original belt and worthy imported analogues.
Rules for replacing the timing belt and roller
Since there are two types of engines on Kalina, it is logical to start with the 8-valve one as it is simpler in design.
Replacing the timing belt on an 8-valve engine
To work on replacing an 8-cylinder internal combustion engine, you will need the following set of tools:
- 10mm spanner or socket with ratchet;
- key to 17;
- flat-tip screwdriver;
- special key for tensioning the belt.
First, you need to remove the generator drive belt, and then unscrew the three bolts securing the cover under which the timing drive is located. The further algorithm of actions is as follows.
- Set the first piston to top dead center.
- Using a 17mm wrench, slightly unscrew the tensioner roller mounting nut, then use a special wrench to turn the roller so that the belt drive loosens.
- The timing belt can now be removed from the camshaft pulley, crankshaft and water pump drive.
But it is impossible to completely remove the part until the generator drive pulley is removed.
To do this, loosen the wheel bolts and lift the right front side on a jack, and then remove the wheel. This will give you access to the pulley fastening nut, but sometimes you have to put in a lot of effort to unscrew it. At the same time, you need to hold the crankshaft from turning and unscrew the nut. To prevent rotation, you can insert a flat-head screwdriver into the inspection window on the clutch housing (where the flywheel mark is placed). Now you can unscrew the nut and remove the pulley, and then completely remove the timing belt.
The tensioner roller is almost always replaced in tandem with the belt, so you should unscrew the nut securing it, and then remove the roller. There will be a puck under it, which under no circumstances should be lost. During installation, the washer is inserted into the roller, only after which it can be installed on the stud.
Now you can install the belt. First it is put on the teeth of the crankshaft gear, and then at the top - on the camshaft drive toothed pulley. In this case, you need to be more careful and not allow the crankshaft pulley to roll without the camshaft pulley, otherwise you will have to re-set the marks.
After this, you can put it on the water pump drive and tensioner roller. If all the belt teeth fit snugly against the pulleys, you can use a special wrench to tighten the timing belt. The belt should not be loose or, conversely, overtightened. If the tension is insufficient, it will deviate from straight-line movement, and if the tension is too strong, the tensioner roller will begin to hum.
Replacing the timing belt on a 16 valve engine
The Kalina is equipped with an engine similar to the one on the Priora. Therefore, replacing a part on these cars, including Kalina 2, is almost no different. To work you will need the following set of tools:
- jack;
- ratchet with socket heads;
- set of spanners;
- TORX bits;
- special wrench for belt tension.
As on an 8-valve engine, the alternator drive belt is removed first, followed by the timing cover. After this, the protective cover is removed from the car. The further replacement procedure is as follows.
- Raise the right front part with a jack and remove the wheel, then unscrew the nut of the generator drive pulley and remove it. To prevent the crankshaft from turning and knocking down the marks, you will need an assistant: he must engage fifth gear and press the brake, at which time you can unscrew the nut.
- Now you can set the valve timing marks. To do this, fifth gear is engaged and the suspended (in this case, right) wheel rotates. This way, the crankshaft will rotate and you can easily set marks on both the camshaft pulleys and the crankshaft timing belt.
- Lock the camshaft gears using a wooden block of a suitable size and unscrew the nuts securing the rollers (support and tensioner) using a 15mm wrench.
- At the same time, you should check the water pump. If extraneous noise or other defects are detected, it is recommended to replace the pump.
- Once the rollers are loosened, the timing belt can be removed from all pulleys.
The new one is easy to install. Installation begins from the bottom, namely the crankshaft gear. Then you need to pass it through the support roller and put it on the right camshaft gear, and then on the left. If the marks are lost, you need to set them again according to the instructions and start installing the belt from the very beginning.
All that remains is to put the strap on the pump gear and install a new tensioner roller. Using a special key, you need to tighten the strap. To do this, use a key to turn the roller counterclockwise until the slot on the outside and the protrusion on the inside of the roller coincide. If these marks coincide, it means that it is tensioned, and further adjustment of these parameters falls on a special automatic mechanism for tightening or loosening. To tighten the roller fastening nut, it is better to use a torque wrench, tightening with a force of no more than 41 Nm and no less than 34 Nm.
After installation, it is recommended to additionally check the alignment of the marks by turning the crankshaft several times.
If the marks are not knocked off, you can install the generator pulley and tighten the nut with a force of at least 110 Nm. All that remains is to install the protective cover and start the engine; there should be no strange sounds. This completes the replacement of the timing belt on Kalina 16 cl. completed.
STAGE 1
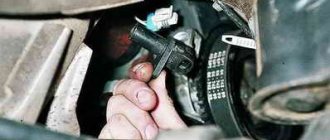
We drive the car into the inspection hole and lift the front right wheel with a jack. We remove the wheel and, opening the hood, let the engine cool. It is desirable that the engine temperature is approximately 60 degrees Celsius. Before getting to the Kalina timing belt, you need to remove the generator belt and its drive pulley on the crankshaft.
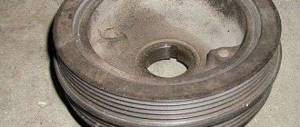
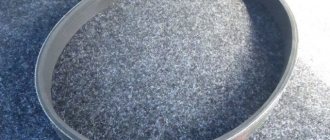
The generator drive device is shown in the photo below:
FIGURE 4 Installing the generator belt for 8 valve Kalina
As can be seen from the photo, the generator belt is tensioned using a roller. To remove the poly V-belt, you need to loosen the tension on this roller. To do this, you first need to loosen the rod locknut with a wrench (19). We loosen the lock nut and use a wrench ( we tighten the rod itself until the belt loosens and it becomes possible to remove it. Now it’s time to get to the generator drive pulley on the crankshaft. To do this, you need to go down into the pit and remove the engine “boot” protection on the right side. Also you need to remove the flywheel protection, which is secured with three bolts (10) from the bottom of the engine, on the gearbox housing. We remove the protection and, by inserting a flat-head screwdriver between the teeth of the ring gear and the gearbox housing, we will lock the flywheel. This is necessary so that when the bolt is unscrewed, the crankshaft does not turn. Bolt ( the key 17) is tightened very tightly, so to unscrew it, you will need to apply some force. To do this, it is better to use a socket with the same size and a pipe as a lever. After tearing off the bolt, unscrew and remove the generator drive pulley.
STAGE 2
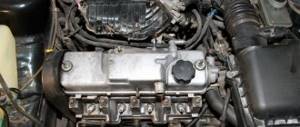
We leave the pit and remove the upper plastic engine protection. It is attached to the engine with four clips; you just need to carefully pull it off from each clip in turn. Next, remove the timing belt protective cover of the Lada Kalina. To do this, you need to unscrew the three mounting bolts with a wrench (10). One of them is located in front of the casing, and the other two are on the side. Having unscrewed the bolts, we removed the casing, and the entire gas distribution mechanism drive opened in front of us (see photo).
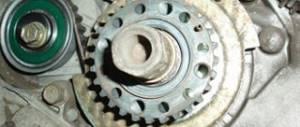
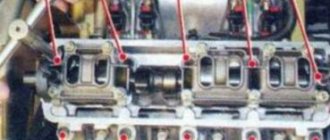
FIG.5 Timing drive Kalina 8 Cl
Now the crucial moment has come! It is necessary to install the entire Kalina timing belt drive strictly according to the marks. To do this, you need to take a socket head (19), preferably with an extension, and screw back the bolt that we unscrewed when removing the generator drive pulley.
Using this bolt, turn the crankshaft clockwise until the marks on the crankshaft and camshaft gears match. The locations of these marks are indicated in the illustrations above.
It is better to turn it by the crankshaft, but it is not advisable to do this with the camshaft. This must be done because the Kalina timing mechanism is driven precisely by the crankshaft, and not by the camshaft.
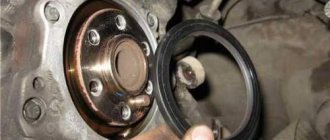
Next, you need to use a wrench (17) to loosen the bolt securing the tension roller and loosen the tension of the timing belt. Remove the belt and tension roller to check the condition. Usually, when replacing the Kalina timing belt, the roller is also changed, since most often the bearing on it has, albeit a small, play. And this is unacceptable. Checking the condition of the pump. You need to tug on the pulley without removing it, and if there is play, it is better to replace it immediately.
The pump may work for a while, but then it will still fail, and to replace it, you have to open the entire drive again and replace it. And it also happens that it jams and because of this the belt breaks. Then you have to open this entire system again and repeat all the work again. It is advisable to check the condition of the crankshaft and camshaft seals. To do this, you need to remove the corresponding gears and the rear cover of the gas distribution mechanism.
After checking the condition of the seals, we will replace them if necessary, which will save you from unnecessary work in the future.
STAGE 3
So! We removed the timing belt, checked the condition of the pump and seals, and, if necessary, replaced them with new ones. Next, we can begin assembling the Kalina timing belt drive.
We install the previously removed camshaft and crankshaft gears into their seats. If during the process of removing them the marks have shifted, then they must be installed strictly in their places.
Before you start installing a new Kalina timing belt, you need to either count the number of teeth, there should be 111, or carefully read the markings. Their number should be indicated there. You can also simply compare the new belt with the old one, they should have the same length. Important point! When installing a timing belt, you must carefully ensure that during the installation process the marks remain strictly in their places.
First you need to put the belt on the crankshaft pulley. Then put the belt on the camshaft pulley on the right side of the camshaft. This is done so that the tension roller can be used to tighten the drive more easily. We install the tension roller, screw it on, but do not tighten it. It should fit against the back of the belt. We put the belt on the pump pulley and tighten it with a roller, turning it counterclockwise with a special key.
To check the belt tension, take it from the right side of the camshaft and turn it along itself. A properly tensioned belt should rotate no more or less than 90 degrees or flex no more than one centimeter when you press it.
After the drive belt has been tensioned, you can already tighten the roller mounting bolt. Here you need to make sure that the belt on the right side of the camshaft pulley is properly tensioned and does not sag.
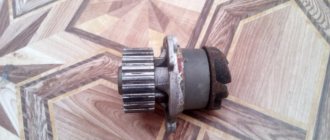
A photo of the roller is shown below, it also shows which holes need to be used to turn the roller: FIG. 6 Tension roller for Kalina 8 valve
Roller adjustment key:
FIG. 7 Tension roller adjustment key
Using a wrench (17), turn the crankshaft three to four turns so that the crankshaft pulley is aligned with the mark in its place. After that, we check them again. All marks must be strictly in place.