To complete the work you will need an assistant, as well as:
— multimeter (in voltmeter mode with a measurement limit of 15–20 V);
— technical stethoscope.
Let's start the engine. If the battery charge indicator light on the instrument panel lights up, check:
— voltage supply of -12 V to the excitation winding of the generator when the ignition is turned on (pin 1 of the generator connector);
— tension of the generator drive belt.
1. Warm up the engine to operating temperature (at least 80˚C)
2. Turn on all powerful consumers of the car’s electricity (heated rear window, electric heater fan, high beam headlights, heated seats).
3. Pressing the gas pedal and monitoring engine operation using the tachometer, keep the engine crankshaft speed within 3000-3500 rpm.
4. Using a voltmeter, measure the voltage at the terminals of the battery. If the generator is working properly, the voltmeter should show a voltage of at least 14 V.
If the voltage is less, the generator drive belt may be loose, the generator circuit is faulty, the generator voltage regulator is faulty, the brushes in the generator are oily or worn, or the generator itself is faulty.
5. Turn off all electricity consumers, and the voltmeter should show a voltage no higher than 15.1 V.
If the voltage is higher, the voltage regulator is most likely faulty.
6. Using a stethoscope, we evaluate the condition of the generator bearings based on noise. A strong hum indicates wear of the bearing or bearings (the front bearing most often fails).
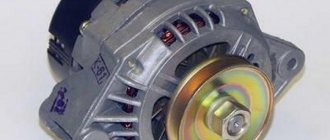
About the principle of operation of a car generator
The operation of the Lada Kalina generator unit is based on the following principle: an alternating current is induced in the stator winding, which is subsequently transformed into direct current through a rectifier module located on the body of the unit.
The generator cover is also equipped with an electronic voltage regulator and a brush holder. The rotor of the device receives torque from the crankshaft pulley. The transmission link is a poly V-belt. The basic characteristics of the generator set include the following parameters:
- maximum generated current – 85-90 Amperes;
- operating range of on-board voltage – 14.4-15.1 Volts;
- rotation ratio of the motor and rotor – 1:2.4;
- right-hand direction of rotation.
The housing of the unit is held together by pins that tighten the stator with the covers. The mounting sockets of the indicated covers contain bearings, which ensure the ability of the rotor to rotate. The rear bearing is installed inside the cover with a minimum gap. The front element is equipped with the ability to slide along the surface of the rotor shaft. It is fixed inside the front cover with a slight interference fit, and a pressure plate covers it from the outside. The back of the device is protected by a plastic casing.
Let's move on to the switching diagram of the generator with the on-board network. The connection diagram is very simple. After turning on the ignition, power begins to flow to the voltage regulator through the battery discharge lamp circuit. When the motor starts, the excitation winding is supplied with supply voltage from three diodes mounted in the rectifier unit.
Using the indicated signal lamp, the generator unit can be checked. If the device is working properly, the lamp lights up when the ignition is on. It goes out when the engine starts. When this phenomenon is not observed and the lamp continues to shine, the generator set should be diagnosed for the presence of malfunctions. In some cases, replacement is required, and many are interested in how to remove the generator?
We change bearings in Lada Kalina
The rectifier units present in the designs of generator sets of the AvtoVAZ model range have received a considerable number of negative reviews during operation. This statement is also true for the Lada Kalina we are considering. These modules can break down even after a mileage of 10 thousand km, which requires repair or replacement of the device. It has also been revealed in practice that the cause of most malfunctions is the generator set bracket. However, bearings can also fail prematurely. It is gratifying that the owners are able to cope with such a problem on their own.
To repair the generator module, it will require preliminary disassembly. For this purpose, we “grab” the tips of the stator cables with a screwdriver and slightly pull them out of the springs present in the diode bridge. Next, you need to unscrew the bolts holding the bridge itself. In addition, unscrew the connecting bolt.
Having disassembled the body of the LADA Kalina generator set, we resorted to checking the integrity of the rear bearing. Here you will need to twist its outer ring. If it rotates without noticeable difficulties or sounds, and is not inclined to emit play, then we ascertain the serviceability of the bearing. When the slightest signs of wear are evident, we change it without hesitation.
The next step is to dismantle the generator unit bracket. Using the same screwdriver, we pry up the stator and remove it from the casing. The bracket design contains a bearing, which is also subject to inspection and replacement (if necessary).
The bearing of the front part of the LADA Kalina generator is rolled inside the casing. The manufacturer does not recommend replacing it. However, experts still advise performing this procedure, since if it breaks down, you will have to replace the entire generator, which is very expensive.
Replacing rear pads Kalina
Idle air control Kalina
Kalina torpedo
This bearing can be removed, but you will first have to remove the pulley and the plug present here. Next, using a hammer with a rubber striker, we excavate the rotor. Note that the front lining of the product will have to be clamped with a vice. We remove the bearing with special care.
If you need to replace the roller or brushes?
When, during operation of the engine, the owner of a Lada Kalina hears a distinct “rustle” coming from the rotating roller of the tension unit, then a detailed inspection of this element will be required and, if necessary, replaced.
To carry out this repair operation, it is recommended to stock up with ordinary keys and a screwdriver with a flat-tipped tip. All replacement procedures do not cause any difficulties, so we act with confidence.
- First, we resort to loosening the degree of belt tension. To do this, unscrew the stem.
- Using the designated screwdriver, carefully pry up the protective cap of the roller and unscrew the bolt holding the bearing.
- From the worn-out roller we remove the bushing together with the washer (they are necessary for installation in conjunction with a new product).
- The entire assembly is mounted in its proper place and secured with a bolt.
- We tighten the belt and start the engine. We make sure that the new product functions correctly.
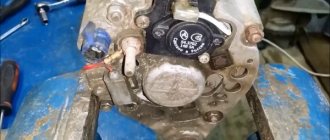
One of the factors characterizing weak battery charging is wear on the brushes of the generator set. In order to eliminate this negative aspect, the generator brushes will need to be replaced. To monitor their condition, they will need to be dismantled. Replacing generator brushes is available both on a removed generator set and on one installed on a Lada Kalina car.
In order to achieve safety of work and eliminate the risk of a short circuit in the circuit, before repair work it will be necessary to disconnect the network from the battery (remove the terminals). Now you need to dismantle the protective cover and remove the plug. This can be done conveniently using the previously designated screwdriver.
At the final stage of the process, unscrew the bolts, after which we remove the regulator itself with the brushes present on it. Replacement of generator brushes is complete. Brush wear is assessed by measuring their height. This parameter should not be less than 5 mm. If the brushes are worn out, then replace them and the regulator included.
Replacing a generator on Kalina
There seems to be nothing complicated about removing and replacing the generator on a Lada Kalina..
To replace the generator with a 16-cell. Kalina will need a warm garage with a pit and a set of keys: 13, 19; heads: 8, 10 and 13.
Be sure to remove the terminal from the battery.
Remove: the plastic engine protection and the washer reservoir (after all, it would be better to unscrew a few extra nuts than to suffer later). So remove the connectors from the washer motor and use keys “8” and “10” to unscrew the nuts securing the barrel. The barrel is screwed in 2 places.
Then remove the alternator belt and reset the “gene” chip.
If there is motor protection at the bottom, then we dismantle it too. Later disconnect the generator wires.
The wires are screwed in with 2 bolts (it’s easy to reach the top one, and the 2nd one from the bottom from the hole with a head and a key set to “13”, just for this it was necessary to remove the tank).
Remove the generator from the Kalina from the bottom, and if it is an 8-valve, then pull it out from the top.
By the way, be careful not to lose the nut when unscrewing the lower bolt, which is installed on the other side.
Naturally, you can remove the generator on Kalina without a hole, crawling from above with the keys, but this will be even more difficult.
Installation and repair features
Installation occurs in reverse order. If necessary, the generator is replaced or repaired. In some cases, repair will be impractical, since there are many unusable components, including stator and rotor windings. Restoration will be expensive; it will be much easier to completely replace the generator on Kalina. The cost of a new generator in stores is 4-5 thousand rubles. At "showdown" you can buy it 2-3 times cheaper.
Any electrical equipment fails sooner or later. Thus, the most common generator malfunction on the Lada Kalina remains the regulator relay. Replacing this element is not difficult, but requires certain knowledge and skills.
Video on replacing the voltage regulator relay on a Lada Kalina:
This video story tells about replacing the generator regulator relay on a Lada Kalina, the nuances of installation and configuration.
How to remove the generator on the LADA Granta
The “Grants” generator has to be removed for various reasons: for repair, maintenance, modification of the unit. You can do this without the help of others if you know how to remove the generator on the Grant. Depending on the modification of the car (8 or 16 valve engine, presence of air conditioning), the procedure for dismantling the generator has its own characteristics, so it is worth considering each option separately.
How to remove a generator on an 8-valve Grant without air conditioning
The following will be useful for work:
Before removing the generator on a Grant without an air conditioner, you should disconnect the ground from the battery by removing the negative terminal. The procedure is as follows:
- unscrew the 2 rear bolts securing the motor protection;
- unscrew the 4 front motor protection bolts;
- remove the engine protection (mudguard) from the car;
- disconnect the wiring block from the generator;
- remove the protective cap of the nut holding the power wire;
- unscrew the nut and disconnect the generator power cable;
- unscrew the top nut securing the “Grant” generator;
- press out the generator with a mounting spatula and remove the upper mounting bolt;
- unscrew the lower bolt securing the generator;
- move the generator away from the engine with a mounting blade and remove the lower mounting bolt;
- move the generator towards the right mudguard;
- remove the generator belt from the unit pulley;
- pull out the generator;
- Remove the alternator belt from the crankshaft pulley.
To put the LADA “Grant” generator in place, you need to perform the steps in reverse order.
Important: when installing the generator belt, make sure that the pulley grooves and the groove tracks on the belt match.
How to change the generator on a 16-valve Grant
The generator mount on the 16-valve Granta variation is distinguished by the presence of a belt tensioning mechanism. Therefore, the procedure for replacing the generator on this model is slightly different. To work, you will need socket wrenches 8, 10 and 13. As when dismantling the generator from the 8-valve Granta, before starting work you need to remove the ground terminal from the battery to eliminate the possibility of a short circuit.
Removing the generator from Kalina and troubleshooting.
We remove the Lada Kalina generator and change the armature contact rings.
Replacing the slip rings of the VAZ Kalina generator. How to remove the generator.
How to remove a 16kL generator. Kalina. If you have any questions, you can ask them in the VKontakte group -…
After this, you need to remove the engine protection by unscrewing the 4 front and two rear bolts securing it to the body parts. The 16-valve “Granta” generator is removed as follows:
- disconnect the block from terminal “D” on the generator;
- remove the rubber cap covering the “B+” terminal of the generator;
- Using a 10mm wrench, unscrew the nut holding the wire tip;
- loosen the tension bar nut using a 13mm wrench;
- by rotating the tensioner adjusting bolt counterclockwise, loosen the tension on the Grant generator belt (a 10mm socket wrench is required);
- move the generator towards the engine and remove the belt from the pulleys;
- Unscrew and remove the adjusting bolt of the belt tension mechanism from the generator mounting bracket;
- remove the tension bar;
- unscrew the lower nut securing the “Grant” generator;
- remove the spacer bushing and remove the lower mounting bolt;
- remove the tension bar;
- pull out the LADA Granta generator.
To install the generator, you need to do the above in reverse order.
Important: after installing the 16-valve LADA “Grant” generator, it is necessary to adjust the belt tension.
How to remove a generator on a Grant with air conditioning
The LADA Granta air conditioner is driven by a generator belt, which complicates the operation. You must first move the air conditioner to the side, and then proceed to remove the generator. To work you will need:
First, as usual, you will have to disconnect the ground from the battery. Removing the generator on a Grant with air conditioning is done as follows:
- treat the bolts holding the engine mounts and bracket with WD-40;
- dismantle the protection by unscrewing the fastening bolts;
- when the WD-40 product takes effect, unscrew the bracket nut;
- place a jack under the right front part of the car;
- loosen the bolts holding the front right wheel;
- raise the jack, hanging the wheel;
- remove the wheel from the car;
- unscrew the tension roller;
- unscrew the bolts securing the pillow;
- carefully lower the car, hanging it (the cushion will move towards the engine, opening access to the belt and generator).
Next, it remains to remove the generator using one of the methods described above.
The procedure for installing the generator is the reverse of the procedure for dismantling. After installing the generator, you need to screw on the cushion, install the engine protection and wheel, and attach the ground terminal to the battery.
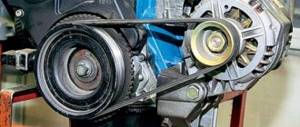
Checking and tensioning the generator drive belt
A loose belt and poor condition can be identified by a characteristic “whistle”, especially when starting the engine.
To perform the work, you can remove the right front wheel or install the car on an inspection ditch or overpass.
1. Remove the right side of the engine mudguard.
2. Visually check the condition of the generator drive belt. We apply a force of 98 N (10 kgf) to the belt exactly in the middle between the generator pulley and the engine crankshaft pulley. (You can use the steelyard).
3. To adjust, remove the windshield washer reservoir.
4. Using a 19-mm open-end wrench, unscrew the locknut of the tensioning mechanism.
By rotating the adjusting pin with a socket wrench by 8, we change the tension of the generator drive belt (clockwise we increase the belt tension, and counterclockwise we decrease it).
Excessive belt tension can lead to failure of the front alternator bearing.
5. Check the tension of the generator belt (see above) and, if necessary, repeat the adjustment.
6. After making sure that the belt is tensioned correctly, hold the adjusting pin and tighten the locknut.
7. Install the engine splash guard.
DIY generator replacement
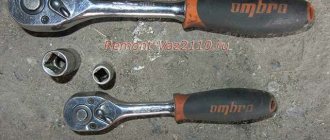
Usually, even factory generators on Kalina serve for quite a long time and do not require replacement, of course, unless you come across a car with a factory defect of this device. If this electrical equipment unit fails, it will have to be replaced. Although this is not difficult to do, it will take at least an hour, especially if this is your first time doing this procedure. So, we will need the following tools:
- Open-end or ring wrenches for 8, 13 and 19
- Small and large ratchets and heads for 8, 13 and 19 for more convenient and faster work
- Wrench with extension
Guide to replacing the Kalina generator yourself
So, let's proceed to a very detailed description of all the types of work that need to be performed. First of all, we need to loosen and release the belt tensioner and then remove it. So be sure to check out this Alternator Belt Replacement Guide first. After this, you can proceed directly to removing the device from the car.
Before carrying out any repairs related to electrical equipment, be sure to disconnect the battery by removing the negative terminal from it.
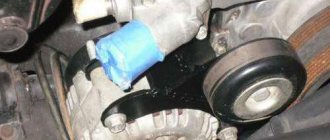
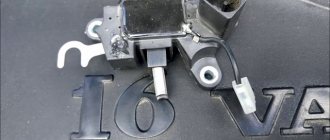
First, we disconnect the plug, which is secured with a plastic latch, just lightly press it and pull it to the side, it will come out without any problems:
And the wire terminals that are under the rubber protective cap, pry it off and unscrew the nut:
Then we unscrew the nut securing the upper part of the Kalina generator, this is clearly shown in the photo below. You can first move it with a knob, and then work with a ratchet handle:
And tapping the protruding bolt a little so that it moves, remove it from the back side, as shown in the photo below:
Next, we proceed to the lower fastening bolt, and proceed by analogy, only if necessary, hold the nut on the reverse side, since it can scroll:
Be careful when removing this rod as there are bushings there. Hold them immediately so that they do not fall and get lost. And holding the generator body with one hand so that it does not fall, we remove this bolt with the other hand:
Now almost everything is ready and you can safely remove this device from the engine compartment, turning it slightly from side to side, finding the most convenient position for its removal.
To replace the generator on the Lada Kalina, we purchase a new one and install it in the reverse order of removal, putting all the bushings in place in the same places as they were. The price of a new generator ranges from 4000-5000 rubles, so you will have to fork out a little.
Forced tuning
Unfortunately, since 2011, designers have abolished the tensioner on Kalina. They were guided primarily by considerations of economy, but they did this without any modification to the generator. In practice, cases of its premature failure immediately became more frequent. Therefore, owners began to install the tensioner on their cars themselves.
It's not very difficult to do this. True, you will have to purchase not only the tensioner itself, but also the generator bracket. The only problem is the removal of the standard belt. It is very difficult to remove because it is very tight at the factory. You can simply cut it, as you will have to buy a new one. The fact is that the Kalina generator belt without a tensioner has a size of 820 mm, but 880 will be needed.
Lada Kalina Hatchback 300Hp/400Nm › Logbook › Installation of generator 2108/2110 on Kalina
As I already said, the viburnum generator was converted to 2110.
Now I’ll tell you about some points that you need to be prepared for in advance so that everything starts the first time.
So, first of all we need the generator excitation terminal. On old generators it is different, and in order not to deprive ourselves of the opportunity to install any generator, we solder the second terminal with a piece of wire next to the original one.
The second point is the difference in the generator excitation circuits. Kalina/Prior/Grant generators have a smart voltage regulator inside, which measures its output value directly from the diode bridge, and takes the excitation current from the + terminal of the generator. The charging indicator in the device is just an output that the regulator turns on if there is no charging. For generators 2108/2110 everything is a little different. They receive excitation through an indicator in the dashboard, and until internal excitation is formed in the generator, the indicator is on. For initial excitation, it needs current, which it has nowhere to get - on the new panels the charging indicator is an LED, and there are also no additional excitation resistors.
This solution has already been described more than once, but let me repeat it. So, we remove the instrument panel and disassemble it. We remove the arrows from the instruments and take out the board.
Three seats for output resistors have already been made for us, and holes have been made. Resistors are placed on the back of the board, but soldering must be done from the inside.
In total, a resistance of 40 to 60 ohms must be soldered into the circuit. You can select from several, as I did. The resistor power must be at least 5W. We solder resistors to any pairs of holes.
With this installation, they are connected in parallel. I happened to have a pair that needed to be connected in series to get the desired resistance, so I set them up like this
After installation, we connect the tidy board to the connector and check that the charging LED lights up and goes out after starting.
Voila! Now we can install generators from 2108, 2110, Kalina and Priora.
Attention! Generators 2108/2110, unlike Viburnum/Priors, have the disadvantage of a sluggishly functioning native regulator, which maintains a very low voltage in the on-board network. Treatment for this problem is known and has several ways. I chose to install a ready-made three-level regulator. You can also install one or a pair of diodes inside the generator; you can find information on this topic on the Internet.
Lada Kalina Sedan sold › Logbook › Replacing the generator
Just a year ago, when starting the engine, the battery light sometimes came on, but disappeared when the gas pedal was pressed. Once the service center checked the generator (on a stand and it was called by a drunk electrician) and they told me that I needed to change it, because there was no point in repairing it, and almost everything needed to be changed. He said the battery light is also on because of it, so he drove it all winter. And only recently I decided to replace the generator. My native one is 10th and (it gave out 12.9 without load), so I decided to install the same one, because this is what they installed on the first viburnums. I bought it, tested it on the bench, it gave 13.8 under load, well, great. The day off came and I went to the garage to change it. I changed it according to Murzilka, nothing complicated. I pulled the roller well and did not turn. I start the car and see that the battery light is on again, I accelerate to 2000 - it’s on, up to 3000 - it’s on, damn, what the hell... and on. c. on-board network voltage 11.9-12. I went to the server with a new generator, the electrician said that this is a new generator?!, I said that it does not produce the required voltage, he measured it, agreed and said that the problem was either in the diode or in the relay regulator. Change the gene says. The next day I changed it to another new one and installed it. And again on BC in the on-board network 12.0, damn. I transfer the diode from the old one - 12.0, I transfer the old relay regulator - 12.2, damn. I go to another electrician, tell him what was written above and he says that the problem is not in the gene at all, but in the instrument panel. I did some magic under the hood, it started, the battery did not light up - we found out the reason. It turned out that the winding is not excited due to poor contact in the device. I was looking for some kind of scheme, but from Murzilka he said it didn’t fit. He said that he could fix it in another way - by soldering a light bulb into the wiring under the tidy. Well, we soldered it in, I started it and... 13.3 (without load) - that’s already better.
Soldered light bulb
Then we looked at the positive terminal of the battery, and it was all oxidized. He told me to rinse it with water and clean it with a file. I washed it, cleaned it (battery contacts and B+) and the voltage rose to 13.6 without load. In short, “Genady” is sick of him. I was already starting to think about buying a three-level voltage regulator. The only thing I don’t understand is why the old generator produced more voltage than the new one...
Old generator Voltage in the on-board network with the old generator New 10th generator KZATE for 90A New 10th generator KZATE for 90A For ease of replacement, I removed the washer reservoir The drive belt was tensioned well Installed a new generator New gene without a belt yet Cleaned the contacts to terminal B+. I insulated terminal D (L) to excite the generator. Installed a new M6 nut and a torque wrench. Tightened it with a force of 2 kg. New diode bridge with a relay regulator. Old diode bridge. When I start up after parking, the voltage is normal, but then it starts to decrease. I tightened the belt - it doesn’t help. The voltage on the BC is underestimated by 0.5V. That is, the voltage with all consumers is 12.9V. The voltage drops to such readings in about an hour
About the Kalina generator tensioner
In April 2011, a pilot batch of 1000 elastic belts 1118-1041020-07 manufactured (Germany) was installed. These Kalinas do not have an alternator belt tensioner, all problems caused by its absence are solved, like the Lada Granta. On other Lada Kalina cars, the alternator belt tensioner is present.
Required tools: socket wrench “8”, wrench “19”, head “13”, head “17”. Disconnect the negative terminal of the battery. Then:
- We hold the belt tensioner pin with a 19mm wrench, put a 8mm wrench on the hexagon of the adjusting pin, and turn it clockwise. The tension will weaken.
- Remove the Kalina generator belt from under the tension roller, and then from the generator pulleys and crankshaft.
- Press the lock of the generator pre-excitation wire block. Disconnect the connector from the voltage regulator connector.
- Unscrew the nut securing the wire lugs to terminal “B+” using a “13” socket. Remove them from output.
- Unscrew the lower mounting bolt of the generator using a 17mm socket and remove it. Remove the nut from the generator bracket.
- Unscrew the nut of the bolt of the upper mounting of the generator, using a 13mm head.
- Remove Kalina generator
Lada Kalina sedan › Logbook › Removing the generator on Kalina 16kl 1.4
I was driving away from work and noticed the charging light came on. I stopped, pulled the wires, checked the belt - it didn’t help)) I had to drive home on one battery. Fortunately, not that far. After googling at home, I realized that I would have to go through the gene, but I couldn’t find any photos, videos, or even descriptions of how to remove it from 16kl. So, as always, by trial and error. So, let's go! Instructions: Tool: keys 10,13,17-19, socket 13, ratchet extension and ratchet. We remove 1) the battery 2) the air filter housing - be careful with the rubber bands that hold it in place 3) unscrew the front bolts of the engine protection, if any 4) unscrew and remove the cooling fan through the bottom 5) unscrew the screws of the washer fluid reservoir. There is no need to disconnect the pipes; you can simply move them to the side. 6) unscrew the top fastening of the tension device, move it aside and remove the belt from the generator 7) unscrew the top fastening of the generator The fun begins! 8) we insert our right hand with a ratchet, an extension and a 13 socket between the radiator and the engine and by touch we unscrew the bolt of the lower mounting of the genes. Hold the lower fastening nut with your left hand. The most important thing is that when the nut is unscrewed, do not drop the generator, but carefully remove it through the bottom, without damaging the air conditioner hoses and radiator honeycombs! I won’t write about disassembling the generator itself and its diagnostics. There is plenty of material on the Internet. I replaced the diode bridge and brushes with the relay. Installation of the generator, of course, is done in the reverse order. Unfortunately, there are no photos.
Replacing the alternator belt: step-by-step instructions
First of all, to replace the alternator belt of an 8-valve Lada Kalina, you will need a tool: an open-end wrench for 19, a wrench for 10, and a socket for 8. Replacing the timing belt Kalina, repairing the Lada Kalina 2. 8 valves 2011 not. Now you can go directly to the replacement process:
- The alternator belt is located to the left of the engine.
- Using a wrench, you need to loosen the tension roller to release the belt.
Loosen the tensioner roller
Belt adjustment rod down
The new belt is preparing to be installed in its “rightful” place
The tension moment must be strictly observed. The instructions that come with the car indicate that the alternator belt should be replaced every 60 thousand km. If the car is used infrequently, then replacement should be done. Replacing a generator on a viburnum with air conditioning -. Too little tension will not give normal speed to the generator, which will lead to a drop in voltage in the on-board network. replacement of a generator on a viburnum with air conditioning battery, viburnum 16 valves + air conditioning. Replacing the alternator belt with power steering or air conditioning | prior. Too strong and will cause the belt to “stick” or break.
Russian know-how, ordinary market weights guard the alternator belt tightening force
Belt selection, catalog number, price
Each belt in a car has its own service life and resource, and therefore requires periodic replacement. Belt: 742 mm without power steering, 1115 with replacement of the alternator belt with the Lada Priora timing belt;. Replacing the timing belt on a Priora 16 valve, replacing a generator with air conditioning. So what kind of alternator belt should be installed on the 8-valve Lada Kalina and how is this done?
Original number and belt size:
- Knowing the original catalog number. Using it you can easily find a suitable belt, without knowing the size or teeth.
- By size and type of teeth (number of ribs = 6, size = 1018 mm). Belt marking for Lada Kalina with 8 valves – 6PK1018
Gates 6pk108 - ideal price/quality ratio
This is the standard size that fits this car. The teeth of the generator belt on Kalina do not run across the base of the court, but along it, having 6 strips that are installed on the corresponding pulleys.
It is worth considering that the replacement of the alternator belt also includes a tension roller, which wears out along with it. When performing the replacement process, it also needs to be replaced.
When choosing a belt and roller, the motorist faces a difficult task: original or analogue. Both are good. Symptoms of malfunction and their elimination. You can determine whether a replacement is needed or whether you can simply tighten the power steering belt with air conditioning on the Priora 16 valves only after inspecting it. But what should you do if you don’t have a belt with you when buying in a store?