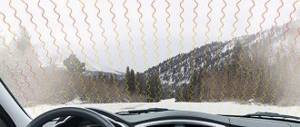
Modern cars have a heated rear window to maintain good visibility in damp and frosty weather. When it doesn't work well, it's extremely inconvenient to drive, and breakdowns, as a rule, happen completely inappropriately.
Fortunately, you can restore the heating yourself if you have some idea of how it works. Below you will find detailed instructions on how to do this.
Principle of operation
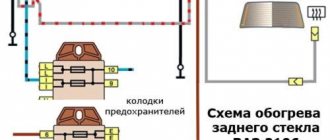
Electricity is used to heat the rear window: threads of thin metal with increased resistance are stretched across the canvas. Under the influence of current, they heat up and dry the water droplets.
The principle of operation of this system is simple: the positive charge of the battery goes through the ignition switch to one of the switching devices, and the negative charge through the car body to the other. When the heating button is pressed, the devices close an electrical circuit, which includes the threads stretched onto the rear window.
Symptoms of a problem
Typically, motorists do not immediately notice that the rear window heating does not work (or does not work well). This is discovered just at the moment when a good view is needed, but for some reason the glass remains foggy. Based on how the problem manifests itself, you can determine its location and cause:
- The heater activation indicator does not light up. Check that the ignition key is turned to the on position and that the engine is running (in some cars, heating is only possible in this case). If you have taken these points into account, but the glass has not dried, it means that the switching device or the wiring connector may be faulty. You need to look in the machine manual to see where these items are located and replace them with new ones.
- Glass dries slowly. If you notice that in relatively warm weather the process of evaporation of droplets from the surface is delayed, then most likely the voltage in one of the electrical connectors has lost. You need to measure its level with a voltmeter at the input terminals. A difference of even one volt affects the quality of heating. In this case, you need a professional to fix the problem (unless you are one yourself).
- Glass dries unevenly. This happens most often: one of the threads on the rear window breaks, and moisture remains in this place. The fact is that thin metal elements can easily be damaged if, for example, you scratch the surface of the glass with a hard object, carelessly put things on the shelf behind the rear seat, etc.
In the latter case, it is quite possible to cope with the breakdown yourself.
When is other heating system components needed to be repaired?
In 95% of cases, broken threads are to blame for rear window heating malfunctions. Therefore, we will dwell in detail on how to fix this particular problem. But other options for system malfunctions are also possible. You should know about them too.
When is it necessary to repair the heated rear window contacts?
If the heating system button turns on and lights up, but not a single thread heats, then most likely the problem is in the relay or in the heater contacts. You need to find the relay in the electrical circuit of your car and check its functionality with a multimeter. If faulty, replace it. If the relay is working, check the contacts.
The heating system contacts are located at two conductive busbars, which are located on the sides of the rear window. Often they are hidden behind the sealing elements and you cannot see the contact point between the threads and the tires without removing the seal.
Knowing the diagram of the heating system, it is easy to understand which bus is connected to ground and which is supplied with voltage. For example, in Renault Logan, the current supply bus is located on the right when viewed from behind the car. But even if you don’t have such information, just measure the voltage on the wiring in front of the buses: it will be 0V at ground, 12V at positive.
The following options are then possible:
- If the bus is working properly (the multimeter shows 12V on the current supply), and the glass does not heat up, then the problem is in the threads.
- If there is no voltage on the data bus, its contacts need to be repaired.
- If both buses show 12V, then the contacts on the ground bus need to be repaired.
Repairs are made using conductive adhesive. For this purpose, Permatex offers a professional kit “Repair of heated rear window contacts” under article number 213515.0.
First you need to clean and degrease the surfaces, then carefully remove the film from the contacts with sandpaper. Then wipe all surfaces with an activator cloth and leave to dry for five minutes. After this, apply one drop of glue and firmly press the surfaces together for a few seconds. You can turn on and check the functionality of the system after 24 hours.
When is the rear window heating button repaired?
If the heating button indicator light does not turn on and the system does not work, then the problem is in the fuse or in the button itself.
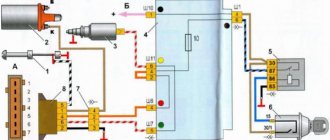
First you need to check the fuse. For example, Daewoo Lanos has it marked as F7/30 on
fuse box in the engine compartment, like the Chevrolet Lacetti (
). If it is faulty, replace it.
Then you need to check the button itself. To do this, you will have to pull it out of the seat and force the contacts to short-circuit. If the system works, the problem is in the button and it needs to be replaced. But let's be honest, this is one of the rarest system malfunctions. In addition to the threads, most often the problem is in the relay, or in the fuse, or in the bus contacts.
How to find the location of a broken glass heating filament
Now let's talk about how to check where the rear window heating thread has broken. To do this, you will need a voltmeter or ohmmeter of your choice. Do the following:
- Inspect the rear window - sometimes the break is visible to the naked eye: the thread is interrupted and resumes after a few millimeters.
- Turn on the heating and see where the water drops have not dried. Take a magnifying glass and look at this area more closely.
- Let the heating function remain active. One metal rod of the voltmeter needs to be connected to the positive heating terminal, and the second should be drawn along the thread from the side of the clamp with the “-” sign. Keep an eye on the indicators: the break will be where 0 volts is displayed.
- Take an ohmmeter and attach one probe to the common wire (the negative of the battery is connected to it), and carefully lean the other one against the center of each thread in turn. The break is where the resistance jumps to 4-6 ohms.
Repair materials
To fix problems with the rear window defroster, you will need:
- paste or glue capable of passing current (special ones, sold in automotive supply stores);
- or copper-brass powder and paint;
- or zinc chloride, material for joining workpieces POS-18, soldering iron;
- as well as a repair kit for heating filaments (if the gap is very large, several centimeters).
VAZ 2105 | Rear window defroster
1.10.19. Rear window defroster
| GENERAL INFORMATION |
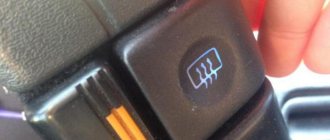
Heater button
The rear window defroster can be turned on while the engine is running.
The warning lamp will light up after pressing the heater switch button. Current will flow through the heating elements on the rear window, heating it so that condensed moisture on the glass evaporates faster or frost melts.
After approximately 11 minutes of operation, the system will automatically turn off.
To turn off the heater before 11 minutes have elapsed, press the switch button again.
The warning light will go out or the heater will be turned off.
If you need the heater to continue to operate after 11 minutes, press the power button again and the heater will operate for another 11 minutes.
By pressing the rear window defroster button, you can also remove fog from the outside rear view mirrors.
Warning
When cleaning the interior rearview mirror, use a soft cloth and clean without pressing hard on the glass.
Do not apply stickers, duct tape, or anything else that is attached to the glass with adhesive.
Do not turn on the rear window defroster when starting the engine or when the engine is off.
Turn off the heater as soon as possible after the glass is clean to avoid draining the battery.
automn.ru
How to fix a heated rear window with your own hands
Now let’s figure out how to repair the heated rear window of a car with your own hands. There are several ways:
- Using paste (glue). Apply the paste to the break site, extending two centimeters beyond the intact thread. Dry with a special hairdryer (not for hair, but for various materials) or let it dry naturally for a day.
- Using a repair kit. If the break in the rear window heating threads is several centimeters, then this is the best method. Unpack the stencil and stick it on the desired area. Carefully place the new thread into the empty space. Apply a layer of the resin included in the kit on top. Once it dries, apply another coat. There should be 4-5 of them in total.
- Using paint and copper-brass powder. This can already be called restoration using improvised means. Take a copper-brass alloy ingot and file it. Mix the resulting fine powder with paint in a 1:1 ratio until it becomes pasty. Glue the electrical tape as a stencil and apply the resulting composition to the tear site.
- Using a soldering iron. Apply zinc chloride to the desired area, apply solder to the soldering area and touch the wire with a soldering iron. This way you can also repair a large tear.
There are other tips on how to restore heating, but to use them in practice you need unsafe reagents: sulfuric acid, copper sulfate, etc. It is best, especially for motorists without experience in self-repair, to use a paste or a special repair kit.
Repair of VAZ rear window heater
The rear window of the car allows the driver to control situations on the road. It's no secret that if the rear window fogs up, the view deteriorates and the driver has to drive “on the side” mirrors.
Naturally, this can lead to problematic situations and repair of the rear window defroster should be carried out as soon as possible. As practice shows, both the heating of the entire glass and several of its strands can fail.
Causes of failure of the VAZ rear window heater
First of all, it is worth remembering that the power supply to the heating is carried out through two terminals soldered on the glass. Heating threads emanate from them, which directly heat the glass and promote the evaporation of excess moisture.
Quite often, when installing the rear window of a VAZ, these terminals are forgotten to be connected (especially if you are dealing with amateurs), or they are broken during connection. In the latter case, the throughput of the conductor decreases, as a result of which it burns out over time, and the glass does not warm up, which leads to failure of the heating.
If the glass heating was damaged mechanically, which is also possible, the situation becomes similar to that described earlier. When mechanical damage occurs, the resistance of the thread increases, it overheats and fails.
There is a third way to damage the thread - a banal burnout. It occurs naturally, or due to the fact that the metal component has oxidized, worn out, or received natural damage. Practice shows that such disruptions in heating operation occur least often.
Finding the cause of heater failure
In VAZ 2101-21099 cars, you cannot do without removing the rear window - this is the only way to check the connection between the main power supply and the heating terminals. The terminals are hidden under the rubber seal that holds the glass, so this procedure is necessary. In the case of other cars (with laminated glass), you can simply remove the decorative trims that interfere with access to the electrical wiring.
If all terminals are properly connected, it is worth checking the threads. To do this, you need to check them for breaks. The location of the rupture will not always be clearly visible - often the rupture is characterized by a simple darkening of the heating thread.
This is due to the fact that it is not the thread itself that darkens, but the layer covering it. Such a place is quite difficult to find. If you can’t do this visually, it’s best to use an ohmmeter or tester.