Replacing steering rods on a VAZ 2107 (photos and videos): step-by-step instructions
During vehicle operation, suspension parts and other systems are subjected to significant loads, which leads to their wear and failure. On the VAZ 2107 model, wear forms in the tie rod ends, and knocking noises appear when driving on a bad road. Ignoring them is fraught with destruction of the unit and loss of control of the car. The solution to the problem is to replace faulty mechanism parts.
To carry out repair work on a VAZ 2107 car, you will need the following spare parts:
- steering rods;
- protective covers;
- nuts with crown and fixing cotter pin.
Replacement of components is carried out on a vehicle installed above the inspection hole. To dismantle parts and install new ones, a special puller, socket wrench and extension are used.
The procedure for performing repair work
Replacement of a faulty part of the steering mechanism is carried out in the following sequence:
- We clean the assembly from dirt using a brush, and apply a penetrating compound to the threaded connections.
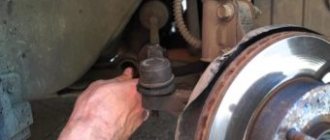
- Using pliers, remove the fixing cotter pins and, using a spanner wrench or a “22” socket, unscrew the nut on the pin.
- The steering rods are detached from the steering knuckle using a special puller. The device is put on the assembly from above and using a bolt, the finger is squeezed out of the eye.
Helpful advice: if you first tap the joint using a copper or bronze drift, the dismantling process will be significantly accelerated.
The manufacturer of the VAZ 2107 recommends replacing worn steering rods as a set. The service life of these structural units from one batch installed on a vehicle is usually the same. Replacing only one of them does not fundamentally solve the problem; a little time will pass and the repair process will have to be repeated for the remaining elements of the system.
Installation of parts and adjustments
Installation of steering rods on a car of the classic VAZ 2107 model is not particularly difficult and is performed as follows:
- We measure the length of the old assembly using a steel ruler as accurately as possible.
- We adjust the new unit using a threaded connection to the desired size and lock it with locknuts.
- Installing the part in place is carried out by inserting a finger into the seat and screwing the nut with a certain torque.
Timely replacement of faulty components of the VAZ 2107 steering mechanism will allow you to avoid serious troubles and emergency situations on the road.
comments powered by HyperComments
7vaz.ru
How to remove the steering tip without a puller and with its help: instructions with photos and videos
No matter how much money you spend on your vehicle, over time, like everything else in our world, it becomes unusable, and cars suffer the same fate. For every car enthusiast, there are moments when your car brings you to tears. There are many such moments, but a tightly stuck steering knuckle is one of those times when your car makes you cry. Today you will learn how to ease your suffering and still do everything to ensure that your parts fall into place correctly.
Table of contents:
How to remove a tie rod without a puller
Let's first look at the stages of removing the steering tip:
- The first stage is lifting the front of the car on a jack. For the safety of the car and the owner, we place reliable stands under the thresholds.
- We remove the wheel. To do this, unscrew the mounting bolts.
- Next, you need to clean the steering column. We do this with a stiff brush - we remove dirt, rust, dust. We treat the stand with a small amount of diesel fuel, kerosene or WD-40 and wait a few minutes. Thanks to this we will be able to unscrew the nuts more easily.
- After the preparatory procedures, we first loosen the tie rod end nut. Only after this action do we move on to the nut securing the ball pin of the steering tip.
- Unscrew the steering tip nut. In this case, it is advisable to turn the steering wheel in the opposite direction of the rack that you are pulling out - this will make the work process easier.
- Using a caliper, we measure the distance from the center of the steering tip to any mark on the tie rod (we ourselves put a mark on it somewhere). This is necessary in order to correctly align the new steering tip. This event must be approached as responsibly as possible. If you don't have a caliper, use the method from step 8.
- Now we need to knock out the steering tip itself. If you don’t have a special puller, you can get by with a hammer and some kind of strong lever (for example, a crowbar). We insert the lever between the rod and the protrusion of the stand connecting to it. We press the lever and at the same time hit the end of the steering tip.
- After the steering tip is knocked out, we simply unscrew it from the steering rod. At the same time, if we want to maintain an approximate camber, but, for example, we don’t have a caliper, or we just want to play it safe, we need to accurately count the number of revolutions when unscrewing and write down this number.
- We have removed the steering end, what should we do now? We put the new one, very important, on the right side, since they come in right and left ones. It is installed in the reverse order as we removed the old one. We screw it into the steering rod, and be sure to check the data from the caliper or the number of turns that was originally.
- When everything is screwed on, we install the entire structure in its original position and tighten all the nuts and bolts. After all the purging manipulations, we be sure to check whether the elements converge everywhere - this is very important for the safety of the car.
the video for more details on how to remove the steering tip without a puller :
How to remove the steering tip using a puller , see here:
There are times when everything does not go according to a good scenario, but, so to speak, with difficulties. This can be for many reasons, such as: broken threads on the nut, various types of rust, bends of an element due to external influences and other not very pleasant things. What to do in such cases?
How to unscrew the steering wheel nut
If there is a broken thread that cannot be unscrewed, there are three ways:
- You shouldn’t immediately take a radical approach to this matter; perhaps not everything is as bad as you think and just simple manipulations are enough. First, let's clean the entire surface on which we will work with a wire brush and drop a little penetrating lubricant. If you do everything described above, then there is a chance that a regular spanner will help you to unscrew a bolt or nut with torn edges. If not, there are other ways. You can try to simply tap the ill-fated object (but not too hard!).
Lubricating a soured nut with WD-40
- How to unscrew a bolt or nut with broken edges? Of course, a gas wrench will help you a lot in this case. This is truly a magical tool. This tool, of course, requires a lot of space since it is very large, but at the same time it is able to hold even the most even objects, which helps a lot in this problem.
Gas key
- In those equally frequent cases when a gas wrench will not help, but the nut (or bolt) is large enough, an angle grinder will come to the rescue. You can simply take and carefully cut the edges, which will be smaller than those that have been erased. Four of these newly cut edges will be enough; there is no need to try to cut out all six. After this, the nut (or bolt) can be easily unscrewed with a socket or socket wrench, or using a gas wrench for greater confidence in a positive outcome (it is not recommended to touch the open-end wrench). You can also restore the edges using a file, although this, of course, takes more time.
Cutting the nut thread with a grinder
Elimination of parts deformation
When bending any element, there are two ways:
- It is trivial to take and cut it in half and thus create freedom of action for yourself. A radical method, of course, but you should understand that parts with defects should be replaced in any case, because this greatly affects your safety.
- Heating a part to deform it to its original position. With this method, you still need to understand that you need to do everything carefully, because you don’t want to damage parts that are in good condition or remove the paint from the car under the influence of high temperatures. After this, it is also still worth replacing the part, since it will no longer perform all its functions and may behave extremely unpredictably.
Caring for steering wheel parts
The first and, it may seem to you, the most banal advice, but, unfortunately, it is often neglected - this is the banal dryness of the room in which the machine is located. Most garages have extremely damp spaces, which is not very favorable for the steel and other parts that are in the car. Due to the prolonged presence of the car in a damp room, parts become susceptible to external influences, and metals oxidize over time.
It is recommended to store the machine in a dry place
The second point is one that you can influence extremely minimally, but you still can. This means trying not to drive on roads with poor surfaces, off-road conditions and, of course, being wary of potholes. Yes, all these insidious surprises on the road can damage literally any part of the car.
Some tips and tricks
In conclusion, I would like to say a few very important points. Remember that if you have the opportunity or desire to entrust all manipulations to specialists, then you should do so. Your safety and the safety of your passengers will depend on this decision. You cannot save any money on your security. History has many examples when people, due to their carelessness, got into accidents, which sometimes ended in failure. But if you still decide to do everything yourself, then double-check that you have tightened all the bolts and nuts all the way. After all, there is nothing more scary than an out-of-control car rushing at high speed.
Also, do not buy extremely cheap spare parts. As you know, original spare parts are used by the manufacturer himself when assembling a car. These parts are best suited for your car, since the manufacturer always tests its products for wear resistance under extreme conditions, and, most importantly, they are designed specifically for your car. If it is possible to get original spare parts, this should be done. Original spare parts have special markings that you will not find at the auto market seller in your city. All these spare parts were created at the automaker’s own plant, which naturally speaks of the quality of the products. Although they are expensive, they are durable, since the manufacturer himself is interested in their high quality. Each manufacturer of such parts always provides a guarantee on them.
It is recommended to use only original parts instead of inexpensive Chinese analogues
Duplicates or non-original spare parts are also produced by factories, but not by the manufacturer, which indicates questionable quality in most cases. They are made by other companies that may not even be licensed by the original manufacturer. Usually this is all due to the fact that the manufacturer either does not have time for their own production, and they order parts from the outside, or they are completely satisfied with this policy. At the same time, there is always a risk that, under the guise of a duplicate made at the factory, parts simply made in a garage will go on sale. Of course, you cannot buy such parts; always try to make purchases from reliable sellers.
How to remove the steering tip without a puller and with its help: instructions with photos and videos
5 (100%) 2 voted
avtoskill.ru
Replacing steering rods on VAZ 2101-VAZ 2107
Welcome! Steering rods must always be kept in good condition and, if possible, checked for various types of damage, because they are an integral part of the car and are involved in turning the wheels. How to replace the rods with new ones if the old ones have become unusable?
Note! You will need the following tools: pliers, a 22mm wrench, a screwdriver, a hammer and a special ball joint puller (a photo of the puller is shown below).
Location of rods
They are located at the bottom of the car, but you won’t be able to just look at the rods, because... they are covered by the front wheels of the car. Therefore, turn the steering wheel and you will see how one of the steering wheels is connected to the steering knuckle of the car.
Note! For clarity, above is a diagram where the red arrows indicate the central steering rod, and the blue arrow indicates two side rods, which are precisely connected to the steering knuckle arms, indicated by the green arrow!
When should you change rods? In a situation of deformation, the car begins to behave sluggishly on the road, namely: with the steering wheel fully aligned, the front wheels begin to move to one side, this becomes especially noticeable when turning (you turn the car, say, to the left, but it pulls to the right).
Note! The rods are deformed from a strong collision with a bump or other obstacle, so be careful and take care of your car, and if trouble happens, then check the rods and ball joints themselves for serviceability! (The process is described in detail in the article: “Checking steering rods and ball joints for serviceability”)
Replacing rods on VAZ 2101-VAZ 2107
Note! Together, the rods are called “Trapezoid” for short, so in some cases it is more profitable to completely replace the trapezoid than just one part. Sometimes, replacing a trapezoid is cheaper than replacing the parts separately.
Our instructions show the replacement using the example of one side rod; the rest are replaced in the same way.
Removal
1) First remove the wheel from the side where you are going to replace it. (Found difficulties? – read the article: “Replacing a wheel on a VAZ”)
2) Next, using pliers, unclip the ball joint pin nut.
3) After the cotter pin is removed, use a 22mm wrench to unscrew the pin securing nut.
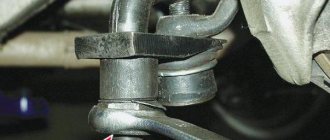
4) Now, taking a special puller in your hands, install it as shown in the photo below, and after installation, start tightening the nut present on the puller. The finger should come out of the fist lever.
Note! If you don't have a puller, take a hammer and give it a few sharp blows to the fist lever and continue hitting until the finger indicated by the red arrow comes out of the lever ear! (You need to hit the lever along its axis).
If you have difficulty removing the pin, try applying some penetrating lubricant like WD-40, it should help and make it easier to remove the part.
5) Then do exactly the same procedure for pressing out the pin, but now press out the inner joint pin, indicated by the red arrow.
6) After all operations are completed, remove the steering rod from the machine.
Installation
Installation of a new rod is carried out in the reverse order of removal.
Note! The new part must be installed exactly the same length as the old one, otherwise the wheel alignment will be disrupted!
It is recommended to adjust the wheel alignment of the car after installing new spare parts! (read details in the instructions: “Adjusting wheel toe”)
vaz-russia.com
Manufacturers of steering linkages
And now a question that interests many motorists - which is the best steering linkage for the VAZ-2107? There are many manufacturers on the market, it is quite difficult to choose a decent one. Here are just a few of the most popular manufacturers:
- "VIS" - have high reliability, their cost is relatively low. According to reviews from motorists, this is one of the high-quality manufacturers of elements.
- "TRACK" - the highest quality elements from this manufacturer. Rubber boots last quite a long time - there are practically no equal ones in terms of service life.
- "BELMAG" - good quality products at a relatively low cost.
- "CEDAR" - low cost and very poor quality.
This is a list of the most popular manufacturers that can be found on the market.
Motorists praise TRACK very much - these are very high-quality VAZ-2107 steering linkages. Its price is approximately 1700-2000 rubles. Its resource is very high, it cannot be compared with KEDR products. Most of them are of very poor quality - it gets to the point that they last 2000-5000 kilometers, after which terrible knocking noises appear. Therefore, it is better to purchase quality products.
Welcome! Steering rods - thanks to them, the wheel turns in the direction you want, this is where the name “Steering Rods” comes from. But over time, like any other units, steering rods wear out, but few know how to find out, although many people should know because it depends on them whether the wheels of your car will turn or not!
Ball joints - they are located next to the ends of the same steering rods and play a very important role, because it depends on them whether the rods will stand rigidly or whether they will dangle!
Note! To check this entire system for serviceability, you will need to stock up on: Either a mounting blade, or a preferably light crowbar, or some piece of pipe about “1” meter long!
And besides these things, take with you: A clean rag, a marker, a metal brush and a caliper, or take a metal ruler instead!
Summary:
Where are the tie rods and their ball joints located? Ball joints, as mentioned earlier, are located together with the tie rod ends, for example, the tip is shown below in the photo below, and its hinge itself is located very close to it, for clarity, look at the upper right corner in the photo, which shows the same ball joint located near the tie rod end.
Note! And you can find out where the steering rods themselves are located on the car from the article entitled: “Replacing steering rods on a VAZ”, everything is described in detail there!
What exactly is the purpose of checking the details in the article? The article will describe in detail the procedure for checking the condition of the protective caps of the ball joints, as well as the axial movement of the rod ends themselves and the play of the ball joints. In addition, instructions will be given for checking the pendulum arm.
Replacing steering tips on a VAZ-2107 with your own hands: how to do it right
Steering tips on a VAZ-2107 must be replaced if they fail or after a certain mileage. Usually the resource does not exceed 30-40 thousand km. Driving on poor-quality roads makes its own adjustments - inexpensive and non-original elements are destroyed much faster, squeaks and other sounds appear. Therefore, replacement of steering control elements is often required. This is quite easy to do.
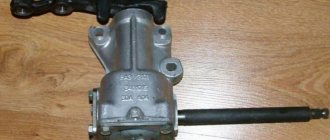
Steering gear
On VAZ-2107 cars and other models of the “classic” series, a worm gear is used - it allows you to convert the rotation of the steering wheel into the translational movement of rods. If you suddenly notice that the play on the car has increased, this does not mean that the steering tips on the VAZ-2107 necessarily need to be replaced.
Very often the gearbox elements wear out and the adjusting bolt has to be tightened. To do this you need to perform the following manipulations:
- Place the car on a level surface and have an assistant drive. Without it, it will be difficult to cope with the work.
- Loosen the nut that secures the steering gear adjustment bolt.
- An assistant should rotate the steering wheel left and right by 10-20 degrees, no more. The faster he does this, the easier it will be for you to tighten the bolt.
- Using a wide flathead screwdriver, tighten the bolt until the free play of the steering wheel decreases.
- Hold the bolt with a screwdriver and tighten the nut.
Be sure to check the presence of oil in the gearbox housing: if it is not enough, add more. It is recommended to use TM-4 transmission oil.
Other causes of backlash
But if the play has changed insignificantly, it is recommended to check all other suspension and steering components. The reason that the free play of the steering wheel increases may be:
- Destruction of ball joints on suspension arms.
- Excessive wear of the silent blocks, which are located where the levers are attached to the body.
- Wear of VAZ-2107 steering tips. You can do the replacement very quickly with your own hands; it will be more difficult to adjust the camber and toe angles.
- Wheel bearing failure.
- Destruction of the pendulum arm located on the right side of the car.
Tip malfunctions
Therefore, before sinning on the faulty tips, you need to carefully check the condition of all other suspension elements. Play and extraneous knocking may appear due to the failure of the ball joint, and the tips in this case have nothing to do with it.
Ball joints can make squeaks even when the steering wheel is rotated, so be sure to conduct a full diagnosis before repairing. Sometimes it may only be necessary to replace the boot of the VAZ-2107 steering tip. If the rubber boot is torn or covered with cracks, but the hinge itself is not damaged, it is necessary to disassemble, wash the element and reassemble it with new lubricant.
Tools for repairs
In order to carry out repairs yourself, you will need the following tools:
- A set of wrenches, in particular, socket wrenches and 19mm sockets.
- Jack, shoes, reliable supports.
- Specially designed tip puller. It is possible to replace the steering end of a VAZ-2107 without a puller, but it turns out to be much more difficult.
- Pliers.
- Screwdrivers.
- WD-40 lubricant.
Be sure to have a good hammer and a mounting blade - with their help, it will be much easier to pull out the fingers of the tips of their holes in the steering knuckles.
Removing the tips
All work must be performed with the vehicle parked on a level surface and with wheel chocks under the rear wheels. It is also advisable to turn on first or reverse gear - this eliminates the possibility of rolling away when carrying out repairs. Almost identical manipulations must be performed when replacing the short steering end of the VAZ-2107 and the long rod. The design of the steering linkage has two short rods and one long rod.
The short ones can be adjusted in length - for this there are special crimp clamps into which the elements are screwed. To replace the entire rod assembly you will need to perform the following manipulations:
- Place a jack under the side to be repaired, lift the car and place it on a support.
- Remove the wheel from the side to be repaired.
- Straighten and pull out the cotter pins that are located in the fingers of the tips.
- Apply a generous amount of penetrating lubricant to all threaded connections.
- Using a 19mm wrench, unscrew all the end nuts.
- Install the puller and, by rotating its bolt, remove all the rod pins one by one.
There is nothing complicated, the main thing is to make repairs easier by treating all threaded connections with lubricant. The long rod connecting the pendulum arm to the gearbox bipod is removed in the same way. But its replacement is required extremely rarely.
Assembly of the unit
After removing the old rods, take a tape measure and measure their length. The problem is that you will have to adjust the wheel alignment - you won’t be able to do this yourself, it’s better to go to a service station and do diagnostics on a computer stand. After replacing the steering tips of a VAZ-2107, even if you have achieved the same length with the new elements, it is necessary to carry out diagnostics. Otherwise, when driving, tire wear will occur much faster.
Installation of new tips is carried out in the reverse order. Insert the ball pins into the steering knuckles and holes in the bipod, tighten the nuts and secure their position with cotter pins. It is advisable to purchase new cotter pins, as old ones are usually covered with a layer of dirt and rust.
fb.ru
Trapezium VAZ 2107, replacement of steering rods and ends (Video)
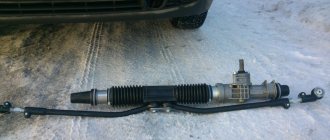
The VAZ 2107 steering linkage (a set of steering rods and ends) ensures the rotation of the front wheels, transmitting force from the steering gearbox to the steering knuckles. Breakage of steering tips and trapezoid rods can lead to an accident, so it is necessary to monitor their condition and replace them in a timely manner. To do this, you can contact a specialized service station or do the work yourself. How to determine whether the steering tips are in good condition and how to replace them? This article is devoted to these issues.
Where is the VAZ 2107 trapezoid located?
Steering rods and ends are located at the bottom of the engine compartment (rather under it), closer to the partition between the car interior and the engine compartment. To see the tie rod ends connected to the steering knuckle, you need to turn the steering wheel all the way.
The steering linkage consists of a middle and two side steering rods, as well as six steering tips (hinges).
Signs of malfunction of the VAZ 2107 steering linkage
You can determine that the steering ends of a VAZ 2107 are worn out by the following signs:
- increased steering play;
- knocking in the steering;
- accelerated or uneven tire wear.
The latter can also be caused by bent steering rods. In addition, their deformation leads to the car moving away from the straight path.
Similar phenomena are observed when other elements of the front suspension are worn out and the wheel camber and toe angles are incorrectly adjusted. Therefore, before changing rods and tips, you need to make sure that the reason lies in them. To check the ends and tie rods of the VAZ 2107, it is necessary to provide access to the car from below - lift it on a lift or install it above the inspection hole.
It is better to start your inspection with the steering tips. Check the condition of the anthers, which should not have ruptures or cracks. The permissible play of the tip hinges is 1.5 mm. If you hear a knocking sound when the tip is pulled up and down, it should be replaced.
Unlike the tips, tie rods practically do not wear out. They can only bend as a result of an accident or due to strong impacts on the suspension (for example, when a car hits a pothole at high speed).
Required Tools
To change the steering rods or linkage assembly, you will need the following tools:
- a set of spanners or open-end wrenches;
- pliers;
- puller for steering rods.
The last point is extremely important. Without a puller, dismantling the steering rods is, if not impossible, then extremely difficult. There are several types of pullers that allow you to remove tie rod ends. It is better to purchase a universal puller that allows you to remove steering and ball joints on cars of various brands.
Replacing steering rods VAZ 2107
Depending on the number of tips and rods to be replaced, you should decide whether to buy and replace parts separately or replace the steering linkage assembly. The assembled VAZ 2107 trapezium is easier to install and costs less than purchasing parts separately.
The work must be carried out by lifting the machine on a lift or placing it on an inspection hole. The thrusts on the left and right sides change approximately equally. The replacement procedure is as follows:
- Raise the car with a jack (if the work is being done on a lift) and remove the front wheel located on the side from which the traction will be replaced.
- Straighten and remove the cotter pin that prevents the steering end nut from unscrewing.
- Using a 22mm wrench, unscrew the nut securing the steering pin.
- Install the steering wheel end remover.
- By turning the nut or bolt of the puller (depending on the design), press the steering tip pin out of the steering knuckle.
- Unscrew and unscrew the nut of the second finger of the tip.
- Using a puller or hammer, press the second pin out of the intermediate joint.
- Remove the steering rod.
- Install a new rod.
- Tighten and cotter the nuts on the rod pins.
This is how the steering rods of a VAZ 2107 are replaced. When replacing the trapezoid assembly, it is enough to disconnect the rods from the steering knuckles of the wheels and the steering gear lever, which will take less time and require less effort.
The steering ends are attached to the rods through special bushings that allow you to adjust their length. This sets the toe angle of the front wheels. When replacing steering rods or trapezoids, this angle will certainly be disrupted. When installing new rods and ends, care must be taken to ensure that their length matches the old ones. To do this, it is necessary to measure their parameters before dismantling. This will allow you to minimize the violation of the wheel toe angle and safely get to the service station, where specialists using special equipment will carry out a thorough adjustment.
semerkavaz.ru
Replacing the Tie Rod End of a VAZ 2106 ~ AUTOTEXNIKA.RU
Method for replacing control rods on a VAZ 2106
An operation such as replacing control rods of a VAZ 2106
, is done on the basis of diagnosing the technical condition of the front suspension of the car. Steering rods VAZ, REPLACEMENT OF TIE RODS VAZ 2106 REPLACEMENT OF STEERING LINK END.
VAZ tie rods, how to change the tie rod end and drive the muzzle on a VAZ 2106 part 1.
The unit is responsible based on the safety of the driver and passengers, therefore, if it malfunctions or wears out, you should not hesitate - it is necessary to install new parts.
How to detect a fault
You can check the serviceability of the control rods without the help of others; for this you will only need an inspection ditch or overpass. Do this check on a VAZ car 2106
better every 5 thousand km or after every long trip on bad roads. Such a small interval is justified by the quality of production of the parts in question; on average, they last 15-20 thousand km.
To perform diagnostics, you need to park the car over a ditch or drive onto an overpass and secure the vehicle with the hand brake. Grasping the rod near the tip , you need to sharply push it up and then down. A serviceable tip either has no free play at all, or it is only a couple of mm, you can feel it with your hand.
If the free play is greater, and at the same time the thrust
simply spins in both ball pins, then
replacing
2106
tips is inevitable.
Using this method, you need to check all 6 fingers, and if they are clearly worn out, it is better to replace the entire steering
linkage, which consists of 3 rods.
It happens that there is no free play in the connections, but the protective boots are torn or cracked. Do this check on a VAZ 2106 car. If they are not changed, all VAZ steering rods. If you do not change them, then the dust and dirt that constantly accumulates in the hinge will do their job: the unit will quickly fail. Worn anthers must be replaced without fail. To complete the work you will need a minimum of tools:
The puller is an iron cup with a slot so that it can be put on the bipod of the control mechanism or pendulum. There is one in almost every garage where a VAZ 2106 or another model of the “classic” Zhiguli is parked.
Replacement of steering rods and ends of a classic VAZ
The Auto_Repair channel will help you fix car problems with your own hands.
Replacing steering tips on VAZ 2101, 2103, 2105, 2106 and 2107
description of work on replacing steering tips
VAZ
cars from 2101 to 2107.
Replacement instructions
Replacing the steering linkage is done in an inspection hole or overpass. The task is to repair the steering rack on a VAZ 2110, replace the steering rack and steering rack - video. The disassembly order is as follows.
- Loosen and unscrew the ball pin mounting nut. On some machines you can still find control rods
with pinned nuts. Replacing the Kalina steering rack boot - photo report on how to remove and install the protective cover for the steering mechanism of VAZ 1117, 1118 and 1119. In this case, you will have to remove the cotter pins first, bending their antennae with pliers. - From the side of the rounded end of the steering
bipod, insert the puller in such a way that its support area is under the bipod lever. - Rotate the bolt at the top of the puller with a wrench and press it out of the socket.
- Repeat the operation on all other tips.
From time to time, when unscrewing the nut, due to contamination of the ball thread, the pin begins to rotate together with the nut, turning at the seating location. Then, to unscrew the nut, you need to block it with a mounting blade. Small feature: left and right last pulls
VAZ
2106
are different from each other, so it is better to mark them after removal.
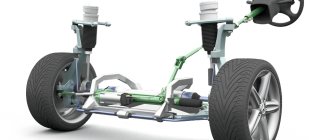
Steering elements
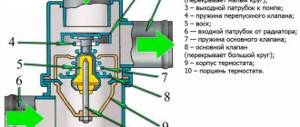
: 1 - lateral thrust;
2 - bipod; 3 - medium thrust; 4 — pendulum lever; 5 - adjusting coupling; 6 — lower ball joint of the front suspension; 7 — right steering knuckle; 8 — upper ball joint of the front suspension; 9 — right steering knuckle lever; 10 — bracket for the pendulum arm; 11 — right side member of the body; 12 — oil filler plug; 13 — steering gear housing; 14 — steering
;
15 — facing casing of the steering shaft ; 16 — steering wheel; 17 — pipe of the upper support of the steering shaft
;
18 — steering shaft ;
19 — left side member of the body; 20 — turnbuckles of the adjusting coupling; 21 - left steering knuckle THIS IS INTERESTING: Repairing the head of a VAZ 2110
After all 3 pulls
removed, you need to adjust the new parts to the length of the old ones. Holding the rod near the tip with one hand, replacing the VAZ 2106 steering rod. This applies to the two outer steering rods. Using the threads for fastening the tips on them, the toe angle of the front wheels is adjusted. To prevent the wheels from initially pointing in different directions, twist or unscrew the tips on the new parts to adjust their length to the size of the removed elements.
The next stage is the installation of new rods, the ball pins of which are inserted into the seats, after which the nut is screwed on top. Changing the oil in the gearbox and rear axle of a VAZ 2106 Changing the oil in the gearbox in the box etc. It must be tightened with good force. If there is a hole for a cotter pin, then insert the latter and straighten the antennae.
Most often, the tips located at the edges, near the wheels, fail. Self-replacement of the VAZ tie rod end. Then they can be changed one by one. Disassembly can be done according to the same instructions, but press out only one end of the rod
.
Then you need to unscrew the clamp, which fixes the rotation of the part along the thread. Replacing tie rod ends involves unscrewing the old part, and then screwing in the new one to the same length and tightening the clamp.
Then you can insert your finger into the socket and tighten the nut.
All steering rods of VAZ 01-07 models are identical, so when purchasing, do not worry about reading the numbers 2101 on the packaging. The only thing worth paying attention to is the mobility of the ball pin in the rod .
Replacing the tie rod end of the UAZ Patriot: Replacing the transverse rod of silent blocks. Replacement of the steering rack bootPriceReplacement of the steering rack boot of the VAZ Kalina steering rack. In the new product, it should be difficult to turn in the socket due to manual effort.
After successfully replacing even at least one tip
You can’t drive right away; you need to adjust the toe angles of the front wheels at the nearest service station.
Source: https://autotexnika.ru/zamena-nakonechnika-rulevoj-tjagi-vaz-2106/
replacing steering rods on a VAZ 2107
Removing steering rods from a VAZ 2107 car
1. We install the VAZ 2107 car on an inspection hole or overpass (see “Preparation of the VAZ 2107 car for maintenance and repair”).
2. Clean the nuts and steering rod covers from dirt.
3. Apply penetrating lubricant to the threads of the steering rod ball joints.
4. Using pliers, remove the cotter pin of the nut securing the steering pin to the steering knuckle lever.
5. Using a 22 mm open-end wrench, unscrew the nut securing the steering pin of the ball joint to the steering knuckle lever.
6. From the top of the engine compartment of the VAZ 2107 car, using a 22 mm socket wrench with an extension, unscrew the nuts (after removing the cotter pins) securing the steering pins of the side rods to the pendulum arm (for the right steering rod) and to the bipod of the steering mechanism (for the left steering rod).
7. Use a puller to press out the steering pins and remove the side tie rods.
8. Before disassembling the side tie rod, measure and record its length. This is necessary so that during assembly the existing wheel toe-in value on the VAZ 2107 is not changed. Loosen the bolts of the coupling clamps and unscrew the steering ends.
Similarly, we remove and disassemble the other side steering rod.
9. To remove the middle tie rod, unscrew the pins and use a 22 mm socket wrench with an extension from the engine compartment of the VAZ 2107 to unscrew the nuts.
10. If the pins of the side tie rod joints are disconnected from the pendulum arm and the bipod of the steering gearbox, then use a puller to press out the pins of the ball joints of the steering rod and remove the rod.
Attention When performing the following operation (to avoid damaging the threads), unscrew the nuts until their ends coincide with the ends of the steering fingers.
11. If the side tie rods are not disconnected from the eyes of the bipod and the pendulum arm, then the fingers of the ball joints of the middle tie rod can be pressed out by knocking them out using a suitable rod A. First, we place the stop B under the inner tip of the side tie rod.
12. After pressing out the steering fingers, unscrew the nuts and remove the middle steering rod.
Installation of steering rods on a VAZ 2107 car
1. Install the steering rods on the VAZ 2107 in the reverse order. After assembling and adjusting the side tie rod length, tighten the tie clamps.
2. After installing the steering rods on a VAZ 2107 car, you need to check and, if necessary, adjust the wheel toe angles yourself (see “Wheel alignment angles on a VAZ 2107 car - camber, toe - adjustment”) or in a specialized workshop.
.
Carrying out replacement: step-by-step guide
You immediately need to decide how many rods and tips need to be replaced. Based on this, you can understand whether it is worth changing the VAZ-2107 steering linkage assembly, or its individual elements. Sometimes it turns out that completely replacing a trapezoid is much more effective - its service life is much longer than that of a restored one.
To replace you will need to perform the following manipulations:
- Place the car on a viewing hole or overpass. It is imperative to remove the wheel from which the repair will be carried out.
- Straighten and remove the cotter pin, after which you can unscrew the nut from the tip pin. You do this using the key at “22”.
- Install a puller on the tip and turn its bolt, squeezing the pin out of the hole.
It is advisable to treat all threaded connections with WD-40 penetrating lubricant before starting work. The price of the assembled VAZ-2107 steering linkage will be about 2000 rubles. And it is much easier to dismantle it than each rod separately.