Many drivers are wondering how to remove play in the steering wheel on a VAZ 2107. After all, such a misfortune happens to this car quite often. There are plenty of reasons for this behavior. And as usual, “smooth” domestic roads are almost always to blame for the backlash. Often it starts to play right in the middle of the road. This can be quite frightening even for an experienced driver. If you are faced with such a situation, the main thing is not to panic.
You can drive home with such a malfunction. You just need to drive very carefully and try to avoid unnecessary maneuvers. You should not exceed the speed; if you drive slowly, you will probably be able to control it. When you arrive at the garage, be sure to identify and eliminate the cause of the malfunction.
Diagnostics
How to remove steering play on a VAZ 2107? The question is quite complicated. After all, there are 2 types of this problem:
- Axial
- manifests itself when the splines are poorly connected or there are problems with the gearbox; - Longitudinal
, appears when the bracket wears out.
No special testing is required to determine the presence of play. You will understand this immediately after its appearance. The amount of play is checked at the service station with a special device - a play meter. But such devices are quite rare in garages. Therefore, another method is usually used. For this you will need an assistant. He will turn the steering wheel, and you must track the moment the wheels begin to react (turn). Normal play should not exceed 10°. Anything higher is a sign of a problem.
↑ Installing a steering gear on a car
Having secured seal 2 to the front panel, install the steering gear housing onto the side member without fully tightening the nuts of the housing mounting bolts.
↑ Installation diagram of the steering mechanism on the VAZ-2107
1 — steering gear housing mounting bolts; 2 — coupling bolt of the lower end of the intermediate shaft; 3 — bracket mounting bolts; 4 — steering shaft bracket; 27.5 mm - the distance from the center of the bipod hole to the supporting surface of the steering gear housing with the bipod in the middle position.
Use a special device to orient the crankcase so that the angle “a” does not exceed 32°, and the gap between the shaft and the brake pedal is at least 5 mm. Then fully tighten the crankcase mounting bolt nuts.
Elimination
The fight against backlash should begin by checking and tightening all threaded connections. Often this is the reason. Particular attention should be paid to the nut securing the column to the gearbox. With frequent trips on dirt roads and worn-out asphalt, this fastener regularly becomes loose. If you do not respond to the problem in a timely manner, you risk getting more serious steering problems. The nut may unscrew entirely, leading to complete failure of the steering. This also leads to increased wear of all parts of the mechanism.
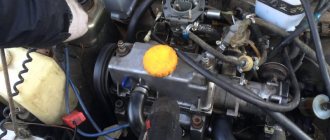
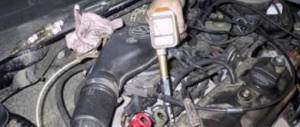
Adjusting the gearbox also helps combat backlash. To do this you will have to look under the hood. There you will see a gearbox. There is an adjustment screw on it. To get to it, you will have to remove the plug. The screw is protected from turning with a 19mm locknut. It is slightly loosened with an open-end wrench. After this, adjustment is made with a screwdriver. The task is to reduce the backlash. If you can’t do this, then it’s time to change the gearbox. It's easier to do the job with two people.
Instructions for repairing and replacing parts in the steering mechanism of the Lada 2107 with your own hands, the procedure for disassembling the steering rack, the procedure for assembling the steering mechanism of the Lada 2105, the stages of installing and removing the bracket for VAZ 2104, VAZ 2105, VAZ 2107. Operation and maintenance of the steering mechanism for Lada 2105. Instructions for repair of the steering, ball and steering rods of the fret 2107. Checking the mechanisms of the fret 2104.
Disassembly . Drain the oil from the steering gear housing of VAZ 2104, VAZ 2105, VAZ 2107. Secure the crankcase to bracket A.74076/R with support A.74076/1.
Removing the bipod: 1 — puller A.47043; 2 — bipod shaft; 3 - bipod; 4 — bracket A.74076/R
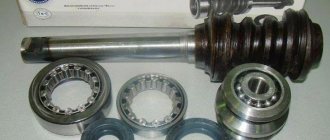
Parts of the steering gear housing for VAZ 2104, VAZ 2105, VAZ 2107: 1 - housing; 2 - bipod; 3 — lower crankcase cover; 4 — adjusting shims; 5 — outer ring of the worm shaft bearing; 6 — separator with balls; 7 — bipod shaft; 8 - adjusting screw; 9 — adjusting plate; 10 — lock washer; 11 - worm shaft; 12 — upper crankcase cover; 13 - sealing gasket; 14 — bipod shaft sleeve; 15 — worm shaft seal; 16 — bipod shaft seal
After unscrewing the nut securing the steering bipod 2 and removing the spring washer, use puller A.47043 to remove the bipod. Having unscrewed the fastening bolts, remove the cover 12 of the Lada Classic steering gear housing together with the adjusting screw 8, the adjusting plate 9, the lock washer 10 and the lock nut. Remove the bipod shaft 7 assembled with the roller from the steering gear housing 1. Having unscrewed the fastening bolts, remove the cover 3 of the thrust bearing of the worm shaft together with the adjusting shims 4. Using the worm shaft 11, push the bearing ring 5 out of the crankcase and remove the 6 bearings together with the separators. Remove oil seal 15 of the worm shaft and oil seal 16 of the bipod shaft.
Removing the outer ring of the upper bearing of the worm using a mandrel 67.7853.9541: 1 - steering gear housing; 2 — outer ring of the upper bearing of the worm; 3 — mandrel 67.7853.9541
Using mandrel 67.7853.9541, press out the outer ring of the upper bearing. Assemble the VAZ 2107 steering mechanism on bracket A.74076/R in the reverse order of disassembly. Press the outer ring of the upper bearing of the worm using mandrel 67.7853.9541, moving the nozzle on the mandrel handle to the opposite side.
Installation of the steering gear worm: 1 – bearing cover; 2 – adjusting shims; 3 – worm
Monitoring the friction moment of the worm with a dynamometer: 1 - worm; 2 — head A.95697/5; 3 — dynamometer 02.7812.9501; 4 — stand bracket for repairing the steering gear housing; 5 — steering gear housing
After installing the worm in the steering gear housing and securing the bottom cover, check the friction moment of the VAZ 2105 worm shaft with a dynamometer 02.7812.9501 with head AA95697/5; it should be in the range of 19.6–49 N cm (2–5 kgf cm). If the torque is less than specified, reduce the thickness of the adjusting shims 2, if more, increase it.
Section of the VAZ 2104 steering gear housing: 1 — plate of the bipod shaft adjusting screw; 2 — bipod shaft adjusting screw; 3 — adjusting screw nut; 4 — oil filler plug; 5 — steering gear housing cover; 6 - worm; 7 — steering gear housing; 8 — bipod; 9 — nut securing the bipod to the shaft; 10 — spring washer; 11 — bipod shaft seal; 12 — bipod shaft sleeve; 13 — bipod shaft; 14 — bipod shaft roller; 15 - worm shaft; 16 — upper ball bearing; 17 — lower ball bearing; 18 — adjusting shims; 19 — lower worm bearing cover; 20 — roller axis; 21 — roller ball bearing; 22 — worm shaft seal; B, C - marks
After installing the bipod shaft, check that there is no play in the engagement of the roller with the worm in the positions of the worm shaft turned to the right and left by 30° from the neutral position of the bipod. Eliminate any possible gap in the engagement with an adjusting screw of 2 cm and tighten locknut 3. After adjusting the gap in the engagement of the roller and the worm, check the friction torque of the worm shaft with a dynamometer, which should be equal to 68.6–88.2 N·cm (7–9 kgf· cm) when turning the worm shaft by 30° both to the left and to the right from the middle position and should decrease smoothly to 49 N·cm (5 kgf·cm) when turning from an angle of 30° to the stop. Upon completion of assembly, check the angles of rotation of the bipod from the neutral position, which should be 32°10'±1° both to the left and to the right until the bipod touches the bolt heads. Fill the steering gear housing with 0.215 liters of TAD-17i transmission oil.
Device
The steering system on the VAZ 2107 is quite reliable. With its help, a sufficient level of controllability is achieved. Of course, the comfort of the car cannot be compared with modern models, but in general, this model is comfortable to drive.
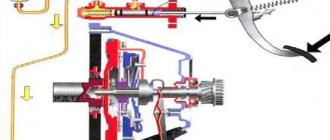
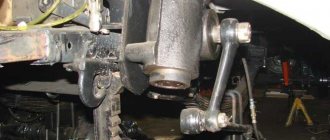
Control is carried out by transmitting force from the steering column to the wheels. This happens through a gearbox with a worm gear. The steering column itself on the VAZ 2107 is composite. It consists of two parts connected by a universal joint. This allows it to fold up in the event of an accident, and leads to less injury.
The gearbox has an aluminum housing attached to the left side member (in some export versions to the right side). The body contains a globoidal worm. It is combined with a double-ridge roller. The gear ratio of this gearbox does not exceed 16.4. This allows the force to be transmitted as accurately as possible. The design also includes 2 ball bearings. They allow you to avoid increased wear of elements. Worm mechanisms are very sensitive to friction, so the gearbox contains gear lubricant. It must be checked regularly and added if necessary.
The steering mechanism also includes the following elements:
- Middle tie rod;
- Pendulum arm;
- 2 lateral (short) pulls.
The middle link is connected directly to the gearbox. This is a fairly reliable structural element. Failures of the long tie rod are rare. A pendulum lever is attached to it on the right. It ensures the stability of the entire system. Small tie rods have ball joints at the ends. This allows you to transfer force to the steering knuckle as efficiently as possible and without heavy loads. These levers are prefabricated. Thanks to the screw thread, it is possible to adjust the wheel alignment angles. The service life of these parts is from 10 to 15 thousand kilometers. When replacing, the new rods are made similar in length to the parts removed.
Conclusion
. The steering on the Zhiguli has its own characteristics. At the same time, such solutions are practically not used on modern cars. Therefore, the question of how to remove steering play on a VAZ 2107 is not uncommon. In general, fixing the problem is not difficult. But, in some cases, the adjustment does not help, then the gearbox will have to be replaced.
Lada (VAZ-2107). Dismantling and assembling the steering gear housing
Home Cars - VAZ VAZ-2107 (Zhiguli) 1982+ - maintenance and repair manual
search site
content .. 130 131 132 133 134 135 136 137 138 139 ..
Lada (VAZ-2107). Dismantling and assembling the steering gear housing
| Rice. 6–5. Removing the bipod: 1 — puller A.47043; 2 — bipod shaft; 3 - bipod; 4 — bracket A.74076/R |
| Rice. 6–6. Parts of the steering gear housing: 1 - housing; 2 - bipod; 3 — lower crankcase cover; 4 — adjusting shims; 5 — outer ring of the worm shaft bearing; 6 — separator with balls; 7 — bipod shaft; 8 - adjusting screw; 9 — adjusting plate; 10 — lock washer; 11 - worm shaft; 12 — upper crankcase cover; 13 - sealing gasket; 14 — bipod shaft sleeve; 15 — worm shaft seal; 16 — bipod shaft seal |
After unscrewing the nut securing the steering bipod 2 () and removing the spring washer, use puller A.47043 to remove the bipod (). Having unscrewed the fastening bolts, remove the cover 12 (see) of the steering gear housing together with the adjusting screw 8, the adjusting plate 9, the lock washer 10 and the lock nut. Remove the bipod shaft 7 assembled with the roller from the steering gear housing 1.
Having unscrewed the fastening bolts, remove the cover 3 of the thrust bearing of the worm shaft together with the adjusting shims 4.
Using the worm shaft 11, push the bearing ring 5 out of the crankcase and remove the shaft along with the bearing separators 6. Remove oil seal 15 of the worm shaft and oil seal 16 of the bipod shaft.
| Rice. 6-7. Removing the outer ring of the upper bearing of the worm using a mandrel 67.7853.9541: 1 - steering gear housing; 2 — outer ring of the upper bearing of the worm; 3 — mandrel 67.7853.9541 |
Using mandrel 67.7853.9541, press out the outer race of the upper bearing (.).
Assembly
carry out the steering mechanism on bracket A.74076/R in the reverse order of disassembly.
Press the outer ring of the upper bearing of the worm using mandrel 67.7853.9541, moving the nozzle on the mandrel handle to the opposite side.
| Rice. 6–8. Installation of the steering gear worm: 1 – bearing cover; 2 – adjusting shims; 3 – worm |
| Rice. 6–9. Monitoring the friction moment of the worm with a dynamometer: 1 - worm; 2 — head A.95697/5; 3 — dynamometer 02.7812.9501; 4 — stand bracket for repairing the steering gear housing; 5 — steering gear housing |
After installing the worm in the steering gear housing and securing the bottom cover, check the friction moment of the worm shaft with a dynamometer 02.7812.9501 with head AA95697/5 (see). it should be in the range of 19.6–49 N cm (2–5 kgf cm). If the torque is less than specified, reduce the thickness of the adjusting shims 2 (); if more, increase it.
| Rice. 6–2. Section of the steering gear housing: 1 — plate of the bipod shaft adjusting screw; 2 — bipod shaft adjusting screw; 3 — adjusting screw nut; 4 — oil filler plug; 5 — steering gear housing cover; 6 - worm; 7 — steering gear housing; 8 — bipod; 9 — nut securing the bipod to the shaft; 10 — spring washer; 11 — bipod shaft seal; 12 — bipod shaft sleeve; 13 — bipod shaft; 14 — bipod shaft roller; 15 - worm shaft; 16 — upper ball bearing; 17 — lower ball bearing; 18 — adjusting shims; 19 — lower worm bearing cover; 20 — roller axis; 21 — roller ball bearing; 22 — worm shaft seal; B, C - marks |
After installing the bipod shaft, check that there is no play in the engagement of the roller with the worm in the positions of the worm shaft turned to the right and left by 30° from the neutral position of the bipod. Eliminate any possible gap in engagement using the 2 cm adjusting screw () and tighten locknut 3.
After adjusting the gap in the engagement of the roller and the worm, use a dynamometer to check the friction torque of the worm shaft, which should be equal to 68.6–88.2 N cm (7–9 kgf cm) when the worm shaft is rotated 30° both to the left and to the right from the middle position and should decrease smoothly to 49 Ncm (5 kgfcm) when turning from an angle of 30° to the stop.
Upon completion of assembly, check the angles of rotation of the bipod from the neutral position, which should be 32°10'±1° both to the left and to the right until the bipod touches the bolt heads. Fill the steering gear housing with 0.215 liters of TAD-17i transmission oil.
The concept and causes of play in the steering mechanism
The steering design itself is not complicated. It contains a special rod that does not fit tightly to the car parts. It must have a small gap so that the parts do not wear out in case of friction. However, if the total play reaches fairly large levels, this can cause serious malfunctions, which can lead to accidents on the road. A backlash of 10° is considered an acceptable norm.
It is important to remember that a small play can develop into a large one, and therefore you should carefully consider this issue if there are clear signs of problems with the steering. These signs may include knocking, squeaking, vibration, or the need to turn the steering wheel hard to the left or right, even on a flat road. In this case, the steering wheel stops “obeying” the driver or performs actions somewhat late.
The second reason may be a recent car repair, namely the fact that sometimes the central hub nut is not sufficiently secured. This is where the backlash comes from. Also, free movement of the steering wheel may indicate that the hydraulic oil is becoming unusable and needs to be replaced.
How to determine the appearance of play in the steering
In order to check the car for problems with the steering, namely the presence of play, the following operations must be performed. First of all, it is necessary to switch the engine to a special operating mode when the vehicle is stationary - idle. After this, you should start turning the steering wheel and monitor the response time of the wheels to these commands. It is this distance that shows the amount of play.
Today, for the convenience and accuracy of measuring backlash, there is a special device - a backlash meter. It helps to measure and control the total backlash.
Eliminating play in the steering
First of all, the check should begin with the universal joint and its screws. Turn the adjusting screw to the required value. Afterwards, check again for the presence and amount of play. If the results are unsatisfactory, do the work again.
If this does not help, then the cause of the breakdown lies elsewhere. The next step is to drive the car into the inspection hole. The problem of play may lie in the steering rod joints. Most likely, these parts are worn out and there is a need to replace them or firmly fix them. You should also check the fastening of the steering rods and tighten them if necessary.
However, if this does not eliminate the cause, then most likely you will have to disassemble the entire steering system. It is better to do this at a car service center, as there is a risk of damaging the system.
↑ Checking the ball joints of the steering rods
- First of all, check the movement of the rod tips along the axis of the fingers. To do this, using the lever and support, move the tip parallel to the axis of the finger.
- The axial movement of the tip relative to the finger should be 1–1.5 mm. This movement indicates that the pin insert is not jammed in the rod tip socket and moves along with the pin, compressing the spring. Replace the hinge with a jammed insert.
- While rocking the steering wheel in both directions, check by touch that there is no free play in the steering rod joints. If you feel free play in the ball joint, replace the tie rod end or tie rod assembly.
- Check the condition of the protective caps of the steering rod ball joints.
- If the protective caps are in good condition and ensure cleanliness inside the hinges, then the service life of the latter is practically unlimited. When moisture, dust, etc. gets into the hinge, premature wear of its parts occurs.
The cap must be replaced if it has cracks, ruptures, and also if lubricant penetrates out when squeezing it with your fingers.