When does the steering rack need to be tightened on a Priora?
The steering rack is a vulnerable point for the Lada Priora.
The first sign indicating the need to adjust the rack is the appearance of a knocking sound when driving over small uneven surfaces. The knocking will be felt especially clearly when driving on country roads. In this case, the driver will feel shocks and vibrations on the steering wheel, which will also be transmitted to the entire car body.
In addition, if the steering wheel adjustment nut is loosened when driving on the highway, the car will “float” a little, and additional steering will be required from the driver, which will also immediately become noticeable.
Experts also say that a tightening is necessary if the driver begins to notice the appearance of a clearly audible crunching sound in the area of the steering column, as well as an increase in the amplitude of the steering wheel rotation.
What is the steering rack for front wheel drive cars?
In cars with front-wheel drive, there is no way to install the classic, long-proven front wheel steering control system. The transverse installation of the motor and power drives to the wheels will not allow this to be done. Therefore, the cumbersome system of levers was replaced by a steering rack. Its main task is to transfer force from the steering wheel to the steering arms.
Important! Most Priors are equipped with electric power steering (EPS) and not power steering. This is a feature of this model.
Location and design of the Priora steering rack with EUR
To save space, this element of the Priora control system is located on the wall of the engine compartment. On the bulkhead between the engine and the interior of the Priora. The rack is connected to the steering column located in the cabin.
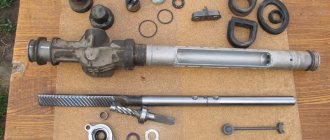
Steering rack device
This important Priora control unit is assembled from the following components.
- The rack is mobile.
- Frame.
- Splined shaft with bearing.
- Metal case (casing).
- Seals and seals.
- Fasteners and accessories (bolts, nuts).
- Springs.
- Rubber cover for the mechanism.
The basis of this mechanism is a metal pin (rail), so to speak. There are teeth on one part of it. They are mated to the steering wheel drive shaft, located at right angles to the supporting pin. This is, in fact, the well-known worm gear. The rotating shaft moves, engaging the teeth, the rack inside the casing. The protective casing has a special slot for attaching tie rod ends. In the center of the pin (rack) there are special holes for tips, which are connected through special levers to turning wheels.
This is interesting: Lada 2109 1.5 16v – turbo assembly!
Malfunctions and their symptoms in the Priora steering rack with ESD
Most often, the rubbing parts of this unit fail. It is quite easy to determine whether the steering mechanism is broken or simply worn out. This will be marked by the following signs:
- The steering wheel is difficult to turn.
- When entering a turn, tapping and grinding noises are heard from the mechanism.
- While driving, when using the steering wheel, sensitive shocks are transmitted from it to the hands.
In general, the handling of the Priora is significantly deteriorating.
During the inspection, the technician will determine the need to replace the Priora steering rack by visual inspection. Usually, he grabs the rod with his hand, and his partner turns the steering wheel. Based on excessive play and extraneous sounds, the technician makes a verdict.
Attention! This device is completely repairable. Ready-made repair kits for the Priora steering rack are available for sale. There are separate articles on this topic.
When tightening doesn’t help and the mechanism needs to be changed
It’s worth thinking about replacing the rack when tightening it does not in any way affect the car’s behavior on the road, and also does not help get rid of the unpleasant knocking noise. A failed steering rack will cause significant play in the steering wheel. Moreover, it may begin to jam (this happens extremely rarely, but similar cases are known). If the rack begins to jam, then it is better to stop using the car, as this can lead to the most dire consequences.
You cannot do without a replacement even if after tightening it you managed to get rid of knocks and vibrations, but they reappeared later.
What is needed for work and how to tighten the steering
To tighten the steering rack you will need special wrenches
To perform the tightening you will need the following tools:
- Slotted screwdriver (in simple terms, a “flat” screwdriver);
- Wrench 13;
- A special 17mm wrench designed to adjust the steering rack.
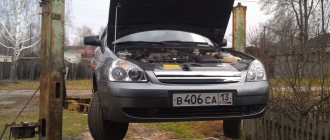
To make the work more comfortable and faster, it is recommended to drive the car into a special inspection hole or overpass, and also use an assistant, whose role even a child can handle.
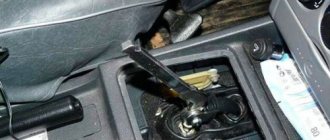
The lower rack fastening nut is not easy to unscrew
To get to the rail, you should perform a number of simple steps:
- Disconnect the battery terminals and dismantle it;
- Using a 13mm wrench, unscrew the bolt securing the battery stand, and then remove it;
- Directly under the steering rack, using a slotted screwdriver, you need to pull out the small plug of the adjustment system.
After this, you will have access to the nut responsible for adjusting the thermal gap in the rail.
Next, you need to put your hand under the steering rack and try to put the rack wrench on the nut. It is necessary to tighten the nut clockwise, but since the rack itself is located upside down, from the outside it may seem that the nut must be tightened counterclockwise. Experts recommend tightening the nut no more than 25–30 degrees at a time, after which you should try to rotate the steering wheel, which should turn without jerking or biting.
It is also necessary to listen to the sounds coming from the steering wheel - if there are no knocks when turning the steering wheel, and there are no other noises, then the rack is tightened correctly, and you can put the battery and rubber plug in their place.
The tightening process on video
Disassembly and assembly of the steering mechanism
We disassemble the steering mechanism when repairing it. Remove the steering mechanism (see “Removing the steering mechanism”). Remove the steering gear boot (see “Replacing the steering gear boot”).
Remove the steering rod support. We insert the bit into the groove of the crankcase pipe mounting nut.
We unscrew the nut, striking the beard (right-hand thread).
...and remove the crankcase pipe.
Use a screwdriver to press out the two clamps of the bushing located inside the pipe...
...and remove the bushing.
Remove the two rubber rings from the bushing (arrows indicate the bushing clamps).
If it is necessary to replace the nut, use pliers to remove the locking rings. . and remove the retaining ring... Remove the nut securing the pipe.
Remove the rubber plug from the rack stop adjusting nut. Using a scraper, remove the jammed metal in the locking areas of the stop adjusting nut.
Using a special 24mm wrench with an external octagonal head, unscrew the stop nut.
We take out the stop spring. Using a screwdriver...
...remove the O-ring.
By hitting the crankcase against a wooden block, we knock out the rack stop. Using a screwdriver...
...remove the liner from the stop. A rubber ring is installed in the groove of the stop.
Remove the rubber ring from the crankcase that seals the hole for the steering mechanism on the front panel.
Remove the boot from the gear shaft. Use a 6mm hexagon to unscrew the two screws (shown by arrows)…
...and remove the crankcase cover.
Remove the separator with the thrust bearing rollers.
Remove the sealing ring of the cover.
We remove the rack from the crankcase.
We press out the gear shaft by holding the shaft in a vice with soft metal jaw linings and pressing the crankcase upward with the mounting blade.
We remove the gear shaft with bearing from the crankcase. We pry it off with a screwdriver...
...and remove the bushing retaining ring.
We take out the gear shaft bushing assembled with the support plate.
If it is necessary to replace the needle bearing, use a drill with a diameter of 4 mm to drill two diametrically located holes in the crankcase so that they extend to the end of the outer ring of the needle bearing. Through the drilled holes, using a rod of the appropriate diameter, we knock out the outer ring of the bearing from the crankcase.
Using a puller, we press the ball bearing of the gear shaft with the inner ring of the roller thrust bearing.
Use a puller to press the inner ring of the needle bearing off the shaft.
Use a screwdriver to pry and remove the gear shaft seal from the crankcase cover. If the outer race of the roller thrust bearing needs to be replaced...
... use a scraper to remove the extruded metal in four places and take out the ring. We generously lubricate the bearings, rack and gear teeth, and the plastic rack bushing with Fiol-1 grease. We assemble the steering mechanism in the reverse order. We press the outer ring of the needle bearing into the crankcase using a mandrel of suitable diameter. To seal holes in the crankcase, you can use “fast steel” or “cold welding”. We press the gear shaft with the ball bearing into the crankcase using a piece of pipe of a suitable diameter or a high head, applying force to the outer ring of the bearing. You can press the gear shaft into the crankcase, resting the outer ring of the bearing on the jaws of a vice. Then we put the crankcase on the bearing...
...and press the crankcase with light blows of a hammer through a wooden block.
We press the gear shaft oil seal into the cover through a mandrel or head flush with the end of the cover. We insert the rack into the steering gear housing. We install the pipe.
After tightening the pipe fastening nut, tighten the nut. We rotate the gear shaft so that the flat on it is located on the right side. We move the rack so that the steering rod support mounted on the rack is located in the middle of the pipe groove. We insert the rack stop, the stop spring and tighten the stop nut. It is recommended to replace the stop nut with a new one.
Scheme for monitoring the gap in the engagement of the rack and pinion shaft
: 1 — dial indicator; 2 — indicator mounting bracket; 3 - nut; 4 - sealing ring; 5 — steering gear housing; 6 — needle bearing; 7 — gear shaft; 8 — bushing; 9 — crankcase cover; 10 - rack; 11 — liner; 12 — rack stop; 13 — indicator leg; 14 - spring
Read more: Tuning Ford Focus 3 hatchback
We adjust the gap in the engagement of the gear with the rack. To do this, set the rail in the middle position and block it from moving. Insert the leg of the dial indicator into the hole of the adjusting nut of the stop until the tip of the leg touches the stop of the rack. The diameter of the tip of the indicator leg must be at least 3.5 mm...
...so that the leg rests against the end surface 1 of the stop, and does not fall into its hole 2 (for clarity, shown on the dismantled stop). We apply a torque of 15 N m (1.5 kgf m) to the gear shaft, while the gear pushes the rack and stop. Based on the indicator readings, we determine the amount of movement of the stop, which corresponds to the actual value of the gap in the engagement. If it exceeds 0.05 mm, tighten the adjusting nut, achieving the specified amount of movement of the stop. After this, having unlocked the rack, we check the ease of rotation of the drive gear throughout the entire range of travel of the rack.
Steering rack boot
The performance of the steering rack mechanism is primarily determined by reliable protection from dirt, moisture and other debris. For this purpose, a special corrugated rubber cover (boot) is provided. The VAZ-2110 steering rack will last a long time if you regularly monitor the condition of the boot. Periodically, using a bright flashlight, check the integrity and tightness of the protective cover and then you can avoid problems with steering rack repair for a long time. If any defects are found in the boot, it should be replaced immediately. Replacing steering rack boots is a rather troublesome procedure. However, this activity can be done with your own hands. To do this you will need a tool, a new boot, a couple of hours and desire. This article provides detailed instructions on how to replace the steering rack protective cover yourself.