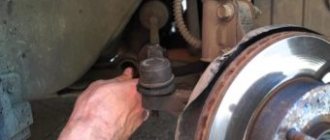
Signs of a Fan Failure
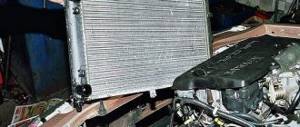
Fan failure can be easily determined by the absence of a characteristic hum and an increase in engine temperature. However, you need to remember that if the fan does not work, this does not mean it is broken. The reason for this “behavior” of the unit may be a malfunction of the fan switch sensor or a blown fuse. For this reason, the easiest way is to connect the fan directly to the battery and check its functionality. If the fan does not work, this means it is internally damaged. In other cases, the cause of the malfunction lies in other components of the car's electrical system. It should be noted that a fan motor failure can also be detected at an early stage thanks to the whistle that is heard when the fan is turned on. Its presence indicates a malfunction of the electric motor bearings or wear of the contact brushes located in its housing.
Disassembling the motor step by step
To dismantle the engine, you need to have a certain tool and know the sequence of actions, as well as the nuances characteristic of the motors of some brands of vacuum cleaners.
Materials and tools for engine disassembly
To dismantle the motor, you need to have on hand a tool such as pliers, a hacksaw, a round file, a small vice, two wooden blocks, and a 12mm wrench.
Disassembly algorithm
When disassembling the motor, it is correct to adhere to the following algorithm of actions.
- Removing brushes. The process does not cause any difficulties. In some engines you have to unscrew a couple of bolts, while in others it’s even easier.
- Removing the impeller casing. Its edges have to be bent in places away from the engine housing and then removed by lightly tapping it with a hammer.
- Removing the impeller. This procedure is the most complex and dangerous, therefore the methods for its implementation are included in a separate subsection.
- Removing bearings. The manipulation is carried out using a puller.
Methods for removing the impeller
Removing the impeller from the engine is not an easy task, since the nut that needs to be unscrewed is located in a very inconvenient place . There are generally three methods used for this process.
- Instead of the removed brushes, wooden blocks of appropriate sizes are inserted so that they extend out a little. The ends resting on the rotor are shaped into a semicircle using a file. On both sides, the bars are clamped with a vice in such a way as not to damage the rotor, but at the same time ensure its immobility when unscrewing the nut.
- About 20 cm of soft insulated wire with a cross-section of up to 2.5 mm is put in a loop on the back of the armature, and then, turning the armature clockwise, it is wound onto the current collector. The end of the wire is attached to the motor housing. After this, the nut can be unscrewed.
- The third method requires the repairman to have pinpoint precision: you need to cut a slot for a screwdriver at the end of the shaft where the nut sits. This can be done using a drill or a hacksaw. Then use a screwdriver to hold the shaft from rotating with one hand, and unscrew the nut with the other. You can clearly see the process in the video.
There is a fourth method, but it does not guarantee the integrity of the winding. It consists of wedging the armature shaft using a thin screwdriver, passing it through the hole at the end of the motor. The tool is carefully inserted into the gap between the rotor and stator. The nut usually sits very tightly, and it takes a lot of effort to unscrew it.
Advice! You must always remember that the nut is unscrewed clockwise. Before starting this work, you should treat it with a penetrating liquid and wait a few minutes.
Features of removing the impeller on motors of different brands
The above methods for removing the impeller are suitable for vacuum cleaners LG, Samsung, Karcher, Tomas twin tt and others.
On a note! According to many experts, it is better not to repair Bosh products at home.
Particularly difficult is removing the impeller from the motor without a nut. This applies to some Philips and Zemler models. In place of the nut there is a pressed washer. There is no way to catch it, but there is one way to solve this problem. Two holes are made in the washer to the left and right of the axis. Threads are cut into them. Take a small metal plate and drill three holes in it with a slightly larger diameter than on the washer. On average, they are threaded. A notch is made at the end of the axle. Bolts are passed freely through the outer holes of the plate and screwed into the threaded holes on the washer. One bolt is screwed into the middle of the plate and goes into the recess of the end. It turns out to be a kind of puller. By turning the central bolt clockwise, the impeller is removed from the axle.
Some engine models do not cause major problems during dismantling. The motor of the Rocket vacuum cleaner can be easily disassembled using a long screwdriver. However, the impeller nut on it is removed counterclockwise. You need to hold the anchor with one hand, and unscrew the nut with the other. It is also easy to do this operation with a Vitek engine.
Signs of fatal engine failure
All of the above about disassembling the engine does not make sense if it is not repairable . The motor does not fail instantly. The following signs may indicate that the end is near:
- the engine whistles and hums loudly;
- There is a burning smell when working;
- the vacuum cleaner body overheats;
- The device turns off after 10-15 minutes of operation.
Such manifestations may also indicate less serious problems, but they cannot be ignored. If all the symptoms indicate that the engine has failed, you will have to replace it with a new one.
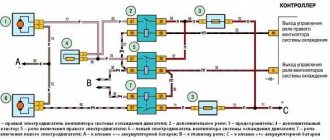
Fan replacement
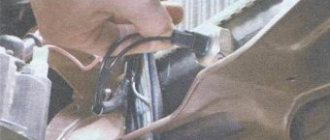
You can replace the cooling fan at a service station within half an hour. In this case, the technician accurately diagnoses the cause of the problem and replaces the assembly. In fact, most of the repair time is spent on checking electrical circuits, and replacing the cooling fan itself takes about 15 minutes. At the same time, during the repair, it makes sense to immediately change the fan switch sensors, which also tend to fail quite quickly. Their cost is low, but such a replacement guarantees the efficiency of the entire car radiator blowing system, which is especially important in the summer, as well as when driving frequently in traffic jams.
Withdrawal procedure
If we put aside the possible nuances, which will be discussed later, the procedure does not seem so complicated. You just need to remember that all actions should be done carefully . The basic rule of disassembly is always: “do not try to apply force, especially if the hardware resists it.” Following this rule will avoid unnecessary mechanical damage. To remove the cooler from the processor you will need:
- Turn off computer.
- Disconnect the surge protector and power cables.
Important! It is a good idea to let the computer sit for 10 minutes before further disassembly. This is due to two factors at once: heating and residual charge in the capacitors. The first one is simply unpleasant. The second can cause significant harm to the user and even components if the power supply is poorly insulated.
- Unscrew the bolts on the body. For ease of understanding, they are shown in the image. It should be borne in mind that unscrew I need the right one cover (if viewed from the back, respectively, the left one - if viewed from the front of the system unit). The opposite one is fixed more strongly (often even soldered to the body).
- If the key (the green oval in the image above) is bent for some reason, then this is the only time when you can take pliers or any available tool and cause mechanical damage .
- Disconnecting the wires inside. It is especially important to disconnect the connector marked in purple. It is easy to recognize a similar connector, regardless of its shape: it comes out of the fan (cooler, marked in red).
Note! In general, it is not necessary to completely disconnect the wires and remove the RAM to remove the cooler from the processor, but for the first 10-15 removals it is necessary. So that your hands get used to the operation and cannot cause harm to surrounding components.
- Remove the cooling fan along with the heatsink from the processor. Almost always they are supplied assembled and are also removed together.
What is a computer system unit and why is it needed?
The procedure for removing a cooler from AMD or Intel processors depends on the method of its implementation and may require both minimal effort and enormous physical effort. We will consider each case separately.
Cooler mount
The fastening determines which algorithm of further actions should be applied. The cooling fan can be mounted in the following ways:
- latches (various types);
- screws;
- grooves;
- hybrid options.
Therefore, we will consider each type separately, mentioning the necessary tools.
Latches
Latches are considered a common option for coolers on socket 775 ( Intel ) , although they are also found in other specifications. Budget fans are attached to the latches. These latches are the main weak point for such cooling systems.
To remove the cooler from the processor using the latches, you will need to turn 4 mechanisms counterclockwise (you must turn ¼ of a circle). Grasp the iron part and pull the cooler.
If the latches break off (they are very delicate and the force for opening borders on the force for breaking), it is better to contact a service center. Without proper experience, it is almost impossible to remove or reinstall a cooler with a damaged latch.
Screws
To remove such a cooling system, you will need a screwdriver (Phillips or corresponding to the type of screw). Or an alternative tool like thin pliers to remove the screw. By exercising prudence and caution, you can handle it with a knife, risking less than opening the latches with your bare hands.
4 bolts are unscrewed (they are not removed from the fan housing), after which the freed element can be safely removed.
Grooves
The mounting method AMD processors and their cooling systems. The design looks like this and differs in the lever:
This lever will need to be turned to release the cooling system, after which it can be pulled out.
Combined method
Combined fastening systems are found in so-called branded computers, where the latch is combined with bolts (less often, everything is found at once). The cooling system is made as simple as possible and is therefore less susceptible to damage during disassembly.
Watching a DVD on a laptop or computer
The disassembly algorithm repeats the steps for each of the corresponding types. The order is followed: first the screws, then the latches.
Liquid cooling systems are much more difficult to remove. Moreover, the procedure is unique for each model, so it is not possible to describe the general procedure.