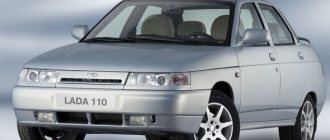
Replacing the outer CV joint on a VAZ 2112
On cars with front-wheel drive, instead of a driveshaft with crosspieces, constant velocity joints (CV joints) with axle shafts are used. Both crosspieces and CV joints tend to fail. This article discusses in detail: replacing the external grenade of a VAZ 2112, visual photos for a better understanding of the process and practical advice from an auto repair specialist.
- Why does the CV joint fail? Principle and working conditions
- How to determine if a hinge is faulty? Diagnostics
- What will you need?
- Replacement
- Removing the axle shaft
- Grenade replacement
- Installing the axle shaft on the car
CV joint device VAZ 2110
The CV joint performs an important function in a car; it consists of seven parts:
- Retaining ring.
- Balloons.
- Separator.
- The boot, which is indicated in the technical manual as a bellows cover.
- Frame.
- Drive shaft.
- Inner ring.
The VAZ 2110 drive unit is responsible for transmitting torque to the wheel from the gearbox. The CV joint allows the front wheel pair to make turns by normalizing the changing angle between the axle shafts. The machine has two grenades: the external one transmits rotation to the hub, and the internal one is needed to transmit rotation from the gearbox to the shaft.
Diagram of the internal CV joint of the VAZ 2110
Basic faults
The most common failures of a grenade include: failure due to contamination and due to wear of the part (end of service life or defect).
A faulty grenade can itself reveal its unsatisfactory condition in the form of crunching sounds, crackling sounds when turning wheels, and body vibrations. But in this case, you will have to buy a new part, but you can notice the malfunction much earlier (at the stage of damage to the cover) and prevent serious repairs.
There are several ways to identify a breakdown:
- shake the drive shaft with your hand. If play is detected, the element should be replaced;
- Turn the steering wheel all the way to the left, and then to the right, and at each stage assess the condition of the anthers. If damage (cracks, breaks) is detected, replace them.
The CV joint is protected by anthers from getting dirt into it, which disables the part. But their service life does not last forever; regular inspection of these parts is necessary (as described above) to prevent more serious damage to the grenade.
When operating a car with a faulty joint, also known as CV joint, there is a high probability of it breaking in half. In this case, the vehicle will not be usable. This means repairs will be required and most likely (if this happens on the road) expensive tow truck services.
It is recommended to replace the grenade in a timely manner to avoid unpleasant situations.
Price
An internal CV joint will cost an average of 1,500 rubles, an external CV joint will cost 1,300 rubles. For the anthers they will ask about 150 rubles each. Replacing anthers will cost much less.
Replacing CV joints at a car dealership will cost 1,200 rubles (600 rubles each).
It is recommended to buy a new part using an old one, so the likelihood of an incorrect purchase is minimized. In addition, the purchase of CV joints should be carried out in trusted stores. You should not buy these parts at a disassembly site; it is possible that a breakdown will occur within a few meters.
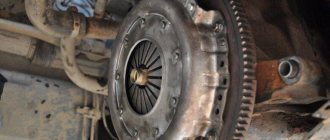
Where is the inner CV joint of the VAZ 2110 located?
It’s easiest to see it from below the car, by the way, and you’ll have to remove it by crawling under the bottom, although you can do without it (For example, you can put planks under the front wheels and lift the front part with two jacks, provided that both jacks stand on these planks, thereby in front of will be higher, this is especially convenient if the car is tall), but it’s still better to put the car on a lift and replace the CV joint you need with a new one, but we’ll immediately explain to you what outer and inner CV joints mean so that you understand this and are no longer confused (It’s just that in the article we will often talk about them and so that you can immediately understand what kind of CV joint we are talking about), so the outer one is the one that faces the car wheel and is inserted into the hub (Both outer ones are indicated by green arrows), and the inner one is the one that is inserted into the box (They are indicated by yellow arrows) and there are four total CV joints in front-wheel drive cars, two of them are located on the left side and go to the left wheel, and the other two are on the right and go to the right wheel, but here are the drives on which CV joints Only two are installed and both of them are indicated by blue arrows in the photo.
The location of the internal and external CV joints of the VAZ 2110 is indicated by arrows
How to avoid CV joint failure?
A grenade flew out, movement is not possible.
Advice! To avoid early failure of the part, it is not recommended to start abruptly with the steering wheel turned in any direction.
Those parts that are installed on new cars can easily serve for 100-150 thousand kilometers. This cannot be said about those spare parts that are sold separately in car shops or markets.
Diagnostics and troubleshooting of the internal CV joint of the VAZ 2110
If you constantly pay attention and monitor the internal CV joint, it will easily last 150-200 thousand km. Otherwise, malfunctions may appear within the first hundred thousand km.
The main enemies of any hinge mechanisms are dust and dirt, which act as an abrasive and accelerate the wear of the grenade. As soon as the car owner misses the damage to the elastic cover and drives for some time without replacing it, the same dirt will get inside, which sooner or later will do its job, even if you change the boot.
There are other reasons leading to malfunction and replacement of elements:
- there is not enough lubrication in the mechanism or its quality leaves much to be desired;
- driving too aggressively on bad roads, constantly creating extreme loads on the CV joints;
- factory defect in the parts of the unit.
Conclusion: most of the causes can be foreseen and prevented through prevention, postponing the replacement of grenades indefinitely
If during operation of the VAZ 2110 the following signs of malfunction appear, then it is necessary to carry out additional diagnostics:
- while driving around a turn, a characteristic crunching sound is heard from the front of the car, as if steel balls are touching the body during operation;
- the same thing, only instead of a crunch, a knock is heard, it may disappear when moving in a straight line;
- A constant crunching sound that does not disappear when driving in a straight line indicates wear on the internal grenade.
Remember that after such noise appears on one side or both, you cannot immediately delay repairs. Otherwise, a faulty CV joint can cause a lot of trouble right on the move.
To make sure the grenade is broken, you can check it in 2 ways:
- Choose a flat area so that there is enough space for the Niva to turn. Make several circles around it clockwise and counterclockwise, turning the steering wheel all the way. Listen carefully to the sounds that arise. If they sound like a crunching sound, proceed to part 2 of the diagnosis.
- Place the machine over the inspection hole and check for play in all 4 units manually by rocking and turning the axle shaft in different directions. A worn joint will immediately make itself known.
- If it turns out that the boot is damaged or water is leaking from it, then the CV joint in this place has probably become unusable.
Now let's talk in more detail about play in ball joints. The play resulting from wear of the support will also negatively affect the condition of the CV joint. And if, while driving at speed, the ball joint pin is torn out of the mount, the inner CV joint may even be broken. By the way, all the main blows of fate are taken by external grenades. And this is due to the fact that they are connected through the hub to the wheel. It is from the wheel that the constant velocity joint receives powerful blows and shocks. And water and dirt from under the wheels get faster and more onto the outer CV joints. Therefore, in order to damage the CV joint that connects to the box, you need to try. The exception is the situation when the ball joint pin is pulled out.
Replacement
After all the preparations, you can begin the process of replacing grenades with a VAZ 2112.
Removing the axle shaft
So:
- Perhaps this is the most interesting thing in the process of replacing a grenade.
- Place the car on a level platform, inspection hole. Install wheel chocks.
- First, remove the hubcap from the wheel, if you have one installed.
- Now you need the help of a partner. He should take a driving position and press the brake pedal hard.
- In this case, you should take a 30 socket (in some cases 27 or 32) and a large wrench. The head is put on the hub nut, which secures the grenade to the hub (located in the middle of the wheel) and unscrew it with a large wrench.
Unscrew the nut with a large lever!
Advice! It will take quite a lot of effort to complete the last step described. Therefore, the longer the driver you take, the easier it will be to unscrew the nut.
- Then you can unscrew the wheel bolts and remove the wheel.
- Spray the splined surface of the hinge with rust remover. Most often, an additional remedy is needed - you can’t just knock it out.
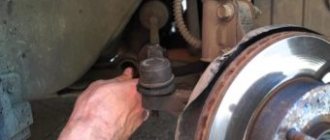
- When the wheel is removed, it is necessary to free the hub from the ball joint. To do this, take a suitable head and unscrew the two bolts securing the ball joint to the wheel hub.
- When the hub is freed from the ball joint, you can try to remove the splined surface of the grenade from the hub. Remove the entire hub nut and metal washer.
- Now you need to take a copper (bronze) adapter and a hammer, and with their help we knock the splines out of engagement. If necessary, add more WD.
- When the splines are disengaged, move the strut to the side and remove the axle shaft from the hub.
Instructions for replacing the outer CV joint of a VAZ 2112
Advice! During operation, make sure that the internal grenade does not jump out of the gearbox housing - this is an unnecessary loss of oil.
Next, we will consider the most profitable option for replacing a grenade on a VAZ 2112 - replacement without removing the axle shaft from the car.
Grenade replacement
Two methods will be considered:
- Remove the boot from the grenade. To do this, use pliers to cut through the fastening clamp and, using a screwdriver, remove the boot from one side. Turn it out so that it does not interfere with further work.
Complete removal of the CV joint boot of the VAZ 2112
- Now again you will need the help of a partner. He needs to hold the axle shaft tightly so that it does not jump out of the gearbox. It is recommended to rest the axle shaft against something (usually a lever or anti-roll bar).
- The outer grenade must be turned with the slots up. This gives access to the grenade's internal bearing.
- It is necessary to place a copper adapter on the inner bearing and knock down the grenade with a hammer. When knocking down, the axle shaft must be rotated so that the bearing moves evenly and does not jam.
- After the outer CV joint has been removed, you can begin installing a new one.
Note! Above is the IDEAL option for removing the CV joint. And then we will talk about how it happens MOST OFTEN.
- After removing the grenade from the hub, the axle shaft is removed and pulled out of the gearbox housing. Place a container under the flow of oil from the box so that you do not have to drain the oil. Ideally, a special plastic plug is inserted into the gearbox hole.
- The axle shaft is clamped in a vice for ease of further work.
- The boot is removed from the grenade, but remains attached to the axle shaft. It turns inside out so it doesn't get in the way. If you plan to replace the boot, then it is either cut off immediately or removed after removing the grenade.
- We remove the grenade in the same way as above. We hit the bearing with a pointer and a hammer, and it comes off the axle shaft.
The grenade is removed as shown in the photo
- If we change a grenade, then we change it. If, for example, we are only replacing a torn boot, then we do the following.
- The boot is removed and a new one is put on the axle shaft.
- The grenade is thoroughly washed with a brush in gasoline and then wiped. Then you need to fill it with special lubricant for CV joints.
- If you install a new grenade, then do not forget to fill it with enough grease and distribute it evenly there by turning the bearing.
Advice! Before installing the grenade on the axle shaft, pay attention to the condition of the retaining rings. Replace them if necessary.
- A new or repaired grenade is installed on the axle shaft much easier than it is removed. One sharp blow with a hammer through the attachment and the grenade is in place. Experienced mechanics can even put a grenade on by hand.
- Next, you need to put the boot on the seat in the grenade and secure it with clamps. There are special clamps for grenades (do not use plastic ones). Metal clamps are installed using pliers and a screwdriver.
Advice! Clean the spline joint, both on the grenade and in the hub, with a metal brush and lubricate.
Now the VAZ 2112 axle shaft with a changed external constant velocity joint is ready for installation on the car!
Installing the axle shaft on the car
So:
- The axle shaft is inserted into the gearbox housing. Its other end is inserted into the hub until it stops.
Bend the strut and put the hub on the grenade splines
- Next you need to reattach the ball joint.
- Don't forget to put the metal washer back on and tighten the nut that secures the grenade to the hub.
- Reinstall the car wheel and lower the car from the jack onto the wheels.
- Again, the partner must press the brakes as hard as possible. You take the wrench and socket and tighten the nut with good force!
- Next you need to tighten the nut. This is done with a hammer and a blunt chisel type attachment. This is done to prevent the nut from unscrewing.
That's basically the whole replacement. If something is not clear in the text, remember that you can always watch a visual video that will show it all live.
Inner CV joint VAZ 2110 - step-by-step do-it-yourself replacement instructions
Before you begin work on replacing the internal CV joint of the VAZ 2110 yourself, you need to prepare everything.
To do this, you need to secure the car, turn on 4th gear, and tighten the handbrake. Secure the rear wheels with wheel chocks. If they are not available, use bars of a similar shape. Remove the protective cap, unscrew the hub nut using an “arm” (extension) - a pipe or a pry bar. After the hub nut is removed, unscrew the wheel mounting bolts.
Let's move on to step-by-step instructions:
- Using a jack, hang up the wheel on which the CV joint is supposed to be replaced.
- Unscrew the bolts to remove the thrust washer of the hub nut.
- Remove the 2 bolts that secure the lower ball joint of the steering knuckle.
- If the CV joint is being replaced on the right, turn the steering wheel as far as possible to the left, and if on the left, then to the right.
- Pull out the steering knuckle and strut. Remove the splined end of the outer CV joint from the hub.
Using a pry bar, remove the inner joint from the gearbox. - Fix the drive shaft in a vice, remove the clamps from the outer and inner CV joints. Turn the anthers inside out. If they are torn or cut somewhere, you can simply cut them off with a knife.
- Remove the VAZ 2110 CV joint from the shaft. You can use a hammer and a wooden or bronze adapter.
- Assembly is performed in reverse order. At the same time, install a new hub nut. Upon completion of the tightening, you need to touch its edge to avoid unwinding.
- When installing the inner CV joint, a plastic plug is placed on the end of the shaft.
- Before installing the VAZ 2110 CV joint, you need to make sure that a sufficient amount of lubricant is applied. Place a retaining ring on the inner CV joint.
- After the drive is placed in the box, place it in the side gear so that it is completely locked. This can be done by lightly tapping the surface of the wooden adapter with a hammer along the entire perimeter of the shaft axis.
Grenade replacement
Tool for the job
What is needed to ensure that the replacement of the VAZ 2112 CV joint takes place as quickly and efficiently as possible:
- Sockets and spanners
- 30mm head (not available in some sets)
- WD-40 or similar product
- Hammer
- Collar - the longer the better
- Pliers
- Jack
- Screwdriver
- Vise
- Gasoline and brush for cleaning surfaces
- Metal brush
- Attachment (bronze, copper)
- Metal brush
- Can't do without a partner
- And, of course, a CV joint complete with lubricant (if it is missing, you should purchase it - the price is reasonable)
Removing the axle shaft (wheel drive)
So, let's begin our renovation:
- The first stage is standard. We drive the car into the pit, put wheel chocks, put the car in handbrake and neutral, pray (optional) and go!
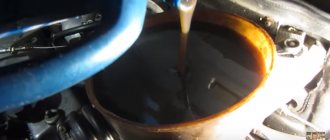
- When changing, oil must be drained from the variable gearbox housing! To do this, unscrew the required plug, place a container for the oil, wait for the drain to finish and screw the plug back.
- We remove the cap, if there is one, put a friend behind the wheel and ask him to press the brake hard.
- At this time we take a 30mm head and a larger knob. Using this tool, unscrew the hub nut, which is located in the middle of the wheel.
- The tightening force of the nut is large, therefore, the longer the knob, the easier it will be to unscrew it.
- After unscrewing the nut, the car should be raised with a jack. Raise the car and remove the wheel. Be sure to place a stand under the car in the form of, for example, hemp. Do not work on a vehicle that is on a jack!
- Unscrew the wheel bolts and remove the wheel from the car.
- We completely unscrew the hub nut, remove the metal washer and spray the splined connection of the hub with the outer grenade with WD-40 rust cleaner.
- In order to remove the axle shaft from the car, it is necessary to free the hub. Using the required wrench or socket, unscrew the two bolts securing the VAZ 2112 ball joint to the hub.
- After this, using a bronze or copper adapter, in order not to damage the thread on the outer grenade, we try to dislodge it (the grenade) from engagement with the hub, adding a rust preventative to make it easier.
- When the parts are disengaged, you can move the shock absorber strut to the side and remove the axle shaft (remember, you need to drain the oil, otherwise it will simply leak onto the floor).
We got the VAZ 2112 axle shaft, now let's start replacing the CV joint.
Removing and installing a new CV joint
So:
- The removed axle shaft must be clamped in a vice for convenience in further work.
- Using a screwdriver and pliers, you need to remove the boot. We unbend the two clamps securing the boot and tighten it onto the axle shaft.
- Now, using a head and a hammer, you should knock the grenade off the axle shaft. The attachment should be placed on the internal bearing housing of the grenade, and not on the body.
- After removing the grenade, you need to remove the old boot and put on a new one, if you plan. It is recommended to change the boot along with the grenade.
- The splined grooves on the axle shaft must be cleaned and preferably washed with gasoline. And then you should wipe it off.
- The required amount of new lubricant should be placed in the new grenade. The lubricant used is a special “CV joint”, and not lithol or others!
- The grease is stuffed inside the CV joint with your finger, rotating the bearing so that the grease is better distributed in the grenade body.
- After this, you can put the grenade on the axle shaft. The grenade is placed on the spline joint and simply snaps into place with a sharp movement of the hand.
Now the axle shaft with the new CV joint is ready for installation on the VAZ 2112.
Installing the drive on the car
Now we do everything in reverse order:
- We insert the axle shaft into the gearbox housing and get into the splined engagement in the box.
- We insert the splines into the hub.
- We fasten the two bolts securing the ball joint to the hub, thereby securing the hub.
- We put on the washer and screw the hub nut onto the outer grenade and tighten it as much as possible.
- We put on the wheel, tighten the wheel bolts and lower the car onto the wheels.
- Now you should tighten the wheel mounting bolts and also tighten the central nut using a 30mm socket.
- To do this, you will again need the help of a partner pressing the brake pedal.
- Don't forget to fill the gearbox with oil.
- After pouring oil into the gearbox housing, check for oil leaks at the junction of the inner CV joint with the gearbox.
If necessary, repair the second axle shaft in the same way, replacing the failed grenades. Keep an eye on the condition of your car and then it will be a pleasure to drive not only for you, but also for your passengers. And most importantly, even your life may depend on the technical condition of any component of the car! Good luck on the roads!
On cars with front-wheel drive, instead of a driveshaft with crosspieces, constant velocity joints (CV joints) with axle shafts are used. Both crosspieces and CV joints tend to fail. This article discusses in detail: replacing the external grenade of a VAZ 2112, visual photos for a better understanding of the process and practical advice from an auto repair specialist.
- Why does the CV joint fail? Principle and working conditions
- How to determine if a hinge is faulty? Diagnostics
- What will you need?
- Replacement
- Removing the axle shaft
- Grenade replacement
- Installing the axle shaft on the car
"Grenade" defects
Before replacing CV joints on a VAZ 2110, you need to make sure that they are made with high quality and can effectively perform their job in a new place.
Alas, sometimes replacing the inner CV joint on a VAZ 2110 does not give the expected result, since product defects .
The literature indicates that CV joints are made from special high-strength alloys that practically do not wear out. But in practice everything looks a little different. Whatever one may say, there are no eternal parts, and CV joints are no exception.
Article on the topic: Phase sensor errors on the VAZ 2114: identifying faults, checking and replacing the sensor
Defects may be as follows:
- Low quality of alloys used in manufacturing;
- Banal fakes and defective components;
- Poor quality or complete lack of lubricant, which leads to rapid failure of even a new grenade;
- Damaged anthers, due to which all kinds of debris get into the grenade.
Regarding the replacement of CV joint boots on a VAZ 2110, we recommend watching a video that will help you cope with the problem that has arisen. This issue should be approached thoroughly.