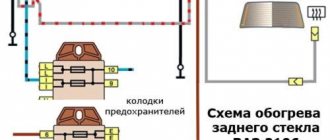
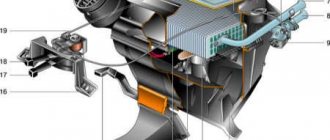
Replacing the heater radiator on a VAZ-2106 car is a very simple, albeit time-consuming task. The main problem is that the stove of the domestic VAZ-2106 is a single compact unit equipped with a pumping device, which has an electric motor, a ventilation device with impellers. In addition, the heater has a heating structure in the form of a radiator with a control valve. As for the air flows entering the vehicle interior, they are regulated by means of a damper.
The heater can fail due to several important parts; in particular, most often the malfunction can occur due to the fact that the electric motor has stopped functioning properly or the radiator has leaked.
Step-by-step instructions for installing a new heater radiator
In order to correctly and accurately replace an old device that has ceased to function properly, first of all, as a rule, you should stock up on the necessary tools. In particular, if we are talking about replacing the radiator installed in the heating unit of a VAZ-2106 car, the car owner will only need a pair of keys (for “7” and “10”), as well as a screwdriver.
The first step is to open the stove faucet; this manipulation can be done by moving the control lever to the right side. Then you need to rid the engine cooling system of antifreeze.
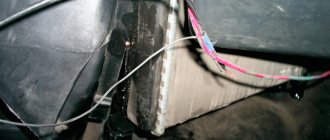
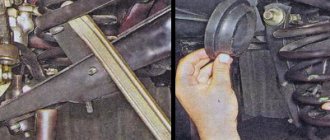
Replacing the heater radiator on a VAZ-2106 car requires unbending the brackets that hold the vacuum hose. These small structural elements are located in the engine compartment, holding the wiring harness. Thanks to the fact that the motorist can move the hose with the harnesses to the side, it will be possible in the future to easily begin working directly with the heating unit.
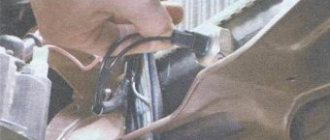
Further actions should be aimed at loosening the clamps; after reducing the fastening force, all hoses can be removed from the system. After both bolts securing the seal are unscrewed, with which the front panel is held in place, the motorist will be able to remove the seal without much effort by carefully pulling it along the pipes. It is important to take into account one important detail, in particular the spacers. These small elements of the system are located inside the seal, so it is important not to lose them when removing them.
The radiator of the VAZ-2106 stove can be upgraded only after removing the fan. It is worth noting that the unit should only be removed together with the machine casing. Immediately after this, you can begin to dismantle the heater radiator itself, carefully lowering the unit down to a level that will be directly determined by the control rod of the heater tap. When dismantling the device, it should be taken into account that the rear part of the radiator is lowered first, after which the pipes located in the niche of the front panel are removed.
The motorist must unscrew the bolt that holds the shell of the faucet control rod, and then remove the rod from the faucet itself. After this, not only the radiator can be removed from the vehicle, the faucet and pipes should be removed along with it. If you carefully unscrew a couple of bolts and remove the outlet pipe, you can quickly get rid of the gasket located on the pipe flange. After unscrewing the next two bolts, you should dismantle the faucet directly with the supply pipe.
The next thing to be removed is the gasket, which is fixed on the tap of the heating device. By unscrewing a couple more bolts, it will be possible to remove the supply pipe fixed to the heater faucet, so it will be necessary to rid the system of the gasket located on the supply pipe and faucet.
Before proceeding with replacing the main device, the motorist should first inspect both gaskets (on the inlet and outlet pipes). It should be remembered that these elements are interchangeable. In addition, the gaskets should not have any mechanical damage, and there should be no marks on them that hint at aging of the rubber. It is more expedient to replace these parts with new standard elements.
If the car owner was interested in how to remove the heater radiator on a VAZ-2106, then the described instructions, with the right approach, will allow you to do everything yourself in the shortest possible time. After dismantling, the car owner will only need to install a new radiator along with a faucet, in the reverse order described.
To make sure that their actions are correct, the motorist can check the heater radiator, in particular, by plugging all the holes in the device’s tank, supply air to it, which will have a pressure of at least 0.1 MPa. Then the unit should be placed in any container filled with water, and everything should be left there for at least 20–30 seconds. Any leaky place in the radiator with this approach will make itself felt by escaping air bubbles.
After a thorough check, it is necessary to position the rod shell, through which the stove faucet is controlled, in such a way that, when positioned in extreme positions, the adjustment handle can completely fix the opening or closing of the faucet.
At the end of the manipulation, you should fill the engine cooling system with antifreeze, check the tightness of the structure, as well as the functionality of the stove in the cabin.
Removing the heater radiator.
The first thing we need to do is remove the radiator. To do this, you will have to slightly disassemble the central panel of the car. Before removing, I recommend placing some kind of liquid reservoir under the pipes. Now we go to the engine compartment and unscrew the rubber pipes going to the stove.
After this, you need to unscrew the bolts securing the plug.
Then remove the rubber plug and rod from the heater tap. Now you need to unscrew the plastic fan casing and pull it out, making room for removing the radiator.
After we have pulled out the radiator, we remove the pipes from it using a 10mm wrench and move it all to a new radiator, having first replaced the old gaskets with new ones.
We put the whole thing back as we removed it, and the replacement process is over. All that remains is to add coolant and check the system for leaks; if there is a leak somewhere, tighten the bolts.
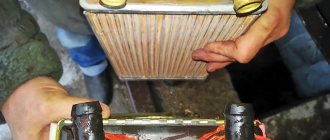
Radiator cleaning and repair.
If you have a copper radiator, you can clean it by unsoldering and cleaning the radiator channels from the inside, then soldering it back, or you can clean it with some kind of chemical. This is what you can sometimes see inside a radiator.
It seems to me that not everyone will want to tinker with something like this, so it’s easier to buy a new aluminum one and forget about it.
VAZ 2105 and 2107 cars have an absolutely similar design of all components and assemblies. Therefore, this article will help deal with the problem of two VAZ models at once. And what problem will we talk about today - the heater (stove).
Of course, drivers use this device very rarely, only 3-4 months a year. But very often a situation occurs when you need to heat the interior of the car, the heater does not work and cold air blows. Let's look at what could be the cause and what parts may need replacement in this article.
How to remove the radiator of the stove VAZ 2106
Repair
Next, remove the faucet control mounting rods and then finally remove the radiator from the car;
How to change
To do this you will need:
public keys 7 and 10;
Phillips screwdriver and flat screwdriver;
antifreeze supply is about 1.5 liters;
by pressing the entire heater control lever to the right, open the tap and drain the antifreeze from the heater radiator;
in the engine compartment, loosen the fastenings of the vacuum hose and harness and remove them from the side, thereby providing access to the heater hoses;
release the clamps, remove them from the nozzles;
then unscrew the two screws that secure the seal to the shield;
carefully remove the gasket from the radiator pipes so as not to damage it;
READ How to Enter Ford Mondeo Radio Code
Please note: two spacer washers are inserted into the gasket, it is advisable not to lose them.
remove the electric heating fan together with the housing (how to disassemble the electric fan is described below);
Warning. Disconnect the negative battery terminal before removing the electric fan.
How to wash off
You can use a brush instead of a brush. In fact, the process is not simple, it will not take much time. When preparing your car for winter, you need to wash its radiator and do it with great care and precision. Starting in the fall, you should check the cleanliness of the radiator. This will need to be considered both externally and internally. If during the inspection it is determined that the surface of the oven is not sufficiently cleaned of the presence of excess deposits, then the problem should be addressed by using a brush and brush. When the job is done, you should blow out the grate with compressed air. If, after removing the radiator, a rusty, cloudy liquid spills out from the heater, it is also necessary to clean the system from the inside. They do this by pouring a chemical solution designed to clean the cooling system. The radiator must be flushed without removing it from the cooling system. The entire cooling system of the vehicle's engine has been completely flushed. The chemical solution is poured into the expansion tank, it is located under the hood of the car.
There are many ways, but if you are not confident in your abilities, it is better to contact a service center where qualified technicians will help you. Car service workers wash radiators many times; they probably know what is best for a particular brand of car. It often happens that after flushing the radiator in the heater cabin, it is necessary to eliminate certain shortcomings that were made when assembling the car on the factory assembly line. By making diagnostics and adjustments, you can get your furnace operating at peak efficiency.
In most cases, the furnace does not work properly due to dirty radiator elements and inside. To fix this problem, remove the radiator and pressure wash it. To do this, you will need a hose, one end of which is connected to the faucet, and the other end to the radiator pipe. Then they turn on the water and wash away the dirt that forms in the radiator. However, this method does not always give the desired result, since oxidative deposits appear on the walls of the radiator and cannot be washed off with ordinary water, so additional money goes into battle. Citric acid will be a medicine. You need to take one and a half liters of water, bring it to a boil, add a small bag of citric acid and rinse the radiator with this solution. When the radiator is half full of water, cover the sockets and smash them well. Then open the nozzles and drain the dirty liquid.
READ How to Remove the BMW E36 Rocker
You should also flush the outside of the radiator as it is dirty on the outside.
But if you wash the radiator, as car owners say, you can cause harm only because you can bend the radiators with a large stream of water. This is possible if you use the sink incorrectly, but if you use it correctly, you will be fine.
To do this, take the vario nozzle, set the speed to maximum and wash it at a distance of 60 cm, not at a distance. This should be done at a right angle. After washing, reinstall the radiator.
You will spend a few hours troubleshooting, but later you should be able to use the car more comfortably while sitting in the warm interior of the car. Successful radiator flushing.
Repair
The heater blower motor has a hidden talent. After a certain mileage of the car, he begins to sing in a voice that could lead to Dzerzhinsky's stone. It starts making noise when the engine is cold and then calms down, but not for long. Therefore, when a malfunction first appears, it should be replaced immediately.
It is better to do this when we change the radiator itself, so as not to disassemble the entire structure again. Typically this cannot be recovered and can be thrown away clean.
The operation of the VAZ 2106 oven may affect the operation of the thermostat; it is worth paying more attention to the condition of the air ducts. they might just clog up the leaves. As you can see, it is not difficult to repair the VAZ 2106 stove, the main thing is to know the reason, and it can always be removed quite easily, and then your six will always be warm.
Procedure for replacing the heater VAZ 2106
The vehicle interior is heated by engine coolant. The heater design details are shown in the diagram. Many car enthusiasts only think about the heating system when it gets cold. But sometimes the heater can remind you of itself with an unpleasant smell in the cabin and the appearance of puddles of antifreeze under the feet of the driver or passenger in the front seat. This means that the heater core is leaking and needs to be replaced. This work can be done with your own hands. To do this you will need:
- open-end wrenches for 7 and 10;
- flat and Phillips screwdriver;
- Antifreeze supply is approximately 1.5 liters;
Replacing the heater radiator VAZ 2106
Open the heating valve and remove the vacuum hose and wiring harness
- Having moved the heater control lever to the right all the way, open the heating tap and drain the Antifreeze from the heater radiator;
- in the engine compartment, release the fastening of the vacuum hose and wiring harness and move them to the side, thereby providing access to the heater hoses;