Trouble-free operation of any car is impossible without a cooling system. The main element of this system is the radiator, which is a reservoir made of synthetic material or aluminum, equipped with fins on the left and right sides.
Constant circulation of coolant through special channels allows you to maintain a certain temperature regime necessary for normal engine operation.
Failure of the cooling device, leakage of coolant, or insufficient coolant level can ultimately lead to overheating of the engine and, ultimately, to its breakdown. The VAZ 2109 radiator can be repaired after identifying the main reasons that could cause a failure in its effective operation.
Removing the radiator and its subsequent installation in place must be performed on a cold car engine. Before installing a new or repaired radiator, you should check it for leaks.
To do this, just plug the pipes, lower it into a bath of water and supply air with a pressure of 0.2 MPa. If bubbles do not appear on the surface within 30 seconds, then we can assume that the device has passed the leak test. All work on repairing and replacing the radiator can be done independently with your own hands, without the help of a specialist.
Replacing the radiator of a VAZ 2109
Dismantling a failed cooling system device is carried out in the following sequence. Photos that accompany the entire dismantling process will help you easily and quickly cope with the task:
- remove the battery;
- drain the coolant;
- disconnect the wires of the electric fan switch sensor;
- unscrew the two nuts and two bolts that secure the electric fan casing;
- unscrew the two fastening nuts and remove the bracket;
- disconnect the block with the wires through which power is supplied to the radiator fan motor;
- tilting the casing with the electric fan towards the engine, remove the fan casing from the engine compartment;
- loosen the fastening clamps and disconnect the two upper hoses leading to the radiator;
- disconnect the lower hose;
- tilting the radiator towards the engine, remove it;
- remove the lower mounting pads from the radiator if they came out together with the radiator mounting pins. If necessary, in case of loss of elasticity and the presence of torn places, we replace them.
Installation of the cooling radiator is carried out in reverse order.
It is worth noting that one of the reasons for constant overheating of the radiator may be its clogging. In this case, it is enough to flush the radiator with high pressure of water.
When repairing an engine, you should immediately check the radiator for leaks.
Replacing the radiator VAZ 2108, 2109, 21099
≡ 4 November 2020 Category: Repair
The radiator should be replaced if its seal is lost, because sealing is not always effective. Replacing the radiator should begin by draining the coolant. It is better to do this on a cooled engine. There is no need to drain all the liquid; we drain it directly from the radiator. It is more convenient to remove the radiator itself together with the electric fan, and then disconnect it.
We start by using the “8” key to unscrew the engine protection, if any, from the side of the radiator drain plug.
If there is no drain valve, but there is a valve, then in order to drain the coolant without losses, spills, etc., you need to unscrew it with the expansion tank cap closed. First, you need to equalize the pressure in the cooling system to atmospheric pressure by opening the reservoir cap.
ATTENTION: DO NOT PERFORM WORK ON A HOT ENGINE! There is a risk of liquid splashing out and causing burns!
We place a container under the drain where the coolant will be drained. With the lid closed...
unscrew the valve...
By slightly opening and closing the expansion tank cap, we adjust this pressure. Next, unscrew the screws securing the air filter housing:
and air hose clamp:
Unplug the mass air flow sensor connector and remove the air filter housing,
while opening access to that part of the radiator where the pipes and steam exhaust hose are located:
We begin removing the radiator. Using the “8” head, unscrew the two nuts securing the pressure plate...
... and remove it.
Having tilted the radiator towards the engine, loosen the clamps on the radiator inlet pipe and steam exhaust hose.
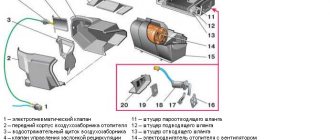
The symbols in the figure are as follows: 1. Steam hose 2. Inlet pipe 3. Inlet pipe clamp 4. Steam hose clamp
We also loosen the clamp of the outlet pipe located at the bottom of the radiator:
Disconnect the hoses and fan connector. We take out the radiator along with the fan and remove the fan. To do this, use the key “to 8”
unscrew the two nuts and two bolts securing the radiator.
We move the fan to the new radiator:
Let's put everything back together in reverse order. At the bottom, the radiator rests on two rubber pads,
which during assembly should fit into the holes of the cross member. We put the pipes on the radiator fittings and tighten the clamps. We screw on the radiator and air filter. Fill the coolant to the maximum. When filling, to reduce the formation of vapor locks inside the cooling system, it is necessary to remove the hose from the fitting of the throttle assembly:
We start the engine and check for leaks. After a while, check the coolant level; it may drop slightly. This indicates that all vapor formation and air pockets have disappeared. If necessary, coolant must be added.
Please rate the article
( 20 votes, average rating: 4.65 out of 5)
There were 10 comments left on the entry “Replacing the radiator of VAZ 2108, 2109, 21099”.
- Sergey:
09.12.2013 at 18:30
It’s detailed and clear, but the second half of the article without photos is a minus.
Answer
- Sanya:
12/21/2013 at 18:30
Thank you, everything is clear - now I’ll go to the store to buy a radiator.
Answer
- Stas:
05/16/2014 at 18:30
Tell me, who has encountered such a problem? The radiator drain valve broke off at 15k, i.e. half remained in it, and half in the hand). Is it really possible to get the thread out of there?
Answer
- Anatoly:
10/16/2016 at 16:47
This is a two year old question, but it might be useful to someone. You drill a 4-5 mm hole and use a square or a screwdriver (sharp edges are needed) into this hole and unscrew it.
Answer
- Paul:
06/07/2014 at 18:31
To avoid loss of antifreeze (antifreeze), you can use a hose that fits the diameter of the drain hole... and voila! Not a bit missed)
Answer
- Paul:
06/07/2014 at 18:31
I almost forgot, the expansion tank cap should be where it’s supposed to be, without any extraneous mechanical actions aimed at any change in its spatial location.
Answer
- Alexander:
09.21.2014 at 18:31
Everything is clear, thanks for the article. Remove the hose from the throttle body fitting and pour coolant. until it starts pouring out?
Answer
- Ivan:
09.21.2014 at 18:32
Alexander, no, it shouldn’t flow - the hose is above the level of the filler neck (or approximately at the same level). Coolant should be poured until the maximum level is reached.
Answer
- Alexander:
01/07/2015 at 18:32
Don't forget to turn off the "mass". We disconnect the “negative” terminal of the battery, and then go as described above!!!
Answer
- Georgy:
03/04/2015 at 18:32
Article on the case. My features: I could not disconnect the power connector from the fan. I was forced to unscrew the fan on the car and remove the radiator without the fan, which is not good.
Answer
Leave your comment
Click to cancel reply.
Replacement
Replacing the cooling radiator in a VAZ 2109
Read more: Tuning for T5 transporter
This part must be replaced if a leak is detected. But still, first it’s better to check it to make sure where the leak is coming from.
Examination
To check the radiator, you need to remove it (how to do this will be described below), plug all the pipes and lower it into a bath of water. Work must be carried out in a specially designated place (workshop, garage, etc.). We supply air under pressure to the bath. If bubbles appear within 30 seconds of air entering, then there is a hole in the radiator and you can even find it if you watch carefully.
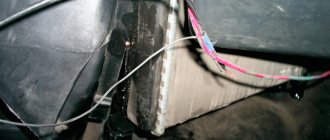
Removing the radiator
VAZ 2109 cooling radiator
- first of all, you should de-energize the battery or even remove it;
- Drain the coolant completely by opening the tap;
- If the car is equipped with a fuel injection system, then you need to remove the air filter.
Note. To quickly remove the air filter, press the latch with your finger or a screwdriver, disconnect the block with wires, loosen the clamp and remove the filter, first lifting its front part.
- now you need to cut the clamp securing the wire harnesses;
- disconnect the fan wire block;
- remove the throttle linkage clamp located on the fan casing;
- Now you need to disconnect the radiator outlet hose, which is connected to the thermostat;
- We also disconnect the supply hose connected to the cooling jacket pipe;
- remove the steam exhaust hose;
- It's time to unscrew the nut securing the radiator to the body from above.
Note. It is worth noting that the same bolt secures the fan casing.
- tilt the radiator towards the engine;
- remove it by moving it up together with the fan;
- now you need to loosen the clamps;
- disconnect all hoses from the radiator;
VAZ 2109 radiator cooling system diagram
- we unscrew the bolts and nuts that secure the casing with the fan and the radiator;
- disconnect the casing with the fan;
- You need to remove the two lower mounting cushions from the radiator.
Note. It is necessary to visually inspect the pillows and if they are torn or have lost their elasticity, replace them with new ones.
VAZ 21099 cooling radiator
Installation of a new radiator takes place in the reverse order. Don't forget to put on only the lower mounting cushions. We fill in new antifreeze and that’s it, the radiator is ready for use. It is definitely recommended to watch the corresponding video or photo materials while working with your own hands. The step-by-step instructions given above were written by specialists who know everything first-hand. Therefore, you need to comply with all its points. By learning how to change the radiator and other parts of your car yourself, you can save a lot on periodic repairs, the price of which is constantly growing.
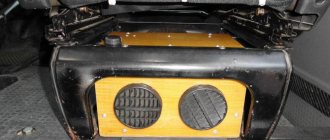
Dismantling the heater radiator on a VAZ 2110 – 2112
To remove the radiator, you will need the same tools as described in the previous section. During the preparatory steps, disconnect the battery and drain the coolant (the technology is the same as described above), then remove the frill and wipers. These operations are described in detail in the article repairing the windshield wiper trapezoid on a VAZ 2110. The radiator is located immediately behind the vacuum brake booster (VUT). To get to it, you need to remove the VUT. To do this, unscrew the two nuts securing the brake master cylinder (MBC) from the VUT and move the cylinder to the side. Then, from the passenger compartment (you may need to remove the driver's seat), unscrew the 4 nuts securing the brake pedal and pull out the VUT assembly with the pedal through the hood. Access to the heater radiator is open; it is located to the left of the place where the VUT stood. You can identify it by the rubber hoses that go with it. Unscrew the clamps and remove the hoses. Then unscrew the three fastening screws and pull the radiator to the right, remove it from the stove.
Heater radiator VAZ 2109
With the onset of cold weather, almost all VAZ 2109 owners are faced with problems. There can be many reasons for this, but one of the main ones is the failure of the heater radiator. Then, even at a normal coolant temperature of 90 degrees, barely warm air will enter the cabin, which will not be enough even to directly heat the windshield and side windows, not to mention creating a comfortable microclimate in the car interior. The heating device of the VAZ 2109 stove may fail or work with low productivity if there are air pockets. You can judge the presence of such a problem by the cold air coming from the cooling system deflectors when the tap is fully open. This problem can be solved in a fairly simple way: set the front wheels of the car on a hill, open the heater tap all the way and turn on the gas.
- The detection of coolant in the cabin can only indicate one thing: the heater radiator has lost its tightness and needs to be replaced. You can replace it yourself, without once again resorting to the help of a specialist; just study the provided photos well and follow the recommendations:
- it is necessary to drain the coolant from the car’s cooling system, while the tap on the interior heater must be completely open;
- on the right side of the stove there is a screw that is used to secure the rod clamp that regulates the windshield heating flap - it must be unscrewed;
- unscrew the three screws that are used to secure the heater radiator;
- remove the radiator from the heater housing;
- loosen the hose clamps and remove them from the heater radiator pipes;
- If necessary, we clean the device from dust, dirt, and foreign debris.
Installation is carried out in reverse order.
Very often, in order to reduce the noise of the stove fan, it is replaced with a more advanced model.
By watching the video provided, you can understand the entire work process in more detail.
Video lesson on replacing the radiator on a VAZ 2109 car.