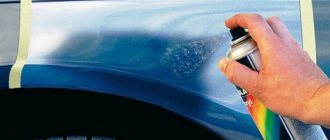
When spraying with a spray gun, part of the sprayed paint does not fall on the surface to be painted, but settles nearby. Most often this happens when part of the car has been primed or painted, but the rest has not been completely covered with camouflage materials. The pollen settles on other parts and dries out. It appears as very small spots on the paintwork. There are other types of pollen that can occur as a result of painting a house, fence or other structure, and the pollen is carried by the wind.
No matter how unsightly dust contamination may look, it can usually be successfully removed without damaging the vehicle's paintwork.
The content of the article:
- Cleaning clay treatment
- Removing pollen with an auto scrub
- Solvent cleaning
- WD40
- Removing dust by polishing
- Removing pollen from plastic
- Removing dust from glass
Cleaning clay treatment
Clay is well suited for cleaning any smooth, hard surface: paintwork, glass, chrome, mirrors, smooth plastic, wheels. The purpose of cleaning clay is to remove stubborn dirt, including pollen. Initially, body clay was invented in Japan precisely as a means for removing dust from the paintwork of vehicles. This is one of the safest ways to clean the body. Cleaning a surface with detailing clay is not always easy and not all surfaces can be cleaned with it. For example, pollen from structural plastic will be difficult or even impossible to remove using this method.
Overall, cleaning clay does a good job of removing pollen. Especially if the car has a protective coating (wax or sealant), then there should be no problems. Dust may only be a problem on a freshly painted vehicle that is not protected by wax.
Detailing clay comes in different grades. The more “aggressive” it is, the more serious stains it can remove, but the risk of micro scratches that will need to be removed by polishing increases. Start with a softer grade (fine grade) and, if necessary, move to a harder grade.
When cleaning in this way, you need to use a sufficient amount of detailing spray or a special “lubricant” so that the clay slides freely over the surface and does not cause any damage to it. The lubricant can also be a simple soap solution.
If you are using new clay, it will be a little hard at first, so you can dip it in warm water and squeeze it to soften it.
To effectively remove pollen, as well as other stubborn dirt, follow these recommendations:
- First you need to wash your car thoroughly.
- Work in stages, clean in sections of 50 cm by 50 cm, do not tackle everything at once. This way you can monitor your progress.
- Spray enough "lube" so that the clay can slide in different directions.
- Initially, the clay will resist sliding on the surface due to its resistance to dirt and dust. As you work the paint and remove unwanted particles, the clay will begin to move more freely.
- With very “stubborn” pollination, there are often cases when it is necessary to repeatedly treat the surface to completely remove particles.
- The longer you use clay, the more impurities it will accumulate. Crumple it as needed to reveal a cleaner area.
- Sometimes it is impossible to remove dirt in this way if the particles are old, from durable industrial paint.
- If the cleaning was successful, then you should carefully inspect the treated paint and, if necessary, polish it to remove possible defects. In most cases, a universal polishing paste, such as 3M with a green cap, will be suitable for this. It would also be a good idea to protect the body with wax or sealant.
How to remove smudges after painting a car? Several possible solutions to resolve the problem.
You will encounter smudges when applying paintwork only if you decide to do all the painting work yourself. Indeed, in workshops, such defects are simply not allowed to be issued to the client, or you will have every right to demand that this unpleasant fact be corrected.
Often, lack of experience with the same spray gun or poor choice of materials leads to uneven application of the layer, and the paint or varnish begins to slide over the coating. And if you are faced with such a problem, then the first thing that will interest you is how to remove paint smudges on a car, and whether you will need to completely redo the whole job. Everything, of course, depends on the situation; if the area of defects is too large, then you will definitely need to sand and reapply the material, but if the drops are located locally, then they can be carefully removed. In this article we will look at techniques for eliminating smudges after painting a car.
Reasons for the appearance of smudges and drops on the coating
First, let’s better understand the question of what are the main reasons for the appearance of these defects; this is necessary primarily for those who have not yet started work.
The list of factors is quite lengthy:
- low quality paints and varnishes.
- an incorrectly selected solvent or failure to comply with the proportion of paint dilution, which makes it too liquid and does not adhere well to the surface.
- incorrect settings of the spray gun and compressor, or applying the material at the wrong angle, and often the tool is moved too far from the surface. Here you need to follow the application technique.
- ingress of dust and insects.
- lack of temperature control, which at low temperatures leads to slow setting of the material and the formation of drops and smudges on the surface of the car body.
- failure to adhere to the drying regime between layers.
- lack of experience to apply a uniform layer of material.
These are basic things, and most of the nuances can be eliminated if you first try to apply the material to a test surface, set up the tool correctly and fine-tune the operating technique. Also pay special attention to the preparation of the workspace, this concerns the cleanliness and temperature of the room.
What will you need for the job?
Before starting work, you need to prepare the tools and consumables that you will need to remove paint smudges on your car.
Here is a list of necessary devices and materials:
- Sandpaper grades: R-600, R-1000, R-1500, R-2500.
- Rubber or wooden block.
- Napkins and rags.
- Soapy water.
- Thin and sharp blade.
- Universal putty.
Article on the topic: Features and technology of painting cars with mother-of-pearl. What do you need to know?
Also prepare personal protective equipment such as gloves, a respirator and safety glasses.
Technology for removing large paint smudges on a car
To remove large paint deposits, you need to wait until the applied coating is completely dry. If you start removing a still wet layer of material, then there is a high probability that you will also touch the primer, and this is a more serious repair, since you cannot leave exposed metal, this will lead to corrosion. Dried smudges of paint can be easily cut off and give you room to maneuver.
There is no guarantee that you will be able to carefully cut off and clean up all the stains, and the quite expected result may be the presence of small shells and chips in the area being treated. Here, as they say, you need to try.
Instructions for removing the defect are as follows:
- We cover all nearby untreated areas of the body with masking tape and film so as not to touch them.
- Using a blade, carefully cut off the top layer of excess paint.
- We take a block and abrasive grade P600. We wet the sandpaper in soapy water, which will provide some sliding on the surface and reduce the risk of tearing off the paint, and gradually sand the surface. You need to control the process, and as soon as you see that on the smudge of acrylic paint the edges of the smudge are starting to come off, and you are approaching the main paintwork, then you need to change the abrasive to grade P1000, then P1500 and do the finishing grout using P2500.
After this, if you were able to remove the smudge, then apply varnish; if you treated the varnish coating, then polish the surface using paste and a grinder.
Also, some craftsmen use a second option for removing smudges on the body - this is the use of universal putty. This technique is used if it is necessary to remove a defect before the coating has completely dried. The point is this. A thin layer of universal putty is applied to the problem area of the part. After adding putty for about 10 - 15 minutes, but no more, the area begins to be sanded with abrasive paper, as in the previous version, until the buildup is completely eliminated. After which the putty is washed off from the car body. Speed of work is important here. After all, if you leave the material on for more than 45 minutes, the putty will harden so that it will be very difficult for you to tear it off the surface of the car.
Removing small paint stains
It is much easier to deal with minimal paint splatters. For example, if you notice that a small drip has formed during application, you can turn the part over in the opposite direction and wait for it to spread over the entire surface. If it has formed after a short drying period, then you can apply another additional layer of paint to hide it along the thickness of the defect. And the third option is drying and removing excess according to the option discussed in the previous paragraph of the article. The only difference is that at the start you can start with fine-grained sandpaper P1000.
Related article: Theory and practice of painting stamped wheels from A to Z
Often small smudges form during local repairs of the coating, especially when using transition painting. When eroding the edges with paint thinned with solvent, beginners often experience mini-defects, but these are eliminated by polishing with P2000 abrasive.
What if smudges formed on the primer?
How to be in this case? They will need to be removed 100% so that no bumps appear later when applying the finishing coat. But it’s even easier to work here, because this is not a finishing layer and you will additionally apply several more layers of materials. Sagging can also be cleaned off using sandpaper, but for primer use grades P240 and P400, using them in turn.
There are other types of gravitex paints on the market. When working with such a material, sagging and smudges may also occur; removing them is much more difficult than when working with acrylic, so they are either filled with an additional layer of material, or the layer is removed with a solvent and reapplied.
Where do leaks most often occur on cars?
In addition to the main surfaces such as the hood, there are places where you can often notice the presence of smudges and the inexperienced hand of a craftsman. Typically these are the lower edges of doors and skirts, as well as vertical planes. Often too liquid paint, applied in a large layer, slides to the edges of the part and sets there.
By paying attention, for example, to the edges and edges of parts, you can see poor-quality repairs to the paint layer, for example, when buying a car, and either complete the inspection or ask for a discount from the seller.
You need to understand that viscosity is one of the characteristics on which the formation of smudges depends. There are special devices that help painters determine the ideal consistency of the material. To avoid smudges, it is better to apply the paint in thin layers and wait until the viscosity of the first layer increases to such a state that it can withstand the next layer and not slip, in other words, dry the layers. The second layer can be applied at a greater depth. In the case of thick paint, there are no options; you will need to apply deeper layers and make sure that shagreen does not appear.
We looked at the reasons for the appearance of these defects and how to remove paint smudges on a car on your own. We hope you found the material useful. How do you deal with paint or varnish build-up when restoring paintwork?
Removing pollen with an auto scrub
Auto scrub is an alternative to cleaning clay and is produced in different versions - a circle (for working with a polishing machine, as well as manually when using a special holder), a mitten, a towel, a sponge (for working manually). It can have different gradations (aggressiveness of impact). When using an autoscrub for machine processing (Autoscrub Foam Pad), it is recommended to use a dual-action (eccentric) polishing machine, since a rotary machine will be too aggressive on the paintwork.
Auto scrub is used with a lubricant or soap solution.
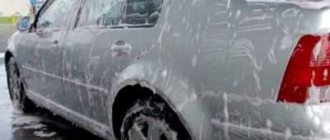
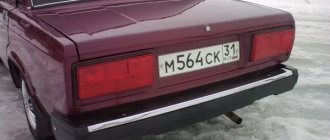
The close-up photo shows pollination along with traces of water droplets. This contamination occurred when the car was parked close to workers who were painting something. The most damaged part was the trunk lid. The surface was very rough, and the contamination was not washed off.
For cleaning, a medium grade Nanoskin Autoscrub wheel was used on an orbital polisher with a large amount of lubricant (diluted Nanoskin Glide). This is a foam circle combined with a very soft rubber surface. After removing dirt and wiping with microfiber, the surface was polished.
Solvent cleaning
Some solvents can more effectively remove paint particles from a paint surface without damaging it. This method works best on relatively fresh pollen.
It is difficult to say which solvent is best, since different solvents act differently on different paint particles. Most often, acetone or compositions based on it are used to remove pollen.
If you are going to try different chemicals, test them on a small, inconspicuous area of the body. It’s even better to test the effect of the solvent on an old, unwanted body panel. If the paint coating does not react to the solvent, then you can try to wipe off the paint particles with it. Always wash off the chemical very quickly after application. Long exposure may dull the paint.
Can acetone damage a car's paint?
It all depends on how long the acetone is in contact with the car's paintwork.
Acetone is a fairly strong solvent. However, its careful, dosed use helps to clean the body of various difficult-to-remove contaminants, including dust. You also need to remember that it will remove any body protection (wax/sealant) and it will need to be restored.
Automotive paint coating is quite durable and inert to many chemicals. Modern cars are painted either with two-component paints and varnishes (with a hardener), or cured in special chambers under the influence of elevated temperatures. For example, most one-component spray paints will be less chemically inert and, even after drying, can be easily damaged by exposure to solvents.
Acetone evaporates very quickly, so it usually has no effect on a car's paintwork. If it is left in contact with the paint for too long, it can take effect.
How to remove old paint from a car. Three options for solving the problem.
If you plan to restore the paintwork of your car, then in any case you will need to remove the old paint from the car. Of course, if the old layer of paint holds well, then you can leave it, only matte the surface and apply a primer. But both with complete and local paintwork repairs, you will in any case need to clean the car of paint, and if you plan to do everything yourself, then without knowledge of all technologies it may take you a lot of time and effort at this stage of work. We will try to offer you some of the most effective solutions to this issue.
What is needed to carry out the work?
Tools and consumables will largely depend on the method you choose for removing the coating from the car body, as well as on the type of part that you plan to restore, whether it be wheels or a car bumper. But there is a basic set that you will need.
- Personal protective equipment. Goggles, gloves, respirator and protective clothing.
- Grinding machine and abrasives grades P220 and P400.
- Water.
- Spatula.
- Brushes.
- In some cases: paint remover, sprayer with compressor, etc.
You will also need detergents to pre-clean the surface from dirt and dust.
Basic ways to remove paint from a car
Based on their technology, there are three main approaches on the market: chemical, mechanical and thermal. Each method has both pros and cons.
In order to use the chemical method, you will need to buy paint remover and a brush to apply it to the surface of the car body. You will also need a spatula.
When machining, a grinding machine and abrasives of various sizes are used, sometimes sandpaper with a block to remove the coating in hard-to-reach places.
For heat treatment, you will need a good industrial hair dryer or blowtorch complete with a scraper and a stiff metal brush.
Related article: Determining how many liters of paint are needed to paint a car. Tips and approximate figures.
Chemical method
This is one of the effective options for removing paint from a car. Its essence is simple, you apply the material to the surface with a brush, wait 10 - 20 minutes and then use a scraper to remove the old layer of paint. After you apply the chemical composition to the problem area of the body, its reagents will begin to destroy the enamel resin and it will begin to move away from the metal surface.
There are two types of such paint remover:
- Organic product based on turpentine and acetone. It dissolves the dried film of paint and makes it possible to remove it with a scraper.
- Acidic or alkaline composition. It contains aggressive components that corrode the paintwork.
There are also cases when formic or phosphoric acid is used to clean paint from a car. Chemical compounds are often used to remove paint in hard-to-reach places where it is impossible to reach with a grinding machine.
Remember about personal protection when working with chemicals; do not allow this material to come into contact with the skin or other parts of the body. To do this, use goggles, gloves, a protective suit and a respirator.
If you locally need to remove a small area of paint, then for these purposes you can use white spirit, solvent No. 648 or R-4.
Work technology:
- We put on protective equipment.
- We dismantle plastic and rubber linings that may be damaged by exposure to chemicals. Cover the glass with film.
- Using a brush, apply the product to the car body.
- Wait the period specified in the instructions, usually 10 - 20 minutes, and remove the paint layer with a spatula.
- For those areas where paint remains, you can repeat the procedure or clean it with a sanding machine.
- Washing the car body with water.
At this point all work is completed.
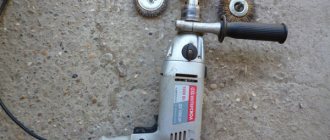
Mechanical method
This is a more labor-intensive option for removing acrylic paint from a car. To implement it, use a grinding machine and, in rare cases, for local repairs, sand the surface manually using sandpaper.
Related article: Restoring the paint layer of your car using a scratch removal pencil
The technology of work is as follows:
- We put on personal protective equipment, including a respirator.
- Remove the old paint layer using a sander with abrasive P
- We sand the surface again with P400 abrasive.
- In hard-to-reach places, paint can be removed either with sandpaper or chemical compounds.
- Surface washing.
Mechanical methods for cleaning old paintwork include sandblasting, which uses a compressor and a sprayer that supplies air with sand under high pressure and thus, acting on the car body, removes a layer of paint.
Thermal method
This is another option for removing paint from your car. Typically, the surfaces to be treated are removed from the body, all plastic linings are removed from them, and under the heat of an industrial hair dryer, gas torch or blowtorch, the paint layer is heated and then removed with a scraper.
The technology looks like this:
- We put on protective equipment.
- We dismantle the part itself and all the plastic and rubber linings.
- We heat the surface in strips of 2–5 cm and immediately remove the old material using a spatula.
- Car wash
At this point, the heat treatment is completed, and you can proceed to the next steps.
What about plastic?
In addition to the metal elements of the car body, the task is often to remove paint from plastic parts, which also need restoration.
In this case, both chemical compounds and heat treatment will not suit you. The only solution is a mechanical cleaning method. But there are moments here too. It is better to scrape off the material manually in order to control the depth of removal and prevent heating and damage to the plastic itself when working with a sander. Do not use an angle grinder for these purposes; it has high speeds and due to heating it can melt the plastic.
That's all, we've looked at the most commonly used methods for cleaning old coatings in practice. What method did you use? We look forward to your comments below.
WD40
WD40 has many different uses, including for automobiles. There are no ingredients in this product that could damage the paint. WD40 is often used to remove tree sap, sticker marks, and even bird droppings from your car body. To remove pollen, it is better to let the product act on the dirt for a while, then you can gently wipe off the paint particles with microfiber. This is not the most effective method, but WD40 can wipe off dust from some paints.
Removing dust by polishing
If you try to remove dust by polishing it with a foam pad and abrasive paste, it will not work or will not remove particles effectively. The foam will just slide over the little paint bumps instead of removing them. If you use a wool wheel with a rotary machine, it will remove some dust, but it will also remove a layer of paint, and there may be additional scratches from the removed particles that will remain on the wheel.
It makes sense to polish the paintwork only after removing paint particles in order to remove any remaining marks. To clean before polishing, you can use either the methods described above or sanding with water using fine abrasive sanding paper P2000. It is better to do this by wrapping sanding paper around a hard block or large eraser. You can use a coarser P1500 abrasive, but then you will need to remove larger marks from this abrasive with P2000 paper. After sanding, the paintwork will become matte. Polishing with an abrasive paste will restore shine (see the article “Do-it-yourself body polishing”).
Removing pollen from plastic
Painted plastic is processed in the same way as the body. For unpainted, smooth plastic, one of the best cleaning methods is to use a cleaning clay.
Cleaning the structural plastic can be a problem. There is no specific product for removing dust from textured plastic parts. Such plastic parts do not have a smooth surface.
Since plastic is sensitive to dissolution and deformation, you are limited in the type of chemicals you can apply. However, some plastics are quite resistant to some solvents. For example, polyurethane (PP) has good chemical resistance. Most plastic car bumpers are made from polyurethane. To remove paint particles from plastic using a chemical such as acetone, first test its effect on an inconspicuous area of the plastic part.
You can try using #0000 grade steel wool with an all-purpose detergent. This method also needs to be tested first in an inconspicuous place.
If you can’t clean the structural plastic, then you can carefully remove individual points with the sharp thin part of a stationery blade.
How to make a composition for removing paint from a car body
There are several folk recipes for compounds that can replace auto chemicals available in specialized stores. Here are some of them:
- A solution of 30% caustic soda. Suitable for processing individual parts, since the composition does not act very quickly - it will take about 12 hours to dissolve the paint. If you use it on vertical surfaces, the composition drains quickly and is not as effective;
- A solution of wood alcohol, benzene and paraffin in a ratio of 1:8:1. The solution must be applied to the surface to be treated for 2-3 hours.
( 106 votes, average: 4.55 out of 5)
Raptor paint for car body protection
Applying wax to a car body