As you remember, last time we looked at how to replace the timing chain and sprockets with new ones. However, before installing the valve cover in place, it is necessary to adjust the thermal clearance in the valve drive. Today we will analyze this moment.
The gap is adjusted after work involving intervention in the gas distribution mechanism, when a loud knocking occurs on a warm engine, and also every 10 thousand kilometers (according to the operating manual). Before work, you need to check and adjust the chain tension, which we did earlier. The adjustment is carried out with a flat, wide feeler gauge 0.15 mm thick or an adjusting rod at an engine temperature of 20 C°, however, it can also be done at a different temperature by making the necessary adjustment.
| The release can be ignored |
However, it should be borne in mind that then you will need a set of probes of various thicknesses.
Rack adjustment is considered the most accurate for setting the clearance, even with significant wear on the camshaft and valve levers (rockers). Using a feeler gauge to set the correct gap on parts even with low production is already problematic, but this option is simpler and more accessible in garage conditions. So, we will need:
- socket wrenches “8”, “10”
- wrenches “13”, “17”
- flat screwdriver
- special wrench or socket for the crankshaft nut (ratchet)
- probe 0.15 mm
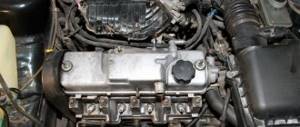
Before starting work, you must turn off the engine and allow it to cool to the required temperature. Remove the cylinder head cover, having first removed or moved aside the interfering pipes and filters.
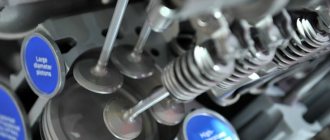
Now you need to install the crankshaft and camshaft to the position of the top dead center of the 4th cylinder (TDC), aligning the factory marks on the crankshaft pulley and camshaft sprocket with the corresponding ebb marks on the engine body.
This can be done using a special wrench (or socket), turning the crankshaft by the nut clockwise.
Or by jacking up the rear wheel and spinning it in 4th gear, we ensure that the marks match.
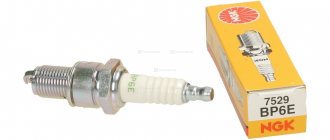
To make work easier, you can unscrew the spark plugs and remove the alternator belt. So, in this position we can adjust the thermal clearance on the 8 and 6 valves. Sequential numbering starts from the camshaft sprocket.
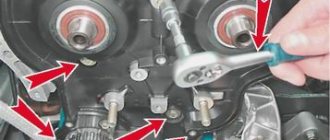
To do this, insert the dipstick into the gap between the rocker and the camshaft cam. If it fits quite freely without noticeable resistance or, conversely, when it “bites”, it is necessary to make an adjustment: use a “17” wrench to loosen the lock nut of the adjusting bolt and use a “13” wrench to tighten or unscrew the bolt, having achieved the required clearance, tighten the lock nut back.
When tightening the locknut, you must keep in mind that the gap will decrease slightly, so an adjustment should be made. It is unlikely that you will be able to select the gap the first time - as a rule, this comes with skill.
After adjustment, the probe should enter with noticeable force, bend a little, but not “bite”. Consistently turning the crankshaft 180° (camshaft 90°), we check and adjust the clearances of the next pair, observing the order.
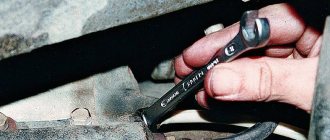
To make adjustment work easier, additional marks can be applied to the crankshaft pulley and camshaft sprocket.
After the adjustment is completed, the crankshaft should make almost two revolutions, and the camshaft should make almost one revolution. We check again the tightness of all locknuts. To be on the safe side, you can crank the crankshaft and check the clearances again.
Reinstall the removed parts in reverse order.
Subscribe to the blog! Good luck on the roads!
Source: https://autovazremont.blogspot.com/2018/02/regulirovka-zazora-klapanov-vaz-2107.html
Adjusting valves on VAZ 2101
Home › Cars › VAZ ›
Welcome!
Valve adjustment is currently an integral part of all engines that do not have hydraulic compensators.
What are hydraulic compensators? In short, thanks to them, the valves open and close with the most even gap, and therefore the valves no longer need periodic adjustment, and their smooth stroke is also created, thanks to which the engine runs quieter and softer. But today we will not talk about hydraulic compensators, but about valve adjustments on cars of the “Classic” family.
Note!
To adjust, you will need the following tools: First, stock up on a basic set of wrenches, and you will also need screwdrivers, a flat feeler gauge for adjusting valves with a thickness of “0.15 mm” and finally, you will need to stock up on a special wrench for turning the crankshaft! (If there is no special key, then in this case you can use a “36” head instead)
When should valves be adjusted?
Valves require adjustment when:
- If a knock appears in the area where the valves are located, the knock can only be heard when the car engine is running.
- And so they must be adjusted after work, during which the camshaft was removed from the car.
Note!
As a note, keep in mind one important detail: when operating a car, the valves develop gaps over time, which do not lead to emergency engine breakdowns, but only disrupt its operation, as a result of which the parts of the valve mechanism will wear out faster!
How to adjust valves on a VAZ 2101-2107?
- First, remove the cylinder head cover. (For information on how to remove the cylinder head cover, read the article, “Setting the valve timing by marks,” in the “removal” section, from point 1-10)
- Then set the piston of the fourth cylinder to the TDC position. (For information on how to install the piston of the fourth cylinder to the TDC position, see the article “Installing the piston of the fourth cylinder to the TDC position”)
- Then adjust the "eighth and sixth" valves, but before you start adjusting them, check if they need adjustment, to do this:
- Insert the feeler gauge into the valve gap and see how it moves there.
Note!
When you insert the feeler gauge into the gap, it should move there with little difficulty, but if it moves smoothly in and out of the gap, then the valve needs adjustment!
- If the valves need adjustment, then:
- Insert the probe into the “sixth or eighth” valve and then use the key indicated under the letter “B” to loosen the lock nut.
- At the same time, use another key to set the gap in the valve that you need by unscrewing or tightening the adjusting bolt, which is marked with the letter “A”.
- And to complete the operation, tighten the bolt indicated under the letter “B”.
- Next, read the “Valve Adjustment Sequence” section just below and adjust all the remaining valves on your car.
In what order should the valves be adjusted?
Note!
Before you start studying, remember one thing that will be indicated in the instructions, namely, it will say that the crankshaft will need to be turned “180°”, which means half a turn! (The crankshaft revolutions are easy to understand by following the mark on the camshaft)
- You should start adjusting the valves:
- First from the “sixth and eighth” valves.
- Then you will need to turn the crankshaft clockwise, strictly 180°, and then begin adjusting the “fourth and seventh” valves.
- Next, turn the crankshaft 180° clockwise again, and this time adjust the “first and third” valves.
- And to complete the work, turn the crankshaft 180° clockwise again, and then adjust the “second and fifth” valve.
Important!
- Do not disturb the sequence of valve adjustment!
- The valves need to be adjusted only on a cold engine!
- For newbies!
- Question: What does the gap adjustment feeler look like?
- Note: The photo shows two types of probes!
Additional video:
Especially for you, we have prepared an interesting video, after watching it, most of your questions about valve adjustment will most likely disappear, but if you still have questions, then ask them in x and we will answer them for you.
Source: https://www.vazzz.ru/regulirovka-klapanov-na-vaz-2101/
How to adjust valves on a VAZ 2101-2107?
1) First, remove the cylinder head cover. (For information on how to remove the cylinder head cover, read the article, “Setting the valve timing by marks,” in the “ removal ” section, from point 1-10)
2) Then set the piston of the fourth cylinder to the TDC position. (For information on how to install the piston of the fourth cylinder to the TDC position, see the article “Installing the piston of the fourth cylinder to the TDC position”)
3) Then adjust the “eighth and sixth” valves, but before you start adjusting them, check if they need adjustment, to do this:
1. Insert the feeler gauge into the valve gap and see how it moves there.
Note! When you insert the feeler gauge into the gap, it should move there with little difficulty, but if it moves smoothly in and out of the gap, then the valve needs adjustment!
4) If the valves need adjustment, then:
1. Insert the probe into the “sixth or eighth” valve and then use the key indicated under the letter “B” to loosen the lock nut.
2. At the same time, use another wrench to set the valve gap you need by unscrewing or tightening the adjusting bolt, which is marked with the letter “A”.
3. And to complete the operation, tighten the bolt indicated under the letter “B”.
5) Next, read the section “Sequence of valve adjustment” just below, and adjust all the remaining valves on your car.
In what order should the valves be adjusted?
Note! Before you start studying, remember one thing that will be indicated in the instructions, namely, it will say that the crankshaft will need to be turned “180°”, which means half a turn! (The crankshaft revolutions are easy to understand by following the mark on the camshaft)
1) You should start adjusting the valves:
1. First from the “sixth and eighth” valves.
2. Then you will need to turn the crankshaft clockwise, exactly 180° and then begin adjusting the “fourth and seventh” valves.
3. Next, again turn the crankshaft 180° clockwise, and this time adjust the “first and third” valves.
4. And to complete the work, turn the crankshaft 180° clockwise again, and then adjust the “second and fifth” valve.
Important! 1) Do not disturb the order of valve adjustment! 2) The valves need to be adjusted only on a cold engine!
For newbies! Question: What does the gap adjustment feeler look like? Note: The photo shows two types of probes!
Adjusting valves VAZ 2101
Valve adjustment is a very important procedure, on which a lot depends, for example: stable engine operation, fuel consumption, power and normal engine starting. Not all motorists know how to adjust valves; the vast majority entrust this work to service station specialists, others turn to friends and acquaintances for help, and there are those who know the adjustment procedure and do it themselves .
Today I will talk about how to adjust the valves on a VAZ 2101 with your own hands
Before you begin adjusting the VAZ 2101 valves, you need to acquire all the necessary tools, so as not to be distracted later, for this work you will need the following set:
- Flat feeler gauge A.95111, its thickness is 0.15 mm or a special device for adjusting the gap between the camshaft cams and levers.
- Spare valve cover gasket (you never know what might happen, you’ll break it by accident...)
- Screwdriver Set.
- Set of socket and open-end wrenches.
VAZ 2101 - valve adjustment
When servicing the engines of classic Lada cars, a number of tasks arise, neglecting which is simply criminal in relation to the engine. Checking the thermal clearance of the valves and, if necessary, adjusting it is just that case. The VAZ 2101, as the most striking representative of the classics, is an unpretentious car to maintain and quite durable, however, it also needs to be given attention.
Content:
Valve clearance value
The thermal clearance of the valves in the gas distribution mechanism is necessary in order to compensate for the thermal expansion of the cylinder head parts and the cylinder head housing itself. If you do not adjust or check the gap in time, the entire gas distribution mechanism will not work correctly, which will lead to a significant loss of power, unreasonably high fuel consumption and instability of the engine in any mode.
The plant recommends checking the thermal gap at least every 15-20 thousand km, although many reduce this interval, knowing about the quality of oils and spare parts.
Be that as it may, you need to check the gap not only based on the service mileage, but also on the behavior of the engine.
A characteristic knock in the gas distribution mechanism, as well as those manifestations that have already been mentioned, can indicate a violation of the thermal gap.
VAZ 2101 on gas and fine adjustments
The valve timing in the VAZ 2101 engine, valve adjustment of which is on the agenda today, is designed in such a way that they not only ensure optimal filling of the combustion chamber with the fuel-air mixture, but also facilitate purging of the combustion chamber at the end of the power stroke. This allows the engine to work at full efficiency and optimal consumption of gasoline or gas.
By the way, the VAZ 2101 on gas also requires adjustment of the thermal gap, but an allowance of 0.05 mm must be taken into account. This is required by the higher octane number of the gas mixture compared to gasoline and slightly different operating conditions of the gas distribution mechanism under the influence of higher temperatures.
Checking the thermal gap
First, let's check the thermal gap and do this after 15 thousand mileage, regardless of whether a violation of the nominal value appears or not. To do this, you will need a minimum set of tools and this table, which indicates the procedure for adjusting the valves.
As you can see, measurement and adjustment must be carried out in strict accordance with the angle of rotation of the crankshaft relative to the marks on its pulley and the front engine cover. The ratio of the marks is shown in the photo below. As an option, and to avoid mistakes, you can put bright marks with a marker on the camshaft drive gear. Like that.
The mark on the camshaft housing boss coincides with the mark on the gear when both valves are closed on the fourth cylinder, which corresponds to position number one in our table.
To control the gap between the valve and the lever, you must have a device for adjusting the valves or a minimum standard set of tools and an adjustment probe for adjustment with a working part thickness of 0.15 mm. It is probably not worth describing the process of dismantling the air filter and its housing. The only thing is that it is advisable to place a piece of rags in the carburetor so as not to drop a nut or some other small thing into the manifold.
Adjustment technology
After this, the valve mechanism cover is removed and the crankshaft is set to the initial position, according to the table and photo with marks. Valve measurements and adjustments are carried out only on a cold engine. That is, its temperature should not exceed 20-30 degrees. Schematically, the technique for adjusting or checking gaps looks like this:
- The crankshaft is aligned according to the mark, and the mark on the drive gear should coincide with the boss on the camshaft housing. In this position, the fourth piston is on the compression stroke, which means both valves must be completely closed.
- After this, the gap in the levers of the fourth cylinder is checked with a feeler gauge; based on the table, these are the eighth and sixth cams. The dipstick is inserted between the lever and the camshaft cam. With a normal gap, the feeler gauge should pass with noticeable force.
- If the gap is small and the feeler gauge does not pass between the cam and the pusher, the lock nut is unscrewed and the gap is brought to the nominal value by rotating the adjusting screw.
- After tightening the locknut, the clearance must be checked again.
The gap is adjusted in the same way on the remaining cylinders after rotating the crankshaft to the specified angle.
Actually, that's all you need to know about adjusting the gaps. After checking, it is advisable to replace the valve cover gasket, especially if it has already lost its elasticity. Good luck with all the adjustments and quiet valves on your dime!
VAZ 2101 - engine tuning
Source: https://ladamaster.com/vaz-2101-regulirovka-klapanov
Adjustment of valves
If knocking, unstable operation, or increased vibration occur, you should pay attention to the valves.
If the valve timing of the gas distribution mechanism is disrupted, they do not operate accurately, that is, the full volume of gas does not enter the working area of the cylinders, complete combustion of the fuel-air mixture in the working chamber does not occur, and the cylinders are not purged. This is all accompanied by the appearance of a shock load on the camshaft cams on the drive lever and the shaft rod. Fuel and engine oil consumption also increases. What happens if you drive with unadjusted valves? Answer: rapid wear of engine parts, increasing cost and repair time.
Rubber oil deflectors, also known as oil deflectors, also burn out due to a burnt valve cap, which leads to increased engine oil consumption. If the wear of engine parts is large, then it may be better and easier to do an engine swap with your own hands or at a service station.
Even if your engine does not have a belt drive, but a chain drive, then if you do not change the chain before its service life expires, the valves will bend on the piston, as, for example, in the sr20det engine manufactured by Nissan.
Adjusting valves VAZ-2107, VAZ-2106, VAZ-2101
Good afternoon dear friends. Today we will tell you how to independently adjust the valves on a VAZ-2107, VAZ-2106, VAZ-2101, and any other classic engine as accurately as possible.
Since rockers and valves tend to wear out, there is no way to ideally adjust the valves with an ordinary feeler gauge on an already running engine; there will still be an error, and depending on the production of certain parts of the engine head, this error can be quite large.
To avoid problems, we use a micrometer to adjust the valves. It is ideal for this task; it allows you to adjust the valves as accurately as possible, regardless of the degree of wear of engine parts.
So, we have an adjustment rack with an indicator (micrometer) and a cooled engine (the valves are adjusted on a COLD engine). I would like to note that before adjusting the valves, I would recommend checking all the timing marks and tensioning the chain.
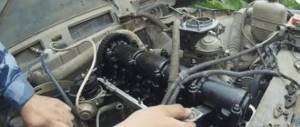
So, let's go, first we remove the carburetor "casket" from the car, pull off the breather hose from it and put it aside, then unhook the gas pedal drive, then unscrew and remove the engine valve cover.
We also recommend removing the cap from the ignition distributor before making adjustments - it will be much more convenient. This is what our engine looks like after all these procedures:
- As a further recommendation, we recommend unscrewing the spark plugs - without them it will be much easier to crank the engine. We turn the engine using a special wrench on the flywheel until the marks on the camshaft sprocket align with the mark on the bearing housing, as in the photo below:
- At the same time, the marks on the crankshaft pulley and on the engine must coincide.
To make it more convenient to adjust the valves, take a bright marker and place marks on the camshaft sprocket every 90 degrees relative to the factory mark. It is better to do this from the front side of the camshaft sprocket.
- In principle, according to this manual, you can adjust both with a probe and a rack, but in this article we will describe the option with a rack, it is more accurate.
- Well, let’s take the rack and screw it onto the camshaft bed mount:
Pay attention to this point: if you tighten all three screws of the rack all the way, it will dangle. Therefore, first we tighten the outer screws until they stop and then we begin to unscrew the middle bolt until it fixes the rail in a stationary state. Then we put the indicator on the rail:
- And place it with its paw on the edge of the cam of the adjustable valve, as in the photo below:
- Next, we grab the cam with a special grip and pull it up, the device readings should change by 52 divisions:
If the readings differ in one direction or another, the valve must be adjusted. To do this, take a strong 17mm wrench and loosen the locknut, as in the photo below.
And then we adjust the valve clearance with a 13 key, up or down, depending on the readings of the micrometer.
We check the correctness of the adjustment again using a micrometer and if everything is correct, then tighten the lock nut back, while holding the bolt with a 13mm wrench. After tightening the valve, we check the gap again, the fact is that due to the tightening of the lock nut it may decrease slightly, and you need get used to taking the gap slightly with a margin.
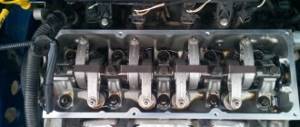
When adjusting with a feeler gauge, everything is somewhat simpler - we insert the feeler gauge into the gap (the feeler gauge itself can be seen in the second photo; it is inserted into the gap of the first valve). The probe should move with slight pinching. By the way, special attention should be paid to the quality of the probe. Now let's describe in a little more detail the procedure for adjusting the valves .
In the position where the marks on the camshaft and crankshaft pulley are aligned, we adjust valves 6 and 8 . After adjustment, crank the engine. Our crankshaft will rotate 180 degrees, but the camshaft and ignition distributor slider will only turn 90, so to control this we previously made marks with a marker.
Having turned the camshaft 90 degrees (the crankshaft rotates 180 degrees), we adjust valves 4 and 7
We turn it another 90 degrees (it turns out the camshaft is 180, the crank is 360) and adjust valves 1 and 3. We make another turn by 90 degrees (the camshaft has generally turned 270 and the crank has turned 540) and adjust valves 2 and 5. At the end of the adjustment procedure, you can scroll through everything again to check the correctness of the adjustment.
Then we assemble everything in reverse order. By the way, we recommend that you immediately install a new seal under the valve cover; it is disposable.
Well, now you have learned how to independently adjust the valves on the VAZ-2107, VAZ-2106, VAZ-2101 and, in principle, on any classic engine (except rotary)