Replacing the Nissan Qashqai heater fan may be required due to mechanical and electrical damage. Some of them can be corrected by replacing individual elements of the mechanism, and in some cases it will be necessary to install a new fan assembly. Next, we will consider the possible causes of failure of the heating system motor and options for eliminating them. We will also present a list of spare parts that can be used to replace the fan and its individual elements on a Nissan Qashqai.
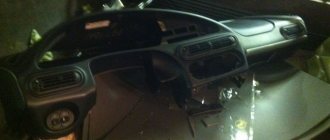
The interior of the updated (below) 2010 Qashqai is practically no different from the pre-restyling (above)
Replacing the Qashqai heater fan
Problems with the heater fan on the Nissan Qashqai, which lead to replacement, are accompanied by the following symptoms:
- The fan speed does not change;
- no air flow when turned on;
- the operation of the rotating element is accompanied by extraneous sounds (grinding, whistling, creaking, and so on).
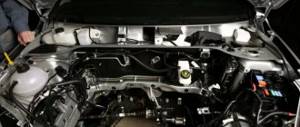
We remove the tunnel panel, unscrew the bolts securing the lower part of the dashboard
. There can be many reasons why the heater fan does not work in the Nissan Qashqai. Among them:
- bushing wear;
- a burnt-out transistor or its heat-resistant fuse;
- short circuit in the motor winding;
- mechanical wear of the brush-contact apparatus.
Tools
To replace the Qashqai interior heating fan, you will need to prepare the following tools:
- Phillips screwdriver and flat blade;
- pliers;
- socket heads for 10 and 13, standard and with an extended tube;
- ratchet with extensions.
We remove the panel, remove the air duct
It is also recommended to take care of preparing good lighting, since the work will be carried out in the lower part of the center console. A portable light bulb with a protective housing is best for this. If you don't have one, you can use a flashlight.
Step-by-step description of replacing the heater motor
When the Nissan Qashqai heater does not work, you have to make a choice between fixing the problem yourself and using the services of car services. Replacing a Qashqai stove fan does not require experience, but is accompanied by inconvenience that arises due to lack of freedom of movement. It is recommended to start the process of replacing the heating system motor by moving the driver's seat to the rearmost position and raising the steering wheel to the highest level. Next, we adhere to the following sequence of actions:
Remove the pedal assembly by disconnecting the three connectors and the brake pedal from the cylinder
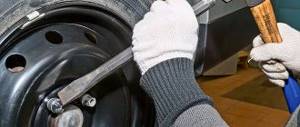
- The lower plastic casing under the steering column is dismantled. It is secured with two ten-point bolts, which are located on the hood and gas tank opening levers;
- With a sharp downward movement, the casing is removed from the seat. After this, you need to disconnect the power cables of the OBD connector and the climate control sensor;
- The air pipe for blowing the legs is dismantled. It is secured with a clip and a ten-point bolt;
- At this stage, you will need to remove the pedal assembly, after first disconnecting the three power terminals. To disconnect the brake pedal from the master cylinder, remove the cotter pin and pin. In order to remove your finger, you need to clamp the white cap with pliers;
- At the top of the pedal assembly, a bar is detached and held in place by two cotter pins;
- All that remains is to unscrew the six fixing bolts and remove the pedal assembly. This will allow access to the stove fan;
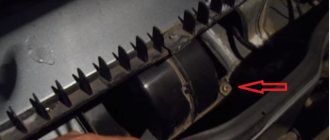
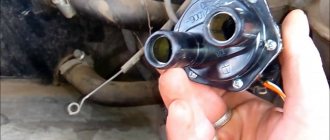
- To dismantle the old element, you will need to unscrew one bolt, disconnect the power connector and remove the motor by turning the housing counterclockwise;
- In the future, all that remains is to install a new heating system fan and perform the assembly in the reverse order.
Unscrew the pedal assembly
Instructions for replacing the stove motor
The procedure for replacing a heating system motor is also not an easy task. But if you are used to repairing a car with your own hands, then it will not cause you any difficulties.
To replace the heater motor, follow these steps:
- First you need to dismantle the dashboard. To do this, disconnect all the necessary fasteners and unscrew the bolts on which the control panel is attached. Disconnect the device from all connectors and plugs and set it aside. All work on the control panel must be carried out carefully to prevent damage to this unit.
- When the instrument panel is removed, it is necessary to dismantle the steering column beam. You will need a standard plumbing tool for this.
- Having done this, you can dismantle the heating device itself, as well as the cooling unit. When removing, also be careful not to damage these system elements.
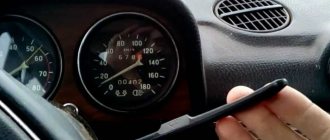
- After these steps, it is necessary to remove the electrical wiring retaining clip from the upper chamber of the intake flap. It should be noted that quite often problems in the operation of a particular mechanism are caused precisely by electrical circuit malfunctions. Therefore, when removing the wiring, be careful not to damage the circuit. If you see that the contacts in the plugs have begun to oxidize, then they must be cleaned immediately, this will avoid possible problems in the future. Use a construction brush to clean the contacts.
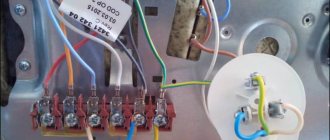
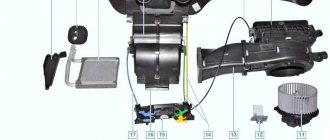
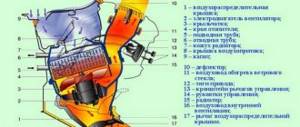
- Next, following the diagram, you need to disconnect the connector marked with the letter B from the damper motor. Having done this, you need to unscrew the mounting bolts A from the housing of the heating unit and the cooling unit using wrenches.
- After these steps, you can dismantle the intake flap motor, marked 1 in the diagram.
- Then you should remove the air conditioning system motor.
- The system venting device moves slightly to the right, after which you can remove the mounting pin along with the elbow. Having dismantled the stove motor, you need to connect a new device instead of the old one, fix and connect it. Mount the engine as securely as possible, this will prevent vibration and, accordingly, more accelerated wear and failure. After installation, further assembly is carried out in reverse order.
1. Designation of connector, damper and heater bolts
2. Air conditioning engine
Spare parts for repair and replacement
As we have already figured out earlier, there can be many reasons why the Qashqai stove fan does not work. In case of a complete replacement of the entire assembly, you will need to know which spare parts are suitable for the Nissan Qashqai. When replacing individual elements of a mechanism, you will first need to correctly determine the cause of the damage. And then move on to selecting the appropriate spare part. The price of an assembled stove fan or its individual components depends on the supplier.
For Nissan Qashqai, you can use original electric motors, which are supplied in a housing and with an impeller. Articles:
- 27225-ET00A;
- 27225-JD00A;
- 27225-ET10A;
- 27225-ET00B;
- 27225-ET10B.
Disconnect the connector and unscrew the heater motor
As analog fans, you can use heating system fans from Nissan X-Trail: 27225-EN000, 27225-EN00B.
If you perform independent repairs, you can replace individual elements, such as electric brushes, transistors, bearings. Brushes can be picked up at an auto parts store or a power tool parts store. To do this, dismantle the old brush and take it with you.
Transistor to replace:
- IRFP064N and IRFP064NPFB - 55 Volts and 98 Amperes;
- IRFP054 and IRFP048 – 60 V, 70 A;
- IRFP044 – 60 V, 57 A.
If bearings fail, you can buy:
- SNR 608ZZ;
- SNR 608EE.
Body
Bumper, Front Bumper, Washer Cap, Rear Bumper, Bumper Grille, Bumper Absorber, Bumper Molding, Rear Bumper Molding, Front Bumper Molding, Bumper Skirt, Rear Bumper Skirt, Front Bumper Skirt, Bumper Reinforcement, Bumper Bracket, Bumper Cover, Rear Cover Bumper, Front bumper cover, Bumper cover, Bumper mount, License plate frame, Fender, Front fender, Rear fender, Fuel filler flap, Fender liner, Front fender liner, Rear fender liner, Fender cover, Fender molding, Fender mount, Fender arch, Hood, Hinge Hood, Hood Cable, Hood Insulation, Hood Seal, Hood Hook, Hood Support, Hood Damper, Trunk, Trunk Damper, Trunk Door, Trunk Button, Trunk Latch, Trunk Lid, Trunk Trim, Trunk Shelf, Trunk Seal, Trunk Support, Doors , Front door, Rear door, Door trim, Door molding, Door handle, Window lifter, Door hinge, Door seal, Door limit switch, Mirror, Side mirror, Left mirror, Right mirror, Mirror element (glass), Mirror button (adjuster), Mirror cover, Mirror cover, Mirror turn signal, Glasses, Windshield, Rear glass, Rear window defogger button, Door glass, Glass seal, Glass molding, Frame, Windshield wiper, Washer reservoir, Washer motor, Wiper motor, Washer nozzles, Trapezium, Motor Windshield wiper, Wiper rod (drive), Wiper blades, Wiper rubber, Lock, Door lock, Lock set, Central locking, Central locking button, Ignition switch, Ignition key, Trunk lock, Fuel tank lock, Hood lock, Lock cylinder, Trim, Grille radiator, Emblem, Air intake (jabot), Mud flaps, Roof molding, Door sill, Arch extension, Panels, Radiator panel, Headlight frame, Threshold, Rear panel, Underbody, Trunk floor, Roof panel, Radiator protection, Side members, Nameplate, Sidewall, Battery mount, Noise insulation, Fasteners, Clips, Pistons, Hatch, Hatch button, Elastic elements
Qashqai heater electric motor repair
Replacing the Nissan Qashqai heater fan is not the only solution. You can try to repair the faulty element. The procedure for removing the fan remains identical to that described in paragraph “Step-by-step description of replacing the heater motor.” After removing it, you can see the accumulation of dust. Clogging can cause the impeller to jam. To perform an audit, you must perform the following operations:
- To dismantle the impeller, unscrew the upper fixing nut;
- The internal cavity of the impeller is cleaned from dust deposits;
- Deposits of dust and dirt particles on the upper and lower parts of the motor bushing are removed with a brush or brush;
- Subsequently, the condition of the brush-contact apparatus is monitored. If the brushes are worn, they must be replaced;
- The lock washers and others following them are removed from both sides of the electric motor shaft, then the fan axis is dismantled;
- At this stage, the condition of the bearings is checked, check for play, hum or increased noise during rotation. If any suspicion arises, the bearing must be replaced. To do this, you will need to bend the three retaining petals, dismantle the failed element and install a new one;
- In the future, we assemble the electric motor in the reverse order. At the same time, we lubricate the rubbing parts of the mechanism.
Lighting
Light bulbs, Headlight lamp, Halogen lamps, Xenon lamps, LED lamps, PTF lamp, Rear PTF lamp, Tail lamp lamp, Brake lamp, License plate lamp, Brake lamp, Reversing lamp, Parking lamp, Turn signal lamp, Instrument panel lamp, Trunk lamp, Engine compartment lamp, Interior lamp, Heater backlight lamp, Headlight, Left headlight, Right headlight, Xenon headlight, Headlight washer, Headlight washer pump, Headlight washer nozzle, Headlight range control, Additional headlight, Finder headlight, Headlight ignition unit, Sensor ground clearance, Headlight mount, Headlight cover, Headlight reflector, LED headlight, Headlight glass, Fog light (PTF), Fog light, PTF mount, Fog light, PTF frame, Tail light, Reversing light, Brake light, Running lights, Side lights , Reflector (reflector), Side marker, Parking lights, Turn signal, Side turn signal, Rear turn signal, Front turn signal, Repeater, Lamps, License plate light, Trunk light, Door light, Engine light, Dashboard light, Interior light, Rotating light