Currently, consumers are offered many different audio systems, differing in price, functionality, and type. An adapter frame for a 2 DIN car radio is an element used to correctly connect a multimedia system. In this article we will talk about the advantages and disadvantages of 2 DIN devices, as well as how to choose the right audio system for your car.
DIN concept
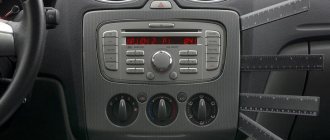
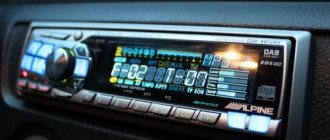
The 2 DIN car radio is a universal audio system used to read media files of various formats. In 2 DIN devices, the key difference from traditional radios is the dimensions, which are 17.8 cm x 5 cm x 18 cm. Installation of a 2 DIN radio is not possible on all vehicles, but only in those cars where a special place is provided for this in the center console.
Car 2 DIN radio
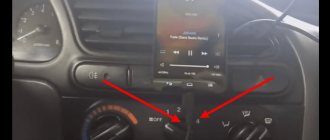
How to connect a camera, phone and steering wheel buttons to a 2 DIN radio
How to connect a 2 DIN radio with aliexpress in a car
DIN stands for "Deutsche Industriele Norme" - or "German Industrial Standards". The standard dimensions of a radio tape recorder installed in the car's standard socket. These standards are used by all manufacturers of cars and car radios (or almost all), at least all Chinese radios supplied to us from aliexpress, all of them are assembled according to 1 DIN standards, and more often - 2 DIN. By the way, 1 DIN is the size of the radio, the width x height of which is 180x50mm. 2 DIN - 180x100mm, with the installation depth of all DINs being 160mm. There is also a very rarely used standard for radio dimensions 1.5 DIN - 180x75mm. But finding such a radio is very rare, so today we will consider the usual size of a multimedia player - 2 DIN.
So, in order for us to connect such a radio, if we previously had a 1 DIN radio in the car, we will have to remove the old radio and install the ears on which the radio is attached under the dashboard from the new radio (these are most often included with the radio, but always please specify). In addition to the ears, we will also need a frame sized 2 DIN, which will no longer be included with the radio. It must be purchased separately for each vehicle. It is very advisable to treat the places of fastening and contact of the plastic of such a frame with an anti-creaking composition, otherwise not very pleasant squeaks will be produced in the cabin; they will not appear immediately, but over time.
So, with the installation of the radio, everything is more or less clear (for those who are not very clear, watch the video of installing the 2 din radio below). Now we need to look at the connection diagrams for the 2 din radio, and also figure out its pinout.
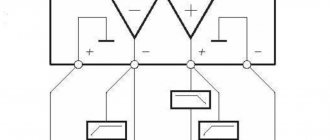
Connection diagrams for 2 DIN radio
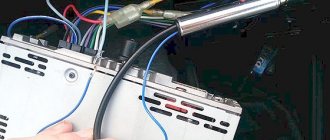
Most Chinese 2 din radios from Aliexpress are connected to the car via an ISO - Euro connector. This is the most universal connector and the easiest to connect to almost any car. And the pinout is quite logical and simple.
Pinout of ISO - Euro connector of Chinese 2 din radio from aliexpress (example - Podofo - 7018B). Similar radios with an ISO connector will have the same pinout.
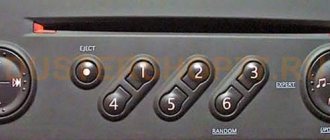
Designation of wires of a Chinese 2 din radio
But there are other connectors often used on Chinese radios. I suggest you familiarize yourself with their pinout and subsequent connection
Pinout of 2 din radio from China
The meaning of the 2 din connectors of the radio
Meaning of 2 din radio wires
Connecting tulips 2 din radio
You can read more about the pinout of the ISO-Euro connector and connecting Podofo radios and similar ones on the pages of our website.
Video - examples of connecting 2 DIN radios
Connection diagrams are, of course, good, but it’s much more clear to see how someone has already gone before you by connecting a 2-din radio to a standard place and made a fairly sensible video about it. So, I suggest you familiarize yourself with the most outstanding works of connecting radio tape recorders that are only available in the YouTube collection.
Connecting a 2 din radio using the example of a Lada Priora
Connecting a 2 din radio in a Kia Rio or Hyundai Solaris
Connecting a 2 din radio in Renault Logan or Sandero
Connecting a 2 din radio in a Toyota Corolla 120
From the videos it follows that there is nothing particularly complicated, except for partial disassembly of the car’s dashboard, connecting a 2 din radio to its standard location is no different. You just need to buy everything you need, understand the connection diagram and pinout of the radio, as well as the wires, and slowly connect everything. This process will not present any problems for any more or less handy person.
How to connect a camera, phone and steering wheel buttons to a 2 DIN radio
The issues of connecting steering wheel control buttons, a rear view camera and synchronizing a phone with it to a Chinese 2 din radio are so extensive that one article is not enough to discuss these topics. Therefore, we decided to break these topics down into the following articles:
Main functional features of devices
The main characteristic of DIN 2 universal radios is the presence of a display that can be used for different purposes.
In addition, such systems have the following features:
- Most devices today offer users touch controls. In this case, it all depends on the model, since on sale you can find 2 DIN car radios that are controlled using buttons. However, touch technology has proven to be practical and reliable, which is why it is a hit with many consumers.
- Ability to play files in a wide variety of formats. That is, the radio can be used not only as a music player, but also as a video player, since such systems allow you to work with video files. If necessary, the system can be synchronized with a mobile gadget or tablet, which will allow you to read data from third-party devices. It should also be noted that such systems allow you to read files from different media, in particular, CDs and DVDs, USB drives and SD cards.
- On sale you can find not just music systems, but also radios with navigation. Thanks to the large display, the driver can easily set up and use the system with a GPS navigator. When purchasing such a device, you should focus on the software on which it runs. For example, many users praise devices with the Navitel platform, since the maps in this software are well adapted to domestic roads.
- Built-in Bluetooth adapter. This function is available in every second 2 DIN car radio today. This option allows you to synchronize any mobile gadget that has a Bluetooth option with the head unit. The driver will be able to add contacts from the phone book to the radio, as well as play tracks from portable gadgets. In addition, if the phone is synchronized with the system, the driver will be able to talk on the phone with other subscribers without being distracted from the road.
- Decent sound quality. As practice shows, usually double radios allow you to provide optimal sound quality, of course, if the car has more or less normal acoustics installed (video author - Dmitry Istomin).
Advantages and disadvantages
Let's look at the pros first:
- ease of control and configuration thanks to the large screen;
- affordable price for most devices - you can choose a model according to your capabilities;
- many different functions used to perform certain purposes;
- convenient platform;
- the ability to connect a rear view camera, but it all depends on the model;
- competitive sound quality, especially if the car has normal acoustics;
- Most radios have a TV tuner function, which allows you to watch television programs;
- ability to read information from different media.
But such car radios also have disadvantages, in particular:
- if you prefer a cheap option, you must understand that it will not work as stably as more expensive analogues;
- As practice shows, the TV tuner in most models is very weak;
- Devices running on the Android platform freeze more often than others.
Transition frames for installation
Adapter frame for audio system
Adapter frames are used to install head units in the center console of a car. Modern car manufacturers are doing everything possible to ensure that non-standard radios cannot be installed in their cars. Accordingly, when purchasing a non-standard car radio, the car owner may encounter difficulties in its further installation. It is necessary to take into account that the frames are different, sometimes they can take up a lot of space on the dashboard.
If you install a multimedia system with a transition frame, you will be able to close any gaps that may appear on the center console as a result of installation. The choice of frame is carried out in accordance with the car model, as well as the year of manufacture. If you are the owner of a new car, then it is quite possible that you will not be able to find a frame on sale, since their production begins some time after the car is released (the author of the video is Alexey Vasiliev).
Reviews
| Module type | Price, rub.) |
| Standard 1-DIM (push-button version) | from 3500 – 3700 |
| Standard 2-DIM (sensor) only for Lada Granta liftback | from 7500 – 8000 |
| Third party manufacturers, depending on configuration and specifications |
| № | Positive |
| 1. | Victor, 39 years old: after buying the car, he did not change the radio, despite the push-button control option. The sound quality is good, the radio reception is excellent, that's enough for me. |
| 2. | Konstantin, 41 years old: bought the car second-hand, second owner. I didn’t change anything, I left the original radio. The functionality is good, the build quality is also good, it reads from a flash drive. |
| 3. | Vasily, 44 years old: I listen to the radio more, the reception in the city is good. True, it causes interference near metal structures, but this is natural. |
| 4. | Kirill, 36 years old: I work as a taxi driver, on wheels all day. The standard tape recorder saves the day, it works properly. My friends recommended replacing it with a touchscreen model from the new Granta, but so far the old one hasn’t failed. |
| Negative | |
| 1. | Victor, 38 years old: the standard audio module, although not bad, seemed to me not enough, so I replaced it with a foreign one and supplemented it with an amplifier. Now the volume is good, the quality is high. |
| 2. | Mikhail, 42 years old: I work as a courier, I drive for the entire shift. I expected more from the standard radio, so I had to replace it with a new one. The volume suits me, I plan to connect an amplifier - a crossover. |
| 3. | Ivan, 33 years old: I bought the car second-hand, immediately replaced the audio module, the reviews are not good. New and high-quality equipment from Trinity, no problems. |
| 4. | Vladlen, 40 years old: friends gave me a gift in the form of a radio with touch control for our anniversary. Before this there was a push-button one. Can't compare, quality, sound, control, functionality at a high level. |
Criterias of choice
How to choose the right 2 DIN radio:
- First of all, this is the cost, which is determined in accordance with the financial capabilities of the buyer. Based on the price, you will choose the best device from a certain price segment.
- You should pay attention to the functional features, because the more options there are, the more opportunities the driver will have in terms of control and operation. We wrote more about additional functions above.
- Ability to read information from different media. CD and DVD drives are a thing of the past, so you can’t rely on the availability of only these drives. The device must be equipped with at least a USB output, as well as a slot for connecting an SD card.
- Dimensions in the center console of your car. If you choose a radio whose dimensions do not correspond to the dimensions of the hole in the dashboard, then you will additionally need to purchase a frame.
- If you value good sound quality, then also pay attention to the output power. The higher the power, the higher the playback quality will be. As practice shows, 50 W of power is enough for normal sound quality.
- Backlight. It is important that it has an adjustment function; if it does not, then the backlight should not be bright. Otherwise, it will distract the driver from the road, which directly affects the safety of driving.
- The ability to customize the equalizer allows you to adjust the sound quality to suit your preferences.
- Number of connected speakers. If, in addition to the standard four speakers, you want to install tweeters (tweeters), an amplifier and a subwoofer, be sure to make sure that the radio you buy supports this feature (the author of the video is the Parcels from China channel for CergeyNchina).
Manufacturing process
Creating the required frame size consists of several stages.
First stage
Masking tape is necessary for gluing the radio in the form of the intended “Cold Welding” application, which will allow you to remove the car radio at any time without fixing it tightly. You can apply cling film over the masking tape to make it easier to remove the frame without damage.
To increase the strength of the transition frame, its perimeter can be surrounded with thin copper wire. For easy removal, it is recommended to thread a nylon thread under the frame.
After completing the frame sculpting process, you need to create 2 thin fasteners. They must fit the size of the caps and match the diameter between the radio tunnel and the edge of the panel at the top. If the molded model goes beyond the edge, you can adjust the size using No. 40 sandpaper and a file. Gently smooth uneven surfaces.
Putty and primer
It is better to putty the surface using a two-component putty designed for plastic bumpers. For priming, it is better to use acrylic primer, sold in spray form, because... it has high performance qualities.
The working surface should be degreased and cleaned. Perform puttying using a rubber spatula and smooth out unevenness at the end of the work with sandpaper No. 120.
Before applying the primer, treat the surface with sandpaper No. 340 and degrease. In most cases, 3 layers of primer are sufficient to obtain the required texture.
DIY installation instructions
Brief installation instructions:
- First prepare the installation site. Depending on the vehicle, it may be necessary to remove some of the center console trim.
- Then the transition frame is installed, if necessary.
- The car radio is connected to the vehicle's on-board network. You need to connect the power cable, the plug to which the speakers are connected, and the antenna to the corresponding outputs on it. If there are radio control buttons on the steering wheel of your car, then they also need to be connected, if the device allows it. By the way, if the car does not have speakers installed, then you should first install them in the doors and rear parcel shelf, and then lay the wiring under the interior trim, which will go to the radio.
- The device is placed in the seat and fixed in it. It should be noted that the radio must be securely fastened so that it does not vibrate when driving off-road or on rough roads.
- Check the functionality of the car radio and replace all interior trim elements.
Photo gallery “Do-it-yourself installation”
1. Remove part of the trim on the center console.
2. Install a purchased or homemade transition frame.
3. Install the car radio into the mounting location.
Price issue
The cost of the radio depends on the manufacturer, as well as its functionality. The cheapest option - Swat WX-212UBW - can be found on sale for 3 thousand rubles. The average cost of more or less high-quality devices is from 6 thousand rubles. A high-quality Alpine INE-W987D radio tape recorder can be bought for 78 thousand rubles.
Instructions for connecting a Chinese radio
At the very beginning of our article, we will define the concept of “Chinese radios” so as not to return to it later. So. Today, all audio and video electronics of universally known world brands, intended for installation in passenger cars and heavy-duty vehicles, are produced at the production facilities of the companies of the same name located in China. Thus, when we say Pioneer, Sony and similar names, we automatically mean products manufactured in China.
Scheme
How to choose
The car owner selects the transition frame depending on the release date of the car (before restyling or after). The front panels of multimedia equipment have unified dimensions; the set includes a decorative element framing the front of the head unit. If the decorative unit is not included in the kit, then you will need to select an element based on the radio model or make it yourself from epoxy resin or plastic used in dentistry.
To make your own frame, you will need to cover the mounting socket with tape, and then install the radio (previously covered with protective material). Then, pieces of plastic are inserted between the player and the instrument panel housing to allow the parts to be positioned. Cold welding or other fast-hardening material is stuffed into the gap; to increase the rigidity of the workpiece, copper wire with a diameter of 2-3 mm is placed in the body of the part and a cord is provided to pull the element out of the socket.
After the material has hardened, the workpiece is removed and machined. Detected cracks or voids are sealed, and the surface is primed several times. At the final stage, the product is painted in the required color. It is allowed to apply a decorative film to the material that imitates various materials. Then the frame is placed in its normal place.
Installation
For installing the head unit on Lada Granta produced 2012-17. you will need to remove the standard cladding. The part is held on by latches located around the perimeter and rotating air conditioning controls. The car owner can independently modify the trim by removing the box for small items and removing the jumpers. The plant produces ready-made cladding (catalog number 2190-0532601-420), adapted to accommodate a 2 Din size radio.
Then you need to cut the jumpers in the depths of the instrument panel that prevent the installation of 2 Din equipment. Since cutting produces chips, a cloth napkin is placed under the working area. The body of the radio with the brackets installed is inserted into the socket, and then secured with screws to the standard holes. After installing the head unit, a standard frame (from the player kit) is mounted around the panel or a decorative element made by third-party manufacturers is inserted.
Installation of a 2 Din radio on cars manufactured after 2020 consists of the following steps:
- Route the antenna cable from the cavity under the glove box to the center of the instrument panel. To simplify the broaching procedure, it is recommended to remove the glove box body, which is supported on plastic axles. Then the decorative trim of the instrument panel is removed, which allows you to remove the plastic panel located behind the glove box.
- Screw the metal brackets to the radio casing; during installation, keep in mind that the parts for the left and right sides have differences in configuration. The screws supplied with the head unit are used for mounting. Align the brackets at the same level; additional washers are used to adjust the position.
- Connect the patch cables and secure the head unit in the panel.
- Install metal latches onto the transition frame to hold the part in the instrument panel.
- Mount the transition element in its normal place, pressing the part evenly with your hands until the latches engage.
After installing the frame, the climate control unit is installed in its original place. The element is fastened with latches; there are no screws in the design. Lastly, the handles for temperature controls and air flow direction are put in place. It is also necessary to mount the choke control lever handle.