- Original German autobuffers Power Guard Autobuffers - save money on suspension repairs, increase ground clearance +3 cm, quick and easy installation...
Official website >>>
Surely, there is not a person left among Russian motorists who has not encountered the problem of antifreeze leakage in the VAZ 2114. What is the reason for this problem? How to eliminate it quickly and effectively, while spending minimal money? Let's try to answer these questions.
Why doesn't the stove tap work?
One of the reasons for a non-working faucet is souring. As a result of corrosion under the influence of chemical liquids, the flag loses its mobility, and the tap stops opening or closing. If this happened when the tap was open, then warm air will flow inside even when no one needs it.
Sometimes a failed heater faucet in a VAZ 2114 leads to air in the system, the stove does not heat, and cold air enters the cabin.
But the most common defect is a leaking stove tap. Antifreeze gets into the car body and stains the floor mats. In both the first and second cases, it is necessary to replace the VAZ 2114 heater valve.
If you find antifreeze under your feet, do not rush to immediately buy a new faucet. The leak can come from a burst pipe; even the heater radiator can leak. First, find out where the antifreeze is leaking from, and only then go to the auto parts store to make purchases.
Causes of heating tap failure
Of the entire cooling system, the heater valve of the VAZ 2114 is the most vulnerable part. Moreover, problems most often appear with the onset of cold weather. This is where one of the reasons for the failure of the heating tap lies: in the summer we don’t use it, it “sours”
and needs renovation.
The most common reasons for the failure of the VAZ 2114 heating tap:
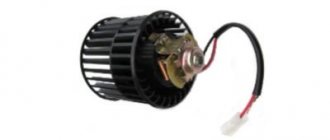
The technical condition of the tap, like the entire heating system, depends on the condition of the coolant. There are too many fakes on the market, which have a very negative effect on the operation of the car’s stove.
One of the reasons for the failure of the faucet and the heating system as a whole may be low-quality coolant. Don't take just anything! Make purchases in trusted stores.
But besides the quality of the liquid and materials, there are other factors that influence the rapid failure of the faucet. Therefore, at the end of the article we will give some useful tips that will allow you to extend its life or notice a malfunction in a timely manner so as not to freeze in winter. Well, for now, let’s pay attention to the choice of the heater valve for the second generation VAZ “Samara” - VAZ 2113, 2114 and 2115, or the first one - 2108 and 2109.
Which faucet is better?
All owners of VAZ 2114, 2115 and other models unanimously claim that the original faucets that are equipped with the stoves of these cars are the most unreliable. The locking mechanism is a rubber membrane. Aluminum housings are susceptible to corrosion and quickly turn sour. True, the price of these parts is low - 80-120 rubles. Apparently, the price is calculated on the fact that the faucets will change every season.
Ceramic faucet is considered the most wear-resistant
But car owners don’t want to crawl under the car every time it gets cold, spoil their shoes with leaking antifreeze, and freeze inside the car. Yes, and this is a troublesome task - replacing the faucet on the VAZ 2114 stove. Therefore, motorists give preference to more reliable models of faucets:
- ceramic, their locking mechanism is made of ceramic plates, and the body is made of high-quality plastic;
- Ball valves, the locking element of which is a ball with holes.
Most VAZ 2114 owners prefer the Yavva ceramic faucet as one of the highest quality and most reliable. Although these models have lower heat transfer than ball models. The latter are susceptible to oxidation, but to a lesser extent than the duralumin models of AvtoVAZ cranes.
How to change the stove tap with your own hands?
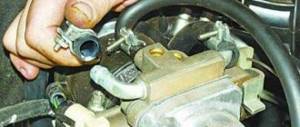
You will need a pit to work with because the heater valve is located at the bottom of the hood, under the side trim on the passenger side. Replacing the stove valve on a VAZ 2114 is carried out in several stages:
- On the faucet, you need to brush the fasteners, rinse them with brake fluid, and leave them for a while so that the fluid cleans the threads on the studs and the nuts are easier to unscrew. To wash studs, it is better to use WD-40, if available. This is an important stage in the work, because rusted bolts can grab the nut so much that unscrewing them becomes problematic. Sometimes when unscrewing nuts, the bolts need to be held with an additional wrench or pliers.
- In the cabin, remove the side trim. Now you can see the pipes leading to the tap. Loosen the hose clamps and remove the hoses one by one. At the same time, keep a container with antifreeze near you, which you immediately place under the emptied pipes so that the remaining antifreeze flows out.
- If you decide to replace the hoses, they must also be released from the radiator. But if they are in satisfactory condition, then when you start assembling, you will only need sealant.
- Return to the pit and use a 10mm wrench to unscrew the nuts holding the tap in place.
- Go back to the body again and try to remove the heater valve of the VAZ 2114 towards the passenger seat. In this position, remove the lock and release the cable that controls the tap.
- Now you can install the new faucet. First put the cable on it, secure it with a spring clip, and only then can you screw it into place. Install O-rings between the valve and the body. Use sealant to secure the stove pipes in place. Don't forget to pour the antifreeze back into the radiator at the end.
Replacing the stove valve of the VAZ 2115, as well as the VAZ 2113, is carried out in the sequence described above. The design of the heater in these VAZ models is the same as that of the VAZ 2108.
Installing a new heater tap
Installation of the tap is carried out in the reverse order. First, we attach it to the body by tightening the nuts on the studs, and then connect the drive cable. It is also better to replace the clamps on the pipes with new ones. Pay attention to the condition of the hoses. If their ends are too stretched or cracked, it is better to replace them too. If everything is in order with them, we connect them to the tap and tighten the clamps with a screwdriver. We don’t put the panel cover back in place yet. We will need to check the tightness of the connections with the engine running.
That's basically the whole process. As you can see, replacing a VAZ-2114 heater tap with your own hands is not such a difficult task.
Heater radiator leaking
It was said above that one of the reasons for the appearance of antifreeze in the car interior may be leakage from the heater radiator.
Important
. If you discover that antifreeze is leaking into the interior of your car, under no circumstances leave repairs for later. Because ethylene glycol, which is part of most antifreezes, is very toxic. And breathing the vapors of this aggressive chemical is dangerous to your health.
Below you will learn how to replace a leaking heater radiator. First of all, of course, you need to drain the antifreeze. Then you get comfortable in the cabin and begin to disassemble the front panel: glove compartment, consoles, sides. Unscrew all the screws and screws. To avoid losing them, collect them on a magnet or in a small plastic cup. There is one hidden screw under the plug on the dashboard console, so be careful.
When you remove all the panels and access to the heater radiator opens, loosen the clamps on the pipes, release them, but do not forget to place a mug or other container under the hoses so as not to flood the interior with antifreeze residue. Now you have to remove the VAZ 2114 stove, or rather, the heating radiator. Assembly is done exactly the opposite. Install the new radiator in place. Experienced drivers recommend lubricating the fittings with soap to make the rubber pipes easier to put on. It is recommended to install new clamps for them, purchasing them together with the radiator. Also install the panel, glove compartment and other parts in the reverse order. When mounting the panel, be sure to ensure that the center pillars are attached to the body. Install and secure the cables, check their adjustment, and make sure that the valve and faucet are functioning properly.
When pouring antifreeze, check that no air pockets form. To do this, remove one of the hoses leading to the throttle valve and release the air. Reattach the hose to its place.
Drivers have repeatedly encountered a problem when the smell of antifreeze appears in the interior of a VAZ-2114. This is especially true when the stove radiator is turned on in winter or summer during the hot season. But what are the technical reasons for the appearance of odor, and what methods of elimination exist.
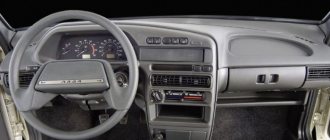
The interior of the car was disassembled after an antifreeze spill, and at the same time noisy, since the factory heat and sound insulation had become unusable
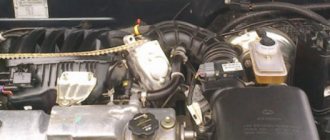
Before finding the reasons for the smell of antifreeze in the cabin, you need to understand the design of the cooling system.
So, let's look at how the engine coolant system works:
Scheme and design of the cooling system
1 – expansion tank plug; 2 – expansion tank; 3 – coolant drain hose from the throttle pipe; 4 – hose from the radiator to the expansion tank; 5 – radiator outlet hose; 6 – left radiator tank; 7 – aluminum radiator tubes; 8 – plug; 9 – right radiator tank; 10 – drain plug; 11 – radiator core; 12 – electric fan casing; 13 – electric fan impeller; 14 – electric motor; 15 – pump gear pulley; 16 – pump impeller; 17 – camshaft drive toothed belt; 18 – engine block; 19 – pump supply tube; 20 – radiator supply hose; 21 – heater radiator outlet hose; 22 – coolant supply hose to the throttle pipe; 23 – exhaust pipe; 24 – filling hose; 25 – heater radiator supply hose; 26 – ; 27 – ; 28 – coolant level indicator sensor
Reasons for the appearance of antifreeze under the rugs and on the bottom of the VAZ-2114
It’s good if the weather is warm outside, it will dry quickly. If it's frosty outside, you'll have to heat it up.
So, when the issue of the design of the cooling system has been considered, we can proceed directly to considering the reasons for the appearance of the smell of antifreeze in the car interior:
- Problems with the cooling system pipes.
- The heater radiator is faulty.
- The interior floor is filled with antifreeze.
- Smell from a new heater radiator.
- The smell is coming from the engine compartment.
The main reasons have been identified, and now we can proceed directly to considering methods for eliminating the effect.
Elimination methods
There are several reasons for the smell of antifreeze in a car. Of course, to eliminate this you will need some tools, as well as knowledge of the design of the VAZ-2114 cooling system, which was discussed above.
Stove faucet
In the process of replacing the stove valve
One of the most common reasons. In this case . The faucet can only flow in certain modes, for example, in heat. Therefore, when diagnosing the heater valve, try turning on different heater modes.
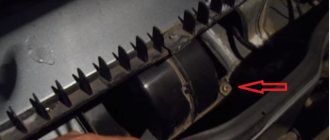
Problems with the cooling system pipes
Leaking coolant system pipes
The most common reason for the smell of antifreeze in the car interior is that cracks appear in the heater pipes, which cause coolant to leak onto the radiator. When heated, this element causes antifreeze to evaporate in the cabin, which actually causes this effect.
The elimination method, in this case, is simple - inspect the inlet and outlet pipes of the stove, and if cracks are found, they must be replaced. Diagnostic operations must be carried out hot, with the interior heating system running.
Heater radiator is faulty
Faulty heater radiator
The heater radiator repeatedly causes the smell of antifreeze to appear in the cabin, which flows out of it and evaporates. In this case, it is necessary to disassemble the heating system and diagnose the stove radiator. If cracks or defects are found on it, the part must be replaced with a new one.
The interior floor is filled with antifreeze
Smudges are visible on the upholstery, but traces of antifreeze are more clearly visible on the mat itself
Many motorists have encountered antifreeze found under the floor mats, which evaporates during the heating of the interior, and also in an inert state soaks into the floor covering and causes an unpleasant odor.
The solution is quite simple - dry cleaning the interior.
. Also, it is worth understanding how the antifreeze got onto the floor of the car. This can be caused by leaks from the radiator and heater pipes during the period when the car is used without a heater and the outside temperature is not too low to turn on the heater.
Smell from new heater radiator
After replacing the old heater core, the smell of antifreeze may appear in the cabin.
This may be due to two reasons.
Firstly, loose connections between the pipes and the radiator
. To diagnose and fix it, it is necessary to check whether the clamps connecting the pipes and the heater radiator are tightly tightened.
Secondly, the smell may be caused by the spare parts storage lubricant
. They are very similar to antifreeze, so they are easy to confuse. If there are no signs of antifreeze leakage, but there is a smell, then you should wait until the lubricant has completely evaporated.
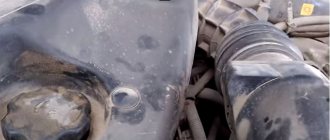
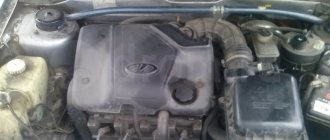
The smell is coming from the engine compartment
Repeatedly, you may notice that the smell of antifreeze can penetrate into the cabin from the engine compartment. Thus, damage to one of the elements of the engine cooling system, as well as leakage of antifreeze, can be accompanied by the appearance of a smell directly in the car when the engine is heated to operating temperature.
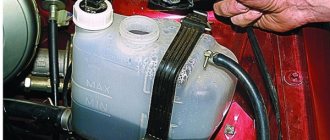
The clamp stopped holding, antifreeze began to drip onto the battery platform, and the heater fan carried the smell of antifreeze into the cabin
The elimination method is to inspect the cooling system directly in the engine compartment, as well as identify the causes and eliminate them. Often, these are breakdowns in the pipes or leakage of antifreeze through loose clamps.
Dirt could get into the cooling system through breakdowns; in this case, it is recommended.
Heater core replacement procedure
- Disconnect the battery.
- Remove the steering wheel.
- Remove all exterior panels and housings for items such as the fuse box, speakers, and the compartment trim in front of the front passenger seat.
- Remove the glove box, radio, speakers and other accessories.
- Disconnect the instruments (be especially careful where the speedometer cable passes).
- Disconnect and remove the heater and air conditioner control panel.
- Unscrew the bolts and remove the dashboard.
- Do not disconnect the air conditioner (unless absolutely necessary and if you can properly dispose of the freon). Freon should never be allowed to leak, as it negatively affects the ozone layer and is also extremely toxic, especially for people with heart disease.
- Disconnect both hoses from the heater core in the engine compartment.
- Move all air lines and other components away from the heater core housing.
- Remove the radiator housing and place it on the table. Unscrew all bolts and other fasteners to get to the radiator itself.
- Take out the old radiator and replace it with a new one!
When installing the heater core, perform the above procedure in reverse order. If any element breaks during removal, it also needs to be replaced during installation.
Source: okuzove.ru
Conclusion
It is quite easy to identify and eliminate the causes of the smell of antifreeze in the interior of the VAZ-2114. You can also eliminate them yourself without any problems. But, if the motorist thinks that the process is quite complicated, it is recommended to contact a car service center, where everything will be done quickly and efficiently.
Probably, many motorists have encountered the fact that they discovered antifreeze smudges on the interior carpet of a VAZ-2114. But not everyone knows why this can happen. In this article we will look at the causes of the effect and methods of elimination.
Smudges are visible on the upholstery, but traces of antifreeze are more clearly visible on the mat itself
Of course, soaking the interior carpet of a VAZ-2114 with antifreeze entails consequences. The most unpleasant consequence becomes.
Thus, antifreeze vapors not only cause an unpleasant odor, but due to their composition, they also settle in people’s lungs, which can cause harmful effects on the body.
So, if left in this environment for a long time, settled coolant vapors will cause asthma, chronic bronchitis, allergies, and in the worst case, lung cancer.
. Therefore, at the slightest appearance of antifreeze on the interior carpet, it is necessary to eliminate the cause.
Completion of work and checking for leaks
Upon completion of the work, we return under the car and tighten the drain plug. After this, pour coolant into the radiator neck, focusing on its level in the expansion tank.
Replacing a VAZ-2114 heater valve requires a thorough check of the tightness of the connections after the repair work is completed, and the repairman himself will be interested to know how well it worked.
We start the engine and warm it up until the radiator fan turns on. Without turning off the engine, we check for leaks at the connection points of the pipes in the cabin and under the hood. If everything is fine, we try to close and open the tap by moving the control lever with the heater fan on. In the open position, the air forced into the cabin should be hot. This means that the shut-off mechanism is open and coolant is flowing through the radiator. When you close the tap, cold air should flow in. This will indicate that the locking mechanism has blocked the flow of coolant into the heater radiator.
- The VAZ-2114 heater tap should be replaced as soon as possible when faults are detected. Especially when it comes to coolant leaks. Both antifreeze and antifreeze are toxic!
- You should not save money when choosing a faucet. It is better to take a good branded model that does not oxidize and use it for 5 years than to buy a device of dubious quality and origin every year.
- Do not use cheap coolants - the duration of operation of not only the faucet, but also the entire cooling system depends on their composition.
- If the faucet is leaking and there is a smell of antifreeze or antifreeze in the cabin, and there is an oily coating on the glass, take the time to wash and dry the rugs or carpet, and also wipe the glass with an alcohol solution.
- If the process described above seems complicated to you, it is better to contact a car service.
Reasons for the appearance of antifreeze under the rug
What are the reasons for such a dangerous effect:
- The stove tap broke.
- Rupture of the material structure or surface of the heater radiator.
How to fix
Now that the causes have been identified, it is worth considering possible solutions to the problem. Before we begin, it should be noted that these reasons can easily be eliminated independently and it is not necessary to contact a car service. Let's look at how to solve the problem of antifreeze on the interior carpet.
Stove faucet
In the process of replacing the stove valve
In this case, the leakage of antifreeze may be caused by the fact that the heater faucet has worn out. Mostly, the leak will form under the driver's mat and occurs only in a certain operating mode of the heater. This malfunction can be treated simply by replacing the heater tap.
Heater radiator
Faulty heater radiator
The second most common reason is a leak from the heater core.
Here you need to be careful and quickly fix the problem, since antifreeze gets not only onto the interior mats, but also affects its location.
So, if coolant leaks out, there is a possibility of damaging other components, especially the main one - the electronic control unit.