What do you need?
In order to paint them, we first need to prepare. So, what do we need:
- A metal brush, you can use a drill, or you can use a regular hand brush.
- Mounting tape, usually paper.
- Rust reducer for treating wheels.
- High-temperature primer, or regular one.
- High temperature paint.
- Degreaser, usually "thinner" or "white spirit"
- I recommend gloves and a respirator.
It will take about 500 - 700 rubles for everything, maybe a little less, because at home you most likely have solvent and gloves. So the main cost will be on paint and primer.
Materials and equipment for painting standard car brake calipers
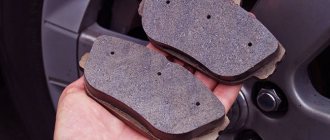
To disassemble and remove the unit you will need:
To paint calipers, you need the following tools and materials:
- cleaner (White spirit or similar);
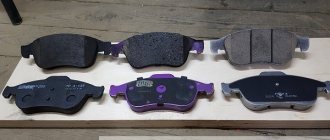
- paint with hardener;
- primer (heat-resistant);
- brush;
- gloves;
- metal brush;
- masking tape (newspapers, plastic film);
- container for combining paint and varnish compositions;
- cotton rags;
- respiratory protective equipment.
Manufacturers producing specialized paint offer ready-made painting kits that include everything you need.
Which paint and primer, choose the right one
What I would like to note about paint and primer is that the choice must be correct, I would even say that ordinary paint will not work here, I’m talking about enamels that are sold in spray cans. Here you need to choose high-temperature compounds. What does it mean?
During operation, the drums become very hot, the temperature can reach 100 - 110 degrees Celsius. Regular paint will begin to flow or even burn, thus the appearance of the brake drums will only worsen (not improve), there will be constant smudges that will mix with dust and dirt.
Therefore, we definitely buy high-temperature paint; it can withstand temperatures from 120 to 150 degrees Celsius, does not flow and does not burn.
It can also be sold in cans, and the method of application is no different from ordinary enamel.
What else I would like to say is that spray cans are very convenient to use; you can’t easily apply paint in cans; it’s quite difficult. Of course, you can “turn on the collective farm” and paint everything with a brush, but really nothing good will come of it.
I would also like to say a few words about color; many people write that you can only paint it black, white or silver. The other colors are supposedly not suitable. Guys, I’ll say this - now you can paint with any color you want, even purple, high-temperature paints are available in almost any shade, so choose what you like and go ahead. However, think about what will suit your car and what will not! I mean, if your car is blue, you shouldn’t paint the drums green, although this is a purely individual approach.
What paint to choose for painting brake system elements
Regular paint is not suitable for painting calipers. Some motorists paint the body with powder paint. But it does not tolerate high-temperature operating conditions of the unit, although it manifests itself as a reliable and durable coating under more favorable conditions. If you manage to find a suitable powder paint, then it must be applied in 4 layers, with a break of 20 minutes between applications.
Paint for stoves and stoves is suitable for painting calipers.
Note!
The paint for the calipers must be heat-resistant. Non-specialized paint will burn and peel off when exposed to high temperatures. You definitely shouldn't use enamels.
Special heat-resistant paint is expensive. But it performs both an aesthetic and protective function. Popular paint brands are Foliatec and Motip.
Heat-resistant high-temperature paint Foliatec is a premium composition and a kit consisting of paint, hardener, varnish and cleaner will cost 2000-2300 rubles. And an aerosol costs 2100 rubles. In addition to the shade of paint, you can also choose its type:
- metallic;
- glossy;
- matte.
Advantages of specialized paint:
- heat resistance;
- strength;
- wear resistance;
- chemical resistance;
- wide range of shades;
- coating hardness.
The form of release of specialized paint also varies. If we consider the paint produced under the Foliatec brand, it is available in the form of:
- aerosol - cheaper and easier to apply. It's easy to paint the caliper yourself. But a single can of spray is often not enough to paint all the parts. Disadvantage: high volatility of the fine spray. Because of this, more careful protection of adjacent elements is required. Small particles of paint settle on surfaces.
- composition in a bank is more expensive. Paint application is done with a brush and takes more time. Disadvantage: you won’t be able to paint it perfectly - there will be streaks.
- painting kit - includes all necessary materials and tools.
German-Dutch Motip paint is a budget option.
Its advantages:
- heat resistance up to 650 degrees;
- good adhesion;
- hiding power;
- dirt-repellent properties.
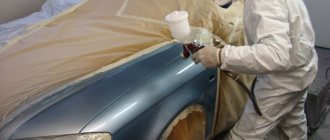
Painting process
Now I will tell you the whole process point by point, and there is nothing complicated here, even for a beginner:
- It is advisable to carry out the work in a garage or a dust-free box. Still, we don’t need dust, because there will be dots on the surface of the paint. Of course, they will not be particularly visible, but still there is no need for this.
- We lift the side and remove the wheel; it is advisable to place something secure next to the jack, for example a wooden “block”.
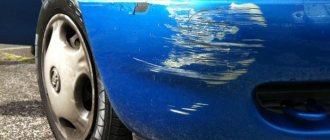
- We see a disk in front of us; all rust needs to be removed from it, and if there is old paint, it is advisable to remove that too. The process is dusty, so you may want to wear a respirator.
- After all this, we begin to process the disk. I read that before degreasing, you need to wipe the drum with a rust converter and then wait about an hour. So that the conversion process goes well.
- Next we degrease the surface. To do this, simply wipe with “solvent” or “white spirit”. After processing, wait until everything dries for about 30 - 40 minutes.
- Next we need to cover up any parts that are protruding with masking tape, usually the hub nut, holes or bolts for the disc. I would also tape the wing around the perimeter, you never know. “Gluing” occurs in order to avoid paint getting on important surfaces. For example, a thread, because if it gets there, tightening a bolt or nut will not be very easy.
Dismantling
In this case, you cannot do without a set of keys and a jack. When the wheels are removed, you need to carefully inspect the calipers for any dirt or oxide that could interfere with the normal operation of the calipers. The nitrous can be treated with WD-40 or simply tapped with a hammer.
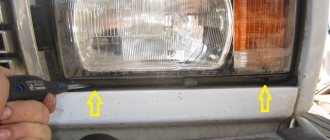
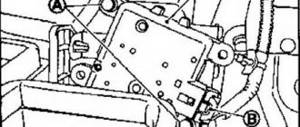
We recommend that you carefully remove the rubber hose connecting the caliper to the car: it is not as difficult to break as it seems at first glance, but purchasing a new one will be quite expensive. The photo shows where you need to press the keys to remove the calipers.
Don’t forget to clean the boots thoroughly, but you don’t need to pull out the pistons all the way, as this can lead to leakage of technical fluid. After cleaning, apply the grease that always comes with the brakes. If there is none, then you can always take litol or another liquid that contains lithium soap.
Removing the brake caliper
The car is lifted on jacks and securely fixed in space. The wheels are dismantled. Then everything depends on the condition of the caliper: nitrous, which interferes with the removal or movement of the caliper along the guides, can be filled with WD-40 and tapped with a hammer. The caliper itself is usually secured with two bolts and connected to the car with a rubber hose - if you don’t hang it specifically and disconnect it, the hose may break, which is not very good.
The caliper moves along guide bushings. Usually there are two of them and they are hidden in the anthers, so getting to them is not easy. However, it is advisable to pull them out and lubricate them. Due to the lack of protection, the bushing can become tightly stuck, so neither WD-40 nor hammer blows will help. In this case, you can try completely dismantling and heating the mechanism in the oven. At the same time, the poor, temperature-unresistant paint will come off the caliper.
Along with these procedures, the discs are usually cleaned of rust and the caliper boots are cleaned of dirt. During the cleaning process, the pistons must not be pulled out completely, otherwise the technical fluid will leak out. For lubrication, it is advisable to use a special substance that comes with disc brakes. If there is no special lubricant, you can use lithol or another substance based on lithium soap.
Painting process
When the surface of the drums and rims is ready, and the paint for the calipers has already been purchased, you can begin the painting process. Prepare the working mixture a couple of minutes before applying it to the caliper. The mixing container must not be plastic - this is the main requirement. The selected paint is mixed with the hardener most often in a 3:1 ratio, but this also depends on the manufacturer, so read the instructions for using the paintwork. When the caliper mixture is ready, stir it with a clean stick - it can even be a ruler.
Painting of calipers, brake discs and drums is carried out in two layers. Each layer is dried for 15-20 minutes. Your main tool will be a brush; apply the mixture in doses to prevent smudges. Be careful not to get paint on the brake mirrors or other parts of the calipers. You can assemble the wheel mechanism after the paintwork has set. But complete drying of the discs and calipers takes about a day. It is best to leave the car in the garage during this time. For the next few days, it is better to operate the machine in a gentle mode.
Painting with a spray gun
Powder coating or other coating of calipers can be done in a variety of ways. You can also paint the calipers using a spray gun. But to do the job well, you must follow the rules:
- This unit must be moved strictly parallel to the surface of the caliper, and the speed on it should not exceed 300-400 mm/s. If you move it too quickly, the coating will be uneven and too thin. Slow movement threatens with smudges.
- The distance from the nozzle to the caliper should not be more than 25-30 centimeters. It will be great if you maintain this distance throughout the entire painting of the discs and caliper. If you move the spray gun away, the adhesion of metal and paint will greatly deteriorate, and consumption, on the contrary, will increase. What happens if you bring the unit too close is already clear.
- The shape of the torch should be oval and the size should not exceed 30 cm.
- Do not allow the spray gun to deviate too much in the vertical and horizontal planes. Obviously, you can’t calculate 5-10° by eye, but this is an acceptable angle of inclination.
- The first coat of paint is sprayed horizontally, and the second coat is sprayed vertically. Each subsequent strip overlaps the previous one by 3-6 centimeters - with this action, the painting of the caliper surface will be maximum.
- Do not move the spray gun away when you approach the edges of the caliper, this can lead to difficulties in the future - the layer will begin to peel off from the edges.
Forget about fines from cameras! An absolutely legal new product - Traffic Police Camera Jammer, hides your license plates from the cameras that are installed in all cities. More details at the link.
- Absolutely legal (Article 12.2);
- Hides from photo and video recording;
- Suitable for all cars;
- Works through the cigarette lighter connector;
- Does not cause interference to radios and cell phones.
Powder coating of brake discs
Just don't laugh. I want to give the rear breams to the hubs for powder coating. Actually, the question is: 1) is it not a crime for the discs to sit in the oven at 200C? What temperature do they generally maintain when braking? 2) will the powder coating on the hub affect the efficiency of heat removal during subsequent operation?
Buy a can of brake paint. calipers and don't mock the discs
what for? paint from a can will last 3/4 of the time the disc is used properly
It will be cheaper to paint with paint from a can
I painted mine from a can (golden Niva color), the main thing is to degrease it well and apply 3 layers of varnish. I really painted it in the summer at +40. Everything was fine.
I also made it from a balloon for 4 years!
what varnish? You mean the spray paint itself? Or is there some kind of varnish on top of it?
Yes, two or three layers of one paint are enough! I bought a German one for calipers, it’s heat-resistant!
It’s not an ordinary one that will come off the can, you need to take a heat-resistant one and paint it yourself and cheaply and respect to yourself (then someone will ask how well the color suits the rims, and you’ll say you painted it yourself))))
Powder is terrible, a very thin layer and it is not heat resistant!
heat-resistant from a cylinder, for 2 hours if in a free dacha mode while looking at the beauties of nature.
a can of heat-resistant paint, paper tape, an advertising newspaper, such as ekstaM, a degreaser, sandpaper/iron brush (depending on the condition of what you are painting in)
I took off the wheel, sanded it, degreased it, sealed it, leaving only the paint and painted it (do not paint the contact plane of the wheel) - after 20 minutes I put the wheel back
welcome to Scotland - (c)
we will meet you and fuck you... quietly, quietly, and no one will notice anything... the hat with the slits is already at the ready.. (c)
MrSwift
It seems to me that the area where the wheel meets the disc cannot be powder coated - there may be subsequent runout during braking. + gimor with removal.
There's really no question about price. Plus the wheels are not on the car now.
The question is whether it is possible to paint the hub with powder
shrek
Do you mean powder is not heat resistant? It is even applied at a temperature, and the calipers are painted in it.
MrSwift
So are you painting the wheels or the hub?! Why bother painting the hub?
There's really no question about price. Plus the wheels are not on the car now.
The question is whether it is possible to paint the hub with powder
shrek
Do you mean powder is not heat resistant? It is even applied at a temperature, and the calipers are painted in it.
Rear calipers are painted. the front ones, if they are on the ring, can peel off in theory, since the stock paint says bye bye. And it is quite possible that the paint will stick to the disc.
p.s. if the disks are removed then it’s generally a freebie. paint from a can.
welcome to Scotland - (c)
we will meet you and fuck you... quietly, quietly, and no one will notice anything... the hat with the slits is already at the ready.. (c)
stop. Aren't you talking about Brembes ass to up racing?
welcome to Scotland - (c)
we will meet you and fuck you... quietly, quietly, and no one will notice anything... the hat with the slits is already at the ready.. (c)
Comrades, painting matte thermal velvet is not a problem, but then where to grab a thermal SUBARU. NO WAY without inscriptions
MrSwift
A friend was painting a caliper on a motorcycle and it flew around! Perhaps the technology was violated or not degreased?
I liked the name of the topic))))) “brake discs” On the topic, I painted it with car paint and a brush without any spray guns, I applied two thick layers, I drove it for a year and everything is holding up perfectly. Before painting, I washed it well with solvent and did not prime it.
I thought the man was overheated. I'm about to paint the brake discs)))
sharino
Yes, good! I only have one badge left on my steering wheel!
Let me make it clear: My calipers have just been painted with inscriptions. I want to paint the brake discs specifically. Just not entirely. I think I wrote it in the first message
Let me attach a better picture.
In front I have these endeless ones. And at the back there is a drain, which also rusts over time. Asymmetry along the axes looks ugly. I want to paint it for symmetry and so it doesn’t peel off. The question is not what to paint with, but what the consequences of painting with powder are. In Japan, hub covers are also sold for a similar effect, but they cost some astronomical money.
murder
And then what will happen with the removal of the hemorrhoids and where will the beating come from?
Painting calipers
Painted brake calipers first appeared in the early 1980s. They were produced by Brembo. It was a great success. Red Brembo calipers have become a trademark and synonym for exclusive and good brakes throughout the sports car world. In the case of expensive cars, the color of the calipers may indicate the brakes of a certain configuration. For example, yellow calipers on a Porsche are an extra $7,000 or more for a carbon ceramic brake kit.
Today, Brembo produces calipers in over 40 different colors. The process of painting Brembo calipers includes the application of epoxy primer, polyurethane paint, as well as varnishing and drying at a certain temperature.
Car enthusiasts in the early 1990s, following the trend, began to use high-temperature engine paint to paint calipers. Then companies producing paints and varnishes caught on to the demand and began producing special paint and kits for painting calipers.
What color should I paint the calipers?
The color depends on your preference. The most popular colors are red, yellow, black and blue.
Here are some thoughts about colors:
Red looks good on all kinds of car colors, including red ones. Yellow is also a fairly universal color, but some may say that it is too bright and flashy. But again, this is a matter of preference. Black is a discreet color that won't attract much attention, but it won't show off brake pad dust too much. Compatible with any car color. Blue or cyan goes well with a blue, yellow or black car, but does not go well with red.
Should I remove the calipers or leave them on the car?
As with any painting, the best option is to remove the part to be painted. Dismantled calipers will be easier to clean and paint from different angles. With complete dismantling, it becomes necessary to disconnect the brake hoses, which will entail the entry of air into the system and the further need to bleed the brake system. Therefore, a more suitable option for most car enthusiasts would be to paint the calipers without removing them. To do this, you need to cover all parts adjacent to the caliper that are not subject to painting. Another option would be to remove the calipers, but not disconnect them from the brake hoses. They will need to be placed on some kind of stand so that they do not hang on the hoses.
To paint the calipers you will need:
Jack and supports for raising and holding the car; High temperature paint (spray or brush) for calipers; Black paint for the hubs (not necessary, but the result will be more impressive); Special varnish for calipers to protect the paint and add shine (some paints do not require varnish); Isopropyl alcohol for cleaning and degreasing, as well as lint-free rags; Wire bit and drill; Respirator (to protect from dust when cleaning calipers); Protective glasses; Newspaper or other covering material to cover unpainted areas; Masking tape.
Preparing the calipers
To begin with, we can advise you not to rush and allocate enough time for preparing and painting the calipers. It may take at least one day to do everything thoroughly.
Start by removing the wheels for easy access to the calipers. It's better to start by jacking up and removing both wheels. That is, it is better to prepare both calipers at once. This will take less time.
The importance of surface preparation cannot be overstated. Cleaning is an important part of painting calipers. This will determine how well the paint will adhere. They contain various contaminants, including dust from brake pads and oil. Poorly washed dirt can cause paint to peel off a couple of months after painting, and sometimes even earlier. It is necessary to achieve an immaculately clean surface of the calipers. The best option would be to sandblast the calipers before painting, but this option is not always available.
Hardened stains are not easy to remove. Start by cleaning the calipers using a wire brush. Take the wire bit on your drill and clean the entire outside surface of the calipers. Be careful not to damage the rubber boot on the caliper with the attachment.
If you notice any stubborn stains, especially in areas where brushing is not possible, you can use sandpaper or Scotch Brite wrapped around your finger. The wire nozzle must not be used immediately after using flammable cleaning agents. Using the nozzle may cause sparks. In addition to a wire drill, you can use an engraver for more thorough cleaning.
Next, you need to treat the calipers with a special cleaner. It is also advisable to pre-close adjacent parts. A special cleaner from a can can ricochet and land on rubber boots and hoses, having a destructive effect on them.
Once dry, sand them with P240 sandpaper. The next step is to use 600-grit sandpaper. Next, you need to spray the special cleaner on the caliper again. Finally, you need to wipe the caliper with isopropyl alcohol. The alcohol will remove any remaining dirt and degrease the surface.
The next step is to cover all areas not to be painted. To do this, use newspapers and masking tape.
Sanding with coarse abrasive to obtain a smooth surface
If you want to get a smooth surface of the calipers, you need to grind them with abrasives of 60 and 120. To grind hard-to-reach places, you need to use a grinder with an attachment with an abrasive of the same gradation.
Coloring
Brake calipers can in some cases become hotter than the outer surfaces of the engine, so it is important to use special high-temperature paint. Brake discs heat up from friction against the pads. Regular paint will burn or darken. Again, it all depends on the car and its operation. One way or another, special high-quality paint for calipers will last much longer.
Special heat-resistant paint can withstand temperatures up to 400 degrees Celsius. It can be used to paint calipers and engine parts. As an alternative, you can use paint designed for painting engine parts. It is also heat resistant.
The calipers can be painted with a brush or by spraying with a spray can. The brush option may be preferable if you use a good epoxy paint. We will look at this option later in this article. First, let's look at painting the calipers using a spray can.
If, when painting calipers, the air temperature is below +20 degrees Celsius, then it is better to first immerse the can in a bucket of hot water. This will improve the flow of the paint so it will spray into finer particles and apply more evenly.
You can use a special high-temperature primer before painting. It will increase adhesion and also serve as a good base for red paint (if you choose that color). As you know, red paint turns out brighter and cleaner if you use a white or light gray base. The primer must be applied in accordance with the instructions.
Only the metal parts of the calipers need to be painted. The remaining parts must be sealed with masking tape. It is also not advisable to paint the inside.
Before spraying, shake the can for 5 minutes and do a test spray to make sure the paint is sprayed evenly.
Now that everything is ready, you can start painting. It is better to apply the paint in thin, even layers. It is better to apply several thin layers with drying between layers (about 5 minutes) than one thick one. There is no need to apply too much paint. The paint will prevent heat from dissipating from the calipers. Excessive heat will cause the paint to fade. Up to 10 coats of paint may be required. It is necessary to ensure that the color is saturated and there is no unpainting.
A special heat-resistant varnish can be applied over the paint. The varnish must be applied after the paint has completely dried. Spray 2-3 layers of varnish for better shine.
To complete the picture, you need to paint the hubs. Better to paint it black. Usually 3-4 layers of paint are enough. Before painting the hub, you must also prepare and cover the adjacent areas that are not to be painted.
Combined method (brush + spray can)
It is more convenient to paint hard-to-reach places with a brush, since if you bring the can closer to such a place for better access, smudges may form.
Start by painting with a small brush. You will need to make up to 4 layers. You need to spray the required amount of paint into a plastic container and use it with a brush. This method will help paint areas that are difficult to reach. At this stage it is not important to cover the surface too well.
Next, apply about 6 coats of paint by spraying. Each layer should be thin and well dried. This will help avoid leaks.
There is no need to try to cover the surface in one go. Red paint is very low opaque and requires more coats than other colors. The last layer can be made a little thicker than all the others. This way the shine will be better.
You need to take a break between layers for 15 minutes (depending on the temperature and humidity, this time may be less or more). To check if the paint has dried, touch the surface. If the surface is sticky, you need to increase the drying time. If the applied layer takes too long to dry and the air temperature is normal, then you may have applied too thick a layer of paint.
The brush and spray combination works really well. A brush can be used to paint hard-to-reach places, and a spray can gives an even, smooth surface.
Painting with a brush
An excellent option would be to use a special two-component epoxy paint (with hardener) for the calipers. Cured paint will provide a more durable finish than single-component spray paints. Despite the fact that the paint will be applied with a brush, the surface can turn out to be very smooth, without streaks from the bristles of the brush, since high-quality paint of this type spreads well over the surface after application.
This paint can come in a set with a cleaner and a brush. It’s better to prepare your own brush. To do this you need to take a medium size. You need to cut the bristles by about half. The remaining short bristles will become stiffer and you will be able to better control the painting process. After cutting the bristles, you need to try to pull out the bristles that are poorly held so that they do not fly out during painting. After this, the brush will be ready to apply paint.
When painting with a brush, you will need 2 layers of paint with a 15-minute drying time after applying the 1st layer. Below, in the photo, you can see the result of painting the caliper with high-quality epoxy two-component paint using a brush.
The calipers are completely dry and the machine can begin to be used within 24 hours.