How to disassemble the dashboard of Lada Vesta
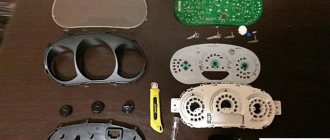
The instrument panel on Vesta has a modern design. The main readings are located in three large wells and are illuminated using SMD diodes. If necessary, this backlight can be replaced, but to do this you will have to first disassemble the Vesta instrument cluster.
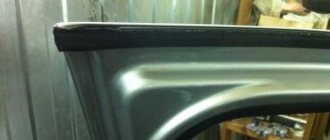
We looked at how to remove the dashboard earlier. After this, you will no longer need tools, because... Absolutely everything is held on by latches and clamps. There is not a single fastening screw. To remove the glass you will have to unclip several fasteners around the perimeter of the instrument panel:
Next, we dismantle the mask (covering in the form of wells), freeing the latches from engagement:
Probably the most difficult thing in the whole process is to remove the arrows of the instrument cluster. They should be unscrewed counterclockwise, and with good force, towards yourself. Very carefully, you can easily break the gear stop!
Now you can remove the back cover. We unclip the latches shown in the photo. If necessary, you can remove the covers from the arrow control mechanisms:
Now you can remove the circuit board, which is held by clips, from the device body:
Remove the instrument panel trim by picking it up from one of the edges:
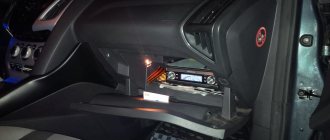
We dismantle the standard on-board computer after disconnecting its connector:
SMD LEDs are used to illuminate the speedometer scales, tachometer, arrows, BC and other indications. Some of them are shown in the photo:
The instrument panel is assembled in the reverse order. At the end, we check the work using an autotest. It is also recommended to glue the wells so that there are no squeaks in the future.
Categories of products that may be of interest to you based on the article “How to disassemble the dashboard of a Lada Vesta”:
How to remove the dashboard on Mitsubishi Lancer 9 and 10, remove and disassemble the instrument panel on Lancer
Category: Mitsubishi
Published on 08/14/2019 · Comments: Comments to the entry How to remove a torpedo on a Mitsubishi Lancer 9 and 10, remove and disassemble the instrument panel on a Lancer are disabled · Reading time: 3 min
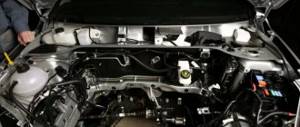
This disgrace opens up to us, we unscrew the four bolts shown in the photo below with a 10mm wrench. We remove the instrument cluster, it is held on by three self-tapping screws. You get this view in the bottom photo, where there should be a hole, we also unscrew the bolt on it.
Next, remove the lower dashboard trim, which is located at the driver’s feet, and only then the plastic steering column trims. We unscrew screws 1 and 3 in the photo below; screw 3 is not included in the frame and bolt 2 is not included.
Removing the instrument panel on a Mitsubishi Lancer
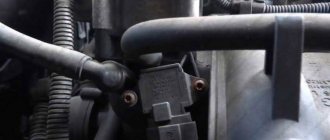
Next, we unscrew the right bolt in the 10th photo below, you can see it by looking under the steering column and looking to the right. It is imperative to disconnect the connector, otherwise the cover will not be removed.
After disconnecting the connector, pull the cover towards you; it is attached to the top using the same clips as the stove cover.
After removing the trim, it will be held on the hood opening handle, which is held on by two screws that can be unscrewed and the trim removed.
Next, from the bottom of the plastic steering column lining, unscrew the three screws and lower the steering wheel down and remove the lining. It is also necessary to remove the steering column switches; to do this, you need to disconnect the connectors from them and, squeezing the plastic latches, remove the switches from their seats.
We unscrew the three bolts securing the ECU unit and lower it onto the mat. To remove the heater control unit cover, insert your fingers into the holes of the temperature regulator and damper control and pull the cover towards you, overcoming the resistance of the plastic holders.
Other Lada Vesta
Products from the Dustershop77 range on the topic of the article:
| Name | Manufacturer | Price | Availability | Add to cart |
| DC060 | Filter mesh for the cabin air intake (with shagreen) | 900 / 700 rub. Discount: 500 rub. | >10 | |
| intro iso ant-1 | Antenna adapter Intro iso ant-1 | INTRO | 500 / 350 rub. Discount: 300 rub. | 2 |
| DC307-ASAM.30587 | Silent bolt (silent lock) ASAM 30587 | ASAM | 700 / 500 rub. Discount: 350 rub. | >10 |
| OBD-BT01 | Bluetooth OBDII - adapter for diagnostics | China | 1500 / 1000 rub. Discount: 900 rub. | >10 |
| DC1167 | Large shock absorber support cup cover | Analogue | 1000 / 700 rub. Discount: 500 rub. | 5 |
| multi-vc731 | On-board computer Multitronics vc731 | Multitronics | 8500 / 7500 rub. Discount: 6700 rub. | 2 |
| multi-c590 | On-board computer Multitronics C590 | Multitronics | 6900 / 5900 rub. Discount: 5490 rub. | 2 |
| DC909 | Oil filter cup puller | Analogue | 500 / 400 rub. Discount: 300 rub. | 2 |
| DC303 | 8mm L-shaped key for Renault oil plug | 200 / 150 rub. Discount: 100 rub. | 1 | |
| multi-cl590 | On-board computer Multitronics CL590 (without voice synthesizer) | Multitronics | 5900 / 5500 rub. Discount: 4990 rub. | 1 |
| multi-vc730 | On-board computer Multitronics vc730 | Multitronics | 7500 / 6500 rub. Discount: 5500 rub. | 2 |
| DC304 | Adapter key for Renault oil plug, 4 sides 8mm, 4 sides 13mm | 400 / 300 rub. Discount: 250 rub. | 7 | |
| DC314 | Case for glasses (eyeglass case) with bracket and parts for installation (original) | Original | 2300 / 1900 rub. Discount: 1500 rub. | 1 |
| DC452-07445 | External antenna Renault Duster ASAM 07445 analogue 7700773864 | ASAM | 500 / 300 rub. Discount: 250 rub. | 1 |
| DC691-LA6-V003 | Anti-theft protection for the electronic unit for Duster 2020, Largus, Logan 2, Sandero 2, Vesta, Xray, Arkana | 4900 / 3900 rub. Discount: 3400 rub. | 7 | |
| PU-4TC-BLACK | Multitronics PU-4TC parking sensors for on-board computers (sensor color: black) | Multitronics | 3500 / 3200 rub. Discount: 2850 rub. | 2 |
| DC1250 | Set of small fuses (10 pcs) | Analogue | 200 / 150 rub. Discount: 100 rub. | 4 |
| DC689 | Anti-theft protection with lock for OBD2 connector | 5000 / 4000 rub. Discount: 3500 rub. | 2 | |
| DC456-8200684863 | Antenna base 8200684863 original | Original | 1200 / 900 rub. Discount: 600 rub. | 1 |
| DC494-8200826850 | Case for glasses (eyeglass case) without bracket original 8200826850 | Original | 1200 / 900 rub. Discount: 700 rub. | 2 |
| DC190 | Monitor for rear view camera, foldable | China | 2500 / 2000 rub. Discount: 1700 rub. | 2 |
| DC533-7703072424 | Rivet for fastening the bumper bracket D=4.8mm (price for 1 piece) original art. 7703072424 | Original | 300 / 250 rub. Discount: 200 rub. | 7 |
| DC313-8200741954 | Renault ceiling handrail original | Original | 1900 / 1300 rub. Discount: 1200 rub. | 1 |
| DC455-200910477R | Exhaust pipe attachment (muffler) (diameter 50mm) 200910477R original | Original | 3500 / 2900 rub. Discount: 2400 rub. | 1 |
| DC1164-243454838R | Battery positive terminal cover original 243454838R | Original | 800 / 600 rub. Discount: 450 rub. | 3 |
| DC954-8200719629 | Manifold absolute pressure sensor MAP sensor for 2.0 and 1.6 engines - F4R/K4M original 8200719629 | Original | 2500 / 1900 rub. Discount: 1700 rub. | 2 |
| DC1195 | Fuse set 180pcs in a plastic box | China | 1000 / 700 rub. Discount: 600 rub. | 1 |
| DC305 | Nameplate sign Renault emblem original art. 908894785R | Original | 3000 / 2500 rub. Discount: 2300 rub. | 1 |
| DC438-32006 | Windshield washer pump gasket ASAM-SA 32006 (analogue 289215361R) | ASAM | 300 / 200 rub. Discount: 150 rub. | 7 |
| DC948-7700424981 | Sun visor holder original 7700424981 | Original | 500 / 350 rub. Discount: 300 rub. | 8 |
| DC1166 | Shock absorber support cup cover, small | Original | 700 / 500 rub. Discount: 350 rub. | 2 |
| DC485-497612479R | Power steering fluid pressure sensor original Renault 497612479R | Original | 1800 / 1400 rub. Discount: 1200 rub. | 1 |
| DC1610 | Large red shock absorber support cup cover (Sport) | Analogue | 350 / 200 rub. Discount: 100 rub. | 8 |
| DC1466-30539 | Fuel tank cap with lock | ASAM | 800 / 600 rub. Discount: 500 rub. | 5 |
| DC990-8200060049 | Seat heating switch original 8200060049 | Original | 800 / 700 rub. Discount: 600 rub. | 1 |
| DC1143 | Renault mirror control button (joystick) | Original | 700 / 500 rub. Discount: 450 rub. | 5 |
| PU-4TC-GRAY | Multitronics PU-4TC parking sensors for on-board computers (sensor color: gray) | Multitronics | 3500 / 3200 rub. Discount: 2800 rub. | 2 |
| DC1163 | Sun visor (sun protection) with mirror, right | Original | 1500 / 1300 rub. Discount: 1100 rub. | 8 |
| DC997-255678753R | Steering column switch right article number 255678753R | Original | 2800 / 2700 rub. Discount: 2700 rub. | 1 |
| DC1404 | Trunk lid and door lock activator (Asam/MANOVER analogue 7700712901) | Analogue | 1400 / 900 rub. Discount: 700 rub. | 1 |
| DC454-200910184R | Exhaust pipe attachment (muffler) (diameter 45mm) 200910184R original | Original | 3500 / 2800 rub. Discount: 2300 rub. | 1 |
| DC1144-7700413867 | Renault interior mirror original 7700413867 | Original | 2400 / 2200 rub. Discount: 1500 rub. | 1 |
| DC634-601986892R | Speed sensor (plug) for cars with ABS original 601986892R | Original | 1900 / 1650 rub. Discount: 1450 rub. | 1 |
| DC996-255675128R | Steering column switch left article number 255675128R | Original | 4700 / 4300 rub. Discount: 3800 rub. | 2 |
| DC1027-8201167988 | Left steering column switch with PTF article number 8201167988 / 255400337R | Original | 6000 / 4700 rub. Discount: 4000 rub. | 1 |
| DC657-6001548677 | Door lock bolt (standard) Renault 6001548677 | Original | 400 / 300 rub. Discount: 250 rub. | 3 |
| DC1517-8200674121 | Speedometer drive shaft 8200674121 | Original | 700 / 500 rub. Discount: 400 rub. | 1 |
| DC1617 | Damper for the glove compartment (for smooth opening) universal | Analogue | 1800 / 1500 rub. Discount: 1300 rub. | 1 |
| V160-234000 | Eyeglass case (case for glasses) | Original | 800 / 600 rub. Discount: 600 rub. | 1 |
| DC623-8200547283 | Speed sensor original Renault 8200547283 / 6001548870 (without ABS) | Original | 1600 / 1100 rub. Discount: 900 rub. | 1 |
| DC1520 | Solenoid relay 1.6 H4M | Analogue | 1900 / 1600 rub. Discount: 1400 rub. | 1 |
| DC1665-21800141301000 | Manifold absolute pressure and temperature sensor MAP sensor 1.6l VAZ 21129 original 21800141301000 | Original | 2800 / 2200 rub. Discount: 1900 rub. | 1 |
| intro iso fr-12 | Adapter for connecting a radio | INTRO | 500 / 450 rub. Discount: 400 rub. | 0 |
| DC565 | Outdoor small antenna (universal) | China | 700 / 600 rub. Discount: 400 rub. | 0 |
| OBD-WF01 | Wi-Fi OBDII ELM327 - adapter for diagnostics | China | 1700 / 1500 rub. Discount: 1300 rub. | 0 |
| DC911 | Fuel tank plug (cover) with key Duster/Logan/Sandero/Largus/Clio | Analogue | 1000 / 700 rub. Discount: 500 rub. | 0 |
| INTRO-PT-04 | Parking sensors with rear view camera included (black) | INTRO | 5200 Discount: 5200 rub. | 0 |
| Incar-VDR | Rear view mirror with DVR and monitor | INTRO | 25000 / 19900 rub. Discount: 19,000 rub. | 0 |
| DC1134-7700427640 | Door limit switch (switch) original 7700427640 | Original | 1300 / 900 rub. Discount: 800 rub. | 0 |
| INTRO-PT-05 | Parking sensors with rear view camera included (gray) | INTRO | 5200 Discount: 5200 rub. | 0 |
| DC1360-7711238598 | Rechargeable battery original Renault 7711238598 | Original | 9000 / 8000 rub. Discount: 7489 rub. | 0 |
| VR-518 | DVR VR-518 | INTRO | 3600 Discount: 3600 rub. | 0 |
| DC129 | Rear view mirror with DVR and rear view camera included | China | 8500 Discount: 8500 rub. | 0 |
| DC059 | Filter mesh for the cabin air intake (smooth) | 600 / 600 rub. Discount: 300 rub. | 0 | |
| DC306-6001548677 | Silent bolt (silent lock) Renault original art. 6001548677 | Original | 1500 / 900 rub. Discount: 700 rub. | 0 |
| DC653 | On-board computer Ancel (Ankel) | China | 3800 / 3200 rub. Discount: 2700 rub. | 0 |
| DC642 | 2.4G Wireless RCA Video Transmitter-Receiver (Camera to Monitor Kit) | China | 1700 / 1300 rub. Discount: 1000 rub. | 0 |
| VCO-2-02 | Headrest with monitor for Renault Duster (black) | 8800 Discount: 8800 rub. | 0 | |
| VCO-1-01 | DVR VICO-SF2 for Renault Duster | VICO | 4700 Discount: 4700 rub. | 0 |
| VCO-1-02 | DVR VICO-TF2 PREMIUM for Renault Duster | VICO | 5900 Discount: 5900 rub. | 0 |
| VCO-1-03 | DVR VICO-TF2+ PREMIUM for Renault Duster | VICO | 6700 Discount: 6700 rub. | 0 |
| VCO-1-04 | DVR VICO-WF1 for Renault Duster | VICO | 8000 Discount: 8000 rub. | 0 |
| VCO-2-01 | Headrest with monitor for Renault Duster (gray) | 7800 Discount: 7800 rub. | 0 |
How to disassemble or repair vinyl siding?
Replacing siding yourself (with your own hands) can save you not only a lot of money, but also nerves from incorrect or illiterate work of the installers. Basically, in this article we will consider issues specifically related to the repair of already installed siding, related to the transfer or replacement of windows, doors, and the color of the material itself. There is nothing easier than reconstructing already installed siding, and we will talk about this below.
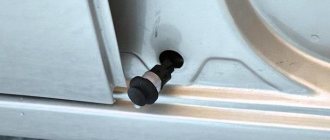
And so, in order for us to sort out or replace the already installed siding, we will need a couple of specific tools. Firstly, this is the so-called siding zip (siding unpacker), which you can try to find in finished form, which is unlikely. It’s easier to make it yourself from a handy piece of platinum metal 3-5mm thick. We will consider the tool and its application below in pictures. We will analyze not only how to disassemble a finished wall using a tool without extra effort, but also how to break the assembled layer. Working with vinyl siding does not require any special skills, the main thing is to understand the construction system.
So, we take several plans above the window or door and begin to dismantle them. Please note that the nail puller must be used with a wide claw in order to prevent the insulation from breaking through and the windproof membrane, which is supposed to be under each covering of this type if it was installed correctly. We take the ZIP tool and begin to unfasten one of the previously installed strips from below. After dismantling, do not forget to mark the line of its location on the membrane, this will be useful for the accuracy of reassembly after reassembly.
The beauty of vinyl is that you can dismantle part of it anywhere on the wall or foundation without much effort. One person can handle the work independently without the help of others. As shown in the picture, hook the edge of the siding with a ZIP tool by sliding it into the fastening seam and pushing up to hook it. Then lightly pull down, smoothly opening the lock. If the siding is recently installed, it will be soft and flexible. Older options lose their elasticity over time and may become brittle. In the latter case, be careful with shrunken vinyls. After partially opening the vinyl lock, it can be finally opened using your fingers longitudinally, snapping out the remaining part of the lock. The system is unfastened, you can begin dismantling the siding strips. Remove mounting nails from the bottom strip. As stated earlier, the nail puller must have a wide jaw!
Ready! Next, you can remove the required number of strips of material for further replacement or installation under new window and door openings. Assembly is carried out in the reverse order, taking into account the verification of the fastening lines that we noted at the time of dismantling.
The next steps are described in these articles:
How to Install Siding Around a Door or Window How to Install/Assemble Siding
Disassemble vinyl siding like you did it yourself.