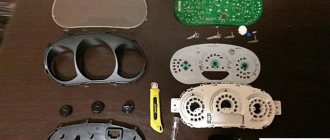
How to remove the front seats and rear sofa of Lada Vesta
_x000D_
It is necessary to remove car seats when installing covers, as well as for repairs or modifications to the interior. The process is not complicated, but it has some features that are best known in advance. For example, in addition to the usual tool (14 head), you will also need a Torx T40 (asterisk). Let's look at the process of removing Vesta seats.
_x000D_
Lada Vesta. Installing seat covers
Eco-leather covers. My channel Our client gets my videos
about Lada
Vesta
.
- the pillow is dismantled as described about 30 years ago;
- unscrew the lower fastening bolts of the left and right seat belts using a 14mm socket;
- the rear seatbacks are lowered;
- the upholstery of the left and right side arch is removed;
- the self-tapping screw securing the side window
; - it detaches from the body, making an effort to overcome the hold of the plastic fasteners;
- the buttons securing the upholstery of the trunk shelf are removed;
- use a flat screwdriver to remove the gaskets for the right and left seat belts from the holes in the upholstery;
- remove the trunk upholstery as an assembly with the left and right side window trim, threading the seat belts through the holes, and also disconnecting the wiring harness deck from the additional brake signal installed on the shelf upholstery;
- using a Torx T20 head, unscrew three self-tapping screws that secure the fastening of the side window
to the surface of the shelf for all sides, the parts are separated.
Front seats
_x000D_
Move the seat as far back as possible. Remove the two front skid mounting bolts.
_x000D_
_x000D_
Move the seat all the way forward and remove the two rear mounting bolts. Disconnect the connectors with the heating wires and remove the front seat.
_x000D_
_x000D_
Installation is carried out in reverse order. Apply Fiol-1 lubricant to the rubbing areas of the slide, 10 g per seat.
_x000D_
Main seat faults on Lada Vesta
They become unusable for several reasons:
- The sled creaks, stopping the movement. This can be corrected by adding lubricant to the mechanism.
- Faulty backrest and height adjustment. Mechanical adjustment can always be repaired.
- Violation of the integrity of the upholstery of the chair, you will feel it, because the fasteners of the frame will rest against the back. Replacing the chair will correct the situation. If you order a replacement from a dealer under warranty, you need to check that the new seat matches the old one in terms of parameters: the same texture, there is (or is not) a heating element, etc.
At the back of the armrest, we bend the factory upholstery a little and there is a zipper there, unfasten it and remove it a little. IMPORTANT - the armrest must be in the down position. Now we take Torx T40, there will be one bolt - unscrew it, don’t be afraid.
As soon as we have removed the bolt, we raise the armrest to the highest possible position “all the way” and begin to remove it, pulling it from side to side.
Start. Removing the front seat
Seat bolts and wires
That’s it, now you can safely remove the seat (I vacuumed it in one go, since that’s the case here :D). I vacuumed with a Soviet car vacuum cleaner, which I got from my grandfather (I will attach a photo later). The front passenger seat is removed in the same way and is no different. It’s more convenient to start putting on the covers from the bottom of the seat, just take them and pull them on.
Plastic inserts
Plastic inserts 2
Where there are plastic inserts, we simply insert the covers into them carefully (I did not remove these inserts). We pull the hooks from below and hook them under the seat from below.
Attaching covers to the seat
The lower part of the seat is ready. There is nothing complicated at the top either. We take the cover, pull it on top, push it between the seats and also pull them, where there are ropes we pull and tie.
Headrest 1
Headrest 2
Finished front seat
The driver's seat is ready! There is no point in describing the process for the passenger one; it is similar and not fundamentally different. Let’s move on to the rear seats, where a number of nuances also await us. We remove the head restraints by pressing a special “button” located next to each of them and remove them one by one.
Removing the rear sofa
We begin removal from the bottom cushion; there is a fastener on each side (visible in the photo above).
Fastening on which the lower cushion is held in front
You need to carefully grab and pull straight vertically upward, they should snap off.
Mount 1
Mount 2
Mount 3
Rear seat bottom cushion
This is the largest element, everything is tightened very simply and simply, you just need to pull it tightly and tie it tightly with ropes.
Rear seat belt attachment
With the upper seats, it was decided not to remove them; fortunately, it’s already possible to put them on normally. The only thing that gets in the way is the central seat belt, where you need to unscrew one bolt (Photo above).
Rear sofa
It turns out something like this, then we put the seat belt back again and screw the bolt into place. The bottom cushion is inserted in the same way as when removing it, only in the opposite direction. First you need to push it as far back as possible so that the latches go into place, then lower the pillow and gently press it into the holes.
The front seats are installed in the same way as they were disassembled: do not forget to snap all the fasteners, connect the wires in their places and screw the seats with 4 bolts. Those who have the equipment with an armrest: you need to install it on the seat in a vertical position, lower it to the lowest possible position and screw on one single bolt, tie it tightly with ropes so that the cover fits tightly.
General view of the rear seats
The final result can be seen in the photo above. I’m very pleased with the result, it’s a very pleasant feeling when you sit on the seat and the appearance has now definitely changed for the better! Of course, it will be more difficult for one person to pull on the covers, but it’s easier and more efficient for two people.
But having seen so many things, there is no trust in them, yet you yourself will definitely do better and conscientiously, and you will also save money! Good luck to everyone!
Price tag: 0 ₽ Mileage 2427 km
| This is what a Lada Vesta seat looks like in an eco-leather cover |
Rear sofa
_x000D_
Lift the cushion up so that the rear seat front fasteners (hinges No. 2) come out of the fastener hole (No. 3).
_x000D_
_x000D_
Move the sofa seat towards the trunk, then lift it up so that the hinge (No. 2) comes out of its engagement on the body (No. 3). Remove the rear sofa.
_x000D_
_x000D_
Remove the bolt (No. 5) securing the right seat belt buckle and the lower mounting point of the middle belt. Unscrew the four bolts (No. 3) of the lower fastening of the sofa backrest. Pull the latches (No. 1 and 2) up and tilt the backrest forward.
_x000D_
_x000D_
Remove the bolts (No. 1) and then remove the rear seat backrest.
_x000D_
_x000D_
The process of removing Vesta's seats and sofa is also shown in the video:
_x000D_
_x000D_
Let us remind you that model covers will help improve the interior of Vesta, as well as preserve the interior from aging.
Categories of products that you may be interested in based on the article “How to remove the front seats and rear sofa of a Lada Vesta”:
Assembly
After carrying out the necessary repairs on the Lada Vesta, the seat is assembled in the reverse order:
- Vertical backrests are installed and bolted;
- Fasten the middle seat belt;
- The sofa is fixed in brackets;
- Finally installed by gently pressing on the front edge.
In the presented video of disassembling the rear seat of a Lada Vesta, all stages are clearly visible.
How to remove the back
seat on a Lada Vesta
with your own hands
The car is prepared for work, the negative terminal of the battery is disconnected.
Floor mats and trunk of Lada Vesta
Products from the Dustershop77 range on the topic of the article:
| Name | Manufacturer | Price | Availability | Add to cart |
| DC709 | Gas pedal cover for Duster 2020 / Captur / Logan / Terrano / Vesta / Isk-Ray | Duster-Guard | 1000 / 800 rub. Discount: 700 rub. | >10 |
| DC985 | Clip for attaching the mat to standard fasteners | Original | 250 / 200 rub. Discount: 150 rub. | >10 |
| DC1198 | Floor part of fastening clip for interior mats | Analogue | 300 / 150 rub. Discount: 100 rub. | 9 |
| DC590-1500403/LXR111701 | Carpet covers (6 pcs) Lada X-Ray | Pt GROUP | 2500 / 1900 rub. Discount: 1500 rub. | >10 |
| DC885 | Armrest Kaptur, X-RAY, SANDERO 2, STEPWAY, LOGAN 2 | ArmAuto | 2200 / 1800 rub. Discount: 1600 rub. | 2 |
| DC494-1S.061.000 | Universal loading mat for trunk | Novline | 1900 / 1700 rub. Discount: 1500 rub. | 4 |
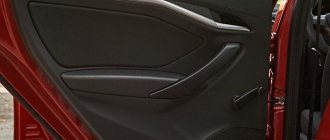
| V075 | Armrests for front doors (2 pieces) | ArmAuto | 1000 / 600 rub. Discount: 600 rub. | 2 |
| V021-01400404 / LVE111703 | Tunnel pads for carpet (2 pcs) | Pt GROUP | 1500 / 1300 rub. Discount: 950 rub. | 3 |
| DC1111 | Moisture-absorbing car mats with absorber, black, 60x40cm, 2 pcs. | 500 / 300 rub. Discount: 150 rub. | 4 | |
| DC589-1500404 | Tunnel pads for carpet (2 pcs) Lada X-Ray | Pt GROUP | 1900 / 1500 rub. Discount: 1000 rub. | >10 |
| DC1053 | Moisture-absorbing car mats 50x38cm and 25x38cm (4 pcs) | 500 / 300 rub. Discount: 200 rub. | 5 | |
| DC1036 | Interior moisture-absorbing mat 50×40cm (2 pcs) | 300 / 150 rub. Discount: 100 rub. | 3 | |
| V059-DC887 | Armrest Lada VESTA | 1800 / 1500 rub. Discount: 1500 rub. | 1 | |
| V074 | Armrests for rear doors (2 pieces) | ArmAuto | 900 / 700 rub. Discount: 700 rub. | 5 |
| DC1052 | Moisture-absorbing car mats 50x38cm (2 pcs) | 400 / 250 rub. Discount: 150 rub. | 4 | |
| V135 | Trunk mat for Lada Vesta Cross (for configuration without raised floor) | 1500 / 1100 rub. Discount: 1100 rub. | 3 | |
| V136 | Trunk mat for Lada Vesta Cross (for configuration with raised floor) | 1500 / 1300 rub. Discount: 1300 rub. | 2 | |
| DC1623 | Driver's mat polyurethane with high side Duster 2011-2015 2WD (Element) | 1700 / 1400 rub. Discount: 1200 rub. | 1 | |
| V134 | Trunk mat Lada Vesta 2015-sedan | 1500 / 1300 rub. Discount: 1300 rub. | 1 | |
| V139 | Raised floor Lada VESTA | ArmAuto | 2500 / 1900 rub. Discount: 1900 rub. | 1 |
| DC882 | Carpet door sill covers Sandero 2014/Stepway 2014/ X-Ray | Duster-Guard | 2600 / 2000 rub. Discount: 1700 rub. | 4 |
| DC1624 | Driver's rubber mat with high side 2011-2015 2WD/4WD (Agatek) | Agatek | 1500 / 1300 rub. Discount: 1000 rub. | 1 |
| V133 | Floor mats for Lada Vesta (4 pcs) | Analogue | 2000 / 1700 rub. Discount: 1700 rub. | 1 |
| DC887-V059 | Armrest Lada VESTA | ArmAuto | 2200 / 1800 rub. Discount: 1700 rub. | 1 |
| V137 | Raised floor Lada X-RAY (bottom) | ArmAuto | 2500 / 1900 rub. Discount: 1900 rub. | 1 |
| V138 | Raised floor Lada X-RAY (top) | ArmAuto | 2500 / 1900 rub. Discount: 1900 rub. | 1 |
| DC1039 | Moisture-absorbing mat 40x45cm (2 pcs) | 300 / 200 rub. Discount: 150 rub. | 0 | |
| V060 | Armrest for door Lada VESTA, SW (carbon) | 1000 / 700 rub. Discount: 700 rub. | 0 | |
| V130 | Organizer for standard armrest | ArmAuto | 700 / 500 rub. Discount: 500 rub. | 0 |
| DC889 | Armrest for door Lada VESTA, SW (carbon) | ArmAuto | 1200 / 1000 rub. Discount: 700 rub. | 0 |
Rear seat layout
To fold the rear seat on a Vesta, pull the lock on the backrest up. As a result, the rear seats fold almost horizontally, but there is no flat floor. The folded backrest is approximately 10-15 cm higher than the level of the trunk floor. Alternatively, raise the trunk floor (raised floor).
How to fold out the rear seats on a Lada Vesta
Transformation of Vesta's salon on video:
Read also instructions for removing Vesta seats, as well as a comparative review of all LADA car seats.
LADA reveals the interior of the new LADA Vesta SW Cross and LADA Vesta SW, which combine expressive design and versatility. Bright and fast, these cars embody a new philosophy of comfort and functionality, complementing the model range of one of the most popular cars on the Russian market - LADA Vesta.
The interior of LADA Vesta SW Cross and LADA Vesta SW is made in a single concept with the body design and represents a real living space. Especially for Vesta SW Cross, designers created a bright orange color scheme for the interior design - these cheerful accents are used on the doors, dashboard and seat upholstery. Stylish lighting decorated the dashboard - the instrument cluster scales now have an orange border.
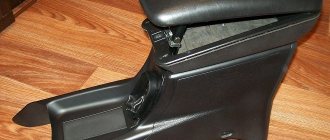
Equipment that was previously unavailable and, as a rule, used on models of a higher class deserves special attention. This is the first introduced three-stage heated front seats, a center console with an armrest and a storage box, equipped with a USB port, a socket and buttons for heated rear seats, a rear center armrest with cup holders.
Thanks to the use of a new concept in the body design, the space above the heads of the rear passengers was increased by 2.5 cm, and the back of the rear sofa folds in a ratio of 1/3 to 2/3. The luggage compartment of the car is a multifunctional space, equipped with a double floor, an organizer, three nets for securing cargo, and various niches. The luggage compartment volume, taking into account the niches, is 480 liters (up to the curtain shelf), including 95 liters under the false floor, and the luggage compartment volume with the second row seats folded (up to the window sill line) is 825 liters. The luggage compartment is accessed using a button located on the trunk lid.