When purchasing a car, car enthusiasts do not always expect that as they use it, it will wear out and problems of varying degrees of complexity will arise. Vehicle owners may not know how to deal with a particular breakdown in the future, how to replace a part, or simply make the interior more comfortable than it already is. Ford cars are quite popular all over the world and in Russia due to their good quality and average price, and drivers often encounter problems that require removing the glove compartment, or it stops opening and closing itself.
When to remove the glove compartment
The procedure must be carried out if:
- The glove compartment does not open;
- Doesn't close;
- The lid is broken and there is no way to repair it on site or replace it with a new one;
- The backlight does not work;
- Noisy or acting up under the glove compartment;
- There are problems with the front panel;
- There is a desire to replace the glove compartment with a new one or install something in its place.
Glove compartment Ford Focus 3
What to do if the glove compartment is broken
To solve the problem with the glove compartment, you need to directly remove it to repair or replace it. There are two ways:
- Removing the dashboard (front panel);
- Removing the glove compartment itself.
How are these methods different?
If you remove the glove compartment, everything is done clearly according to the instructions and does not require special knowledge and skills - you just need to correctly understand what to disconnect and why.
Removing the dashboard is a larger process that takes more time. This should be done if work will be carried out not only on the glove compartment, but also on the entire panel, or if for some reason the glove compartment cannot be removed using the standard method.
How to remove the glove compartment on a Ford Focus 3
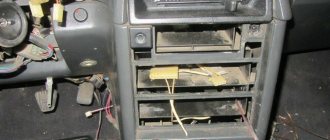
First you need to remove the side panel cover. It can be easily removed, as it is designed so that in case of breakdowns inside the dashboard, it can be opened and closed without problems, and so that the motorist does not have to remove the entire front panel. To do this, you can simply pry its edges with a wide flat screwdriver or spatula and pull it towards you.
Removing the side plug on a Ford Focus
The plug is lifted and pulled towards itself until all its clips are unfastened and it is removed. Under the plug there are two screws - black and white. To work directly with the glove compartment and remove it, you need to unscrew the black one and leave the white one alone.
There are also screws inside the glove compartment itself that you should pay attention to further. Having lifted the glove compartment lid and fixed it in this position, you need to find two screws on top and, unscrewing them, close the glove compartment lid. If it does not open, there is no need to touch it.
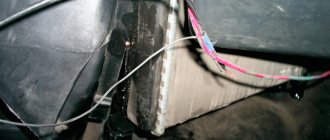
Under the glove compartment there are two latches and a fabric spacer that will also get in the way, so you first need to unfasten the latches (they just pull down) and then remove the fabric panel. There is a fuse box inside, so there is no need to touch anything else - you could accidentally touch something important and cause more serious damage to the car than a glove compartment malfunction.
There are also other screws under the glove compartment that need to be removed, so the steps are as follows: you crawl further under the glove compartment and look for two black screws next to the yellow clips that held the latches. Do not touch the gray bolts - they are not needed now.
Location of the two bottom bolts
Now the glove compartment is held on only by a few clips that simply snap off. It is most convenient to start removing the glove compartment from the right side of the fastenings, where the plastic plug was removed and where the very first bolt was unscrewed. Gently pull down the part of the glove compartment that we then “released”. It bends, so you have to be careful not to break it off completely.
When the clip on the part is detached, you can begin to remove the remaining clips - they are located around the perimeter of the glove compartment, approximately in the corners. After disconnecting all the clips, the glove compartment simply pulls towards itself and is removed. Now you can carry out repair work on it - for example, fix the lid or light.
Removed glove compartment
Installing the Ford Focus glove compartment back
After the glove compartment has been removed and repaired, the question arises of how to put it back. Everything is done exactly the same way, only in the reverse order - as if from the end, that is, first the glove compartment is put in place, secured with clips, the two bottom screws are screwed in, the fabric panel is laid back, latches are placed on it, two screws are screwed into the glove compartment, and another one on the side. The last step will be to install a plastic panel on the side of the dashboard.
Robotic box on Lada Vesta
In addition to the indicated manual gearboxes, Vesta is equipped with a robotic version of the AMT. It is suitable for drivers who practice a very calm type of driving and is not suitable for those who like to drive aggressively and actively.
https://www.youtube.com/watch?v=5ZVDFBq3NzU
The main disadvantage of the robot compared to the manual Lada Vesta is considered to be its “thoughtfulness”. That is, according to reviews from motorists, the robotic gearbox does not allow sharp acceleration to be made quickly enough. In addition, during the gear shift process, short jerks throughout the car are observed, which affects the comfort for the driver and passengers.
Rate the article!
Tips for removing the glove compartment
- It will be more convenient to focus on adjacent parts when looking for screws. So, you need to look for the lower screws under the dashboard trim near the yellow clips.
- It is best to take a small and not too massive screwdriver - it will be most convenient to work with;
- Don’t forget about a flashlight - the backlight will help you see the screws in the dark and not touch important parts;
- If for some reason you cannot remove the glove compartment separately, proceed to remove the entire front panel. It will take more time, but you will solve the problem;
Removed dashboard from Ford Focus 3 - When reassembling, do everything sequentially, in the same order as you took it apart, so as not to confuse anything;
- It is recommended to keep the screws from each place separately so that when installing the glove compartment back, you do not mix them up;
- The location of the screws is inconvenient, and there is a chance that you will have to lower yourself to the floor of the car. In order not to stain your clothes, dress in something that, as they say, is not a pity, or wash the floor of the car first - it will never be superfluous;
- Do not tug too hard on the glove compartment or plug when you remove them - you may accidentally damage or even break the plastic parts, which will only lead to more repairs.
Lada Vesta repair books
Products from the Dustershop77 range on the topic of the article:
| Name | Manufacturer | Price | Availability | Add to cart |
| 35026 | Repair book for VAZ LADA Xray | 1700 / 1500 rub. Discount: 1300 rub. | 1 | |
| DC1661-210102692R | Water pump (pump) engine 1.6 H4M original 210102692R / 210102248 | Original | 4100 / 3600 rub. Discount: 3300 rub. | 1 |
| DC1662-WPP2463 | Water pump (pump) engine 1.6 H4M PILENGA analogue 210102692R / 210102248 | Analogue | 1600 / 1200 rub. Discount: 990 rub. | 1 |
| DC1666-LWP0129 | Water pump (pump) 1.6 / 1.8 21129/21179 LUZAR analogue 21129130701020 / 21176130701000 | Analogue | 2000 / 1800 rub. Discount: 1700 rub. | 1 |
| DC1629-1040321ZH | Air conditioner radiator Logan 2014-, Vesta 2015- (Termal) | Analogue | 5500 / 4800 rub. Discount: 4300 rub. | 1 |
| 35025 | Repair book for VAZ LADA Vesta | 1500 / 1300 rub. Discount: 1200 rub. | 3 | |
| DC1553-7701208363 | Set of sealing rings for air conditioner pipes (6 pcs) original 7701208363 | Original | 1100 / 900 rub. Discount: 700 rub. | 0 |
The glove compartment is a fragile part
Experience shows that owners of Fords of different brands often have their upper glove compartments break down - the lid doesn’t work, something is acting up inside, or the light is broken. Whether it depends on the manufacturer or on improper operation, the problem is common, and cars are still different, and it can arise in different situations.
Upper glove compartment on a Ford Focus
The best advice that can be given is a reminder that you need to take care of your car and treat it with more care. Despite the fact that removing the glove compartment is not difficult, it can take a long time. It is much easier to make sure that it does not break, not to slam the lid too hard, and then you will not have to take it out in the future to look for problems.
How to remove the glove compartment on a Ford Focus: detailed photo instructions
4.9 (97.14%) 7 votes
How to make a cooled glove box for Lada Vesta
The Lada Vesta cooling system includes engine and heater radiators, a thermostat, a pump, an expansion tank, a temperature sensor, a fan, pipes, hoses and clamps. In addition, the cooling system of the Lada Vesta uses an air conditioning system.
Purpose
During engine operation, the housing and cylinders heat up. If the temperature exceeds 100 degrees, the lubricant will burn, and the friction force will increase many times over. As a result, the engine will fail due to jamming of the rubbing parts.
The circulation of coolant allows you to maintain a stable temperature in operating parameters. If any element of the system fails, its functionality is disrupted, without which it is impossible to operate the vehicle.
Principle of operation
Antifreeze is used as a coolant: a mixture of ethylene glycol and distilled water. The lower the temperature outside the car, the higher the percentage of the chemical reagent (its density) should be.
Important! When using refrigerant, do not mix it with oil. The system must be filled with antifreeze of the same brand recommended by the manufacturer.
Liquid circulation occurs in two circuits. The small circle begins and ends in the engine, including the heater radiator. It operates when the car is not moving or the engine temperature remains up to 85 degrees.
At temperatures above 85 degrees. The thermostat includes a large circuit that involves the engine radiator. Hot antifreeze flows through the outlet hose into the radiator, where it cools and is sent back to the engine. Cooling occurs by air flows entering through the air intakes of the front bumper.
If this is not enough due to high outside temperature or stopping the car with a hot engine, then a signal from the electronic control unit turns on the fan behind the radiator. To control the engine temperature, in addition to the thermostat, there is a special sensor. The operation of the fan does not depend on the position of the key in the ignition switch.
A cabin heater is integrated into the Lada Vesta engine cooling system. Hot engine antifreeze enters its radiator and, after cooling, returns to the large circuit.
When the coolant temperature is above 100 degrees. and a pressure of 0.1 bar the expansion tank comes into effect. The fullness of the cooling system is determined by the level of antifreeze in the tank. In a plastic translucent container, the liquid should be halfway between max. and min. marks. After reaching a pressure in the range of 1.1-1.3 bar, the coolant is discharged into the system.
With the air conditioning system in the Lada Vesta there is a function of a cooled glove compartment (glove compartment). The air duct branch flap is located in the upper left corner of the glove box. To lower the temperature in the glove compartment, you need to open the valve and close the central air ducts while the air conditioner is running.
How to make a cooled glove compartment on a Lada with your own hands
The option of a cooled glove box appeared on Lada Vesta and Lada XPAY. On other models you can do this function yourself.
For production you will need:
- drain hose from a washing machine or sink;
- a ready-made handle from the headlight range control or cut out of plastic;
- a piece of plastic;
- insulation;
- glue moment;
- two fittings with rubber gaskets;
- two clamps;
- two screws.
The entire manufacturing process consists of 6 stages:
- remove the glove compartment from the niche;
- install a valve in it and thermally insulate the box;
- cut into the upper air duct from the air conditioner and glue the fitting there;
- Glue the fitting on the back side of the installed valve;
- connect the hose from the glove compartment to the air duct;
- Replace the glove box.
Attention! When turning on the glove box cooling valve, for the best effect, you need to shut off the flow of air from the air conditioner into the passenger compartment.
Valve manufacturing
The valve can be made entirely of plastic or use the handle from the headlight switch. A hole for fastening is drilled in the center of the handle. Then a circle of the same diameter is cut out of a piece of plastic from a box with discs, in which symmetrical holes are made in the form of butterfly wings. These will be regulators for air flow into the glove compartment or valve.
The circle can be treated with any material to provide roughness. Using glue and L-shaped devices, the valve is connected to the handle. To make the fastening stronger, it can be metalized with staples from a stapler.
Valve installation
The regulator is installed in the lower left corner of the glove compartment, where there is a recess suitable for this purpose. Two butterfly-shaped holes are drilled into it, symmetrical in size and location on the valve. Along an arc of 90 degrees. Along the edges of the recess there are two screws that will act as travel stops. Through the central hole, the handle with the valve is attached to the niche from the inside of the material box.
Duct connection
The fittings are secured using glue: to the hole drilled in the air duct from the air conditioner, and to the back side of the recess with holes on the glove compartment. The hose and pipes are connected using clamps. The corrugated pipe for thermal insulation is covered with insulation.
The glove box is put in place. The cooler operates when the air conditioner is on.
zelv.ru