Recently, almost every manufacturer equips their cars with power steering. It can be either hydraulic or electric. The latter type is actively used on domestic Kalinas of the first and second generations. On Ulyanovsk cars, they use a classic hydraulic power amplifier. But many people ask the question: why not install power steering on UAZ of other models? Indeed, there are many cars that are still not equipped with such an option. These are the “Loaf” and the 469th UAZ, popularly called the “Kozlik”. In today's article we will look at how to do it yourself.
Characteristic
At the moment, almost all budget cars are equipped with such an amplifier. However, owners of old cars have a desire to retrofit their car with power steering. This is a very useful option. Even with a large diameter steering wheel, the effort required to control the car will be several times less. This is especially noticeable when parking in densely populated cities. The power steering itself is part of the car's steering system and runs on hydraulic fluid pumped by a pump. This also includes the steering column. The usual factory one does not fit here. There are many advantages of this system.
The first is the comfort of control, because you no longer need to turn the steering wheel as much as before. The second is reliability. The hydraulic booster practically does not fail. The third advantage is ease of maintenance. You will not have any difficulties when operating such a car. Even if the amplifier breaks, you can fix it with your own hands. Moreover, it is quite possible to get to the garage with such a breakdown. The only thing that will happen is that the ease of control will deteriorate. The steering wheel will become “heavy”. By the way, for the first time such an amplifier was installed on Gorky’s “Chaika”. GAZ-13 was the first car with power steering.
Steering gear UAZ 469
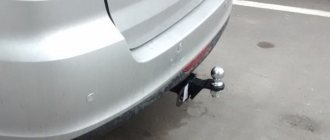
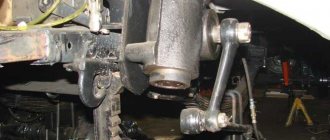
The UAZ 469 is equipped with mechanical steering. It consists of a steering column, gearbox and drive. The mechanism is operated from the vehicle's cabin using the steering wheel. During operation, various malfunctions of the steering gear may occur. To restore its functionality, repair or adjustment is necessary.
Photo 1: Steering gear UAZ 469 (Source: Yandex.Pictures)
The design of the UAZ 469 steering gear
The steering gear of the UAZ 469 car is a unit that serves to turn the front wheels of the car. The design of the UAZ steering gear provides for reducing the effort exerted by the driver on the steering wheel when the vehicle is moving.
Disadvantages of modification
Among the disadvantages of installing power steering on a UAZ-469 with your own hands, it is worth noting the poor information content of the steering wheel at speeds of more than 60 kilometers per hour. If without a booster it becomes stiffer, then with power steering it turns just as easily as at 10 km/h.
On the other hand, UAZ is not a car for racing. Therefore, if the budget allows, such a modification is quite acceptable. By installing power steering on a UAZ-469 from a foreign car, you will reduce the load on your hands by three times when crossing off-road terrain or parking in a cramped yard.
Technical side of the issue
It is better to leave the choice of power steering to a professional - there are many difficulties here. Several models are suitable, each of which has its own advantages and disadvantages. You should focus on financial possibilities and ease of repair in the future. Rare performance will require expensive spare parts, which is contrary to the spirit of UAZ.
Installing power steering on any modification of the UAZ 469 will require minor changes in its design. Main difficulties:
- Replacement of part of the steering device, with modification of the mount. Old brackets will only get in the way, and it is better to cut them off immediately.
- Installation of a pump and reservoir that will supply transmission oil. The fluid should be changed several times a year during intensive use, and its level should also be monitored. The pump operates exclusively when the engine is turned on - it is not autonomous.
- Requirements for precision debugging and complete absence of air in the system. Even a small layer will instantly form foam, and the performance will drop.
- The need to connect with UAZ 469 controls designed decades ago.
It is always worth contacting a competent master who will do everything quickly and accurately and take into account all the features.
It usually takes several days to get used to the new control conditions. Such changes are perceived unequivocally positively, and you shouldn’t even think about a reverse alteration.
What will we need to buy?
To do this, we need to purchase a power steering column, as well as a pump. The latter will create and maintain the necessary pressure in the control system. The operation of the element is carried out by a drive belt. We will also need a fluid storage tank and connecting hoses. The latter are divided into two types - low and high pressure. The first will drive “return” into the tank, and the second serves to circulate liquid in the system itself. As for the amount of liquid that is used in the system, it is not too much. For UAZ, 1.2 liters of special oil is enough. It differs from motor oil in viscosity and consistency.
Necessary equipment
Electric booster for cars
To convert a car to a system with a hydraulic booster, various mechanisms are produced.
Thus, the universal module ShNKF 453461.130 is a unit where a pressure fluid distributor and a power cylinder are added to the steering mechanism, which controls the levers. In this case, the chain that controls the wheels looks like this:
- lead screw - ball nut;
- ball nut - gear rack;
- gear rack - trident sector;
- driven sector - steering column.
The design of such power steering has good technical characteristics:
- gear ratio of the mechanism - 17.3 to 1;
- installed weight - 12 kg;
- maximum torque - 100 kgf/m;
- maximum developed pressure - 12 MPa;
- output shaft rotation angle - up to 80°.
It should be noted that the previous gear ratio was 16.4.
The UAZ product line includes a car with hydraulic power steering. True, improvements are needed there too. The amplifier unit was not protected in any way at the factory, which can lead to damage to the high-pressure pipes and corrosion. Today, the cost of the van version, which includes power steering, ranges from 500 thousand rubles.
How to install?
To do this you need to remove the steering wheel. Here you will need not just a set of keys, but a puller. You can't just remove the steering wheel. This puller looks like this:
It will be impossible to remove the wheel with your bare hands - this will only damage the steering column. After removing the steering wheel, the column must also be removed. The universal joint and the nut securing the steering rod bipod are removed. Next, unscrew the three nuts of the steering element. After this, a new set of bipods is installed on the column shaft with power steering. The latter must be connected to the steering rod and secured with cotter pins. When installing a new column “under the power steering,” the old mount will interfere with us. It is cut using a grinder. Next, install a plastic protective casing on the column. The screws for fastening are old ones. Next, a rubber ring, castle nut and washer are put on the casing. The penultimate one is secured with stepladders.
A small driveshaft is installed between the steering mechanism and the column, which will connect both elements and reliably transmit force. Drive a wedge into a wide hole (using a hammer, light blows). Two washers are mounted on the wedge thread - spring and regular. As a result, the length to the hinge should be 300 millimeters. Next, tighten the castle nut and mount the steering wheel. The power steering steering column (UAZ-469 is a tuning object) has been successfully installed. But that is not all. We need to secure the remaining parts of the mechanism.
Modernization of the steering column for UAZ 3909, 3741.
It all started with the desire to change the steering wheel from “bone” to “semi-luxury”. “Luxury” - a la 3160 - I didn’t like it purely in appearance. The two-spoke “junior deluxe” seemed to everyone - both in appearance and in the hands it felt comfortable... In general, the choice fell on it.
To remove the old steering wheel, a puller was hastily made from a thick steel strip. Since the M8 bolts began to stretch under load and threatened to simply break off, I had to hit the central bolt with a sledgehammer. The steering wheel has been removed. A careful inspection showed that the steering wheel had already been removed, and barbarously - with a chisel. But the worst thing is that the shaft was damaged. The carving was crushed and split in two places. Moreover, I did not directly hit the shaft and could not cause such destruction. The shaft became unusable, the question of replacement arose and the steering mechanism was removed from the car.
At this moment I already had three steering mechanisms, and all of them were 451D. And in all of them the worm shaft was bent - in some places it was slightly bent, and in others there was a guard at all. Is this a normal phenomenon? One would be fine, well two... but three? You need to buy a new shaft and worm assembly. What if... What if we make a different steering column, a better one? And also adjustable? Am I the UAZ driver or where?
The 469th steering gear was taken out of the bins, the worm with the shaft was taken out of it and inserted into its body. The result was the 452nd mechanism. After a short search, we bought: a GAZ-3307/4301 steering column, a steering cardan 31512-3401400 (one splined fork, the other “bare” for a wedge) and a wedge for the cardan 3302. As you know, the splines for the steering wheel are the same for us and for GAZ . The diameter of the column shaft is smaller than the hole in the cardan fork, which, however, was not a problem. At the top of the column pipe, brackets with threads for the steering column switches are welded. One “but”: the mounting “ears” are very large.
Measurements showed that the length, taking into account the splined part of the cardan, of the entire structure is sufficient with a margin. The diameter of the column shaft is 20mm, the diameter of the hole in the fork is 23mm. To compensate for the gap, I bent a bushing with a cutout for a wedge from a 1.5 mm strip - the shaft entered the cardan using a hammer. From the same strip I made a lining for the wedge. As a result, everything fits tightly, there is no play.
On the side of the column there is a slot for installing the ignition switch and securing the shaft with an anti-theft device. The available “Moscow” lock (2126-3704005) had to be adjusted to fit the slot so that it would stand more or less horizontally on the left.
To mount the column, I welded a bracket from two 3mm strips and a 15mm square rod. To make it even more rigid, I welded the gussets to the strips. The upper (in the picture - right) strip fit into the standard holes, but the lower one had to be raised up 10 millimeters by re-drilling the holes in the column.
Steering column bracket (picture). 1 — 8mm holes for speaker mounting; 2 — 8mm hole for fastening to the bracket on the dashboard; 3 — 6mm hole for adjusting stretcher.
The extra length of the cardan made it possible to move the steering column so that it aligned with the axis of the driver's seat. I removed the standard bracket from the torpedo and made another one in its place.
Bracket for fastening the column to the body (picture). 1 — corners 25 for fastening the column bracket; 2 — 10mm holes for attaching to the torpedo; 3 — base strip 25x3; 4 — 6mm holes for fastening the adjusting extension; 5 — 8mm holes for fastening the speaker bracket; 6 — guy wires (square pipe 20x2); 7 — support for the guy wires, attached to the floor (angle 75 with a welded strip 25x3).
Stretch bars attached to the floor are necessary: without them, the torpedo “plays” when you press the pedals, especially the brake pedal. On the “native” column, the steering shaft pipe plays the role of a stretcher. The brace stop is attached with two bolts to the horizontal part of the floor against the flange. The right (farthest according to the picture) hole of the base strip falls on the pedal block mounting bolt; a hole needs to be drilled for the left one.
The sequence of actions was as follows:
- welded the bracket for the torpedo (without bracing), drilled one additional hole in the torpedo;
- I cut the strips, drilled holes and screwed them to the holes in the “ears” of the speaker mount;
- I cut off a spare piece of rod, drilled a hole for the bolt and attached it to the bracket under the torpedo;
- I set the position of the column in height, noted the position of the strips, removed it and grabbed it to the bar, setting the alignment of the bar and the shaft according to the ruler;
- set it up again to check the correct position, removed it and welded it properly with gussets;
- made a stop for the guy wires and screwed it to the floor with two bolts;
- I adjusted the guy wires in place and secured them with welding;
- I took everything off, boiled it, painted it, installed it;
- I cut out an adjusting stretcher from the strip, bent it where necessary in place, drilled holes (also in place) and screwed it on;
- An ejector made of tin is screwed onto the steering wheel hub on the reverse side.
As a result, the steering wheel dropped slightly and tilted towards the driver. I did not adjust the tilt, but set the column as convenient for me. Subjectively, it has become much more convenient than the standard layout. When turning the steering wheel, the elbow does not meet the door. Even with my height of 2 meters, my knees do not touch the steering wheel when I press the pedals. The increased tilt of the steering wheel does not interfere with landing. In general, I'm pleased. It’s just that I’ll probably have to give up the “Bychkov” steering column shifters: when the left turn is on, when I press the clutch pedal, my left knee touches the lever. On the right it’s the same story: in the lowest position (2nd windshield wiper speed), the knee rests on the lever. However, I will get used to this faster than replacing the steering columns.
Cost of components and parts:
- steering column GAZ-3307/4301 — 450 rub.
- steering cardan shaft 31512-3401400 — 950 rub.
- wedge 3302 - 15 rub.
- electrodes and metal - breech


All this was purchased at the Planet Zhelezyaka store, which is on the 86th km of the Moscow Ring Road, outer side, October 15, 2004.
Finally, some general comments.
- I am aware that I have made changes to the steering design and the possible consequences of this step.
But, damn it, I really want comfort... On the other hand, I did not interfere with the body structure (I only drilled three holes!) and can easily install a standard column if necessary. - Almost the entire structure was made on site with multiple estimates and checks, therefore specific dimensions are not given. It took 3 days to complete everything. The main concern was to set the correct position of the steering column in space.
- Since the column shaft is solid, without a hole for the wire, I turned on the sound signal in the standard way for GAZ - by pressing the left lever of the steering column.
- For those who want to create a similar design, I would recommend looking at the steering column from Sobol. It is already adjustable and has a more compact mount. Its shaft dimensions, in my opinion, are the same as those of 3307. I simply didn’t have enough money for it (840 rubles, ibid.).
- The question is, of course, rhetorical, but WHY HAS NOT THE FACTORY DONE THIS YET?!?! Yes, my design is by no means an example of design and technological thought; moreover, it was made “on the knee” from what was at hand. But the car plant, half of whose sales are cabovers, could have gone the extra mile! Moreover, alterations of body stamps would amount to 3 (THREE!) holes. If not for everything, then at least they would put it on “luxury” cars... Oh, dreams, dreams...
 It is already adjustable and has a more compact mount. Its shaft dimensions, in my opinion, are the same as those of 3307. I simply didn’t have enough money for it (840 rubles, ibid.).
 Additions.
Operating experience, which is still small, showed that the column was installed correctly. Driving has become much more enjoyable. Some inconvenience is caused by the location of the ignition switch when inserting and turning the key with the clutch pedal pressed (starting the engine). The lining under the wedge had to be redone due to the old one being crushed. I made a new one from 2mm steel and hardened it.
Installation of the pump and reservoir
Any hydraulic booster is driven by fluid pressure. To create it, there is a pump. But it works through a belt drive - from the crankshaft pulley. It is worth noting that there are different belts - for power steering on UAZ and for cars without it. We will need a longer element - for the hydraulic power steering. So, remove the drive belt, fan impeller and crankshaft pulley.
Next, unscrew the water pump. We attach the radiator impeller to the wheel hub. We will also need extended bolts “for the power steering” on the UAZ and a spacer (usually included in the kit). A belt is installed on the new crankshaft pulley. The fuel filter bracket is also removed. The pump will be installed here. The bracket that comes with the power steering kit is mounted in place of the pump stud. Next, the pump is secured to the brackets. The bar and bracket are attached to the locknut. When installing the belt, it is necessary to set the correct tension. Adjusting the power steering (UAZ "Simbir" can also be upgraded) is carried out by tensioning a special roller. How to determine normal tension? The belt should not hang on the pulleys. If you press on it with your finger, it bends by 10-15 millimeters, while rotating at a right angle relative to the plane of the pulley. After we installed the power steering belt on the UAZ, we install the fuel filter back. It is attached to a square hole. Next, we take a drill in our hands and drill several holes in the place of the left engine mudguard.
They are needed to secure the fluid reservoir. Here we will need bolts, nuts and a clamp. This element is connected to the pump using a polymer hose. The system operates on regular transmission oil. Once again we check that the parts are installed correctly and start the car.
DIY installation instructions for power steering
The installation of a hydraulic booster on a UAZ is carried out in several stages:
- First, the second pulley is installed to install the strap. Attach the device, measure all the necessary distances, after you understand how to align the pulley, install it and tighten the bolts (you need to use longer ones, since your family won’t). The pulley itself must be pressed onto the existing crankshaft pulley.
- The next step is to install the bracket on the power unit. Take the bracket that will secure the UAZ power steering pump and install it in the place where the fuel filter is mounted, secure all the nuts. There is still room for a third fastening, but since there is no corresponding hole for fixing, you will have to drill it yourself, and for this you will have to remove the valve cover. Before drilling, all holes into which metal shavings can enter must be closed. After completing these steps, the pump itself is installed on the pulley and bracket, then the strap is put on.
- If necessary, the steering gearbox, as well as the fitting head, will need to be sharpened.
- Then this gearbox is installed on the frame, and all open areas must be painted over. The high pressure line must be fixed in the gearbox, after which this element is removed from the bottom side of the radiator device and fixed using the existing bolts.
- At the final stage, the expansion tank and all remaining lines are installed, as well as the system is pumped. The tank can be installed in any convenient place, but keep in mind that the lines should not be bent. In addition, the liquid level in the tank should in any case be higher than in the pump. When the lines are installed, the working fluid is poured into the tank, and the pumping itself is carried out on suspended wheels.
Hi all! I’ve been thinking about a hydracha for a long time, but the price of a factory one was very scary; in our region it’s already under 40,000 rubles. The other day a friend came to visit, also a UAZ driver, we got to talking and it turned out that he had a used power steering pump with a bracket. On the second day the pump was already at my home. Then my corefan and I decided to go to the city of Biysk, which is 150 km from us. I was going to get new tires (Ya-192), and my friend was going about his business. Having wandered around the city, almost by chance we came across one very good shop in the UAZ, where the power steering itself was purchased, also used, Sterlitamak. We took the hoses, fittings and tank at home.
Briefly about the installation. It took about 2-3 hours in total, I didn’t time it. We worked with my brother-in-law. We started by dismantling the old steering column, which had already been in place since 3151, because it had a cardan. The bipod was also twisted without removing the traction. Before removing the column, I unscrewed the lower pipes, which turned out to be in vain. Hydrach stood up straight. I watched a video on YouTube where a guy talks about how he moved the steering shaft down. I don’t know about others, but this power steering aligned with the shaft, all that remains is to connect the shaft and power steering with a cardan. This is where the hemorrhaging began, because the cardan from Hunter does not fit 3151 and vice versa, fortunately the crosspieces are the same. We swore and broke it, the lower end is from 31519, the upper is 3151. The bracket was screwed to the cylinder head, the pump and all the hoses with the reservoir were attached to it. It's up to the drive. The Hunter belt is made for a small pulley, which is screwed to the main one, but mine is a two-strand one, because the engine is from a Gazelle. Or from the Volga. Hell knows! They swore even more than with the cardan, but in the end they pulled the Zhiguli belt through the pump and started the engine. Power steering is working! It’s not like on a foreign car, but it’s easy to turn from end to end with one palm. The bumps will no longer be kicked, the fingers will not be beaten off. But there are no smooth repairs, the power steering is a little snotty. I’ll order a repair kit, today they took the whole city and didn’t find it, but that will be later, but now the steering wheel is soft and smiling from ear to ear) Thank you for your attention and good luck on the roads and directions!
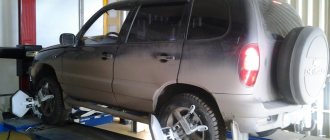
Examination
With the engine warm and running, turn the steering wheel from side to side. In the first seconds, excess air should come out of the tank. If it starts to foam, it means the system is leaking and you need to look for a breakdown. After thoroughly sealing all the hoses, start the engine and check the operation of the amplifier again. The power steering installed on the UAZ “Bukhanka” from a foreign car should operate smoothly and silently. The belt does not whistle, there are no leaks of working fluid.
You will immediately feel the performance of this amplifier. The steering wheel turns much easier than before. During operation, regularly monitor the remaining liquid in the plastic tank. It needs to be topped up if necessary. Operating the hydraulic booster when the fluid level is insufficient can result in pump failure. The steering wheel will become much heavier.
Power steering or electric power steering on a UAZ: which is better?
The UAZ power steering is a relatively inexpensive system - its installation is more appropriate for large vehicles, as well as inexpensive passenger cars. This is perhaps the main advantage of the system. Another advantage is that power steering has a higher power reserve, unlike electric power steering, which is why SUVs and minibuses are equipped with such systems.
Regarding the disadvantages of power steering:
- If you install power steering on a UAZ, then you will need to regularly monitor the level and condition of the consumables in the tank - you need to remember that the fluid requires periodic replacement.
- You must always follow the rules for using the system to prevent its failure.
- The operation of the unit should always be monitored by the car owner - for optimal functioning, you need to monitor the condition of the straps and pipes. In addition, the power steering pump must always be in working order - leaks or cracks are not allowed. If problems arise in the operation of the unit, this is fraught with repair of the power steering.
- The functioning of the power steering largely depends on how the power unit operates. That is, if the engine is not running, it will be extremely difficult to turn the steering wheel (the author of the video is the domowe channel).
Now let's look at the advantages of EUR systems:
- The EUR itself is a simple and relatively small system, which saves space in the engine compartment.
- ESD systems do not have pipes or lines, which greatly simplifies the design; accordingly, this is reflected in its cost. When using an electric power steering system, the car owner no longer needs to regularly monitor the level and condition of the working fluid; the same goes for belts.
- If installed correctly, the EUR will save fuel.
- In addition, the electric power steering on the UAZ allows you to customize the system to suit your preferences, that is, the driver can adjust the force, as well as the operation of the unit in a certain mode.
Also, the electric steering system has its disadvantages:
- The main disadvantage of the EUR is its high price. That is why their installation on UAZ vehicles is considered inappropriate from an economic point of view.
- High cost of repairs. Despite the fact that electric amplifiers themselves are quite durable systems, malfunctions can still occur in their operation over time. If the unit fails, the cost of repair will not be cheap, especially since repairing the unit at home is more problematic than power steering.
- The power reserve of electric amplifiers is small. That is why such systems are not installed on SUVs, minibuses, pickups, etc. Accordingly, this is another plus in favor of installing a hydraulic booster on the UAZ.
Power steering from BMW
The question of installing power steering (UAZ) from a foreign car, namely a BMW seventh series, is often raised. It would seem that these are two completely different cars. But the German power steering works quite adequately on the Ulyanovsk Kozlik. To do this, you will need a pump with 130 or more Bar and a flat pulley.
The latter can be turned by a turner to order. This is necessary for the alignment of the crankshaft pulley and the pump. Some install a two-stream element from the 24th Volga. The hoses for the tank fit without modifications. Otherwise, the installation is no different.