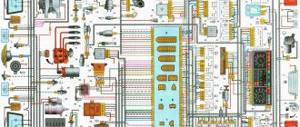
Full scheme
The order of conditional numbering of plugs in blocks:
a – mounting block, instrument cluster, ignition switch and windshield wiper (for blocks with a different number of plugs, the numbering order is similar); b – ignition distributor sensor; c – switch and carburetor solenoid valve control unit; d – headlight units, headlight and rear window cleaners; g – interior lighting lamp; e – fuel level sensor; d – rear lights (pin numbering in order from top to bottom)
* Installed on parts of manufactured cars. ** Not installed since 1995.
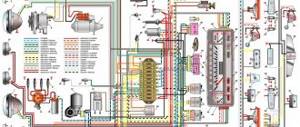
Electrical diagram of VAZ-2108, VAZ-2109, VAZ-21099
Electrical diagram of VAZ-2108, VAZ-2109, VAZ-21099 cars. Low instrument panel.
1 – block headlight; 2 – electric motor for headlight cleaner (installed on parts of manufactured cars); 3 – engine compartment lamp switch; 4 – sound signal; 5 – electric motor of the engine cooling system fan; 6 – fan motor activation sensor; 7 – generator; 8 – solenoid valve for turning on the headlight washers (installed on parts of manufactured cars); 9 – solenoid valve for turning on the rear window washer (installed on parts of manufactured cars); 10 – solenoid valve for turning on the windshield washer; 11 – spark plugs; 12 – ignition distributor sensor; 13 – ignition coil; 14 – reverse light switch; 15 – coolant temperature indicator sensor; 16 – starter; 17 – battery; 18 – brake fluid level sensor; 19 – switch; 20 – top dead center sensor of the 1st cylinder; 21 – diagnostic block; 22 – carburetor solenoid valve control unit; 23 – starter activation relay; 24 – carburetor limit switch; 25 – carburetor solenoid valve; 26 – sensor for emergency oil pressure warning lamp; 27 – windshield washer motor; 28 – heater fan electric motor; 29 – additional resistor of the heater electric motor; 30 – heater fan switch; 31 – electric motor for windshield wiper; 32 – cigarette lighter; 33 – backlight lamp for heater levers; 34 – plug socket for a portable lamp; 35 – engine compartment lamp; 36 – glove box lighting lamp; 37 – mounting block; 38 – instrument lighting switch; 39 – parking brake warning lamp switch; 40 – brake light switch; 41 – steering column switch; 42 – external lighting switch; 43 – alarm switch; 44 – rear fog light switch; 45 – fog light circuit fuse; 46 – rear window heating switch; 47 – side direction indicators; 48 – lampshade; 49 – connector for connecting to the individual lighting lamp; 50 – lamp switches on the door pillars; 51 – ignition relay; 52 – ignition switch; 53 – instrument cluster; 54 – switch for the carburetor air damper warning lamp; 55 – rear lights; 56 – sensor for level indicator and fuel reserve; 57 – rear window heating element; 58 – electric motor for rear window wiper; 59 – license plate lights;
A – the order of conditional numbering of plugs in the ignition switch block; B – the order of conditional numbering of the plugs in the windshield wiper motor block.
If the cooling fan does not work
To drive the fan, a DC electric motor with excitation from permanent magnets ME-272 or similar is installed. Technical data of the electric fan and fan switch sensor:
- Rated rotation speed of the electric motor shaft with impeller, 2500 – 2800 rpm.
- Electric motor current consumption, 14 A
- Sensor contact closure temperature, 82±2 degrees.
- Sensor contact opening temperature, 87±2 degrees.
Read more: Rear suspension of the Chevrolet Lacetti sedan
The cooling system fan may not turn on due to:
- electric drive malfunctions;
- blown fuse;
- faulty thermostat;
- a failed thermal sensor for turning on the cooler;
- faulty VO relay;
- broken electrical wiring;
- faulty expansion tank plug.
To check the VAZ fan electric motor itself, we apply 12 V voltage from the battery to its terminals - a working motor will work. If the problem is with the fan, you can try to repair it. The problem is usually the brushes or bearings. But it happens that the electric motor fails due to a short circuit or break in the windings. In such cases, it is better to replace the entire drive.
The BO fuse is located in the mounting block of the car's engine compartment and is designated F7 (20 A). The test is carried out using a car tester turned on in probe mode.
- In a car with a carburetor engine, you need to check the sensor - turn on the ignition and short-circuit the two wires going to the sensor. The fan should turn on. If this does not happen, the problem is definitely not with the sensor.
- For injection cars, it is necessary to warm up the engine to operating temperature and disconnect the sensor connector, disconnecting it from the vehicle’s on-board network. In this case, the controller must start the fan in emergency mode. The electronic unit perceives this as a failure in the cooling system and forces the fan drive to operate in constant mode. If the drive starts, the sensor is faulty.
Electrical diagrams of VAZ 2109
So, in order to understand which VAZ 2109 electrical circuit you need, let’s go through each of the factors listed above in detail: 1) Do you know whether your VAZ 2109 has a high or low panel? If you don’t know, look at the pictures:
VAZ 2109 high panel
VAZ 2109 low panel
You can tell whether a panel is high or low by the instrument cluster on the control panel, as well as by the appearance of the car panel itself. 2) If the VAZ 2109 is fuel-injected, then in 99% of cases a high panel is installed on it and you need a wiring diagram for the high panel.
3) If your VAZ 2109 is an export version, then the wiring diagram will be exactly the same as that of the base version, with the exception of options. The options may be different and, as a rule, finding a scheme exactly for your option will be problematic. That is, the basic diagram: instrument panel, ignition, recharging, etc. are the same, only additional options will not be indicated.
4) Remember, the ECM wiring diagram is completely separate from the general electrical circuit. That is, if you download the VAZ 2109 wiring diagram on the Internet, then it will not contain either a controller or sensors. ECM wiring diagram is a separate technical document; You also need to search and download it separately.
Below are links to download electrical diagrams for low and high panels of the VAZ 2109:
Each archive contains two electrical circuits; their differences are that on one the VAZ 2109 mounting block is drawn as one solid block, on the other the wiring inside the mounting block is drawn. Naturally, the version of the diagram with the wiring of the mounting block is more complete and convenient for working with the wiring of the VAZ 2109 car.
I also found a good program for owners of old VAZ 2108, VAZ 2109. This program makes the electrical circuit of the VAZ 2108, VAZ 2109 interactive. That is, the user has the opportunity to select the circuit element he is interested in on the right in the window and part of the wiring for working with this node will blink:
When working with VAZ 2109 wiring, always remember that color coding of wires is your main assistant. The color marking of the wires of VAZ 2108, VAZ 2109 on the diagram and on the car itself must match. You took out the cable of wires and you can immediately find your bearings - yellow - dimensions, red - brake light, blue - reverse, orange-black - fog lights.
Rear window heating mechanism
Using relay type 113.3747, the rear window heating element is switched on.
In this case, indicator lamp 5, which is located next to the switch, lights up. She illuminates the switch key with orange light. Only when the ignition is on can you turn on the heated rear window, because voltage is supplied to the switch through an additional relay, which is activated when the ignition is turned on. Through the relay contacts, power is supplied to the heating element from a fuse directly connected to the power source. If when the heating of the rear window of the VAZ 2109 is turned on and the glass is not heated, then you should check the fuse, wires and connections, switch, relay.
If the heating element fails, it is advisable to replace the glass, however, it is much more convenient to purchase a kit for restoring damaged threads.
The heated rear window of the VAZ 2109 defrosts the rear window. Consists of parallel conductors sprayed onto glass. An electric current is passed through them, the conductors heat up and defrost the rear window, also clearing it of moisture. The relay located in the engine compartment fuse box supplies current. If after fifteen minutes the glass is still not cleared, then you need to turn on the heater for the second cycle.
VAZ 2109 wiring diagram
The VAZ 2109 car has remained one of the most popular in the country for many years. Not just popular, but also prestigious. In the social hierarchy, owners of nines were not much lower than owners of used Cadets and Jettas. One could argue with the reliability of the car, but since there was no alternative, the car filled the entire CIS and was even assembled using the hub method in Finland, but this has little to do with the 2109 model.
This is interesting: How to avoid cracks on your car windshield?
Content:
Wiring diagram VAZ 2109
Like the entire car, the electrical equipment was not at the highest level, so owners of nines should know the VAZ 2109 wiring diagram thoroughly. To do this, we have provided the factory diagram in good resolution, which can be used with adjustments for changes made from time to time.
This is a diagram of the canonical nine with factory markings and explanations. In principle, the circuit is quite simple, but the electrical appliances themselves caused difficulties, the problems with which we will talk.
Basic problems with electrical wiring 2109
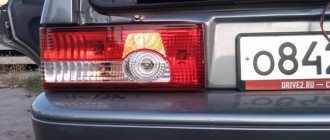
The biggest problem with the electrical equipment of the VAZ 2109 was the low quality of components and unsatisfactory build quality. Despite the fact that Togliatti traditionally blames suppliers for all mortal sins, in the end we have to take the rap, and as ordinary users, we should not be interested at all in why the spirals on the double-filament rear light bulbs constantly burn out. Also, in principle, we don’t care which factory made the housing for the fuse box - we only see the inadequate operation of the electrical equipment when pressing the brake pedal turns on the right turn.
And a lot of such examples can be given. If the factory is not confident in the quality of the components, then why install them on the car. Therefore, rhetorical questions only lead to unnecessary vibrations in the air, and do not solve the problem. The above problem with feet can be solved quite simply:
- the rear light cover is removed;
- the power terminals are disconnected from the trunk;
- the entire strip on which the lamps are mounted is unscrewed;
- The contact on the flexible board at the point of attachment to the lamp socket is checked.
Short circuits of the tracks of this board occur due to contamination of the contacts and tracks. Then the signal sent to the stop lamp can simply be redirected to the turn signal lamp. This can be radically solved by replacing the entire board with a new one, but the new strip will not last as long as we would like due to poor sealing of the lamp from inside the luggage compartment. It seems like a trifle, but we spend precious time solving trivial problems that are solved at the production level with the right approach, not the VAZ approach.
Improvements and correction of factory errors
In light of the above, a breakdown of the electronics control unit is very typical for the nine. The reason is very simple - its body simply allows water, dust and moisture in the form of condensation to pass through. Its very placement on the air supply shelf is not entirely clear, but there are also more significant disadvantages that can be eliminated with your own hands. The factory provided a tiny groove to drain water from the housing, but it constantly gets clogged, the housing fills with water, and the control unit slowly and surely dies. It is not cheap, so such negligence of the designers cannot be explained. There are two ways out of the situation - constantly clean the water drainage channel, or change the block at least once a year.
It is also worth paying attention to the fact that the power wiring on the bottom shelf of the radiator is constantly exposed to high temperatures. In addition, in this place it is in no way protected from water and dirt. This is also a difficult moment to explain. The category of wiring harness oversights includes the harness under the carpet next to the driver's seat. Moisture constantly accumulates there, and in order to remove it, you need to dry the floor, inevitably tugging on the rope. Of course, this problem cannot be solved on your own - the amount of work required to re-tighten all the wiring in the car is too large.
It is worth paying special attention to the power terminals on the generator. They very often become loose, heat up, spark and melt the wiring. But that's not the worst thing. The wires may short out, and it already smells burnt. Therefore, you should not be lazy, but check this unit as often as possible for tightness of the terminals.
Wire harness insulation 2109
No one will disassemble half a car for the sake of insulating the harnesses, but if necessary, you need to do this for your own safety. Using the diagram that we placed at the beginning of the article, all the work will not take much time, but you will be confident in the quality of the wiring insulation. For this you will need:
- Corrugated hose for electrical wires.
- Insulating tape.
- Wire cleaner.
Before wrapping old wiring in a sleeve, treat the wires with a cleaner, which is widely available in aerosol cans. Next, following the instructions and checking the electrical diagram, we proceed as follows:
- Disconnecting the battery
- Disconnect the terminals and remove the harness.
- We treat it with an aerosol.
- We carry out a visual check of the contacts.
- We lay the tourniquet in the corrugation.
- We fix and seal the entry points of the harness into the corrugation.
- We put the finished cable in place.
- Referring to the diagram, connect the terminals.
Particular attention should be paid to sealing the harnesses in places where they come into direct contact with water or hot surfaces. Also, when assembling, pay attention to the integrity of the pads and the condition of the contacts and terminals.
Thus, having spent very little time, we will save the wiring and get rid of unnecessary problems with short circuits. Keep an eye on the wiring, and good luck on the road!
Wiring - VAZ 2109: interior and engine compartment modifications
Perhaps, without exaggeration, we can say that the most popular AvtoVAZ model is the family of front-wheel drive cars. And many owners strive to change the VAZ 2109 on their own, introducing various improvements that affect the standard wiring.
But are they all justified? This will be discussed in this article.
Front-wheel drive VAZ 2109 is a leader in the number of successful tuning experiments
Today you can find several modifications of the car, in which the wiring diagram for the VAZ 2109 has significant differences.
In particular, the car is equipped with:
- Carburetor power unit;
- Injection power unit.
Generalized wiring diagram for a VAZ 2109 with a carburetor type
In addition to the desire to change or improve something, owners of early models of this car are faced with the need to replace the engine due to the exhaustion of its service life.
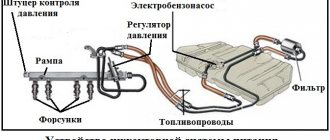
Device
The electrical circuit of the VAZ 2109 with distributed fuel injection is much more complex than carburetor models. This is quite logical, since the injector itself assumes the presence of electronic devices. Any electrical circuit is designed to solve a number of problems. The VAZ 2109 distributed injection system diagram solves the following problems:
- Transmission of signals about the status of parameters;
- Transmission of control impulses;
- Electrical protection of devices;
- Protection of the system from short circuit.
Based on the functions performed, the design of the system must be necessary and sufficient for their implementation.
Transmission of parameter status signals and control pulses
The electrical signal in the VAZ 2109 engine control system is transmitted to the electronic unit via wires that are color-coded accordingly. This makes it easier to read the electrical diagram and find the correct wire. Necessary conditions to ensure high-quality signal transmission are:
- Required wire cross-section;
- Minimum contact resistance of detachable connections;
- Electric strength of conductor insulation.
The operation of the engine, and therefore the dynamic characteristics of the VAZ 2109 engine, determines the state of the wiring.
Reducing the cross-section of the conductor reduces the power of the signal transmitted by it and increases its temperature. Even if the destruction of the veins is not noticeable from the outside, this does not mean that it does not exist.
During the operation of the car, the wiring is exposed to destructive factors. Over time, contacts oxidize. For this reason, their resistance increases, which necessitates periodic cleaning.
Distorted signals introduce inaccuracy or interruptions into the operation of the entire VAZ 2109 system. In order to ensure noise immunity, the oxygen sensor, knock sensor, crankshaft position sensor and the anti-theft system unit are equipped with shielded wires.
Electrical protection of elements
Failure of any injector device may result in replacement with a new one. This is accompanied by material costs. If there are several such devices, then the costs increase many times over. In addition to replacement, tuning may be required. In this case, in the absence of the necessary knowledge, you will need to contact specialists.
The fuses of the VAZ 2109 multipoint injection system have a smaller cross-section than the rest of the wiring. Therefore, they burn out when the current exceeds their rating, thereby protecting the wire insulation and system elements from bad consequences. The injector electrical circuit contains the following fuses:
- Main relay;
- Electric cooling fan;
- Gasoline pump.
Blown fuses should be replaced and the cause that led to this must be found and eliminated.
However, not only fuses provide protection, but also electromagnetic relays. Galvanic isolation of signals allows you to separate low-current and power circuits. This property plays a big role in management. The system contains a main relay, a fuel pump relay and an electric radiator fan.
Short circuit protection
Car wiring is characterized, among other things, by the electrical insulation strength. The latter depends on the condition of its material. Over time, the insulation becomes brittle and microscopic cracks appear. When testing, the wiring may be in good order, but while the car is moving, it may fail to ground. A short circuit is possible between two or more wires.
What can be changed in the electrical circuit
Let's figure out what exactly car owners undergo alterations.
Moreover, we will indicate only those alterations that are not prohibited by the manufacturer and current regulations:
- Installation of a new instrument panel;
- Alteration of internal (interior) lighting;
- Installation of additional turn signal indicators in the rear view mirrors;
- Installation of additional headlights (fog lights);
- Installation of an acoustic and multimedia system;
- Immobilizer installation.
Wiring diagram for VAZ 2109i with a high panel
For reference: the visual differences between the standard panel and the “high” one are that the radio compartment is moved to the level of the dashboard. Accordingly, the wiring on the VAZ 2109 under the instrument panel must be replaced.
Interior modifications
Many owners come to mind with the desire to improve the lighting in the car interior.
Let us remind you that inside a passenger vehicle there are several places equipped with lighting sources:
- The salon itself (interior lighting);
- Glovebox;
- Cigarette lighter;
- Instrument panel (instrument cluster lamp and symbol lamp)
Layout of incandescent lamps for a VAZ 2109 car
If you, as the owner, like a high panel in the cabin, then you cannot do without replacing the standard wiring. Because the:
- Control devices have a different location on the panel;
- The standard length of wires is not enough;
- Terminal blocks may also differ.
Electrical wiring for a VAZ 2109 in the process of connecting to devices
Accordingly, without replacing the electrical wires it will not be possible to use:
- instrumentation;
- on/off buttons for various devices.
Differences in the terminal blocks of the “low” and “high” instrument panel
As for making changes to the instrument panel lighting, today there are sets of special lamps on sale along with the wiring with which they are connected to the car’s electrical network.
Tuned instrument panel lighting for VAZ 2109
You can install such kits yourself; it is only important to adhere to accuracy and safety rules.
Advice: carry out all electrical wiring replacements and connecting instrumentation only with the battery disconnected.
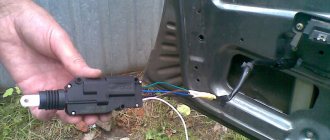
Replacing an electric fan in a car
- We park the car on a flat surface and immobilize it with the parking brake.
- Open the hood and disconnect the negative terminal.
- Using a 10mm wrench, unscrew the fastenings of the air filter housing.
- Using a screwdriver, loosen the air duct clamp on the air flow sensor and remove the corrugation.
- We unscrew the screws securing the cover of the air filter housing and remove the filter element.
- Using a size 8 wrench, unscrew the air intake mount and remove it.
- Using a 10mm wrench, then an 8mm wrench, unscrew the nuts securing the fan casing around the perimeter (6 pieces in total).
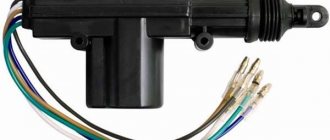
- Disconnect the wire block on the fan connector.
- Carefully remove the fan casing along with the drive.
- Using a 10mm wrench, unscrew the 3 bolts holding the electric motor to the casing.
- We put a new one in its place.
- We install the structure in place, fix it, and connect the connector.
- We carry out further installation in the reverse order.
Read more: Replacing the Lanos differential bearing
Engine compartment modifications
In addition to replacing the power unit after it has exhausted its life, there are many components in the engine compartment whose wiring also needs to be replaced:
- high-voltage wires from the ignition unit;
- wiring of various control sensors;
- battery power cables (connections are most susceptible to corrosion).
If there is no spark, repair of the electrical wiring of the VAZ 2109 is inevitable.
Numerous sensors in the engine compartment require special monitoring:
- Coolant temperature sensor - if the electrical wiring is faulty, the driver will not notice overheating of the power unit;
- Brake fluid level sensor in the expansion tank - a leak or low level can lead to brake system failure;
- ABC system sensors - oxidation of contacts or disruption of wiring integrity can lead to system failure;
- Exhaust gas sensor - based on its readings, the electronic unit “prepares” the fuel-air mixture. If the sensor does not work, gasoline consumption will increase.
The only wireless car security alarm element
A useful addition to the functionality of the car is the acquisition of a modern anti-theft system.
Installing a modern alarm system is a special topic, since its work affects several main components and systems of a VAZ family car:
- General electrical system;
- Supply system;
- Sound and light circuit and actuators (side lights, headlights, sound signals);
- Standard immobilizer.
To install an alarm system, a VAZ 2109 wiring diagram is required
Advice: often manufacturers of alarm systems accompany the installation process with video and photo materials for each specific model of a particular family of cars. Before starting installation, you should read them carefully.
General alterations
Installing additional fog lights is a general modification because:
- Affects equipment in the engine compartment;
- Interferes with the instrument panel inside the cabin;
- Connects to the vehicle's standard power supply system;
- Attached to the power body.
The kit must contain connection instructions
To install and connect fog lights, you will need a wiring diagram for the VAZ 2109, because the package includes:
- Connecting wires;
- Terminal blocks;
- Switching relay;
- Actuators (buttons);
- A backlight lamp (or LED) indicating the status of lighting fixtures.