VAZ 2110: heater damper gearmotor and replacing it yourself
Gearmotor on a car
The climate of the car is important for every motorist, since this circumstance directly affects the degree of comfort of both passengers and the driver himself. On the VAZ 2110, the heater damper motor regulates the temperature inside the cabin. Of course, the optimal temperature also depends on the time of year. In this regard, there is a practical need to artificially maintain the required temperature inside the car. Often the gear motor deteriorates and there are reasons for this. On a VAZ 2110, replacing the gear motor can be done on your own, and this will be discussed in the article.
Replacing the heater gearmotor on a VAZ 2110: installation rules
As you know, the heating system in any car plays a huge role. The domestic car production model VAZ 2110 is no exception. If even one element fails, the functionality of the entire system may be impaired.
Today we will talk about the stove gear motor. It is responsible for closing and opening your heater damper in your car. Opening and closing is determined by signals from the heater control system. This way the air inside the cabin can be cooled or heated as needed.
Geared motors for the VAZ 2110 have one important feature. Depending on the year of manufacture, the configuration of this element differs significantly. Therefore, it is important to determine in advance which gearmotor is on your car before making a purchase and replacement.
Dismantling
The stove is being disassembled
To replace the device, you will have to perform a series of sequential steps. The work is not particularly simple, but doing it yourself is more than possible:
- Drain all coolant from the heating system;
- Disconnect the battery. To do this, simply remove the negative terminal;
- Remove the trim, windshield trim and sound insulation;
- Remove the fan from the stove;
- Disconnect the vacuum pipe clamps from the heater housing;
- Remove the front heater air intake housing. There's definitely no need to rush here. To facilitate dismantling, we recommend removing the dashboard. Inside the cabin, the fasteners that hold the heater are unscrewed, and then raised;
- Remove the spring clips, mounting nuts, and front housing;
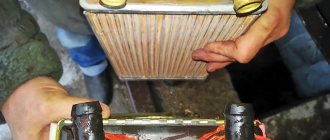
- Disconnect all hoses from the radiator;
- Disconnect the rear casing from the heater;
- Remove the radiator from the stove.
After these manipulations, you can finally replace the damper.
Causes of failure
If the gearmotor is out of order, then you will not be able to regulate the temperature inside your car by controlling the heating system.
To check the operation of the element, you can supply electricity from the battery directly to the gear motor in the middle position. The functionality of the controller is checked in a similar way. If it breaks, then it also becomes impossible to regulate the temperature.
Failure of a gearmotor (MR) may be due to the following reasons:
- The integrity of the electrical circuit has been compromised. This means that there is no voltage supplied to the motor, and therefore the gearmotor is not able to work properly;
- A defect has occurred in the autonomous control unit of the stove. Because of this, the gearbox does not provide air at the temperature required by the driver.
Old sample
The main reasons for the failure of the VAZ 2110 gearmotor
If the device in question is damaged, the motorist will not be able to control the temperature in the cabin by controlling the heating system. To test the functionality of the device, you can charge it from the battery. To do this, the gear motor must be installed in the middle position. In a similar way, the functionality of the controller, which is also responsible for temperature control, is checked.
There are two reasons preceding the failure of the gearmotor:
- The autonomous heating system control unit is damaged. As a result, the device does not supply air at a certain temperature;
- damage to the electrical circuit. The point is that there is no voltage supplied to the gearbox.
Replacement of micromotor gearbox
To replace an element, you will need to perform several not particularly complex activities. Therefore, it is not at all necessary to go to a service station and pay a lot of money for their services.
- First of all, remove the frill.
- Next, the vacuum brake booster is dismantled.
- After this, you still need to remove the pedal assembly.
- Now we begin to dismantle the old micro-gearbox along with the plastic component.
- A new micromotor gearbox should be installed in place of the damper sector. There you will see a similar square.
How to repair or replace the gear motor of a VAZ-2110 stove
Normal operation of the VAZ-2110 stove is impossible without the correct functioning of the gearmotor, which is responsible for opening/closing the damper. As a result of this interaction, the air that enters the car interior is heated/cooled depending on the situation. Therefore, when a stove gear motor needs to be replaced or repaired, you cannot hesitate. This work can be done with your own hands, without the help of specialists.
Assembly
When installing a new damper, be sure to make sure that the fork located on its axis is clearly engaged with the lever. If the flap is in the raised position, you did everything right. Otherwise, it will be impossible to control the device, so you can forget about restoring the functionality of the stove.
DETAILS: Repair of bumper mounting for VAZ 2110
Damper location
After this, reverse the assembly procedure according to the dismantling steps. Refill the system with coolant and check that the new damper is in place. It is important to ensure that there are no leaks and that the hose connections are not tight.
Turn on the stove and check how the heater behaves. If everything is normal, you have carried out competent and successful work, for which we congratulate you.
How to detect and determine a malfunction
First of all, the car owner notes the impossibility of changing the temperature of the air supplied through the heating system. To check the condition of the micro-gearbox, it is necessary to supply electricity from the battery to its motor in the middle position. The functionality of the controller is checked in the same way, which also affects the ability to regulate the air temperature.
The most obvious sign of a non-working gearmotor is a significant decrease in the rate of heating of the interior. If there is no ventilation regulation at all, then we can talk about problems with the heater wiring.
Problems with the operation of the stove are not always caused by the heater damper motor of the VAZ-2110. You need to know about other reasons so as not to attribute them to a non-working gearbox:
- inability of the electrical circuit to transmit voltage to the engine;
- malfunction in the autonomous control unit of the heating system.
Signs of a malfunction of the VAZ 2110 gearmotor
The most obvious sign of a non-working gear motor is a significant decrease in the rate at which the interior warms up. But if there is no ventilation regulation at all, then most likely there are problems with the stove wiring. In addition, the car owner notes the impossibility of changing the temperature of the air supplied through the heating system.
There are several reasons why this device fails:
- There is a violation of the integrity of the electrical circuit, the power unit does not receive voltage from the battery, as a result of which the heater gear motor cannot function normally.
- Malfunction of the autonomous unit controlled by the heater; the gearbox is not able to provide the normal temperature regime of the heater.
Replacing the gearmotor
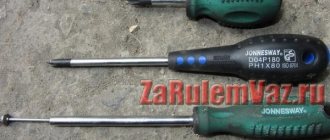
In the case when it is necessary to replace the micro-gearbox, it is necessary to follow the work plan given below, for the implementation of which you will need two Phillips screwdrivers (long and short), and a ten-point open-end wrench.
- We remove the windshield wipers from the special fuse, which is presented in the form of a rubber cap. But first you need to unscrew the contact nut using a ten key.
- We dismantle the frill, which is located in four plugs, which mostly serve a decorative function.
- On the side planes of the frill you can see a couple of nuts that will need to be unscrewed.
- We look at the electric motor compartment and find a rubber seal that needs to be removed.
- To disconnect the pipeline, you will need to unscrew the screws that hold the thermal radiators from the electric motor.
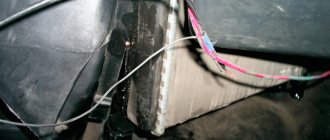
- Next to the brake vacuum booster there is a damper motor, which is mounted on three mounting screws.
- At this stage, you can dismantle the electric motor by first removing the smallest block. The larger block has a wire fastening.
- We install a new gear motor in place of the damper sector.
- To assemble the heating damper, we strictly follow the described plan, but all steps are performed in reverse order.
Important practical points
Some difficulties may be associated with the installation of the micro-gear damper. For this work you need to hire an assistant. First you need to connect the contacts to the new motor. If the heater damper is turned against the clock, cold air is supplied. This means that you need to turn on the car’s ignition and switch the sensor on the heater control system so that it is located opposite the blue dot. Checking the micromotor gear can be carried out according to the opposite scheme, which involves turning the damper along the clock mechanism and installing the sensor near the red mark. The micromotor gearbox must turn more than it normally does. The square can be treated with a special lubricant, which will facilitate installation.
When installing the motor, you need to pay attention to the alignment of the holes for the screws. The invited assistant must turn the temperature regulator and press on the electric motor. If the squares coincide, we can talk about a successful replacement of the gearbox, the operation of which will be carried out at a high level.
In some cases, you can observe incomplete insertion of the square along the length of the damper. You shouldn’t get upset ahead of time, because even if the micromotor reducer is only a third of the way in, its functioning will still be at a high level. The gearbox will need to be turned several more times from one mark to another so that the heating system fixes the operating range.
Gearmotor repair
If, however, you still have a desire to repair the gearmotor, and not just replace it with a new one, then the next part of our article will be of interest to you. It’s worth mentioning right away that the details of the new model are significantly different from their predecessors.
Old style part
First of all, let's look at the principle of repairing gear motors on an old-style VAZ-2110. Such a part may have a plastic or metal body. The first option is much easier to work with, but a gear motor in a metal case will be difficult to remove without denting it.
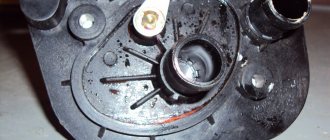
We already know how to dismantle such an element, so let’s proceed directly to disassembling it and identifying faults. We remove the adapter from the shaft, which is inserted into the damper and serves to transmit rotational energy. You can safely pull it towards yourself, since there is no glue or stoppers here.
There are latches along the entire perimeter of the case. To deal with them, you need to use flat screwdrivers, which need to be driven between the latch tongue and the body. Raise the eyelet quite a bit and insert a second screwdriver next to the latch. The halves will open due to the turning movement. Similar actions will need to be performed several times throughout the entire body.
You need to make sure that small parts that may get lost do not fall out. We completely remove the second half of the housing, pull it up from the axle and remove the three gears. On the second half of the housing there should be an electric motor with a gear and shaft.
When removing the electric motor, you need to pay attention to the worm gear, at the end of which there is a segment responsible for centering the shaft and holding the pair of gears in mesh. The part is small and can easily get lost. The motor housing has a locking screw that prevents the motor from turning inside the housing.
We remove the motor, remove the gears and segment from the shaft. We carefully inspect all parts for breakage and defects. If nothing like this is found, then we will examine the gearmotor further. In the place where the wires are connected, the motor parts are secured. We unbend it with available tools and release the bottom part.
Again, we act carefully and carefully so as not to break or lose anything. Inside there is a permanent magnet, which, due to the magnetic field, holds the motor armature in its place. In order not to cause trouble, you need to take the unit in your hand and press it with your finger on the shaft. Using the fingers of the other hand, we grab the anchor and separate the motor into parts. Do not grab the windings as they are easily damaged. We see two brushes that are attached to the bottom part. Using a screwdriver, pull the brushes by their holders. At the end of the armature there is a washer that prevents the brushes from being easily removed. There is no reason to remove the washer.
The armature has three windings, which are subject to careful inspection and ringing with a tester. We also inspect all dismantled elements for critical abrasions, melting, and soot deposits. Reassembling the gearmotor is carried out in the reverse order, carefully and with extreme caution.
New sample part
Dismantling of the new type gearmotor is carried out according to a similar scheme as described above. When the part is in your hands, you need to disassemble the body, which is held in place by clamps. They need to be carefully pryed off with a flat screwdriver. First of all, you need to examine the motor for any malfunctions. To do this, you need to connect it to the connector located in the engine compartment. The micromotor must be disassembled, for which it will be necessary to bend the pressed side. It is important to note the position in which the cover is located relative to the body. This will help maintain the correct polarity of the electric motor during assembly.
If you find a fault in the motor, you will need to look for a break. When the part is running, it is necessary to lubricate it and the gears on the gearbox. A silicone-based lubricant is ideal and can be used over a wide temperature range. It may be necessary to replace the damper position sensor; it is worth paying attention to. Assembly of the part is carried out in strictly reverse order.
Repairing and replacing a heater gear motor is not the easiest job a car owner may encounter. But there is nothing super complicated about this either. If you have the desire, minimal experience and imagination, you can successfully fix the problem with the car heating system and create a comfortable climate in the cabin of your car.
Repair of the VAZ 2110 heater damper
Of course, AvtoVAZ products cannot be called the highest quality. But still, with proper care and sufficient skill, you can make the car quite comfortable, convenient, and enjoyable.
Let's talk about warmth and comfort, in particular, about how to repair the heater damper on a VAZ 2110 so that it provides exactly the temperature in the cabin that you set.
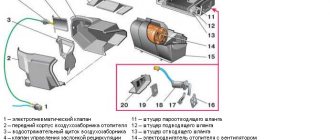
Heater diagram VAZ 2110
Common faults
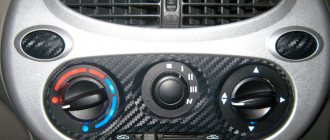
Most often, the VAZ 2110 suffers in terms of heating because the heater adjustment, as they say, does not work. Regardless of the selected position of the temperature control knob, only cold or, conversely, only hot air blows from the heater.
The reasons for this phenomenon may have different origins. Among them:
- Jamming of the MMR (micromotor-reducer) that controls the damper drive;
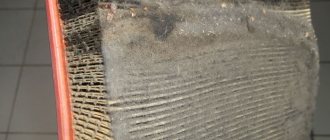
- The plastic damper (the first VAZ 2110 was equipped with these) has a destroyed seat, and due to jamming it is impossible to control it normally. If the gearbox is working, but the damper does not turn, you can most often hear peculiar clicks - this is the square shaft turning in the socket. For such a malfunction, there is only one treatment - replacing the old plastic damper with foam insulation with a new one. Better, more modern, metal, with a rubber seal. This one does not warp or warp like its plastic sister;
- To finally decide who to blame - the damper or the MMR, you still need to pay attention to its control unit. He is also among the “suspects”.
Functionality check
To begin with, especially if serious repairs are not yet in your plans, you need to try to help the damper sit in its place. Why turn on the ignition and, moving the regulator to different positions, manually move the damper, trying to “seat” it as expected.
When checking and adjusting this way, you must first remove the deflector to get to the heater damper. If you succeed, and the damper begins to move, obeying the regulator, you can consider that the half-measure was a success.
The fact is that if the socket is loose, normal operation is impossible, and over time you will still need to replace the VAZ 2110 heater damper. Therefore, you can still drive if there is such a need, but heater repair is just around the corner.
If it turns out that the damper can only be controlled manually when the ignition is turned on and the regulator is turned to its extreme positions, then the cause is most likely MMR. What often helps here is not repair, but replacement of this micromotor gearbox.
In addition, the fact that the damper does not work as it should, its adjustment does not give the desired result, can also be blamed on the microfan with a temperature sensor, as well as the control unit.
If any of the mentioned heater components fail, the best solution for the VAZ 2110 is to replace them, otherwise repairs will later require more significant investments.
Disassembly
Naturally, replacing a VAZ 21210 damper that works poorly or does not want to change its position at all begins with a rather troublesome analysis. Here are its stages:
- Draining coolant from the heater system;
- Disconnecting the battery. It is enough to disconnect the “minus”;
- Removing the trim, windshield trim, sound insulation upholstery;
- Removing the stove fan;
- Disconnecting the vacuum hose clamp from the heater body;
- Removing the front heater air intake housing. The work is meticulous and not fast. To make disassembly easier, removing the instrument panel can help. From inside, unscrew the screws that secure the heater, then it can be lifted;
- Removing spring brackets, mounting screws and removing the front housing;
- Removing all hoses from the radiator;
- Disconnecting the rear heater casing;
- You need to remove the radiator from the stove;
- It is now possible to replace the damper.
Reassembly
The new damper on the VAZ 2110 must be installed so that the fork on its axis engages with the lever. It is correct if the damper is in the raised state. Otherwise, it will be impossible to control it, and the operation of the stove will not be restored.
Next, we put everything back in place in reverse order. Fill the cooler. We check the functionality of the dampers, the tightness of the hoses and all connections. Then we turn on the stove and monitor the heater. If his work satisfies us, then the repair was successful.
We are engaged in the drive
Simultaneously with replacing the damper, we check its drive, and if the MMR does not work, it is necessary to either replace the motor or repair it. After removing the trim and the windshield trim behind the VAZ 2110 vacuum amplifier, we find the MMR, disconnect two connectors - the MMR and the micromotor.
MMR new sample MMR old sample
Next, unscrew the screws and take out the MMR, from which we remove the motor. Its operation is checked by connecting to the automatic control system.
If you find that it is not working, you can replace it, but repair is also possible. The stages are:
- Partially bending the pressed side, remove the lid;
- Check the condition of the bearings, brushes and commutator;
- Replace or fix them. If the gear teeth of the gearbox are worn out, it needs replacement;
- Bearings require silicone grease.
If after repair the operation of the motor is restored, you can assemble the MMR and install it in place. In the VAZ 2110 this is done like this:
- The MMR lever pin must be inserted into the slot of the lever, which is located on the heater damper drive;
- If the indicated lever is turned incorrectly, you need to apply 12 V voltage with two wires to the contacts of the motor connector (yellow wires fit here), and the lever will move to the desired position;
- After installing the MMR, check how it works, at the same time, how the heater damper drive moves and the heater control lever works to set the temperature in the VAZ 2110 cabin.
How to repair the gear motor of a VAZ 2110 stove
As you know, the heating system plays an important role in a car. Thanks to it, the driver can feel comfortable in the cabin even if the temperature outside is sub-zero. However, if at least one component breaks down, the functionality of the system may be impaired. If the heating system in your car has stopped functioning correctly (warm air has stopped flowing), the reason for this may be a failure of the gear motor. That is, when you switch the temperature knob, the motor does not move the damper, which leads to this result.
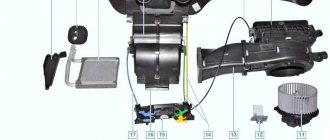
Geared motor VAZ 2110, device, purpose and principle of operation
The opening/closing of the damper is performed by the heater damper gear motor using signals from the heater control system, as a result of which the air that enters the cabin is heated or cooled as needed. Note that the configuration of the “tens” gear motor may differ significantly depending on the year in which the car was produced. The gearmotor itself looks like a small electric motor. Often a broken device is completely replaced, since repairing it is quite problematic.
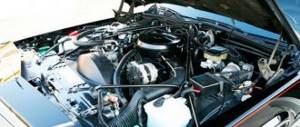
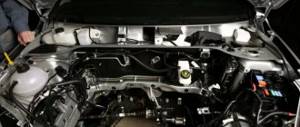
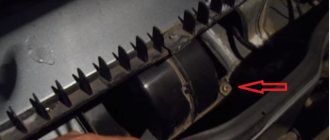
Where is the gear motor located?
The unit is located in the engine compartment on the steering wheel side; it is installed near the brake booster, so it will not be difficult to find it.
Signs of a malfunction of the VAZ 2110 gearmotor
The most obvious sign of a non-working gear motor is a significant decrease in the rate at which the interior warms up. But if there is no ventilation regulation at all, then most likely there are problems with the stove wiring. In addition, the car owner notes the impossibility of changing the temperature of the air supplied through the heating system.
There are several reasons why this device fails:
- There is a violation of the integrity of the electrical circuit, the power unit does not receive voltage from the battery, as a result of which the heater gear motor cannot function normally.
- Malfunction of the autonomous unit controlled by the heater; the gearbox is not able to provide the normal temperature regime of the heater.
How to check the operation of the heater gearmotor 2110
If it is not possible to control the temperature in the cabin using the knob, first of all, the heater gear motor is checked. To check the condition of the micromotor-gearbox, you should supply electricity from the battery to its motor with the handle in the middle position. The controller is checked in the same way, which also affects the ability to regulate the air temperature.
Tools, accessories, consumables
To replace the heater gear motor you will need the following materials and tools:
- Slotted and Phillips screwdrivers.
- Set of wrenches.
Replacing the old-style VAZ 2110 stove motor gearbox
- First you need to remove the wiper arms by unscrewing the fastening nut on each arm.
- Now lift the wiper arm and pry it with a screwdriver so that it comes out of the slots.
- Next, remove the hood insulation and frill - this is a plastic lining that protects the windshield from damage. To get to the required element, remove the trapezoid with the electric windshield wiper motor. The trapezoid must be removed so that the metal frame is not damaged. Lift this component up, disconnect the power plug, and then the fastening element.
- When access to the required node is gained, disconnect the two plugs responsible for power supply.
- Then unscrew the three damper screws. When unscrewing, be careful; the structure must be in your hands. When you unscrew all the screws, carefully remove the gear motor; you need to pull it to the side so that it comes off the mounting points.
- The device is released, you can remove it.
- Next, we proceed to install the new gear motor.
- When installing, insert the pin of the gearmotor lever into the slot in the damper drive handle.
- But if the gearmotor lever is turned in such a way that it is not possible to perform the above action, you should apply 12 volts with two wires to the contacts of the electric motor connector (two yellow wires) so that the lever takes the required position.
- After installing the micromotor, check the movement of the damper drive handle from the lowest to the highest positions when turning the temperature control lever in the cabin.
Diagnostics, repair and replacement
You can check the gearmotor immediately after dismantling. You need to apply 12 volts to the contacts of the power connector. The easiest way is to take this voltage from the battery. We put two wires on the battery and connect them to the connector contacts. The gearmotor shaft should begin to rotate. When the polarity changes, the shaft movement must be reversed.
If this does not happen, disassemble the gear motor. If the servo drive operates, then the problem is in the control unit or wiring.
You can only disassemble the micromotor gearbox of a new type on your own. The plastic case is held on by clamps and can be easily separated into two halves with little effort.
After disassembly, we try to rotate the worm of the electric motor shaft with our fingers. If it rotates easily, then the mechanical part is working properly. Inspect the gear teeth. The recesses in the top cover for the gear shafts must be intact, without chips or ellipsoidal wear.
We try to apply voltage to the motor directly, past the chip. In some cases, a break is observed precisely in this area. If even after applying voltage directly nothing happens, the repair of the gear motor of the VAZ-2110 stove can be stopped at this point. The motor is faulty. It will be necessary to install a new motor or completely replace the gear motor, which is usually done due to the lack of suitable electric motors on sale.
Video: The stove on the VAZ 2110 does not heat up? Replacing the heater damper gearmotor
Replacing the gear motor of the VAZ 2110 stove of the new model, like the old one, is carried out in the reverse order of dismantling.
The only recommendation at the installation stage is to check the functionality of the new part. There are cases where even new spare parts had defects. And if you purchased a used servo drive, checking is required.
Detection and causes of malfunction
The main indicator of gearmotor failure is the inability to regulate the air temperature of the car heater. You can check the performance of the micromotor gearbox by supplying electricity from the battery to its motor in the middle position. In the same way, you can check the functionality of the controller, the failure of which also leads to the impossibility of temperature control.
The following defects may be the cause of gearmotor failure:
- violation of the integrity of the electrical circuit, that is, the supplied voltage does not flow to the engine, the gearmotor cannot function correctly;
- a defect in the autonomous heater control unit, as a result of which the reducer does not supply air at the required temperature.
The following material will help to identify the causes of malfunctions of the VAZ 2110 stove: https://vazweb.ru/desyatka/otoplenie/neispravnosti-pechki.html
Heater diagram VAZ 2110
Drive problem
Most often, owners of the domestic “ten” are faced with situations regarding the stove when the regulator does not respond to user manipulations. That is, the regulator does not work. Whatever position you choose, either cold or only hot air comes from the air ducts.
There are different reasons for damper failure.
| Causes of failure | Characteristic |
| Micromotor gearbox jammed | This element is responsible for controlling the damper drive |
| Problem in the control unit | It should be checked in order to understand whether the micromotor gearbox, the damper, or the control unit is at fault |
| The plastic dampers have moved from their seat and are jammed, making it impossible to control the stove. | This is typical for the old-style VAZ 2110 heater damper, when plastic was still used for this component. |
When the gearbox is functioning, but the damper still does not turn, you can hear characteristic sounds - clicks. This indicates that a square shaft rotates inside the socket.
There is only one way to cure such a malfunction - remove the old damper made of plastic with foam insulation, and replace it with a new, modern one. The new type of damper is made of metal, and the seal for it is made of rubber.
When changing the damper, do not forget to check the functionality of the actuator.
Drive unit
If the micromotor gearbox does not work, it will have to be repaired or simply replaced with a new one.
- Having removed the trim and trim from the windshield, directly behind the vacuum booster of your “ten” you will find a micromotor gearbox. Disconnect two connectors from the amplifier - the micromotor and the micromotor-reducer. Now unscrew the screws and
- remove the micromotor gearbox. You have to remove the motor from it.
- Connect it to the automatic control system to check its functionality.
If the device does not work, you can try to repair it. For this:
- Bend the pressed side slightly and remove the lid;
- Check the condition of the commutator, brushes and bearings;
- Replace the specified components or correct them;
- If the gear teeth are worn out on the gearbox, it will have to be replaced;
- Be sure to lubricate the bearings. Ideally, a silicone-based lubricant should be used;
- If the above measures do not help, simply install a new unit.
DETAILS: Golf 3 automatic transmission repair. Removing a manual transmission and repairing a clutch drive on a Volkswagen Golf 3 ADZ
Replacement of micromotor gearbox
If it is necessary to replace the micromotor gearbox on a VAZ 2110, you need to carry out a number of simple operations. You will need to remove the frill, as well as the VUT and pedal assembly. Then dismantle the old heater gearmotor along with the plastic element and install a new micromotor gearbox instead of the damper sector, where there is exactly the same square. Replacing the gearbox usually takes place without any particular difficulties.
Before you start replacing the MMR, it is worth studying the design of the heating system, which is discussed in detail here: https://vazweb.ru/desyatka/otoplenie/sistema-otopleniya.html
Installation of the micro-reducer damper is carried out with an assistant. You must first connect the contacts to the new motor. Turning the heater damper counterclockwise means supplying cold air, so you need to turn on the ignition and move the heater control system sensor to the position opposite the blue dot.
You can also do the opposite and check the micromotor-reducer, that is, turn the damper clockwise until it stops, and install the sensor opposite the red dot. The micromotor gearbox of the stove will rotate more than necessary, and for the installation to go smoothly, you can use a special lubricant for the square.
It is necessary to install the motor so that the holes for the screws coincide. Then the assistant turns the temperature regulator and at the same time presses the motor inward. The coincidence of the squares means that the replacement was successful and the gearbox should provide air flow at the desired temperature.
If the square does not go the entire length of the damper, it’s okay, the micromotor-reducer can only go a third, and this will not affect the functioning in any way. Then screw in the screws and turn the gearbox a few more times - from the blue mark to the red mark and in the opposite direction. This is done so that the stove system remembers the operating range and in the future the gearmotor works properly.
As a result, when you turn the heater damper of the gearmotor on a VAZ 2110, it immediately takes the required position, and in mode “A” the adjustment occurs automatically.
The subtleties and nuances of stove damper repair are presented in the following article: https://vazweb.ru/desyatka/otoplenie/remont-zaslonki-pechki.html
Installation of gear motor
In order to install the gearmotor on a VAZ 2110, you need the following tools: a Phillips screwdriver and a 10-open-end wrench. Replacing and installing a part such as a gearbox does not require special knowledge and skills; even a beginner can cope with such a task.
To gain access to a part such as a micromotor gearbox, you must first remove the windshield wipers from the fuse. To do this, unscrew the contact nut, and then release the frill and access to the screws will open. Unscrew the two nuts on the sides of the frill and remove the rubber seal from the electric motor compartment of the heater gearbox.
First, the pipeline of the heater damper frill on the VAZ 2110 is disconnected, then the screws holding the thermal radiators of the gearbox are unscrewed. The motor is located in the left compartment of the heater damper gearbox on the VAZ 2110, next to the brake booster. You need to unscrew the two bolts at the top.
Then the screw at the bottom is removed and the electric motor is dismantled. The damper is assembled in exactly the reverse order after the gearmotor is installed.
Functionality check
In order to check the gearbox, you need to set the position on the blue dot on the left handle and wait 10-15 seconds, start the engine. Disconnect the controller from connector X1 and test the resistance in contacts X1.4 and X1.1. The gearmotor must have a voltage of 800-1200 Ohm for controllers 1303.3854, 1313.3854, 1333.3854 and 3600-5000 Ohm for controller 1323.3854.
After this, test the micromotor gearbox in the position on the red dot. The gearbox must have a resistance of 3200-5000 Ohm for controllers 1303.3854, 1313.3854, 1333.3854 and 1200-1600 Ohm for controller 1323.3854.
If the micromotor-reducer has no resistance or it does not change, this may indicate a defect in the shaft position sensor. It is impossible to purchase it separately, so there will be a need to completely change the gearbox in such a situation.