08 August 2017 Lada.Online 16 287 2
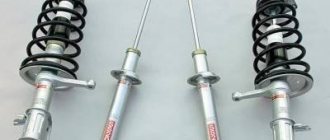
The front and rear suspensions of Lada XRAY and Largus are equipped with telescopic hydraulic gas-filled shock absorbers. During operation they have to be replaced with new ones. The process of replacing them with XRAY and Largus is similar, because both cars are produced on the same B0 production line.
Attention.
Suspension shock absorbers should be replaced as a set for both sides. Replacing the shock absorber on one side is not allowed.
Rear shock absorbers Lada Largus
The shock-absorbing struts specifically for the model we are considering are produced by Monroe. The rear shock absorbers of the Lada Largus are a non-separable design. In this case, low pressure gas pressure is used. Replacement of oil structures should be carried out only in pairs.
Manufacturers provide detailed instructions for using and servicing the product, emphasizing that replacement of failed rear shock absorbers should be replaced with original kits. This guarantees the service life declared by the manufacturer.
However, due to certain circumstances, our drivers often use related products instead of the original. Read below about which analogues are used.
Shock absorbers Lada Largus article number:
- Left: 6001549248.
- Right: 8200779901.
Case length 38.5. Rod width 12.5. The body height is 382. The stem is not taken into account. The stroke of the rod is 241. All dimensions are indicated in millimeters.
Let's sum it up
When the rear suspension or front suspension or its individual component fails, diagnostic procedures and repairs should not be neglected. Don't forget that the diagram shows what is located where. This approach will not only ensure the vehicle is in good condition, but will give the owner of the Lada Largus confidence in his own safety. If it is not possible to perform these manipulations yourself, it is recommended to seek the help of specialists.
Analogs of rear shock absorbers
As for analogues of largus. We do not have exact data (sizes). Therefore, we will not mislead you. But, we authoritatively declare that on the spare parts market you can choose the necessary goods from global manufacturers and products from Russian companies. Here are some of them:
- The products of the manufacturer Monroe are of interest. You can order directly and save money.
- Sachs products are considered softer.
- Among the domestic manufacturers, one can single out the Russian one, which produces several lines. The “Comfort” kit has won the greatest popularity among Largus owners. They have an acceptable price/quality ratio. Many people like the kit, although they complain about excessive rigidity. The best absorption of road surface irregularities occurs at a speed of 50 km/h.
When to change shock absorbers on Lada Largus
It is important to know when to make repairs. To do this, you need to have information about the actual operating life of shock absorber struts.
Information can be gleaned from the technical specifications and service documents provided by the manufacturer.
Manufacturers indicate different service life, which ranges from 50-60 thousand km of car mileage. However, taking into account the state of the road surface in the countries of the post-Soviet space, you can confidently reset the manufacturer’s data by 10 thousand km.
When approaching the issue of car repair, you need to decide on the working tool. More on this below.
Replacing shock absorbing struts
It is necessary to change the Lada Largus shock absorber when a factory defect is detected or when a certain mileage has been covered. Unscheduled work is carried out in the presence of obvious defects or leakage of technical fluid. And also, in case of loss of their performance.
On a note! Replacement of a failed set must be carried out in pairs.
Carrying out technical work is preceded by diagnostics, and the tightening of the bolts securing the shock absorbers to the levers is also checked.
Removing shock absorber struts
Let's find out the algorithm for dismantling actions:
- The vehicle must be placed on a lift. It is possible to carry out dismantling activities in the inspection pit. In this case, you need to put the car in first gear and put stops under the front wheels.
- If the car is designed for 5 passengers, as is the case with the R90 model, you need to move the lining of the rear wheel arches to the side. Having opened the luggage compartment door, we remove the rear seats of the third row, if we are talking about a station wagon.
- Remove the trim from the rear arches and remove the lower mounting bolts. Remove the trim frame.
- Remove the rubber cap from the shock absorber.
- Next, you can see the nut that holds the rod. She is also being filmed.
- Then the rubber cushion is removed.
- The fastening bolts are removed.
- The shock absorber is removed.
Please note that there is a rubber cushion, a washer and a spacer sleeve on the rod: the elements must be removed.
- The compression buffer and protection cover are removed from the rod.
- They must subsequently be separated.
- The protective cap is dismantled.
- If there are worn out and/or damaged parts, remove them.
After this, the shock absorber is placed vertically. The rod lowers and extends until it stops. In this case, there should be no extraneous noise, knocking or failure.
If the above points occur, the shock-absorbing structure changes. It is also dismantled if deformation of the rod is detected and/or the integrity of the threaded connection is compromised. When checking, pay attention to the degree of compression of the spring.
Similar to the procedure described, the second shock-absorbing device is dismantled and replaced.
It remains to consider the issue of installing a new kit, which is what we will do.
Shock absorber installation
Installation of the rear shock-absorbing structure is carried out in reverse order.
Note! If the boot and bumper have become unusable, you need to change them.
So, as we have already said, installation is carried out in the reverse order:
- You need to install a new nut that secures the shock absorber rod.
- It is advisable to change the shock absorber mounting bolt connecting it to the rear suspension.
- The following is placed on the rod: a washer, a hinge bushing, and a lower cushion.
- We install the shock absorber in the rear wheel arch of the car.
- We connect it to the lever of the rear suspension structure.
- The rod fits into the mounting hole of the wheel arch.
- The upper hinge pad, control washer and new fastening nut are put on the rod. The tightening torque of the nut is 14 Nm (1.4 kgf.m).
It is important not to tighten the fastening bolt all the way. We work with replaceable head No. 21 and a knob.
Don't forget to put the plugs where the new elements are attached to the rear wheel arches.
The above operations in the specified sequence are acceptable for working with the second shock-absorbing structure.
We put the wheels in place. We fasten the arch trim, storage compartment, fastening parts and brackets for the side and rear armrests.
We lower the car to the ground. And only now we tighten the bolts securing the shock absorbers to the arms of the rear suspension structure.
The tightening torque of the bolts is 105 Nm (10.5 kgf.m. We work with a replaceable head No. 21.
Removing and installing the rear suspension shock absorber Lada Largus
Rear shock absorber: 1 – shock absorber rod fastening nut; 2 – washer; 3 – upper rod cushion; 4 – spacer sleeve; 5 – lower rod cushion; 6 – compression stroke buffer; 7 – cover; 8 – protective cap; 9 – shock absorber
Removal
Warning: Replace the rear suspension shock absorbers as a set for both sides. Replacing the shock absorber on one side is not allowed. If you do not change it in pairs, then the wear of the new shock absorber will occur sooner (due to different loads), and may also affect the behavior of the car (masters say that unstable control may be noticeable at a speed of 100 km/h). The old strut always has wear and tear and this is reflected in rigidity and changes in characteristics, the new one behaves differently than the old one, as a result, the suspension works asymmetrically, differently, and the car can drive unpredictably at the most inopportune moment.
Warning: To prevent damage to the rubber-metal hinges of the rear suspension arms, do not hang the rear suspension arms with the hinges tightened by an amount exceeding the position of the arms with the rear suspension springs completely unloaded.
Place the car on a two-post lift, apply the parking brake and turn off the ignition (electrohydraulic lift type P-3.2G with a lifting capacity of 3.2 tons).
For R90, 5-seater vehicles, move the rear wheel arch trim to the side.
For R90 cars, 7-seaters - transform the rear row of seats into the luggage position and remove:
— rear side armrests;
— fastening parts and armrest brackets;
— storage compartment;
— move the lining of the rear wheel arches to the side.
For all cars
Remove plugs 1, Figure 2-1, from the places where the shock absorbers are attached to the rear wheel arches.
Remove rear wheels
Raise the car, install a stand under the rear suspension arm and lower the car until the spring begins to compress (stand type Pallbockar K 5160 f. “Kamasa Tools”).
Figure 2-1 — Removing the rear suspension shock absorber:
1 - plug;
2 — shock absorber rod;
3 — nut for fastening the shock absorber rod;
4 — washer;
5 - upper shock absorber hinge cushion
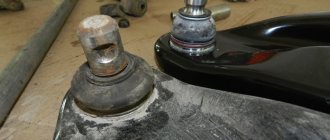
Lock rod 2 and unscrew nut 3 securing the shock absorber to the body (wrench 6, 16).
Remove washer 4, upper shock absorber joint pad 5 and shock absorber joint bushing.
Figure 2-2 — Removing the rear suspension shock absorber:
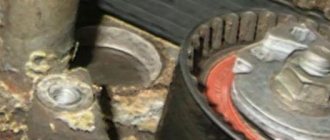
1 — rear suspension lever;
2 — rear suspension shock absorber;
3 — shock absorber mounting bolt
Unscrew bolt 3, Figure 2-2, securing the shock absorber to arm 1 of the rear suspension and remove shock absorber 2 (replaceable head 21, knob).
Remove the lower shock absorber joint pad and washer from the shock absorber rod.
Installation
Warning: Reuse of the nut securing the shock absorber rod to the rear wheel arch is not permitted. The nut must be replaced.
Warning: Reuse of the bolt securing the shock absorber to the rear suspension arm is not permitted. The bolt must be replaced.
Install the washer, lower cushion and shock absorber hinge bushing onto the shock absorber rod.
Place the shock absorber in the rear wheel arch, connect the shock absorber to the rear suspension arm and tighten, without tightening, the new fastening bolt (replaceable head 21, wrench).
Insert the shock absorber rod into the mounting hole of the wheel arch, install the upper shock absorber hinge pad, washer and screw on the rod with a new fastening nut. The tightening torque of the nut is 14 N.m (1.4 kgf.m) (spanner 6, 16, replaceable insert 16 type 58 22 10 16 f. “Stahlwille”, torque wrench type 50 18 00 04).
Install the plugs for the shock absorber mounting points to the rear wheel arches.
Repeat the removal and installation operations for the second shock absorber.
Install rear wheels
For R90, 5-seater vehicles, reinstall the rear wheel arch trim.
For R90 cars, 7-seaters - install in place:
— lining of the rear wheel arches;
— storage compartment;
— fastening parts and armrest brackets;
— Rear side armrests.
Warning: The final tightening of the bolts securing the shock absorbers to the rear suspension arms must be done with the vehicle standing on its wheels.
Finally tighten the bolts securing the shock absorbers to the rear suspension arms. The tightening torque of the bolts is 105 N.m (10.5 kgf.m) (replaceable head 21, torque wrench).
Source: https://lada-largus.narod.ru/html/amortizator.html