Have you ever had a desperate desire to “unstick the eyelids” of your car on a dark night so that the path is illuminated by a bright light? If the answer is yes, then your headlights clearly need polishing. With regular use, the plastic head optics gradually become cloudy, and road lighting becomes dim. It is not always possible to solve the problem simply by changing the headlights, at least because of the cost of new or even good used ones. The author of these lines was once saddened by the appearance of the headlights and the dimness of the light on his old-fashioned Volvo, but it was not possible to install fresh optics with the transparency of a mountain stream - the personal toad, having learned about the rather impressive prices, used a technique called combat strangulation. I had to pick up a sanding machine, stock up on props and put the plastic in order myself. Polishing headlights with your own hands at home is not a difficult task. The main thing is to approach the process properly prepared and having the necessary knowledge.
The reasons for their appearance are:
- Constant dust on the roads remaining on the headlights
- All kinds of stones, sand, soil falling on the headlights
- Worn rubber bands on headlight wipers causing scratches
Washing headlights with various cleaning liquids and wiping with dry or wet wipes do not bring the desired result? This means it's time to clean them.
Naturally, there are many drivers who immediately rush to buy and replace optics. First you need to point the light at the road. And if you see a shapeless spot of light, instead of a brightly lit road, then try polishing the headlights with your own hands and making them look as good as new. Save your budget.
Preparatory stage of polishing headlights
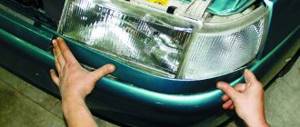
Before you start polishing your headlights at home, you first need to thoroughly rinse them and wipe them with a dry cloth. In order not to damage the nearby paintwork areas on the car body, we will stick construction tape on them. We will polish the headlights with our own hands without dismantling them. We will remove the headlight only when they need internal polishing.
It is also necessary to protect the rubber seals, as they may be damaged by abrasives or other polishing agents.
We remove dust and dirt using special detergents, you can even use a vinegar solution. It is also possible to dissolve vinegar in water.
We use a grinding machine as a polishing tool, or, if one is not available, an electric drill will do.
Polishing with purchased auto chemicals
One of the easiest ways to polish headlights with your own hands is to carry out this work using certain store-bought chemicals, for example: PlastX, Mothers Nulens, Turtle Wax. They work best against problems such as cloudiness or yellow discoloration. In most cases, retail kits for this type of polishing consist of a special cleaning abrasive paste, a protective spray and a special microfiber sponge.
The subsequent list of actions is as follows:
- Insulating the surrounding elements of the vehicle with masking tape.
- Cleaning the surface of the headlight from dust and dirt. A large speck can leave marks on glass or plastic.
- Apply the purchased paste and lightly wipe the entire surface with it. It is best to perform this action using a napkin. The substance in the paste has a restorative effect. As the work progresses, you can increase the pressure a little. The headlights should be wiped in this way for 10 to 20 minutes.
- After the plastic has become more transparent, use a napkin or a stream of water to clean it of the paste.
Polishing a plastic headlight using Abralon
The Abralon set for polishing headlights consists of circles with an abrasive layer of different grain sizes, the base of which is a dense fabric. Under this fabric there is a foam cushion and Velcro for attaching the wheel to the grinding surface. typewriter For the final polishing step, you can use a different polish, like 3M.
This set is enough to polish a dozen headlights.
Application of grinding Using a machine will significantly increase the polishing speed, but all this can be done manually.
We begin the grinding process with coarse abrasive using Abralon 600 wheels. Before use, they need to be moistened to obtain greater effect and significantly reduce dust. We finish grinding with this wheel after the formation of a uniform matte surface of the entire glass. Afterwards we wash the headlight glass with water.
In the next stage, it is necessary to grind using the Abralon 1000 wheel according to the method described above.
And we also sequentially move on to fine-grained wheels “Abralon 2000”, “Abralon 4000”.
The end result should be a transparent headlight glass surface.
After washing the headlight, dry it and begin polishing. Squeeze a small amount of polish onto a soft cloth and gradually polish in a circular motion until the headlight glass becomes shiny.
When using a grinding machine, do not abuse your strength and put pressure on the machine, as the glass may overheat and crack. Use medium speed of the tool. Remember to constantly moisturize the circles.
When using an electric drill, you will need to buy or borrow a special attachment for attaching circles and a pad for them and follow the process described above. In the video you can see how to polish a plastic headlight with your own hands at home.
Do-it-yourself polishing of rear headlights (lanterns) on a VAZ-2109
Probably many VAZ owners have encountered the problem of dull and cloudy plastic on the taillights. In fog, the headlights shine very poorly, so the driver behind the car has difficulty seeing the exact distance to the car. Many people solved the problem by purchasing new headlights, but there is another option for eliminating the cloudiness of plastic. This option is to polish the headlights.
You can make your headlights shine using professional technology. The polishing procedure will be carried out in three stages. The base of the polish is water-dispersed, the so-called wet polish. First, we coat the headlights with a coarse paste containing coarse abrasive particles. At the first stage, we clean off the dull, old layer of plastic with a coarse paste. During operation, you will notice how the color of the headlight changes. When the headlight is abraded, it is necessary to remove all that remains of the working material, otherwise the remaining abrasive material can seriously damage the headlight. Then we apply an abrasive with smaller particles to the headlight, this will help remove the deep cutters remaining from the abrasive materials. The procedure must be carried out carefully, at a low speed of rotation of the polishing machine. The recommended polishing speed is approximately 500 - 700 rpm. After removing the scars, we move on to the last and most important stage. You need to install a soft felt circle on the polishing machine and apply the softest type of polish on it. The main thing, I repeat, is not to work at high speeds, as the plastic will overheat and the desired effect may not occur. For the last stage of polishing, you need to remove the headlights from the car, because the last stage is the longest and most difficult, when working with headlights installed on the car, everything will be very difficult. And the safety of elements painted with the car in contact with the headlight is compromised. So removing the headlight would be the best option. So, when working, you should moisten the headlight generously with water to avoid overheating. Polishing should be done for several minutes until noticeable results are obtained. When the headlight has regained its original appearance, the polishing work will be completed. If you still decide to polish the headlights without removing them, then I advise you to resort to using adhesive tape; the adhesive tape will protect the painted parts of the car and the bumper from unnecessary scratches and stains. Apply tape to the protruding part of the trunk, bumper and the edge of the license plate and only then begin polishing. In our case, the headlights were removed and therefore the effect was much better than in the case when the headlight remained on the body. The headlight was installed in place and all the wires were connected. We checked the quality of the work and were satisfied with it. The headlights regained their original appearance and began to shine very brightly.
Now it will be difficult not to notice you in the fog, since the light is not scattered across the almost matte surface of the headlight, but penetrates through it. This polishing can be done at a car wash and other car service centers. At least this procedure will not take much time and will not hit your wallet, at least it will be much cheaper than purchasing new headlights. You can also polish the headlights in this way, but only if there is a plastic protection on it, since the glass is not polished.
- Author: Soulless Robot
Rate this article: Share with friends!
Related posts:
Unique budget tuning of rear lights for VAZ 2108, 2109, 2199
Do-it-yourself installation of rear disc brakes on a VAZ-2108
Modification of the rear lights of the VAZ 2108
Polishing glass headlights on your car
Glass headlights are no exception. With prolonged use, clouding and small scratches also appear on them. But even such headlights can be polished with your own hands. In addition to power tools, we will need wheels with different grain sizes, glass washing liquid, polish, napkins, varnish (possibly acrylic), a polishing wheel (soft), and water.
Since glass is a fragile material in composition, during grinding it is necessary to refrain from overheating and placing strong pressure on the electric power. tool. We set the speed of the grinder to no more than 1500 rpm. During grinding, the glass must be constantly watered with a small stream. We replace coarse-grained circles with fine-grained ones over and over again. Before each replacement of a circle with another, let the glass cool.
The completion of the glass grinding process can be determined visually. It should be matte equally over the entire surface or finely rough. After that, we wash it and get smooth glass to the touch, without any roughness. Apply the polish you have chosen for polishing headlights onto a soft circle and polish until the glass is transparent. In the video below you will learn how to polish glass headlights using PTF as an example.
We would like to remind you that when grinding, the top protective layer of glass is removed. Without this layer, the surface of the headlight will not last long and will become cloudy again. To avoid this, after you polish the “eyes” of the car, they will need to be coated with a protective colorless varnish. The varnish protects the glass from the effects of sand, including small stones.
An example of a protective varnish is clear acrylic. It is applied to glass in two layers. The method of applying acrylic has its own characteristics: you need to apply it carefully and carefully, from top to bottom, making sure that there are no drips left. All this must be done slowly, but without stopping, so that the varnish does not have time to dry. Also make sure the process is clean. No contaminants must come into contact with the varnished surface. A protective layer of varnish will provide the headlights with a long service life.
Manual headlight polishing method
You can polish your headlights without the use of electric tools, with your own hands. To do this, it is worth purchasing abrasive sandpapers, the grain size of which is 600, 800, 1000, 2000. Leave them in water for ten minutes. If there are deep scratches on the headlight glass, then we will start sanding with 600 grit. Gradually reduce the grit.
If the scratches are small, we start sanding with 1000-grit sandpaper. The order is the same, but we do everything by hand.
At the final stage, we use 2000-grit sandpaper. Before using new sandpaper, the headlight glass should be washed with water.
After washing, you need to dry the glass. Then apply the polish to a soft cloth and use a circular motion to polish the headlight for a bright look. You can see how to polish a headlight by hand below.
In general, polishing plastic headlights takes about 1 hour. It is recommended to polish your headlights every two years. This preserves illumination, the loss of which with “dim” headlights can be up to 40%. Provides a fairly wide and bright view at night, which directly affects the safety of driving a car.
Prices for polishing headlights in Moscow range from 300 to 500 rubles, in Minsk from 10 to 30 Belarusian rubles, in Tomsk from 250 to 500 rubles.
Do-it-yourself internal grinding of car lenses
If you are unable to restore the required transparency to the plastic diffuser, polish it on the inside as well. To do this, the headlight should be dismantled and cleaned of dirt. Any of these parts should be opened with the utmost care. Grinding inside is carried out according to the standard scheme, but all work will have to be done manually.
Before manual polishing, it is recommended to soak the sandpaper in water for about ten minutes. Since there are no scratches on the inside of the headlight, processing can be started with an abrasive of 1000 or more. For final polishing, use a soft flannel cloth or similar material.
Timely restoration of headlight transparency is a concern for driving comfort and safety. You can do the polishing yourself, saving significantly on service costs.
Smooth polycarbonate glass for headlights VAZ 2114, 2115
Smooth polycarbonate glass for headlights VAZ 2114, 2115.
Used to improve the luminous flux when installing bi-xenon lenses or bilens into the headlight.
The glass is completely transparent and therefore ideal for replacing standard reflective glass.
Our online store offers glass for headlights for cars:
- VAZ 2114, 2107, 2108, 2109, 21099, 2106, 2110, 2101
- Oka
- Gas 3110, 31029.
- UAZ
- VW Passat b3, T4
- Audi A6
If you are interested in other glasses, call our managers.
Smooth glass is made of modern impact-resistant material - polycarbonate.
For help selecting glasses for the headlights of your car, contact our managers.
Polishing headlights with toothpaste
The easiest and cheapest way to clean your headlights from scuffs, clouding and small scratches with your own hands is to polish the headlights with toothpaste. This method is suitable for both plastic and glass headlights.
To work, we need simple toothpaste, a couple of clean, soft towels, water and any car detergent. First of all, you need to thoroughly wash the headlight with detergent to remove dust, dirt and other contaminants. Then apply the paste on a towel and rub the paste into the surface of the headlight in a circular motion. After this, thoroughly wash the headlight and wipe it with a damp towel.
To give the headlights shine and protect them from external negative factors, it is advisable to apply a little polishing agent to their dry surface and rub with a soft, clean cloth.
How to polish manually with GOI paste and other means
If you want to save on polishing lenses without much damage to the final result, it is recommended to choose GOI paste. Let's take a closer look at the technology of polishing headlights with your own hands.
Preliminary stage
Work should be carried out in a clean room to prevent solid particles from entering the working surface of the tool. The garage floor needs to be washed to prevent dust from rising into the air. Headlights or lenses are removed from the car and processed separately at home or polished without dismantling.
For a beginner, it is preferable to remove the headlights so as not to accidentally ruin the paintwork
In the second case, at the preparatory stage it is necessary to wash the headlights and wipe them dry with a soft, clean cloth. The rubber seals between the headlight and the body are treated with a special product for the car or an aqueous solution of vinegar. Then strips of masking tape are glued around the perimeter of the diffuser - it will protect the paintwork of the body from accidental damage. The radiator grille and other parts that interfere with operation can be removed. It is better if the surface of the lenses is degreased.
Tools and materials to perform the job correctly
Work to restore the transparency of headlights can be done manually, but this activity requires a lot of effort and time. It's easier to use a power tool. During the work you will need:
- polishing machine/electric drill/grinder with grinding wheel;
- abrasive wheels from 600 to 2000 (for glass headlights - from 400);
- GOI paste or other polishing agent;
- felt circle (for polish - foam nozzle);
- protective varnish;
- napkins;
- protective gloves.
Important! When processing a polymer surface, it is important to avoid overheating, otherwise the plastic diffuser will deform or lose transparency. Therefore, an electric drill or angle grinder (grinder) must have a speed regulator.
Pressing too hard with a sander and overheating can lead to more serious damage than what you wanted to deal with in the first place!
Polishing headlights with ZM paste
We will carry out this work with the following materials and tools
- sanding paper P1500,
- a polishing machine or a hand-held electric drill with an attachment and Velcro for attaching polishing wheels,
- 3M polishing paste number 75 and 77,
- polishing wheel,
- protective tape,
- clear varnish.
Polishing technology
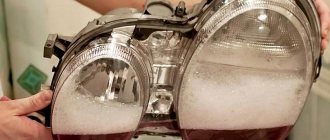
- First, thoroughly wash and dry the headlights.
- We clean the surface of the headlight with sandpaper P1500, constantly wetting the headlight with water until it becomes matte. If you do everything dry, you may leave scratches on the headlight.
- Wash and dry the headlights.
- We protect the nearby surfaces of the body with protective tape so as not to damage the paint during polishing.
- Apply 3M paste number 75 to the polishing wheel, spread the paste over the entire headlight and slowly begin polishing. Do not set high speeds or apply much force to the polishing tool, so as not to overheat the plastic. Otherwise it may turn yellow.
- Wash and dry the headlights.
- At this stage our headlights became transparent. And to give shine to the headlights, apply ZM paste number 77 to the polishing wheel and do the same as in the previous paragraph.
- To give the headlights protection, apply a colorless protective varnish to a clean surface and rub with a soft cloth.
Polishing is complete. We admire the polished headlights with our own hands using 3M paste.
Polishing process
Cover the headlight with masking tape, as shown in the picture below.
Let's start polishing the headlight using sandpaper. We start sanding with coarser paper, for example with P800 grain, and gradually move on to less coarse paper. The grain of the sanding paper is adjusted according to the damage to the plastic of the headlight. If there are no serious chips and a lot of dullness, then you can start with P1000 grain.
Wet the headlight and paper. Apply sandpaper to the headlight. We try to press the entire palm, not just the fingers, and grind in different directions. We don't press too hard. We use each number of sandpaper for approximately 3-5 minutes.
After sanding with sandpaper, you need to polish the headlight with polishing paste. But first, let’s put on the headlight. To do this, you can turn on the high or low beam. This will help the headlight dry faster.
Next you will need a polishing machine. Under no circumstances should polishing be done using an angle grinder. This tool has too high speed. As a replacement for a polishing machine, you can use a screwdriver or drill with adjustable speed.
Apply the paste to the headlight.
Set the speed to minimum and rub the paste in smooth circular motions over the entire headlight.
When the paste begins to turn into granules, it means that it has done its job and more should be applied. Polish until the headlights shine like new.
You should periodically check the temperature of the headlight with your hand to ensure it does not overheat. It is very easy to determine overheating; if you hold your hand on the headlight it is extremely unpleasant - it is overheated, take a break, let it cool down.
After polishing, remove the paste with a microfiber towel.
Headlight after polishing.