Step-by-step instructions for repairing and inspecting oil pump parts:
1. For a detailed inspection, it is necessary to remove the oil pump.
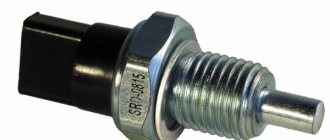
2. First, you need to unscrew the bolt (1) and remove the crankshaft position sensor (2), which is only available on engines with a fuel injection mechanism.
3. When disassembling the pump, you need to unscrew the six bolts and remove the pump cover.
4. Using two screwdrivers, you need to lift the pump housing so that the pins on the housing can come out of the holes located in the cover of the VAZ 2110 oil pump. Now remove the housing itself by disconnecting it from the cover.
5. We take the gears out of the cover: first the driving one, and then the driven one.
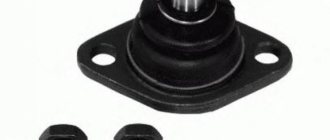
6. Now you need to unscrew the pressure reducing valve plug. An O-ring must be installed under this plug. Inspect the ring - if it is too compressed, it needs to be replaced.
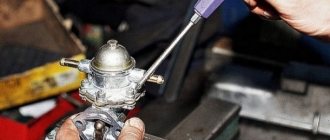
7. Having unscrewed the plug, we take out the spring of the pressure reducing valve.
8. Now we take out the valve itself, gently tapping the body on a clean wooden stand. If the valve does not come out, it must be removed using a thin pointed object, preferably also wooden, so as not to damage the surface.
9. Now you need to carefully inspect the aluminum cover for visible signs of wear, mechanical damage, deep scratches in the contact areas of the gears. If found, the cover must be replaced with a new one.
11. The size of the maximum permissible diameter of the driven gear socket is 75.1 mm, so we measure the diameter, and if it exceeds the permissible one, we will also have to replace the housing.
12. Now you need to measure the width of the body segment in the middle part. If the measured value is less than 3.4 mm, the VAZ 2110 pump housing must be replaced.
13. Check the gears. The thickness of the drive should not be less than 7.42 mm. We measure: if it is less, we replace the gear.
14. The same applies to the slave. If the thickness is less than 7.35 mm, the gear must be replaced.
15. Then we check the axial clearances of the gears. It is necessary to install the drive gear back into the housing, after which we apply a steel ruler to the housing and use a feeler gauge to measure the gap between the gear and the ruler.
16. In the same way, measure the axial clearance between the attached ruler and the driven gear. For the drive and driven gears, the maximum permissible axial clearance is 0.12 mm and 0.15 mm, respectively. In cases where these values are exceeded, the gears must be replaced with new ones.
17. Through calculation, more accurate values of axial clearances can be obtained. To do this, a micrometer is used to measure the thickness of the oil pump housing along the outer surfaces, as well as the thickness in the area of the sockets for the drive and driven gears along milled surfaces in several places. The axial clearance is calculated based on the difference between the arithmetic mean of the socket depth and the measured thickness of the gears.
18. The next stage of repair is to inspect the pressure reducing valve seat to detect rough scratches and other deep mechanical damage on the inner surface. If found, the cover must be replaced.
19. If burrs and deep mechanical scratches are detected on the pressure reducing valve itself, it must also be replaced with a new one.
20. We also replace a bent, broken/broken or cracked pressure relief valve spring. The height of the spring in its free state is normally 44.72 mm; the same parameter under a load of 4±0.24 kgf is 31.7 mm. If there is a discrepancy, the spring must be replaced.
21. Assembling the oil pump. We install the driven gear with the chamfers on the teeth towards the housing.
22. Then install the drive gear in the same way - with the chamfers on the teeth facing the body. The gears must be lubricated with engine oil before installation.
23. Now you need to install the cover on the body and tighten the fastening bolts.
24. Before installing the pressure reducing valve into the seat with the bottom down, it must be lubricated with engine oil. Then you need to install the spring and tighten the plug with the aluminum O-ring of the oil receiver tube, also pre-lubricated.
25. It is necessary to pour engine oil into the pump through the oil receiver tube.
26. At the end of the repair and complete assembly of the car’s oil pump, turn the gears several turns so that the working surfaces of the gears are well lubricated.
Dismantling
Depending on the situation, the oil pump can be completely replaced, or repair work can be performed - change gears, return the pump pressure reducing valve to functionality.
But let's talk about everything in order. In any case, work begins with dismantling the oil pump:
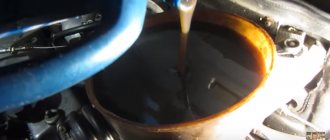
- Before you remove the pan to gain access to the pump, you will definitely need to drain the oil.
- To do this, warm up the engine to operating temperature, open the drain hole and wait until all the liquid drains out.
- Draining can also be done when it is cold, but due to its high viscosity, the oil can flow for a very long time and most of it will still remain inside the crankcase.
- After draining the oil, remove the three mounting bolts from the crankcase protection using an 8 mm wrench. The protection blocks access to the flywheel near the crankcase.
- Remove the flywheel guard and then remove the bolts from the crankcase. That's it, now the crankcase can be removed.
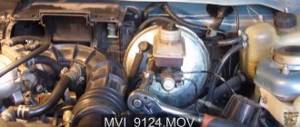
- In front of you is the crankshaft and the oil sump where the desired pump is located.
- By unscrewing the three mounting bolts, you can remove the intake from the pump.
- Let's move on to the engine compartment. Lift the hood and remove the plastic cover. This is a guard that covers the timing belt.
- Next, you need to remove the front right wheel to remove the pulley fixing washer, and then remove the pulley itself.
- Remove the timing belt and remove the six mounting bolts that hold the oil pump in place. Here you will need an 8 mm wrench.
- Remove the oil pump from the crankshaft.
Disassembly
If you do not want or cannot yet purchase a new pump, you can try to repair it. Perhaps the problem is a malfunctioning valve or worn gears.
What tools are needed for repair and replacement?
In order to replace or repair the oil pump on cars of the 10th family, it is necessary to have an inspection hole or overpass. As a last resort, a jack can be used. You also need the following tools:
- Wheel wrench for unscrewing wheel bolts.
- Wrenches in sizes “10”, “13”, “17”.
- Hex socket wrenches size "5" and "8".
- Large slotted screwdriver.
- Tool for tensioning the timing belt roller.
- Clean and dry container to drain the oil.
After you have prepared all the tools, you can begin the repair work.
Replacing the VAZ 2110 oil pump yourself
The oil pump is replaced when it stops pumping oil normally. The pump is driven directly from the crankshaft, so it is impossible to damage the oil pump drive on a VAZ 2110; rather, the gears will jam. Pump wear occurs due to oil contamination with wear products, abrasives, or simply due to low-quality oil. Poor pump operation will lead to loss of oil pressure in the engine, and this is a danger of more serious repairs. Therefore, let's look at how to repair an oil pump.
Where is the oil pump located?
VAZ 2110 cars use an engine with a VAZ-2108 / 21083 block. In this block, the oil pump is installed in front directly on the crankshaft, under the timing gear. The pump is bolted to the block, the crankshaft passes through the pump, driving the gears, and the front crankshaft seal is also the oil pump seal. The pump also acts as the front cover of the engine.
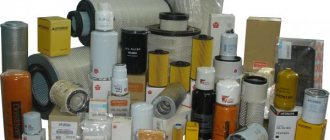
The price of a new oil pump for a VAZ 2110 is in the range of $30-50, although there may be more expensive analogues.
The most popular manufacturers of pumps for this engine:
- Original AvtoVAZ
- Luzar
- PEKAR
- VAZINTERSERVICE
Removing and installing the oil pump
To remove the pump, you need to remove the timing belt, drain the engine oil to remove the pan, unscrew the oil receiver from the oil pump housing, then unscrew the pump itself from the block and remove it from the crankshaft. Now everything is in order.
And now everything is in order.
First you need to completely drain the engine oil and remove the pan.
There we will see an oil receiver, the tube of which is inserted into the pump body and bolts - with one bolt the oil receiver is screwed to the pump body, and with two more bolts - to the crankshaft main bearing cover. You need to unscrew these bolts and remove the tube from the housing. Nothing else will interfere inside.
Now remove the wire from the crankshaft position sensor; the sensor is located in the pump housing.
The picture shows:
- Oil pump
- Gasket between pump and motor
- Oil receiver
- Engine sump gasket
- Pallet
- Crankshaft position sensor
After you have removed the plug from the crankshaft sensor, you can remove the sensor itself - it is screwed on with one bolt and is simply inserted into the housing, you just need to pull it.
To remove the pump, you need to remove the crankshaft pulley - it is already turned, you just need to pry it off with a screwdriver. We also pull out the key that is underneath it by prying it off with a screwdriver.
Now we have full access to the oil pump.
Unscrew the remaining bolts in a circle and pull out the pump. It needs to be pulled along the crankshaft, but it may not work right away - it sticks to the block. We insert a screwdriver between the block and the pump and pry it from all sides - it should go easily.
Assemble in the reverse order of assembly. A new or repaired pump is installed on new gaskets. The surface must be cleaned and degreased; anti-silicone or a solvent is best for degreasing. It is advisable to anoint the gasket with silicone - this will better protect it from oil leaks.
You need to be careful with the seal so as not to damage it. You need to buy a new oil seal, it comes with the pump.
The inner surface is lubricated with oil so as not to damage it when you put it on the crankshaft.
Dismantling the pump
The procedure for removing the oil pump on cars of the 10th and 9th families is as follows:
Remove the casing that covers the gas distribution mechanism drive. To do this, you need to unscrew all the bolts on it with which it is screwed to the motor. There are three bolts on 8-valve engines, and 6 on 16-valve engines. Then you need to loosen the tension on the generator drive belt and then remove it from the pulley. Remove the bolt that secures the crankshaft gear. To prevent the shaft from spinning, it is necessary to fix it using a large slotted screwdriver. Install it in the inspection window, which is located in the clutch block. Now you can remove the crankshaft pulley and screw the bolt back in. Rotate the crankshaft until the mark on the camshaft is located opposite the notch on the timing cover. The mark on the crankshaft pulley should match the one on the pump housing. Using a wrench, you need to loosen the nut that secures the tension roller. In the case of a 16-valve engine, you will also need to unscrew the nut that secures the guide roller. If the car is not parked in a viewing hole, you need to unscrew the bolts that secure the front right wheel. Then you need to lift the entire body using a jack. Remove the crankshaft pulley using a screwdriver
Please note that there is a key inside. Drain the engine oil into a suitable container. Remove all bolts that secure the pan. Try not to lose the figured washers that are under them
Remove the pan so as not to damage the integrity of the gasket. If it is damaged or deformed, you will need to install a new one. Using a wrench, unscrew the two bolts that secure the oil pickup to the main bearing. There is also one bolt securing the oil receiver to the pump housing. Now you need to remove the oil receiver tube from the housing and remove it. Be careful not to lose the rubber O-ring that is on the tube. Otherwise you will break the tightness of the system. Remove the six bolts that secure the pump to the engine block. After this, you can carefully remove the mechanism. The crankshaft oil seal is located here; there is no need to remove it yet. Now carefully remove the gasket that is located between the oil pump and the engine block.
Dismantling is completed, the unit is reassembled in the reverse order. Before replacing the oil pump on a VAZ-2110, make sure that it cannot be repaired. In most cases, this unit can be repaired and will serve for many years.
How to understand that the breakdown lies in the oil pump
Now let's talk about how to check the VAZ-2110 oil pump. First, measure the oil level in the engine and also check its consistency. Think about the last time you changed the filter and lubricant. If you have driven more than 10,000 km since the last replacement, it is recommended to replace these elements. After this, apply a drop of oil to your thumb and rub it.
If the oil is too dark, liquid, and quickly absorbed, then it is necessary to replace it. But if the oil level is below the minimum mark, you need to top it up and start the engine. Pay attention to whether the warning light is on. Inspect the motor for leaks. If you have previously heard a clattering sound, you need to pay attention to whether it continues after adding lubricant.
Oil pump repair
Detailed instructions with photographs for do-it-yourself repair of an oil pump for a VAZ 2110 car.
If there is a possible breakdown of the gear oil pump installed on VAZ model 2110 cars, you must first check the wire leading from the sensor to the warning light on the dashboard (the signal may be false), then check the filter by unscrewing the pressure sensor: if there is no oil on the sensor , then the filter is probably clogged or the valve is stuck. If replacing the filter does not correct the situation, you need to check the oil receiver and the sealing ring of its tube. If the result is not achieved, it is necessary to disassemble the unit in order to check for wear of its parts and their possible breakage. If the breakdown cannot be repaired, then replace it; it is relatively inexpensive. Repair is optimal and profitable if you have another one that is not working, otherwise there is no problem buying a new one and replacing it yourself.
Signs of a pump failure
On Lada cars of the 10th family, the following signs of oil pump malfunction can be identified:
- Oil receiver clogged.
- Destruction of the mechanism body.
- Excessive wear on the gear mounting points in the cover and housing.
- Destruction or slight deformation of the pressure reducing valve spring.
- Destruction of the pressure reducing valve.
The fact that the pump has failed can be determined by the following signs:
- A red light with a picture of an oil can lights up on the dashboard. This indicates that the pressure inside the system is less than the minimum.
- Significant heating of the internal combustion engine.
- A strong knocking sound comes from the place where the pump is located.
Cars of the 10th and 9th families do not have a sensor that displays the current oil pressure value on the dashboard. In fact, this design is used on most modern cars.
Therefore, there is only one condition in which the driver becomes aware of the critical oil pressure in the system. This is a flashing light on the dashboard. It is worth noting that excessive engine heating is not necessarily a symptom of a failing oil pump.
troubleshooting
Don't rush to conclusions and blame the pump for everything. It is necessary to organize a full check to make sure what caused the signal to appear on the dashboard.
| Check area | Your actions |
| Checking the electrical circuit | You need to check the functionality of the electrical circuit that goes from the sensor to the instrument panel. The wire that goes from the regulator to the engine must be connected to ground. If the circuit is working properly, the lamp will go out. |
| Checking the oil filter | Just unscrew the oil pressure sensor. If it is soaked in lubricant, everything is fine. If it is dry, then the filter is clogged or the filter valve is stuck. |
| Checking internal elements | You will need to replace the filter if there is a problem with it. Next, the pan is opened and the condition of the oil receiver and rubber seals are inspected. |
If the measures taken did not produce results, the lamp still does not go out, then the pump is the culprit in the current situation.
Useful information
Let's talk a little about the principles of the design and operation of the oil pump. This can help you during the repair process.
- Domestic “tens” use a combined lubrication system.
- The design of the car provides for the presence of a gear oil pump. It is installed on the front end of the cylinder block.
- Special gears with trochoidal internal gearing help reduce mechanical losses during rotation.
- The pump is equipped with a full-flow filter with a non-separable design. It contains an anti-drip and bypass valve.
- This design guarantees efficient circulation of lubricant throughout all engine components.
- The pump operates by rotating the crankshaft. The connection is direct.
- The operating life of the pump is about 120 thousand kilometers.
Location
Not everyone knows where to look for this oil pump. It is not located in a visible place, so you will have to try hard to gain access to the device.
The MN is located directly inside the engine oil sump. To get to it, the oil must be drained from the engine.
Please note that if your engine uses high-quality oil that was only recently filled, use a clean container when draining it so that you can then refill the same substance. If the oil is old, replacing the pump is an excellent reason to change the lubricant.
Why do you need oil at all?
I often hear that oil is the lifeblood of the engine. This is not entirely true, of course, the comparison is very rough, but still, the engine will not function without oil (or it will, but not for a very long time). Modern motor oils lubricate and protect all rubbing parts, and these are pistons (with their rings), shafts, bearings, etc. Let's just say that good oil extends the life of the engine by many thousands of kilometers.
BUT oil must flow through the system, just like blood itself through human vessels, if the oil is simply poured in a pan and does not go to the rubbing parts - IT IS USELESS!
Replacing the oil pump cover of a VAZ 2110
Most often, the VAZ 2112 pump and other VAZ models that have front-wheel drive cause a leak through the stuffing box, which must be changed at the same time.
The oil receiver also breaks quite often, especially if you use low quality oil or miss a timely change, or the oil is not up to specifications (too thick).
Too much liquid simply will not be pumped out, and the pressure sensor will immediately light up.
At the same time, the oil manifold mesh becomes clogged, oil circulation through the engine is hampered, and oil starvation occurs, as a result of which the engine service life is significantly reduced.
Here we include a malfunction of the pressure reducing (bypass) valve: either it freezes in the open position, and then the oil pressure drops. Either it does not pass, and then the oil is squeezed out through the oil seal
Alarm indication
Of course, now in almost all cars there is an emergency indication for a complete lack of pressure, this is known to us all - a “burning oil can”. If it does not go out for some time after starting, for example 10 - 20 seconds is one thing, it is almost always the fault of the oil filter. But if the lamp is constantly on, then this is already an alarm bell. Perhaps the oil pressure sensor has simply failed, or perhaps the oil pump has failed.
In any case, the emergency indication is very important, and I do not advise you to joke with it; nevertheless, this is fraught with a major overhaul of the engine.
Remember this rule, if the lamp comes on, then turn off the car and preferably immediately to a service station, either a tow truck, or in tow.
Oil pump disassembly instructions
To determine the nature of the malfunction, the removed pump must be disassembled:
- We remove the gasket.
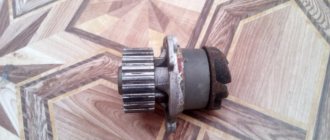
- First, unscrew the bolt (1) and remove the sensor that registers the crankshaft position (2) (Photo No. 2), which is present on engines with a fuel injection mechanism.
Photo No. 2, Remove the sensor, unscrew the cover fasteners and remove the cover
- Unscrew the six bolts and remove the pump cover.
- Using two screwdrivers, lift the pump body so that the pins on its body can freely come out of the holes in the pump cover.
- Now we remove the body itself and disconnect it from the cover.
- We remove the pump gears from the cover - first the drive gear, followed by the driven gear.
We take out the drive and driven gears
Now unscrew the plug (cover) of the pressure reducing valve. There is an O-ring underneath.
Unscrew the pressure reducing valve plug
- We inspect the ring - if it is too squeezed out or if it is damaged, we must replace it.
- We take out the pressure reducing valve spring.
- Now we take out the valve itself, tapping (gently) the body on a wooden stand (the stand must be clean).
- If the valve is stuck, remove it using a thin and pointed object, preferably also wooden, otherwise the surface may be damaged.
- Now let's carefully inspect the aluminum cover. If signs of wear, mechanical damage or deep scratches are detected where the gears are adjacent, we must replace the cover with a new one.
- We carry out further repairs of the pump by inspecting its housing. Signs of wear, such as scuffing and mechanical damage, are not allowed on the body (working) surfaces. Having discovered them, we replace the case without hesitation.
- The dimensions of the maximum acceptable diameter of the socket for the driven gear are 75.1 millimeters, so we measure the diameter; if it is larger than acceptable, we will have to change the housing.
- Now we measure the width of the body fragment in its middle part. If the measured value is less than 3.4 millimeters, the pump housing must also be replaced.
- We measure the thickness of the gears. According to technical requirements, the thickness of the drive must be at least 7.42 millimeters. If suddenly it is less, we change the gear.
- The same operation with the driven gear. If its thickness is less than 7.35 millimeters, it must also be replaced.
- Now we move on to checking the axial clearances of the gears.
We check the axial clearances of the gears with a ruler and feeler gauge
- We install the drive gear back into the housing, then apply a steel ruler to the housing and, using a feeler gauge, measure the gap between the ruler and the gear.
- In the same way, we measure the gap between the ruler and the second (driven) gear. For gears - driving and driven, the maximum permissible axial clearances are 0.12 mm and 0.15 mm, respectively.
- If the gaps exceed these values, the gears must be replaced.
- Using calculations, you can obtain more accurate values for the size of the gaps.
- To do this, use a micrometer to measure the thickness of the pump housing along all external surfaces.
- We measure the thickness of the metal in the area of the sockets for both gears using milled surfaces, always at several points.
- We calculate the axial clearance by finding the difference between the arithmetic mean values: the resulting thickness of the gears and the depth of the socket.
- The next step is to inspect the seat of the pressure reducing valve itself. If we find rough scratches and other deep mechanical damage on the inner surface of the socket, replace the cover.
- Having discovered scuffs or deep scratches on the pressure reducing valve, we also replace it with a new one.
- We replace a bent, cracked or broken spring.
- The free height of the spring should be 44.72 millimeters. The height of the spring under a load of 4±0.24 kgf should be 31.7 millimeters. If there is a discrepancy, replace the spring.
- We install the driven gear to the housing with chamfers on the teeth.
- We also apply the chamfers on the teeth to the housing of the drive gear.
- Before installation, lubricate the gears with engine oil.
- Then we install the pump cover on the housing and tighten the fastening bolts.
- Lubricate the pressure relief valve before installation.
- We install it in the nest, always bottom down.
- Then install the spring and screw in the plug with the O-ring, also pre-lubricated.
- Pour engine oil into the unit through the oil receiver tube.
- At the end of complete assembly, turn the pump gears a couple of full turns so that all working surfaces of the gears are thoroughly lubricated.
Now we have completed the repair of the pump, install it in place according to the instructions.
How to check oil pressure?
The actual check is carried out using a special device - a pressure gauge. It is also worth noting that you need to warm up the engine to operating temperature, usually 90 degrees Celsius. If you measure with a cold engine, especially in winter, the pressure can jump to high values, from 0.5 BAR or even higher, but measuring with a cold engine is WRONG!
In order to check the pressure, you need to find the emergency sensor, which is responsible for the indication on the dashboard. It is worth noting that it is not always located nearby and it is convenient to unscrew it. We unscrew it, and in its place we attach the test output connected to the pressure gauge.
The check can then be divided into two options:
- AT “idle” it is usually from 900 to 1200 rpm.
- Then at “higher” speeds, usually 4000 - 5000 engine speeds.
It is also worth noting that if you unscrew the emergency sensor, the “oil can” will light up on your instrument panel, this is normal. Now a short video showing how measurements are taken.