VAZ 2106 steering column and signs of its breakdown
"Six" can look stylish
Steering was present in all cars: from the very first to the latest models, which not everyone can afford to buy. This part of the machine should not be changed, as safety depends on it. It is prohibited to make any changes to the control design. VAZ classics are popular - these are rear-wheel drive cars with a worm-type gearbox. But the steering column of the VAZ 2106 is different from the one installed on the 2107 model.
The latter is a little longer despite the fact that their scheme is almost the same. The VAZ 2107 model is equipped with a safety shaft, which folds in the event of a frontal collision and cannot injure the driver. The VAZ 2106 does not have such a system; the shaft is solid and does not contain hinges. There are also problems with the gearbox, which can be solved by simply adjusting the steering column. But the mechanism also has “incurable diseases”, in which it turns out to be easier to buy a new steering wheel and install it in place of the old one.
Return to contents
Steering VAZ 2106
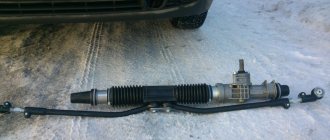
Rack and pinion steering
The main task of the column is to transfer the rotational movement made by the steering wheel to the front wheels. All cars in the classic series have almost identical mechanisms. So, for the VAZ 2106 the gearbox from the VAZ 2101 is ideal. It is attached to the body with three bolts. In its upper cover there is a bolt with which the VAZ steering column is adjusted in the event of large play in the steering wheel.
Between the steering wheel and the gearbox there is a shaft made of a single piece of metal. It is attached using slots. Moreover, on the steering wheel side there are external splines on the shaft, and on the other side there are internal splines. If you are replacing the steering column on a VAZ 2106, you can slightly modernize the system by installing a shaft with two cardans, which are necessary to increase safety. This shaft has needle bearings, thanks to which the steering wheel will not be so tight.
If the steering column of a VAZ is being adjusted, then no unnecessary manipulations are necessary. Another thing is replacing the steering rods, of which there are three on the VAZ 2106: two outer ones and one middle one. Most often the extreme ones fail. Their repair is impossible, only replacement of tips is allowed.
After repairing the steering column, be sure to perform a wheel alignment. It is difficult to install wheels at the correct angle in a garage; it is advisable to carry out the adjustment on a special stand.
Return to contents
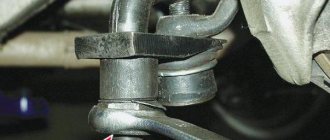
Column malfunctions and replacement
Six steering wheel repair
The basis of the steering column is a gearbox with two gears, one of which is a worm type. You can feel a steering malfunction at a very early stage, so the main thing is not to miss the first “bell” and carry out repairs on time.
Main signs of failure.
- Creaks directly in the column, caused by excessive wear of various elements, as well as malfunction of the steering column switches.
- The presence of backlashes is the most dangerous sign. Moreover, the backlash can be of two types - axial and longitudinal. The first indicates a malfunction of the gearbox or spline connection, the second indicates excessive wear of the bracket.
The first step is to check the tightness of all threaded connections. If you operate a VAZ 2106 car for a long time with worn splines on the shaft, this will lead to free rotation of the steering wheel. Over time, the slots simply wear out. Moreover, the splines on the steering gear can become unusable, and its price is quite high, and no adjustment of the VAZ steering column can help.
If axial play is present, it can be reduced slightly. A simple adjustment of the VAZ steering column will allow you to do this in a few minutes. To work, you will need a flat-head screwdriver and a 19mm wrench, which you need to loosen the nut on the top cover of the gearbox. You need to take a partner to help you, who will rotate the steering wheel in different directions. The steering wheel should be turned no more than 20-30° in each direction. This will allow you to use a screwdriver to turn the adjusting screw, which will reduce the backlash when tightened. When it reaches the minimum value, you need to tighten the nut.
Repairs associated with replacing the gearbox will be a little more difficult. To do this, you will have to disconnect the battery for safety reasons. Then you need to loosen the bolt on the splined connection of the shaft and gearbox. The left side of the VAZ 2106 is raised on a jack and placed on a reliable support, the wheel is removed. Using a steering tip remover, two rods are removed from the gearbox.
Using 17mm wrenches, unscrew the three nuts from the bolts securing the gearbox to the body. Next, repair or replacement is carried out if adjusting the VAZ steering column is impossible. When installing a new column, it is necessary to securely tighten all threaded connections, and after final assembly, adjust the camber and toe of the wheels of the VAZ 2106.
It is not advisable to remove the lever from the gearbox. Firstly, it is very difficult to dismantle; you will spend a lot of time and effort. Secondly, any adjustable column is sold together with this lever; it comes complete with a gearbox. The tightening is done with a nut that is difficult to unscrew. All this is done to improve security.
expertvaz.ru
Steering VAZ 2106
Rack and pinion steering
The main task of the column is to transfer the rotational movement made by the steering wheel to the front wheels. All cars in the classic series have almost identical mechanisms. So, for the VAZ 2106 the gearbox from the VAZ 2101 is ideal. It is attached to the body with three bolts. In its upper cover there is a bolt with which the VAZ steering column is adjusted in the event of large play in the steering wheel.
Between the steering wheel and the gearbox there is a shaft made of a single piece of metal. It is attached using slots. Moreover, on the steering wheel side there are external splines on the shaft, and on the other side there are internal splines. If you are replacing the steering column on a VAZ 2106, you can slightly modernize the system by installing a shaft with two cardans, which are necessary to increase safety. This shaft has needle bearings, thanks to which the steering wheel will not be so tight.
If the steering column of a VAZ is being adjusted, then no unnecessary manipulations are necessary. Another thing is replacing the steering rods, of which there are three on the VAZ 2106: two outer ones and one middle one. Most often the extreme ones fail. Their repair is impossible, only replacement of tips is allowed.
After repairing the steering column, be sure to perform a wheel alignment. It is difficult to install wheels at the correct angle in a garage; it is advisable to carry out the adjustment on a special stand.
Steering column VAZ 2106 - studying the detail
It is well known that the steering column of the VAZ 2106, like other wheeled vehicles, is considered one of the main components responsible for safe driving. The standard steering column, the price of which is acceptable for Russian car enthusiasts, is very durable, reliable and simple. These qualities give this mechanism the ability for long-term operation in various meteorological conditions. Therefore, the cost of the steering column is comparable to the degree of real threat to life that arises in the event of using a defective product.
At the same time, the VAZ 2106 steering column, a photo of which is posted on our Internet resource, like any mechanical component, is subject to wear and requires timely maintenance, and in some cases, repairs, otherwise drivers of such vehicles will face unpleasant consequences.
In the VAZ sixth model, the steering column arrangement is similar to many other vehicles. The purpose of this vehicle control unit is to transmit the muscular efforts of the driver turning the steering wheel to the worm-type steering column shaft with subsequent transmission of the rotational force to the wheelset. The steering column itself is attached to the car body with three powerful bolted connections using a special fastener element and has a rigid connection with the steering mechanism.
There is an installation bolt in the top of the cover, which is used to adjust the steering column if necessary. This need arises if increased play is detected in the steering column, which in its projection represents a shaft made of a solid metal pipe, equipped at the top with splines and an external threaded connection for fastening the steering wheel, as well as splines on the inside for fastening the worm shaft in the upper position.
Taking into account the simplified design of the steering column of the VAZ 2106, the defects of such a unit are few. In such a situation, the main thing is to literally listen to the operation of the steering column, to the sounds that it makes during operation. Timely diagnosis and adjustment of the steering column is of great importance, which can be carried out without the involvement of specialist car repair specialists.
Typical steering column defects include:
- creaking in the steering column caused by increased wear of components, temporary changes in the lining, defects in the elements of the switch system located under the steering wheel;
- play in the steering column, which is regarded as a more serious sign of a malfunction of the steering mechanism. Such play in the steering column ultimately leads to increased wear of components or their sagging. At the same time, the play of the steering column along the projection of the axis of the product indicates a weakening of the spline connections, which can provoke a situation where the splines begin to wear out.
To eliminate deficiencies in the functionality of the steering column during repairs, it is necessary to use a steering column repair kit, which can be used to eliminate any malfunctions that have arisen.
The need to replace the steering column arises if the splines in the connecting pair are worn out, and this connection cannot be restored. To do this, you need to dismantle this mechanism. For this purpose, it is necessary to disassemble the “Shohi” steering column, which even novice motorists can do. The procedure for removing the steering column is not particularly difficult technologically, but preventive measures take a lot of time.
Information for car enthusiasts: when replacing the steering column of the “six”, a slight modernization of this unit is allowed. It is possible to install a steering column from a VAZ 2107, the design of which is complicated by two small cardan shafts, increasing the degree of safety of the mechanism. In addition, additional equipment of the system with needle-type bearings will allow significantly less effort to be applied to the rotation of the steering wheel.
The required replacement of the steering column is carried out in the following sequence:
- We de-energize the battery and carefully remove it from the car and put it aside so that it does not interfere with work.
- We dismantle the steering wheel and the protective coating of the steering column shaft.
- We turn off the steering column control complex and the ignition switch.
- We dismantle the bracket fasteners, and it is possible that individual fastener components will have to be removed using a drill.
- Unscrew the tie bolt connecting the splines to the steering mechanism.
- We dismantle the sealing mount of the steering column shaft, and it is pulled out into the interior room.
Additional information: after completing the repair of the steering column, it is necessary to adjust the wheel alignment of the wheel pair to restore the required conditions of the chassis. It is almost impossible to install the wheelset at the optimal angle yourself without special adjustment equipment and stands.
Important: long-term operation of the “six” with splined joints, subject to increased wear, can ultimately create an emergency situation that is dangerous to the health and life of the driver and passengers. The steering wheel may turn completely uncontrollably, and this can happen at high speed. This is very life-threatening!
avtovx.ru
Steering column device
In the VAZ sixth model, the steering column arrangement is similar to many other vehicles. The purpose of this vehicle control unit is to transmit the muscular efforts of the driver turning the steering wheel to the worm-type steering column shaft with subsequent transmission of the rotational force to the wheelset. The steering column itself is attached to the car body with three powerful bolted connections using a special fastener element and has a rigid connection with the steering mechanism.
There is an installation bolt in the top of the cover, which is used to adjust the steering column if necessary. This need arises if increased play is detected in the steering column, which in its projection represents a shaft made of a solid metal pipe, equipped at the top with splines and an external threaded connection for fastening the steering wheel, as well as splines on the inside for fastening the worm shaft in the upper position.
Taking into account the simplified design of the steering column of the VAZ 2106, the defects of such a unit are few. In such a situation, the main thing is to literally listen to the operation of the steering column, to the sounds that it makes during operation. Timely diagnosis and adjustment of the steering column is of great importance, which can be carried out without the involvement of specialist car repair specialists.
Typical steering column defects include:
- creaking in the steering column caused by increased wear of components, temporary changes in the lining, defects in the elements of the switch system located under the steering wheel;
- play in the steering column, which is regarded as a more serious sign of a malfunction of the steering mechanism. Such play in the steering column ultimately leads to increased wear of components or their sagging. At the same time, the play of the steering column along the projection of the axis of the product indicates a weakening of the spline connections, which can provoke a situation where the splines begin to wear out.
To eliminate deficiencies in the functionality of the steering column during repairs, it is necessary to use a steering column repair kit, which can be used to eliminate any malfunctions that have arisen.
Replacing the steering column of a VAZ 2106, how to change the steering column of a VAZ
It is no secret that not only the controllability and stability of the car, but also the safety of the people in it depends on the serviceability of the steering system. When the first suspicion of a breakdown appears, you must quickly diagnose and fix the problem. But how to proceed correctly? In fact, everything is simple - just know the design features of the unit, possible faults and methods for eliminating them. And in this article we will focus on one of the most important elements of the system - the steering column.
Purpose, device and features
The steering column is the connecting link between the steering wheel in the cabin and the wheels of the car. Its task is to transmit commands from the driver turning the steering wheel to the worm of the steering mechanism. Many car enthusiasts underestimate the importance of this unit. But in vain. Ignoring seemingly insignificant problems can lead to the destruction of mechanical elements and, as a result, loss of vehicle controllability. It's scary to imagine how this could end when driving on the highway.
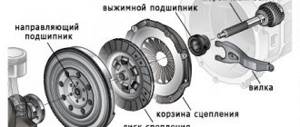
Among the structural elements of the column, it is worth highlighting the shaft itself (essentially the same steering column), the bracket on which the steering wheel is attached, the bearing, the crosspiece (some models have it) and the steering wheel. Please note that even in classic models of AvtoVAZ products, steering columns can be structurally vary. For example, in the “six” it is a solid shaft made entirely of metal. On top there is a spline connection and a special thread for mounting the steering wheel. On the other side of the column there is an internal connection intended for fastening to the worm mechanism. In the same “seven” the design of the mechanism is more sophisticated. It includes a pair of small hinges that allow the steering column to fold in the event of a powerful frontal impact. Thanks to this property, this type of design is called “injury-proof”.
Signs and causes of failure
Signs of a faulty steering column are as follows: 1. There is a knocking sound in the rack. If nothing is done, the sound will increase (especially with frequent trips on uneven roads). Over time, strong feedback will appear in the steering wheel, which in itself is very dangerous. The longer you ignore the problem, the worse the controllability will be, and the greater the likelihood of complete failure of the unit.2. The occurrence of backlash. The appearance of play in the axle is often caused by loose spline connections, and in the plane - by problems with the bracket elements (wear or weakening of the structure is also possible here).3. Creaking in the steering column is often caused by bending of the facing panels or trim, or failure of the steering column switch unit. With high-quality installation and timely care, the steering column can last a very long time. But most car enthusiasts don’t even look under the car. With such operation, after just a few thousand kilometers, nuts and bolts may become loose, play may appear, and the splines may wear out. Over time, the unit becomes completely unusable.
Replacement features
I would like to note that replacing the steering column is a very complex process that will require some patience and knowledge from you. But armed with the necessary tools and tips from the article, you will definitely cope with the task. As an “experimental” we use one of the most popular domestic cars - VAZ-2106.
So, let's get started: 1. Drive the car into a pit or overpass. If this is not possible, raise one of the sides with a jack and secure it with a wooden stand.2. Prepare the necessary tools. You will need a wrench with a head at “30” and at “17”, a wrench (it is important that it is long and powerful), a hammer, a pry bar, a handle with a ratchet and one open-end wrench at “17”.3. Immediately look for the steering column - on the “six” it is located in the lower left corner.4. Remove the steering shaft (without this, further work will be impossible).5. Unscrew the nut holding the column to the steering rods. This is where big problems can arise. To make your task easier, treat the threads thoroughly with WD-40 and stock up on a long lever (two powerful wrenches will be just right). Be prepared to use a lot of force.
Some car enthusiasts do not unscrew this nut at all - they simply dismantle the column and steering ends assemblies (here it all depends on your tasks). If you still decide to unscrew the nut, then be prepared for another very unpleasant job - knocking the column off the splines.6. Unscrew the bolts securing the column and spar. Getting access to them is a very difficult task, so remove the front left wheel (the work will be much easier).7. Take the knob at “17” and unscrew the three fixing bolts one by one. To prevent turning on the other side, hold the nut with an open-end wrench. Please note that there is very little space there, so the key will have to be inserted and held from the end.8. Once you have managed to remove all the bolts from their “established” positions, finish the job using a more convenient ratchet.9. After removing all the bolts, remove the column. And here the nuance that we discussed in point 5 “pops up”. If the tips are disconnected, you can safely remove the assembly. Have you decided to unscrew the big nut? “Then you’ll have to work extra hard to knock it off the slots.”
10. Now install the new steering rack and reassemble the unit in reverse order.
In principle, if you have the necessary tools at hand and minimal technical talent, this work can be completed in 1-2 hours at a leisurely pace and with smoke breaks.
Conclusion
A good driver will never cause a fault and will detect the defect at an early stage. Follow this principle too. When you first suspect that the pad is failing, inspect it and, if necessary, replace the unit. Why put yourself and your loved ones in danger if you can spend only 1-2 hours of personal time, solve the problem and calmly go on a trip. Good luck.
www.megasos.com
Removal and installation of the steering shaft of the VAZ 2106 Zhiguli
- Repair manuals
- Repair manual for VAZ 2106 (Zhiguli) 1976-2005.
- Removing and installing the steering shaft
| EXECUTION ORDER |
↓ Comments ↓1. General information 1.0 General information 1.1 Safety precautions 2. Diagnosis of faults 2.0 Diagnostics of faults 2.1 diagnostics of faults in the engine and its systems 2.2 Diagnostics of faults in the clutch 2.3 diagnostics of faults in the gearbox 2.4 Diagnostics of faults in the driveline, rear axle, chassis, steering and braking system 2.5 Diagnosis of faults in the body 2.6. Diagnosis of electrical equipment faults 3. Engine 3.0 Engine 3.1 Cylinder head and timing mechanism 3.2 Lubrication system 3.3 Oil change 3.4 Replacing the camshaft drive chain guide 3.5 Replacing the camshaft and valve levers 3.6 Replacing the valve stem seals 3.7 Replacing the intake and exhaust manifold gaskets 3.8 Replacing the cylinder head gasket ov 3.9 Disassembling the head cylinder block, valve grinding 4. Engine power system 4.0 Engine power system 4.1 Replacing the air filter element 4.2 Replacing the fuel pump 4.3 Repairing the fuel pump 4.4 Replacing the fuel tank and its hatch cover 5. Carburetor 5.0 General information about the carburetor 5.1 Cleaning the fuel filter 5.2 Replacing the idle air system solenoid valve 5.3. Adjusting the carburetor 5.4 Replacing the carburetor 5.5. Carburetor repair 6. Engine cooling system 6.0 Engine cooling system 6.1 Replacing the coolant 6.2 Replacing the coolant pump 6.3. Replacing the thermostat 6.4 Replacing the engine radiator 7. Exhaust system 7.0 Exhaust system 7.1 Replacing exhaust system parts 8. Clutch 8.0 Clutch 8.1 Replacing fluid and bleeding the clutch hydraulic drive 8.2 Adjusting the drive 8.3 Replacing the clutch master cylinder 8.4 Repairing the clutch master cylinder 8.5 Replacing the clutch slave cylinder 8.6 Replacing the pressure plate assembly and clutch release bearing 9. Gearbox 9.0 Gearbox 9.1 Checking the level and changing the oil in the gearbox 9.2 Replacing the reverse light switch 9.3 Replacing the secondary shaft cuff 9.4 Replacing the gearbox 9.5 Repairing the gearbox 9.6 Replacing the speedometer drive 9.7 Features of repairing a five-speed gearbox 10. Cardan transmission 10.0 Cardan transmission 10.1. Maintenance 10.2. Replacing the driveshaft 11. Rear axle 11.0 Rear axle 11.1 Checking the serviceability of the rear axle 11.2 Changing the oil 11.3 Replacing the axle shaft and its cuff 11.4 Removing and installing the rear axle 11.5 Replacing the cuff of the drive gear 11.6 Replacing the gearbox 11.7 Repairing the gearbox 12. Front suspension 12.0 Front suspension 12.1. Maintenance 12.2 Replacing the bearings and hub cuff 12.3 Replacing the cushions and stabilizer bar 12.4 Replacing the ball joints 12.5 Replacing the shock absorbers 12.6 Replacing the springs 12.7 Replacing the upper arms and their rubber-metal hinges 12.8 Replacing the rubber-metal joints of the lower arms on a car 12.9 Replacing the lower arms 12.12 . Adjusting wheel alignment angles 13. Rear suspension 13.0 Rear suspension 13.1 Checking technical condition 13.2. Replacement of rear suspension parts 14. Steering 14.0 Steering 14.1 Adding oil 14.2 Checking the condition of the steering 14.3 Adjusting the gear engagement 14.4 Replacing steering rods 14.5 Replacing and repairing the pendulum arm 14.6 Removing and installing the steering wheel 14.7 Removing and installing the steering shaft 14.8 Removing and installing the steering mechanism 14.9 Removing the bipod 15. Brake system 15.0 Brake system 15.1 Checking the condition of the hydraulic drive 15.2 Checking the vacuum brake booster 15.3 Checking the functionality of the pressure regulator 15.4 Replacing brake fluid and bleeding the brake system 15.5 Replacing the brake pads of the front wheels 15.6 Replacing the brake pads of the rear wheels 15.7 Replacing the brake caliper of the front wheel 15.8 Replacing the brake cylinders of the front wheels 15 .9 Repair of front wheel brake cylinders 16. General information 16.0 General information 16.1. Checking electrical circuits 16.2 Fuse blocks 16.3 Replacing fuses 16.4 Replacing the main and additional fuse blocks 16.5. Replacing the relay 16.6 Replacing the ignition switch 16.7 Replacing the contact part of the ignition switch 16.8 Battery 16.9. Generator 16.10. Starter 16.11. Ignition system 16.12. Lighting, light and sound alarms 16.13. Windshield cleaner and washer 16.14. Repair of the electric heater motor 16.15. Control devices 17. Body 17.0 Body 17.1 Replacing the front bumper 17.2 Replacing the radiator grille 17.3 Replacing the hood latch 17.4 Replacing the hood 17.5 Replacing the windshield 17.6 Replacing the interior rear view mirror 17.7 Replacing the sun visor 17.8 Replacing the headliner 17.9 Replacing the ceiling grab handle 18. Heating and ventilation system 18.0 Heating and ventilation system 18.1 Replacing the electric heater fan 18.2 Replacing the heater radiator 18.3 Replacing the radiator casing 18.4 Replacing the heater valve 19. Car body care 19.0 Car body care 19.1 Car washing 19.2 Preservation and protection of paintwork 20. Applications 20.0 Applications 20.1 Tools used in addition to the standard set 20.2 Electrical diagram of VAZ-2106, VAZ-21061, VAZ-21063 cars produced in 1976–1987. 20.4 Tightening torques for threaded connections 20.5 Basic data for adjustments and monitoring 20.6 Characteristics of spark plugs 20.7 Fuel, lubricants and operating fluids used 20.8 Lamps used on the vehicle 20.9 Lip seals (oil seals) |
Do-it-yourself replacement of the VAZ-2106 steering column: step-by-step video instructions
When owning a personal car, car owners must carefully monitor the operation of all systems and components and, of course, promptly replace an element that has become unusable. In the “classic” VAZ-2106 models, however, as in other cars, all systems are important, but special attention should be paid to the steering wheel, since it is she who is responsible for the safe movement of the car. If any, even the most minor, problem is detected in the control system, it must be eliminated as quickly as possible. One of the most common malfunctions in this system is a broken steering column.
It is worth noting that this element cannot be repaired, so it will simply need to be replaced. Replacing a faulty VAZ-2106 steering column, of course, is a long process, but if the work is carried out step by step and taking into account the recommendations provided by professionals, then every car enthusiast can easily cope with this work.
Replacement Tools
To replace the steering column yourself, you need to prepare the most necessary tools:
- heads in sizes 17 and 30;
- a special tool called a wrench, it is advisable to use the longest and most powerful one;
- regular hammer and pry bar;
- tool with ratchet handle.
How to tighten the steering column | Repair of VAZ 2106
If you notice too much free play in the steering wheel, that is, the steering wheel turns, but the wheels behind it lag a little, then most likely you need to pay attention to the steering column. If She is not completely broken yet, then you can tighten her up and this problem should be solved. All this is done very simply and will take no more than 5 minutes of time. Tools you will need:
- Key to 19
- Flat screwdriver wide
Before you begin this procedure, you must align the steering wheel strictly in the center so that the front wheels are not turned to either side. This will allow for more precise adjustments.
Now open the hood of the VAZ 2106 and use a 19mm wrench to unscrew the nut on the steering column from above, as is clearly demonstrated in the photo below:
Then you need to remove the lock washer (a polygonal “star”), which is located under the nut:
Now use a flat screwdriver to turn the rod (there is a slot there) clockwise. Make at least half a turn first and try to turn the steering wheel, watching the front wheels turn.
If they turn almost without slowing down, that is, there is no play, then the procedure can be considered completed. If necessary, turn the rod until the free play approaches the minimum, but at the same time the steering wheel rotates normally, without effort or biting.
After you have achieved the desired result, install the lock washer in place and tighten the nut.
vaz2106-remont.ru
Gearbox maintenance and replacement
Steering gear 2106
The VAZ 2106 steering gear does not require any maintenance as such, you just need to make sure that no oil leaks out of it. If a leak is detected, it is advisable to repair or replace the unit. If this is not possible, try to keep the oil level normal.
One of the troubles that can upset the driver is play in the gearbox. In this case, the wheels begin to turn only after a certain angle of rotation of the steering wheel has been overcome. This causes some inconvenience, since the VAZ steering wheel has a fairly large free play and maneuvering becomes problematic.
To reduce steering play, you need to perform a few simple manipulations. The first step is to call an assistant who will rotate the steering wheel during the adjustment. Prepare a tool - a 19-mm wrench and a wide flat-head screwdriver.
Loosen the nut on the adjusting bolt, you can even unscrew it completely. Now the assistant should rotate the steering wheel in different directions a quarter turn from the original position. At the same time, using a screwdriver, screw in the screw until the play disappears. This adjustment will reduce the free play, but the steering wheel will turn a little tighter. Finally, you need to tighten the nut securely.
Replacing the gearbox will be a little more difficult, but the steering will become more reliable. To do this, you will have to raise the left side of the VAZ 2106 to free up space for repairs. Remove the left wheel and plastic protection, if any. You will need a steering rod puller; it is highly undesirable to knock out the ends with a hammer, as you can damage the threads on them. In this case, the steering of the car will be very unreliable, which will affect your safety. If time permits, make a special wrench from a piece of reinforcement, one side of which should have a square cross-section and fit securely into the head at 19 and 22. It will be useful for unscrewing and tightening the nuts on the ends of the rods.
The length of such a key should be about a meter, and you also need a lever to turn the key from above. First, unscrew the nuts, removing the pins in advance, and then install the puller on the tip. Next, you need to screw in the puller bolt until the tip comes out of the seat. The second one is removed in the same way. Now you need to unscrew the bolt that is located on the steering shaft near the gearbox. After removing it, it is necessary to remove the shaft from the splines. All that remains is to unscrew the three nuts from the bolts that secure the gearbox to the body. This completes the removal of the gearbox, the steering mechanism is repaired or a new column is installed.
All parts are installed in reverse order. Do not forget to tighten the nuts on the rods well and secure them with pins.
Self-installation or replacement of the VAZ-2106AutoRemka steering column
You should never forget about periodic inspection and testing of the steering system. It is one of the most important car systems responsible for driving safety. If we notice even small errors in its operation, then it is better to eliminate them before they result in serious malfunctions, and right at high speed.
The most common problem is a broken steering column. Note that replacing the steering column of a VAZ 2106 requires special tools and certain skills of an auto mechanic. Therefore, we are preparing heads for 30 and 17, an elongated and strong driver, a handle with a ratchet, a driving tool and an open-end wrench.
First, let's determine where exactly the problematic mechanism is located. It is located on the left side of the engine compartment, that is, almost at the very bottom left. But before you begin the repair, you must first unscrew the steering shaft. After this, we take the long lever and remove the fasteners that hold the columns to the steering rods. In some cases, two strong wrenches will do instead. You need to be prepared for the fact that it will take a lot of effort to unscrew the fastener. To do this, you can rest your feet on the bottom and gradually break the connection. Some craftsmen prefer not to touch this nut at all, so as not to later remove the column from the splines. This activity will take a lot of time and effort. Sometimes you can simply remove the problematic part along with the steering wheel ends. But often the steering column is changed during some major repair, when the system is already almost completely disassembled.
When we deal with the nut, we begin to unscrew the bolts that attach the column to the spar. In VAZ models there are no more than three bolts. It's difficult to get to them, so it's smarter to first remove the left wheel to gain access to them. Next, use a 17 mm wrench to unscrew the fasteners, holding the parts on the side with an open-end wrench for reliability. You should not hold it from the inside, since there is almost no space there, and the key will have to be placed from the end. In principle, you don’t have to unscrew the bolts completely, but just make them move. And then take the ratchet and unscrew the fastenings with greater convenience and less time.
So, the bolts are unscrewed. Now we move the column to the side and see if the tips are disconnected. If this is the case, then the column is removed from its place easily and simply. Otherwise, you will still have to deal with its slots. They should be knocked down carefully so as not to destroy the entire part. The device is assembled in reverse order.
autoremka.ru
Replacing the steering column
The need to replace the steering column arises if the splines in the connecting pair are worn out, and this connection cannot be restored. To do this, you need to dismantle this mechanism. For this purpose, it is necessary to disassemble the “Shohi” steering column, which even novice motorists can do. The procedure for removing the steering column is not particularly difficult technologically, but preventive measures take a lot of time.
Information for car enthusiasts: when replacing the steering column of the “six”, a slight modernization of this unit is allowed. It is possible to install a steering column from a VAZ 2107, the design of which is complicated by two small cardan shafts, increasing the degree of safety of the mechanism. In addition, additional equipment of the system with needle-type bearings will allow significantly less effort to be applied to the rotation of the steering wheel.
The required replacement of the steering column is carried out in the following sequence:
- We de-energize the battery and carefully remove it from the car and put it aside so that it does not interfere with work.
- We dismantle the steering wheel and the protective coating of the steering column shaft.
- We turn off the steering column control complex and the ignition switch.
- We dismantle the bracket fasteners, and it is possible that individual fastener components will have to be removed using a drill.
- Unscrew the tie bolt connecting the splines to the steering mechanism.
- We dismantle the sealing mount of the steering column shaft, and it is pulled out into the interior room.
Additional information: after completing the repair of the steering column, it is necessary to adjust the wheel alignment of the wheel pair to restore the required conditions of the chassis. It is almost impossible to install the wheelset at the optimal angle yourself without special adjustment equipment and stands.
Important: long-term operation of the “six” with splined joints, subject to increased wear, can ultimately create an emergency situation that is dangerous to the health and life of the driver and passengers. The steering wheel may turn completely uncontrollably, and this can happen at high speed. This is very life-threatening!